Category: Без рубрики

In this post, we will explain how to make zoom effect in a video on Windows and Mac computers or just use multimedia players to enlarge an opened clip.
About zooming in videos
Before we go deeper into details and see how zooming works in different video editing solutions for Windows and Mac, we should learn some important basics.
What is to zoom in a video? Under this concept, we normally understand the changing of the perspective in your clip. In other words, the camera “approaches” some smaller elements and they become more visible.
How to zoom in a video? Clips can be either zoomed during or after the filming process. There are two types of zooming — optical and digital. Optical zoom means you adjust a physical lens to a camera, whereas digital type is about using software instead. The optical type is believed to result in a better quality. In this article, we apply digital zoom to recorded clips.
Why zoom in a clip? Individual users need this functionality for making a focus on the most essential parts of the image, getting rid of unnecessary surroundings in a scene, and producing an effect of a camera moving smoothly. Sometimes it is also used for business purposes, for example when making spectacular TV commercials. Simple zooming in media players can be useful for VAR during soccer games or watching recordings from security cameras.
Zooming vs cropping. These two terms are often misinterpreted, partly because they have the same goal, but different ways to achieve it. You can zoom the overall movie without changing the aspect ratio or make the perspective move from one angle of a clip into another. Cropping is about emphasizing any part of the recording by deleting the others. You can crop videos on Windows and other platforms.
Most providers of software for Windows and Mac provide necessary tools for zooming in movies. In media players, you can simply enlarge a video to see details, whereas editing suites let you apply zooming effects and save them in clips.
How to zoom in video in PC with Windows
Each popular video editing suite for Windows 11 and previous versions allows zooming videos. You can either use the native Windows player and editor or choose third-party software, such as AVS4YOU.
AVS Video Editor
In AVS Video Editor you can use the Zoom effect. Just follow these simple steps.
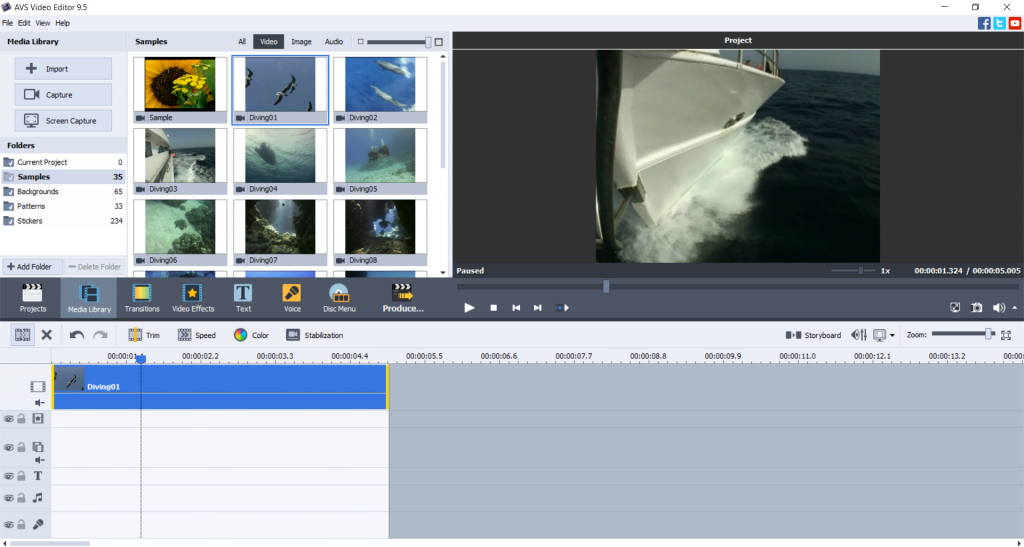
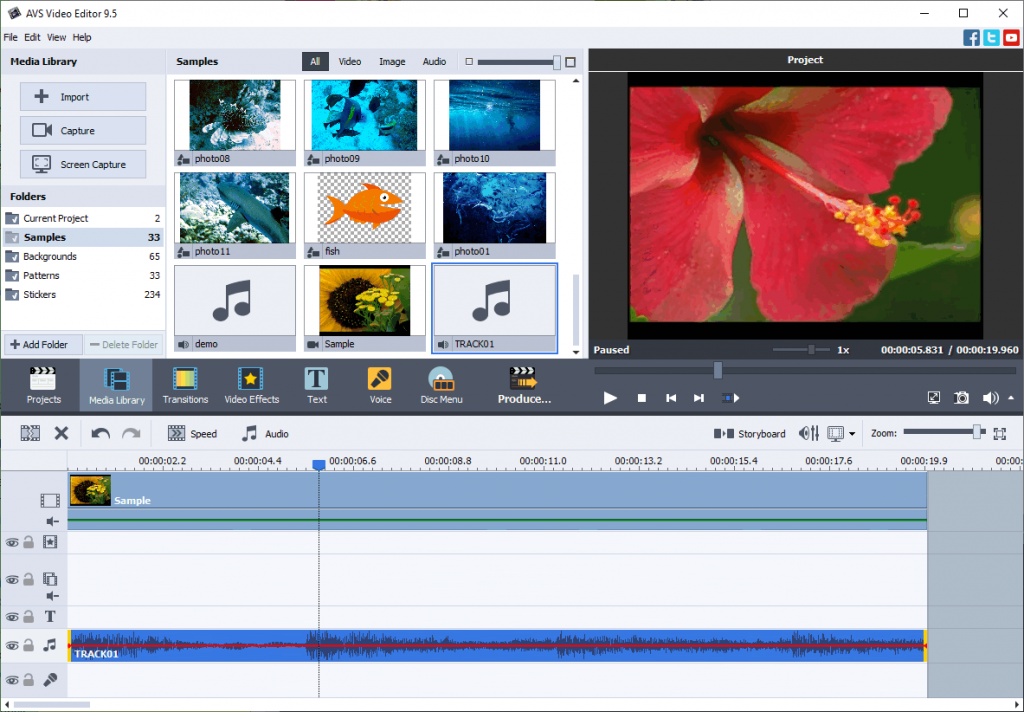
Step 1. Upload a clip and place it to the timeline.
Step 2. Select the uploaded video and go to Video Effects -> Transform -> Zoom.
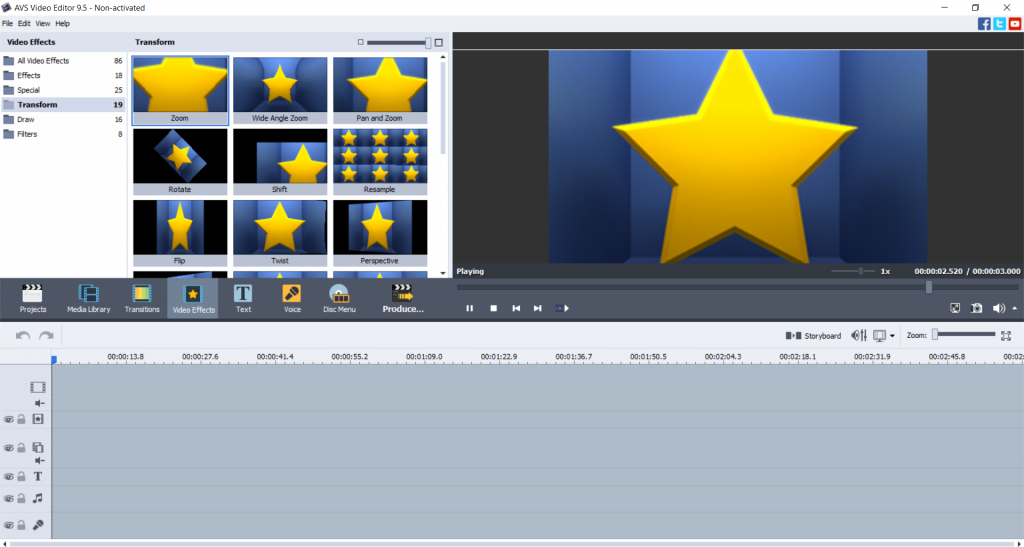
Step 3. Double-click the line with the Zoom effect, adjust the properties.
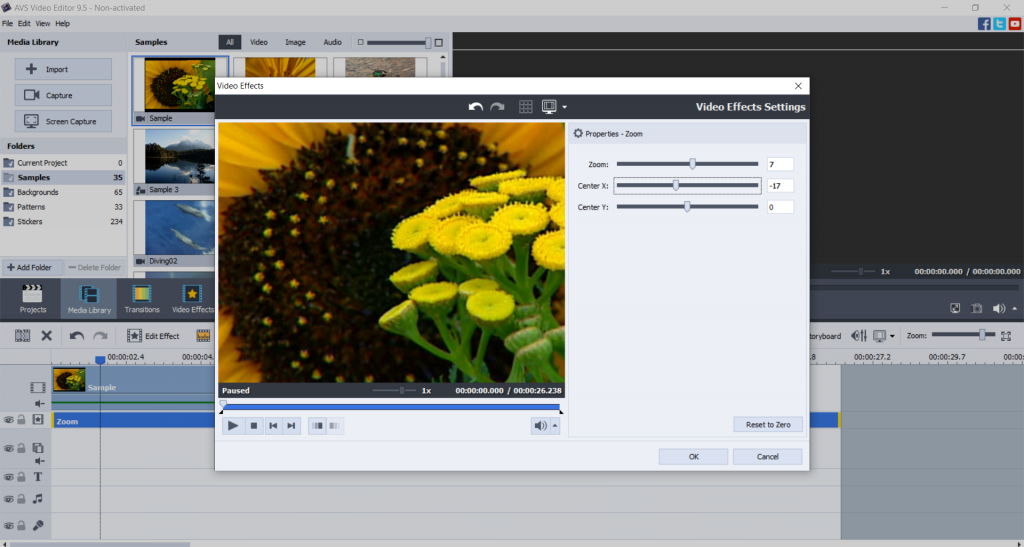
Click OK to apply changes.
Watch this step-by-step guide to learn how to zoom your video.
Get AVS Video Editor today to zoom clips on Windows 11 and previous versions!
AVS Video Editor is one of the best video editing software for zooming in clips on Windows 7, 8, 10, and 11. The app is also supported by previous versions Windows XP and Vista.
Windows Movie Maker
In Windows Movie Maker you can apply various animations. That is how to zoom in a video on Windows Movie Maker.
Step 1. Upload a clip, put it on the working area, and select it.
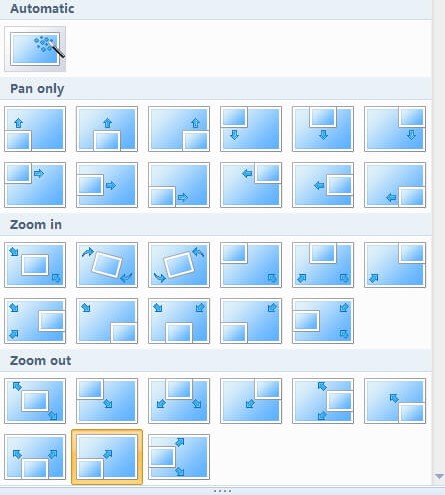
Step 2. Go to Animations -> Zoom in and choose the necessary option.
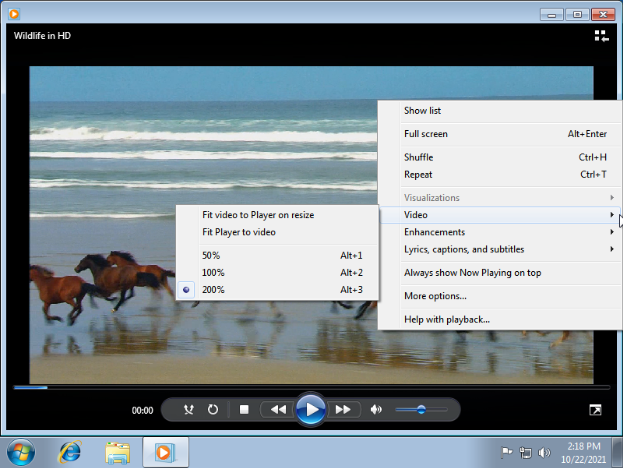
Windows Media Player
In the native player for Windows 7, you can scale a clip up to 50%, 100%, and 200%.
Step 1. Open the clip in Windows Media Player, right-click it at any part, disable the Fit video to Player on resize and Fit Player to video options.
Step 2. Go to Video and choose the desired option.
How to zoom in video on Mac
If you have Mac, you can use native multimedia editing software iMovie and QuickTime to zoom a video or do it with third-party apps.
iMovie
That is how to zoom in on a video on iMovie for Mac.
Step 1. Open a clip and go to Cropping.

Step 2. Tap the Ken Burns button.
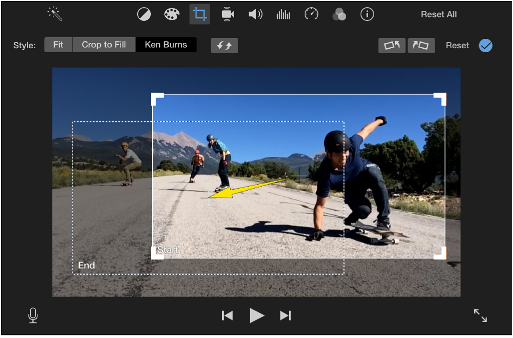
Step 3. Set crop at the beginning or end of your clip.
For Mac users, iMovie is probably the best idea about how to zoom a recorded video.
QuickTime
Don’t want to get started with iMovie? Use QuickTime, a free multimedia player offered by Apple.
Just open a clip and click the Zoom icon on the main toolbar.

The clip will not be scaled after you close the player.
Easy, right? This method is the right choice for anyone who wants to scale a video quickly without iMovie.
Adobe Premiere Pro
Adobe is the market-leading software for video production, where you can apply zooming on Mac.
Step 1. Open a video in Adobe Premiere Pro and apply the Motion effect.
Step 2. Go to Effect Controls and scale the video.

Adobe provides customers with a full-stack multimedia suite, but you can also purchase Premiere Pro separately for $20.99 per month. The solution is used by filmmakers in studios internationally, but it is hardly affordable for anyone who just wants to scale a video.
VLC Media Player
VLC Media Player is a free and cross-platform player, which means it is also good for Linux machines and Mac. Here is how to scale a video on Windows 10 using VLC.
Step 1. Open a clip, go to the Video tab, and disable the Always Fit Window option.
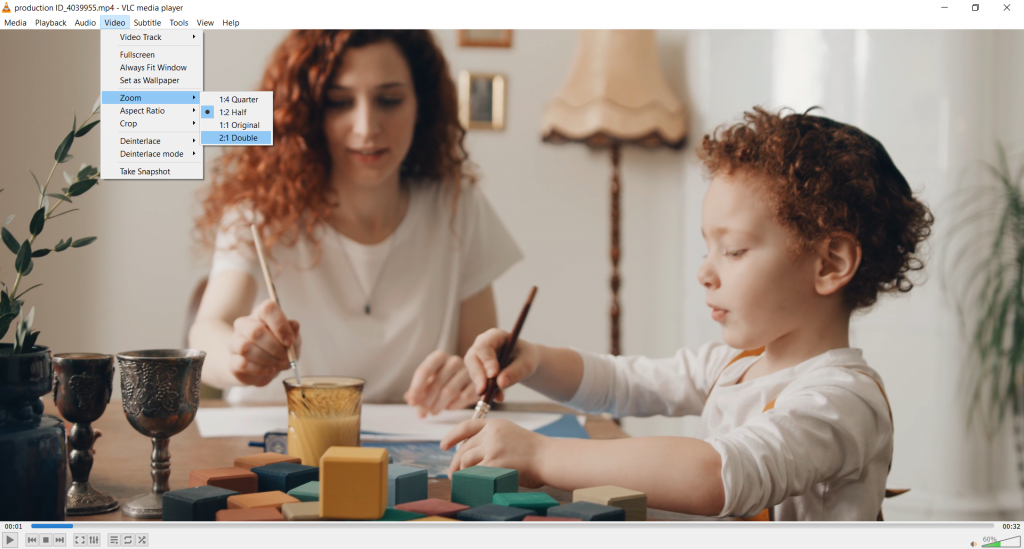
Step 2. Click Video -> Zoom and choose the desired parameter.
VLC Media Player supports not only Windows 10 but also any older version of Windows starting from XP. There are installation options even for Windows 95/98/Me.
How to zoom in a video — final words
There are many ways to zoom in a video on PC and Mac. In this article, we have made a short overview of the most popular software with this functionality, which can be especially useful for home use and even some specific tasks in your job.
Useful links
How to remove audio from clips. Read post
How to add music to movies online, on Windows, Mac, and mobile. Read post
Top 10 software for editing clips in 2021. Read post
Get the latest update of AVS4YOU software. Download

Microsoft has recently rolled out Windows 11 for some computers and laptops. Interface modifications have made pretty familiar features difficult to access for some users. In this article, we’ll find out how to change text-to-speech voice and language on Windows 11, 10, 7.
What is text to speech and why do you need it?
Text-to-speech (TTS) is the technology that allows pronouncing printed text on your operating system. TTS engine is used for text recognition and speech synthesis.
This feature is important if you want to generate a voiceover for videos, hear text aloud with Microsoft Narrator, or check pronunciation in foreign languages.
There are no configurations for TTS voices for Windows within your audio editing software. TTS Windows 10 voices and languages need to be chosen in the settings, the same is true for other versions. Sometimes, Windows has default settings applied, but on Windows 11, 10, 7 you can change the text to speech voice and locale manually.
About Windows 11
The new version of the world’s most popular operating system is intended to improve user experience by introducing a clear and intuitive interface, providing necessary apps, new capabilities for gaming and entertainment.
Here are the minimum requirements for your computer or laptop, if you want Windows 11 on board.
CPU — 64-bit processor or System on a Chip (SoC) with the frequency of 1 GHz, 2 cores
RAM — 4 GB
Storage — 64 GB
System Firmware — UEFI, Secure Boot capable
TPM: Version 2.0
Display: 720p resolution, 9″ screen, 8 bits per color channel.
The requirements were taken from the official Microsoft website. To know more about the initial release of Windows 11 for your device, follow this link.
How to change text-to-speech language on Windows 11, 10, 7?
Before you change the language of the text-to-speech technology on the latest versions of Windows, make sure you have additional languages installed. Go to Microsoft Store or open the settings to get them.
Install TTS languages on Windows 11 and 10
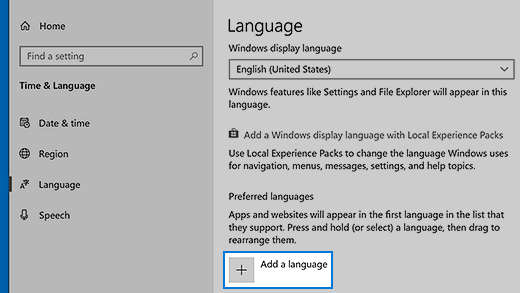
In settings, click Time & Language -> Language -> Region (Windows 10).
On Windows 11, the path will be Time & Language -> Language & Region.
Tap the Add a language button and choose the language you want to install. Make sure there is the Microphone button next to the locale you choose. It means text-to-speech is available for your option.
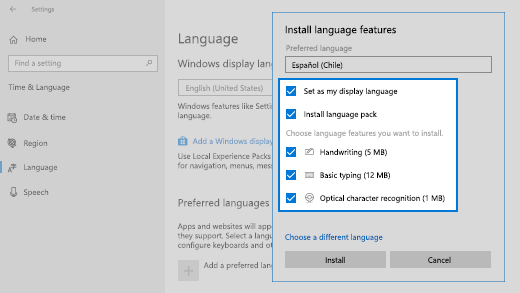
Choose the recently installed language as the preferred one, if necessary.
How to install TTS languages on Windows 7
To add language packs on Windows 7, click Start -> Windows Update. Check the optional updates.

Choose the pack under the Windows 7 Language Packs category and click OK.
Change text-to-speech language on Windows 11 and 10
Go to the language settings and open the Speech tab.
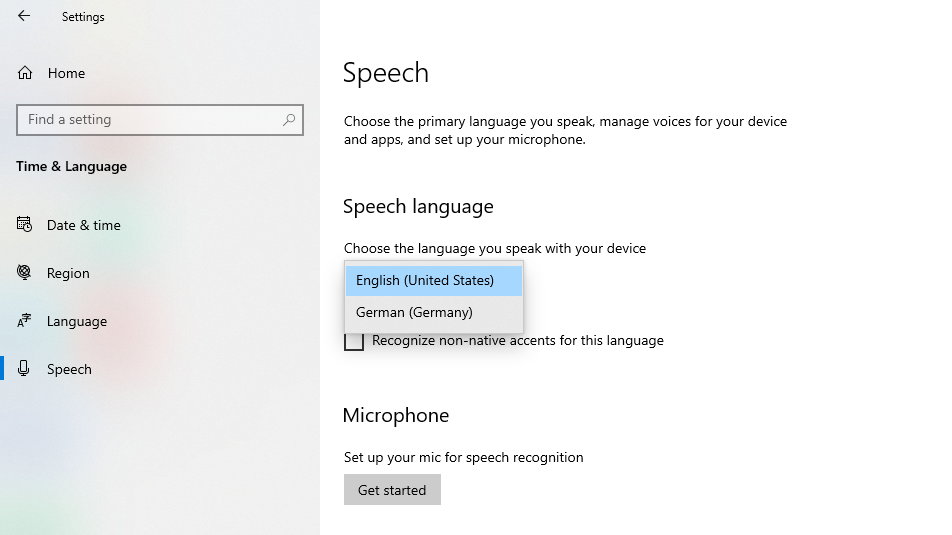
Choose the necessary language for your device from the dropdown menu under Speech language.
Change text-to-speech language on Windows 7
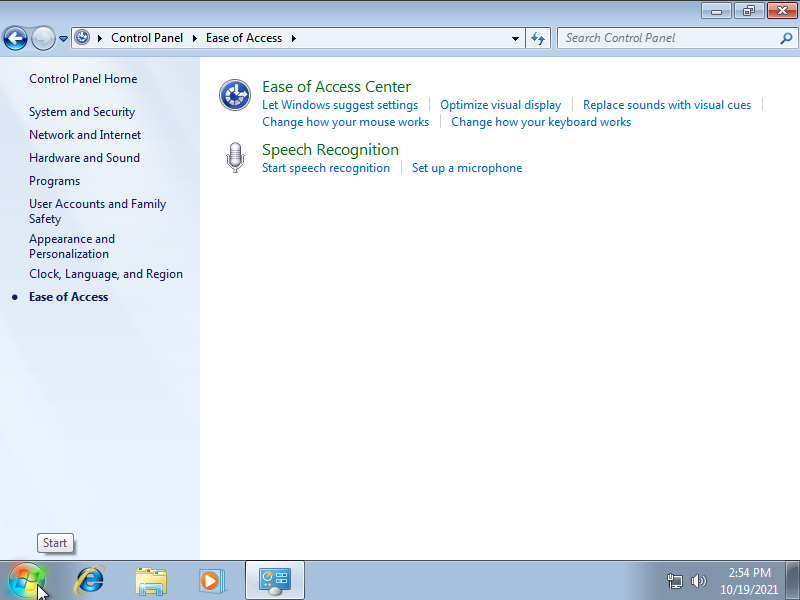
Click Start -> Control Panel -> Ease of Access and switch to Speech recognition.
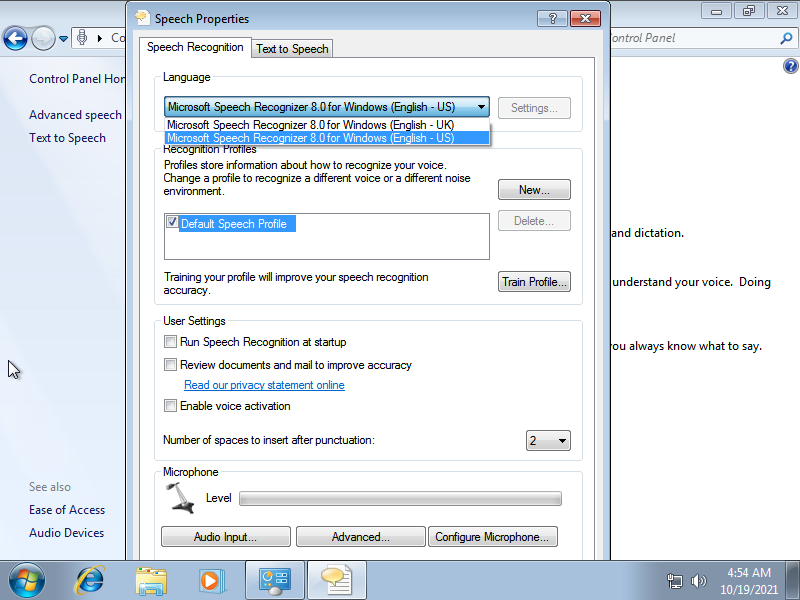
Click Advanced speech options and choose the language from the list.
That is how to change text-to-speech language on Windows 11, 10, and 7.
How to change your text-to-speech voice on Windows 11, 10, 7?
Now that we have added or changed the preferred language for TTS, we can choose between male or female voices. Some languages have even multiple speakers for each option.
How to change a TTS voice on Windows 11 and 10
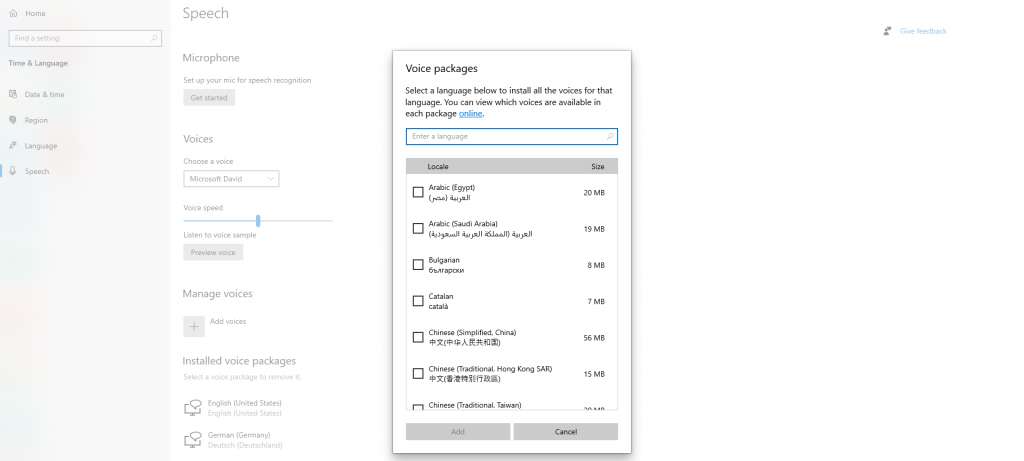
In settings, go to Time & Language -> Speech and choose a voice from the dropdown menu.

The chosen voice will be used to read text aloud. Don’t like any of the installed options? Add new ones using the Add voices button below.
How to change a TTS voice on Windows 7
Click Start -> Control Panel -> Ease of Access and switch to Text-to-speech.
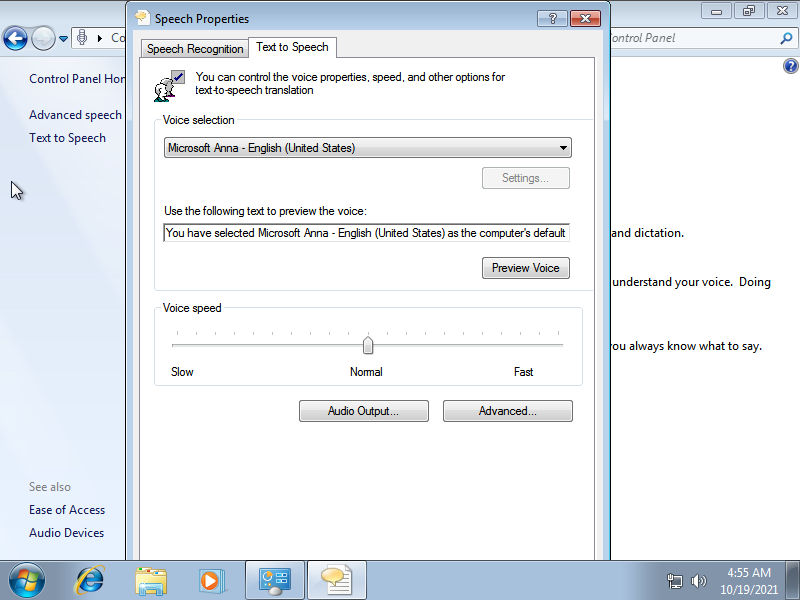
Select the desired voice from a list.
Now you know how to change text-to-speech voice on Windows 11, 10, and 7. But what if you want to slow it down, change the tone of voice, or apply effects? Then you need an audio editing app.
How to use text-to-speech in AVS Audio Editor?
We’re all set and ready to test the new voice and language for TTS in the audio software. Let’s see how it works in AVS Audio Editor.
1. Open the Generate tab and select Text to Speech in the top toolbar.
2. Enter your text in the opened window.
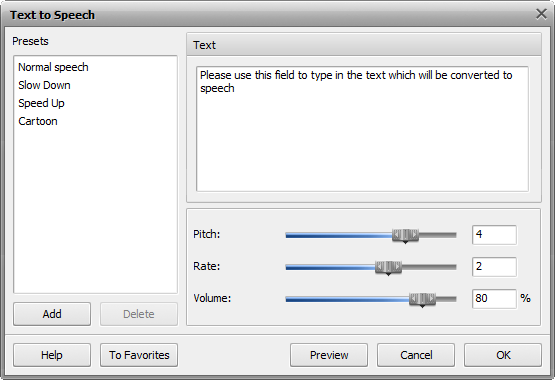
3. You can choose custom pitch (tone of voice), rate (how fast the text must be pronounced), and volume. Alternatively, use ready presets on the left side of the window
4. Click OK to save the voiced text.
Convert text to speech easy with AVS Audio Editor:
Useful links
How to clean up voice tracks in AVS Audio Editor. Read post
How to regulate volume levels of different tracks in AVS Audio Editor. Read post
How to add echo to your audio file. Read post
How to add music to video. Read post

Today we‘ll make an overview of popular video editing suites where you can loop a video. There are many apps for any operating system or platform, including Windows, Mac, iOS, Android, and any browser.
Let‘s start with some ideas for repeating scenes in a clip.
Why you should loop a video?
There are several most common reasons for copying scenes in a video. Since it is predominantly used for making a focus on important points of a clip, you may want to let some scenes be played over and over again.
- Repeat a scene that you think was to the point.
- Create short repetitive clips for social media.
- Make infinite gifs with or without sound.
Repeating clips look hypnotizing and can go viral on the Internet.
Let‘s see how to make a video loop on various platforms.
How to loop a video on Windows 10
Most popular video editing suites worldwide provide Windows 10 users with the necessary tools, including those to make a repetitive video.
AVS Video Editor is one of the best options if you want to learn how to loop a video on windows 10, 8, and 7. The app is also supported by previous versions Windows XP and Vista.
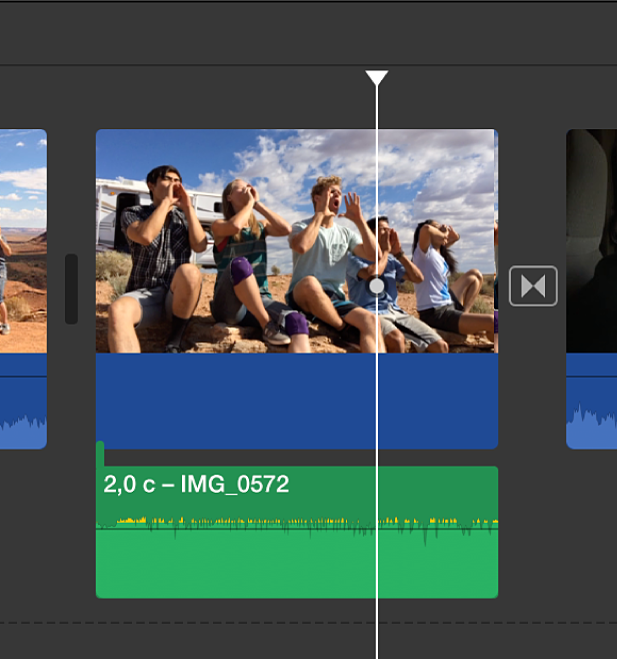
Step 1. Choose a clip and put it on the timeline.
Step 2. Set the cursor at the beginning of a fragment and click the Split button. Do the same at the end of the scene.
Step 3. Right-click the scene and tap Duplicate Object. The fragment will now be played twice.

Repeat this step as many times as you want the shortened clip to start from the beginning.
Step 4 (optional). Remove the unnecessary content from a video.

Right-click a fragment and choose Delete Object.
Learn how to trim, crop, and cut videos for further removing some of them.
Step 5 (optional). Add music to a new clip.
Drag‘n‘drop an audio file to the timeline.
Get AVS Video Editor today to make repetitive videos and infinite gifs on Windows 10 and previous versions!
How to loop a video on Mac
If you have an iMac or MacBook, you can use native multimedia editing software iMovie to create a repetitive video on Mac.
Step 1. Open a video in iMovie.
Step 2. Go to the View menu and tap Loop Playback.
The clip will be repeated until you click on the Stop button.
iMovie is probably the best idea about how to put a YouTube video on loop on Mac.
How to make a video loop on iPhone / iPad
Apple mobile devices provide users with the Clips apps specifically designed for making shorter videos.
- Import a clip to the app and trim it, if necessary.
- Hit the Duplicate button.
Watch the step-by-step video on the official Apple‘s YouTube channel to learn how to make a loop video on iPhone.
Clips is the best idea if you ask yourself how to loop iPhone video.
How to loop a video on Android
Android-based portable devices from Samsung, Huawei, Xiaomi, and other vendors have a choice between many third-party apps to play video in the loop on Android. One of them is Boomerate Video Reverse & Loop.
- Upload a clip and open the Looping Settings by clicking the circled arrow.
- Choose how many times you want the clip to be repeated. The options are 0, 1, 2, and 4.
Google Play offers many alternative third-party apps to create repetitive videos on Android of various versions.
How to loop a video online
Veed.io is one of many web services that allow playing videos in loop. Here‘s how to get started.
- Upload your video and put it on the timeline.
- Click the plus button and add the same clip. Repeat this step as many times as you need.
- Save the video.
This method is simple but hardly suitable for everyone with a rather slow Internet connection or those who don‘t want to expose personal video files online.
Final words
As you can see, there are many video editing services that allow you to loop a clip scene on Windows 10, Mac, iPhone, Android, and even online. Today we explored how this functionality works in popular video processing apps, including AVS Video Editor, iMovie, Clips, and others.
Useful links
How to convert a video to gif animation. Read post
How to slow down a video. Read post
Top 10 video editing suites in 2021. Read post
Get the latest AVS4YOU update. Download

In this article, you‘ll learn how to turn a video into slow motion by changing its playback speed on various platforms. Our overview of solutions for Windows, Mac, any web browser, and mobile devices will give you a clear understanding of how to change a video to slow motion without extra effort.
Why slow down a video?
Apart from the commercial use of the slow-mo effect in VAR during soccer games and when actors perform dangerous stunts in Hollywood movies, many people love to create simple clips for family evenings or sharing via Instagram, YouTube, TikTok, and other social networks.
Sometimes you need to slow down the time-lapse video or you‘re just wondering how to do slow a motion video. Such clips usually look breathtaking.
Whatever the reason for changing the playback speed of a movie, most cameras let you shoot slow-mo clips even with a smartphone. The key thing here is how many FPS for a slow-motion video is needed.
60 FPS (frames per second) is the ideal setting for a traditional slow-mo video, though you can make it even more dramatic with 120 FPS and 240 FPS. Adjust this parameter in your in-camera settings.
But what if you‘ve already filmed a clip with the original speed? Can you put a video in slow motion after recording? No worries — most video editing suites for Windows, Mac, and mobile devices have such functionality.
How to create slow-motion video in Windows 10
Any worldwide known multimedia editing suite for Windows 10 and previous versions allows making a slow-motion video.
AVS Video Editor
AVS Video Editor is one of the best slow-motion video editing software for windows 7, 8, and 10. The app is also supported by previous versions Windows XP and Vista.
Follow these steps to modify the playback speed of your movie.
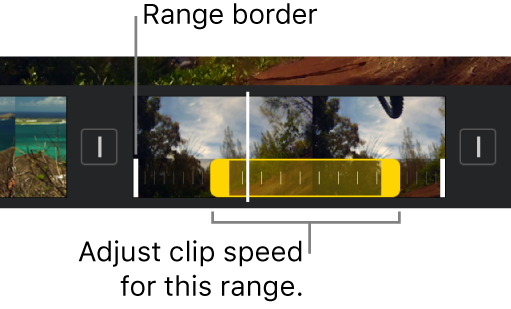
Step 1. Choose a clip, place it on the timeline, and select the area you want to be played slower.
To slow down the whole video, just left-click a file on the timeline.
If you need to change the speed of a scene in a movie, put the slider at the beginning of the scene and click the Split button. Do the same at the end of a clip.
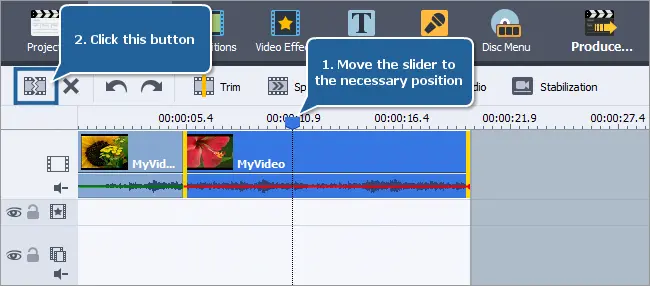
Step 2. Click the Speed button on the toolbar above to open the settings of the video speed.
Tap the button with three dots next to the speed value and drag the slider to the left to slow down a video.

Note: if your clip contains a soundtrack or voiceover, their speed can also be altered accordingly with the Stretch option next to Audio.
You can also choose Mute to remove sound from a video or add a song to a clip.
Step 3. Preview the slowed down output video to make sure you like it.
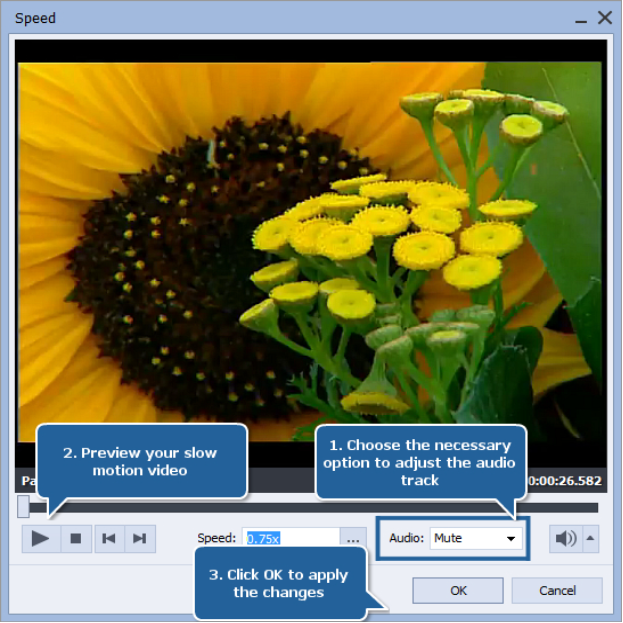
Click OK to apply changes or Cancel to reset the original speed.
Get AVS Video Editor today to slow down videos on Windows 10 and previous versions!
Windows Video Editor
Video Editor is the successor of Microsoft’s most popular film editing app Movie Maker. The program is free and available on Windows 10.
- Open a clip and place it on the storyboard.
- Select the file on the storyboard and click the Speed button.
- Regulate the speed in the video.
Video Editor works on Windows 10 and later versions only. For Windows 8, 7, XP, or Vista alternative apps are required.
Adobe Premiere Pro
Adobe is a professional proprietary solution for film production and editing. There are numerous tools and features for Windows and Mac users, including those for slowing down the speed of videos.
Step 1. Select a clip on the timeline, right-click it, and choose Speed/Duration.

Step 2. Set the value less than 100% and confirm changes.
Adobe provides customers with a full-stack multimedia suite, but you can also purchase Premiere Pro separately for $20.99 per month. The solution is used by filmmakers in studios internationally, but it is hardly affordable for anyone who just wants to slow down a video.
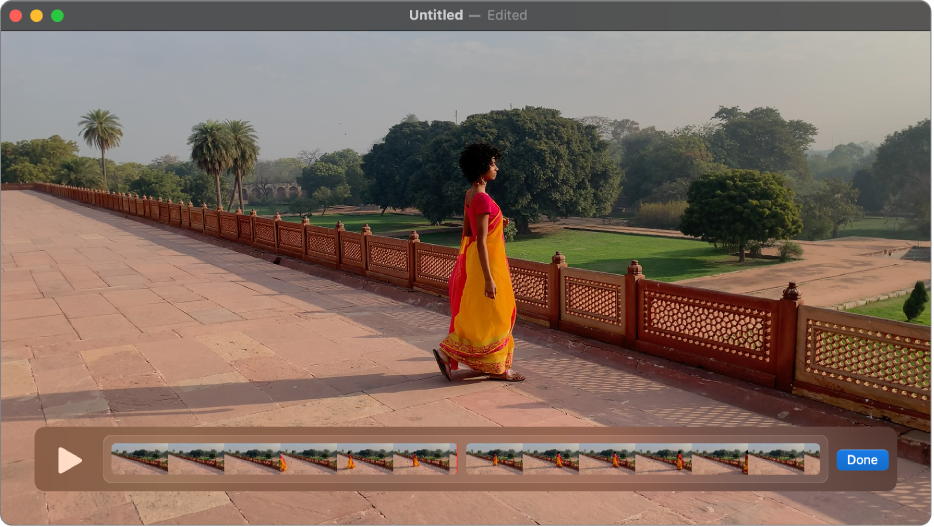
How to slow down a video with iMovie
If you have an iMac or MacBook, you can use native multimedia editing software iMovie to slow down video on Mac.
- Select a clip on the timeline and click the Speed button.

- Choose Slow in the drop-down menu and select 10%, 25%, or 50% to alter the speed of a clip.
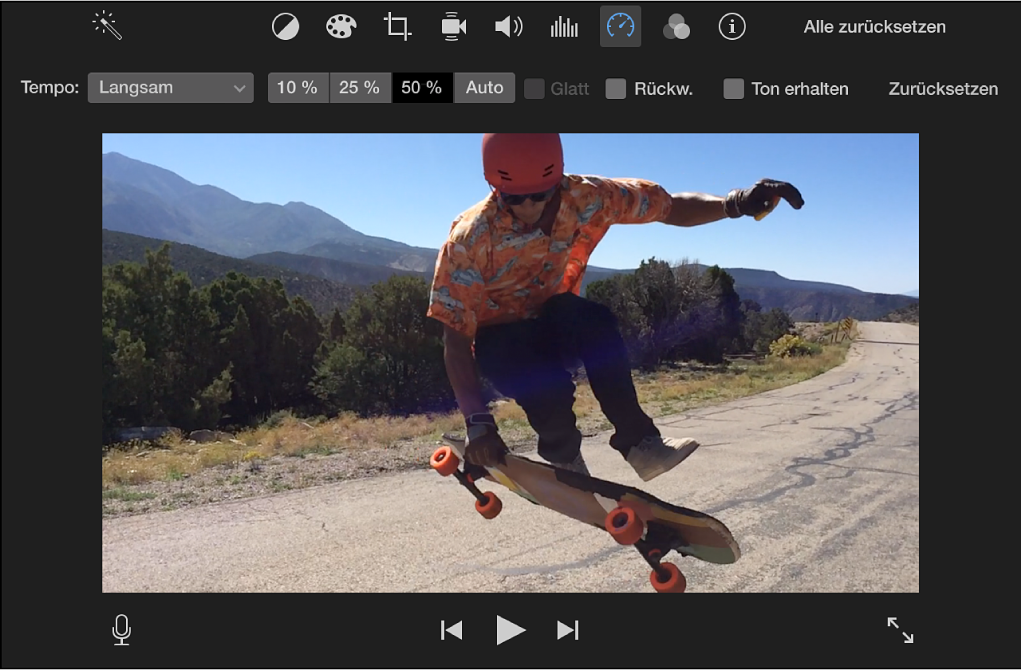
- To set a different speed choose Custom from the menu and enter any value below 100%.
For Mac users, iMovie is probably the best idea about how to slow down a video. If you have hardware from Apple, why ever search further?
How to slow down a video on iPhone/iPad
iMovie is available on your mobile devices too. The process is similar, but the interface is a bit different.
- Tap a video on the timeline to activate a yellow bar below. This is called the inspector.
- Hit the Speed button.
- In the yellow bar, drag the slider to the left until you see values less than 1x.
iMovie is the best way to slow down a video on iPhone or iPad for free.
How to make slow-motion video on Android
Android-based portable devices from Samsung, Huawei, Xiaomi, and other vendors have a choice between many third-party apps for slowing down a video. One of them is Slow motion video FX.
- Choose the video you want to slow down and add the points to the timeline.
- Move the points down to decrease the speed of your clip.
Google Play offers many alternative third-party apps to slow down videos on Android of various versions.
How to slow down video online
Many services over the web provide you with an opportunity to slow down a video online. One example is Veed.io.
- Upload your video and put it on the timeline.
- Click the movie, switch to Settings and choose the speed. You can also set a custom one.
This method is simple but hardly suitable for everyone with a rather slow Internet connection or those who don‘t want to expose personal video files online.
Final words
There are so many ways to slow down a video on Windows 10, Mac, iPhone, Android, and even online. In this article, we have made a short overview of the most popular software with this functionality, including AVS Video Editor, Windows Video Editor, Adobe Premiere Pro, iMovie, etc.
Useful links
How to remove audio from video. Read post
How to add music to video online, on Windows, Mac, and mobile. Read post
Top 10 software for editing clips in 2021. Read post
Get the latest update of AVS4YOU software. Download

Today we’ll be covering how to remove audio from video on different devices, including Windows and Mac computers, smartphones and tablets on iOS and Android. Another big topic we approach here is how to mute a video on YouTube or Instagram.
Before we jump into the explanations though, let us briefly overview common reasons to remove audio from video.
Why remove audio from a video?
Sometimes you want to delete an audio track from the original clip. Here are the two most popular purposes for that.
- Apply your own music or voiceover. To replace the sound in your movie with voice comments or favorite songs, you need to delete audio from the video.
- Remove noise or background sounds. Humming or buzzing of the surroundings can ruin any charming recording. The way out is to cut out an audio track.
In the list below, you’ll find the most popular software solutions to remove audio from a video online, on Windows, Mac, mobile, and some social networks.
How to remove audio from video on Windows
Almost any worldwide known multimedia editing suite lets you remove audio from video on Windows.
AVS Video Editor
With an intuitive interface and easy-to-use tools, AVS Video Editor is one of the best ways of how to remove audio from video on Windows 10.
- Drag the desired clip to the timeline.
- Right-click the file on the timeline and choose Mute.
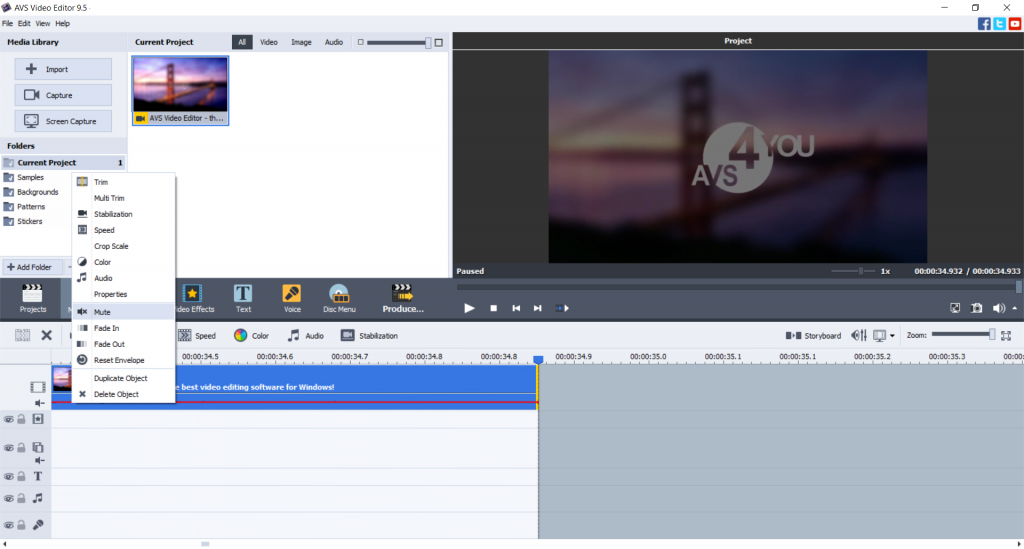
- Save the output movie with the necessary parameters. Go to File -> Produce or just press Ctrl+P.
Apart from Windows 10, you can use AVS Video Editor to remove sound from videos on previous versions, including Windows 8, 7, XP, and Vista.
Get AVS Video Editor today and silent videos in a few clicks!
The entire AVS4YOU multimedia suite is currently available with large discounts. Save 70% today!
VLC Media Player
VLC Media Player is a free and cross-platform player, which means it is also good for Linux machines and Mac. Here is how to remove audio from a video on Windows 10 using VLC.
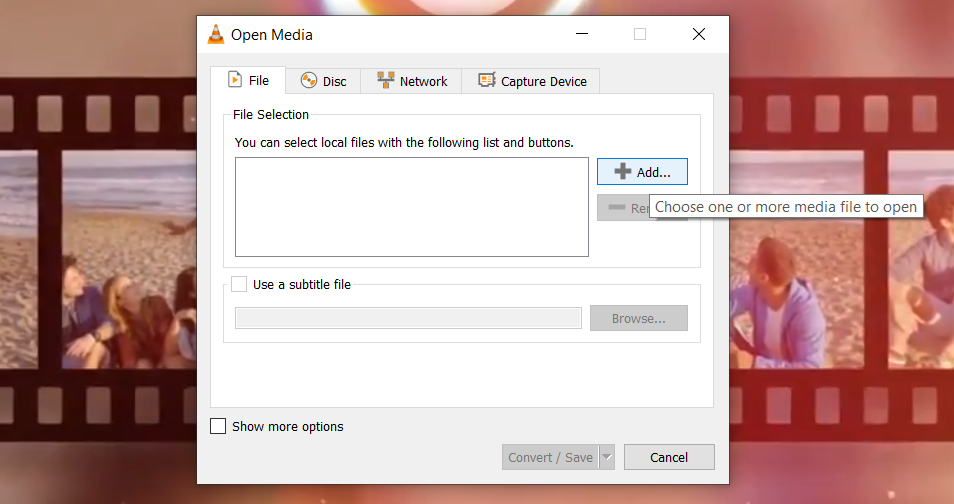
- Open Media and choose Convert / Save.

- Click the Add button to find and select the desired file.
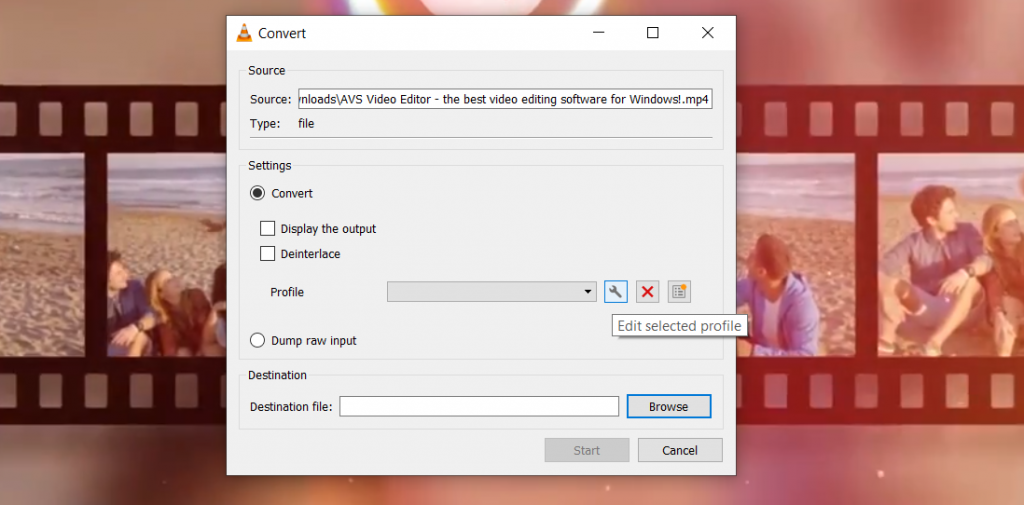
- Click the Convert / Save button and hit the wrench icon.
- Go to Audio codec and uncheck the box next to Audio.
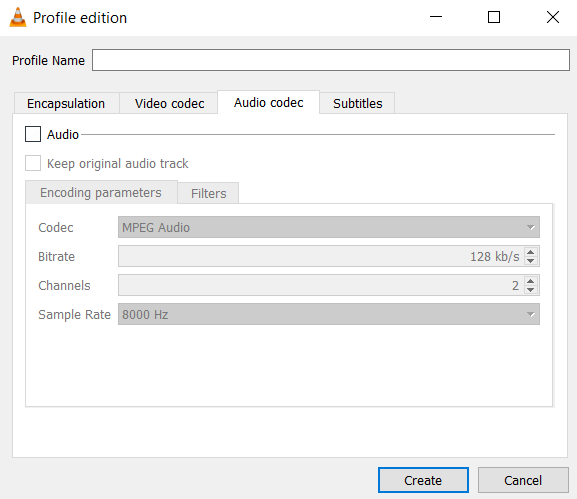
- Tap on Create, then choose the destination folder for a new file.
- Choose Start to save a clip without audio.
VLC Media Player supports not only Windows 10, but also any older version of Windows starting from XP. There are installation options even for Windows 95/98/Me.
Adobe Premiere Rush
Adobe is a professional proprietary solution for film production and editing. There are numerous tools and features for Windows and Mac users, including those for removing audio from video.
- Select and right-click the layers for footage and sound, then choose Separate Audio.
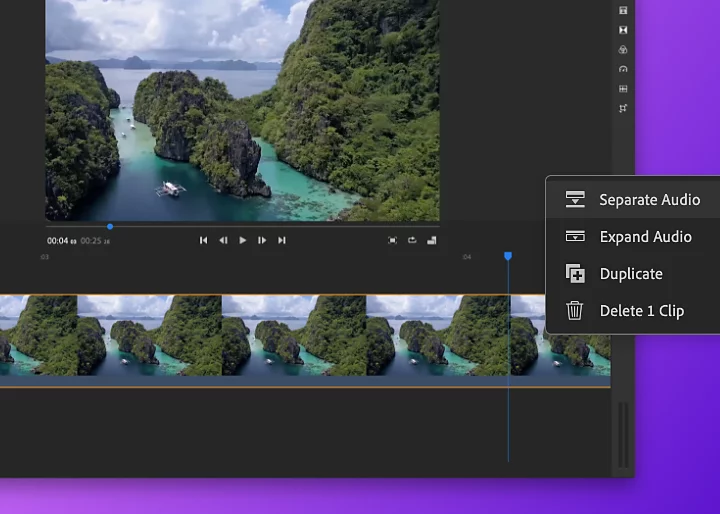
- Right-click the audio layer and choose Mute from the context menu.
Adobe provides customers with a full-stack multimedia suite, but you can also purchase Premiere Rush separately for $9.99 per month. The solution is used by filmmakers in studios internationally, but it is hardly affordable for anyone who just wants to remove audio from video.
Windows Video Editor
Video Editor is the successor of Microsoft’s most popular film editing app Movie Maker. The program is free and available on Windows 10.
- Add the desired file to the library and place it on the storyboard.
- Click the speaker icon to remove sound from a video file.
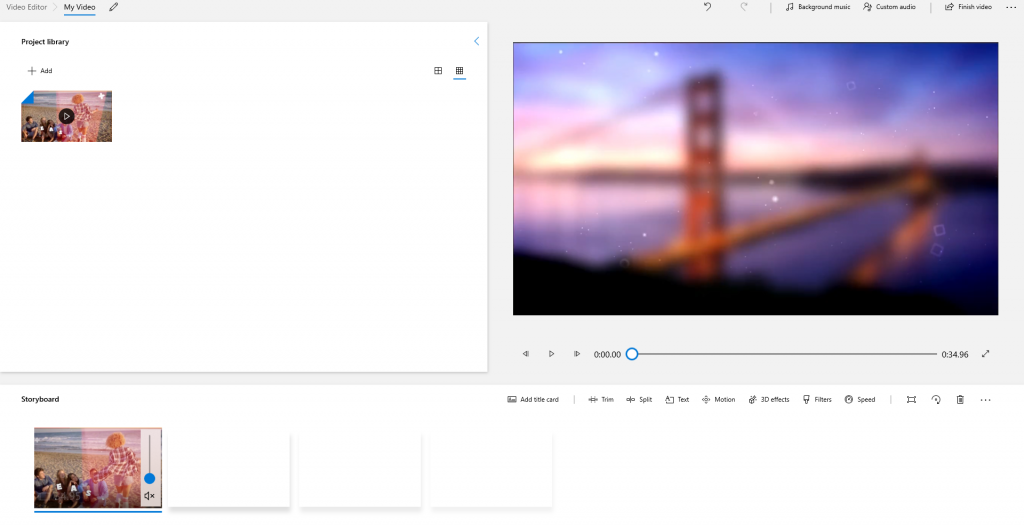
- Click Finish video in the upper right corner to save the result.
Video Editor works on Windows 10 and later versions only. For Windows 8, 7, XP, or Vista alternative apps are required.
Deleting audio from video on Mac
Apart from the above overviewed cross-platform solutions VLC Media Player and Adobe Premiere Pro, you can use native multimedia editing software and silent a clip on iMovie or use QuickTime.
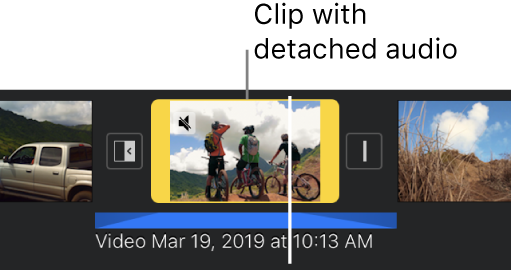
iMovie
iMovie is a free editor for high-quality clips on Apple devices, including iMac, iPhone, iPad, and iPod. With an intuitive interface and dozens of useful tools, you will delete audio from video on Mac without extra effort.
- When placed the desired file on the timeline, right-click it, and choose Detach Audio.
- Right-click the green-colored audio layer, and select delete from the context menu.
- Go to File -> Share -> File to save an output movie on your computer or send it to friends.
For Mac users, iMovie is probably the best idea about how to remove audio from video free. If you have hardware from Apple, why ever search further?
QuickTime
Don’t want to get started with iMovie? That is how to remove sound from a video on iMac or MacBook using QuickTime, a free multimedia player offered by Apple.
- Go to Edit -> Remove Audio and save the output file.
Easy, right? This method is the right choice for anyone who wants to remove audio from video quickly without iMovie.
How to remove audio from a video on iPhone / iPad
With native mobile apps for iOS smartphones and tablets by Apple, you can remove audio from video without transferring the file to your Mac computer.
iMovie
This free app is available on your mobile device too. The process is similar, but the interface is a bit different.
- Open a movie in the app and click it.
- Tap the scissors at the bottom of the screen (the Actions button).
- Click Detach.
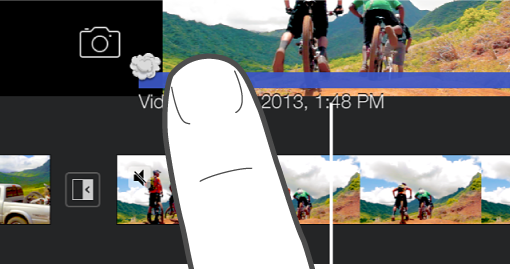
- Grab the blue-colored audio layer and drag it above the timeline. Release the layer when you see the smoke cloud.
Alternatively, you can just click the soundtrack and choose Delete.
Photos
Another possible option to remove audio from video on an iOS device is the picture gallery. Many iPhone users believe that the Photos app is only a place for storing images and clips. In fact, there are many useful editing features available.
- Open the file and tap Edit at the upper right corner of the screen.
- Deactivate the speaker icon at the upper left corner of the screen. The sound disappeared.
- Choose Done to save an output file.
Clips
The free Clips app is pre-installed on each Apple mobile device, including iPhone and iPad. Here you can produce shorter clips with colorful text, augmented reality, Memoji, animated stickers, and much more. This format is good for TikTok and similar media channels.
In Clips, you can delete sound from an iPhone video in a few clicks.
- Tap a clip and choose Mute.

- Save the video.
Deleting audio from video on Android
Android-based portable devices from Samsung, Huawei, Xiaomi, and other vendors have a choice between the default Google Photos app and a variety of third-party apps for deleting sound from a video.
Google Photos
This app stores your images and recordings, but you can apply simple editing too. That is how to remove audio from video on Android devices with Google Photos.
- Open a clip and choose Edit.
- Tap the speaker icon to deactivate the sound.
- Save the video.
Video Sound Editor
Another way to silent clips on an Android phone or tablet is to use Video Sound Editor.
- Choose Mute Video and find the clip you want to remove sound from. Tap the checkmark in the upper right corner.
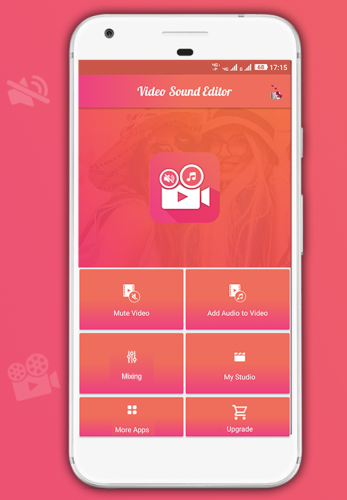
- Move the borders of the video track to trim your clip.
- Tap the checkmark once again to save the full video or the trimmed part without sound.
Google Play offers many alternative third-party apps to remove audio from video compatible with different Android versions.
How to remove audio from video online
There are many services on the web, where you can delete sound from your clips without installing additional software. The best thing about them is availability for every computer and operating system.
The process or removing audio may vary in each service.
Veed.io
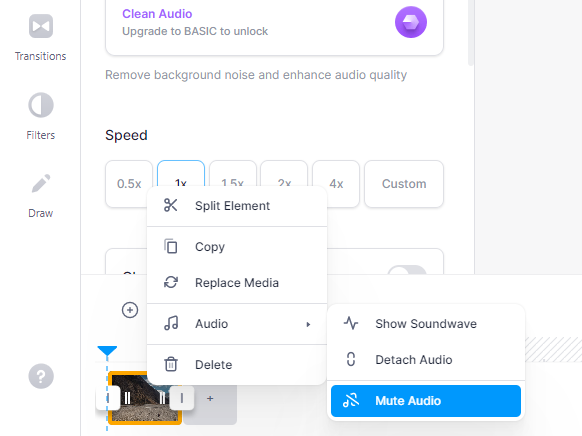
Open your clip in Veed.io and put it on the timeline. Then just right-click on the video and go to Audio -> Mute Audio.
Clideo
In Clideo, you can upload your clip from the computer, Google Drive or Dropbox.
The sound in a video will be deleted automatically. Just download it afterwards.
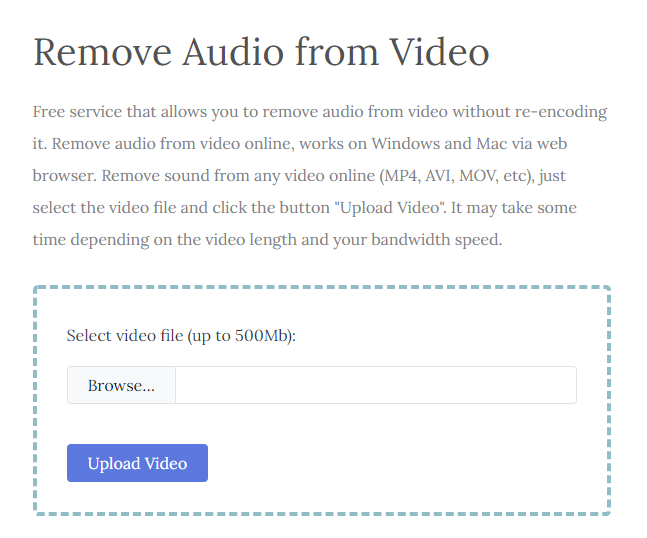
AudioRemover
Upload your video up to 500 MB, wait until the process is complete, and download your output file.
The online approach is easy and fast, but also has some drawbacks. The editing session requires stable Internet connection, and you need to register or subscribe to remove watermarks in output videos.
How to mute YouTube video
On YouTube, you can disable sound in each video to watch it with subtitles in a silent place.
This method is very easy and useful anytime you do not want to disturb other people during playbacks, such as libraries or a midnight train.
- Hover the mouse cursor over a video or tap it when watching YouTube on a mobile device.
- Click the sound speaker icon.
Unfortunately, YouTube Studio does not have an option to remove audio from YouTube videos. If you want to upload a movie without audio and then add music from the library, use one of the suites for your operating system (Windows or Mac).
How to mute video on Instagram
Instagram lets users post clips without sound — they can be muted right on Instagram. Here is how to remove audio from clips on Instagram.
- Pick a video from your library and tap Next.
- Click the speaker icon at the top of the screen to deactivate the sound.
Now the video will be muted even if your viewers choose to turn on the sound.
Frequently asked questions (FAQ)
We’ve gathered answers to the most popular questions from users when they approach removing audio for the first time. If you’re a beginner in multimedia editing, they’ll definitely be good to know.
Remove audio VS mute video: What’s the difference?
In all well-known multimedia suites, the terms remove audio and mute video are used interchangeably. That is why some interfaces have the Mute option to delete sound from a movie.
In technical terms, muting is the possibility to switch off the sound while watching a clip on e.g. YouTube, Instagram, or similar streaming services. That is, you can change your mind and activate the sound again.
When you remove audio and save the output file, there’s no possibility to switch on sound again in your player. It’s deleted permanently.
Can I save the removed audio as a file?
Yes. We haven’t covered the topic here, but you can learn how to extract audio from video and save an output track.
Will the video size smaller without audio?
Cutting out sound from your clips makes them smaller in some way, but that’s not the best way to have an output video with the reduced size. See our 5 ideas on reducing video size.
Final words
As you can see, there are many ways to remove audio from video on Windows 10, Mac, iPhone, Android, and even popular video-sharing platforms, such as YouTube and Instagram. In this article, we have made a short overview of the most popular software with this functionality.
Useful links
How to add music to video online, on Windows, Mac, and mobile. Read post
How to record screen on Windows 7, 8, and XP. Read post
Top 10 software for editing clips in 2021. Read post
Get the latest update of AVS4YOU software. Download

How to record screen on Windows 8 or earlier versions? This question is relevant for anyone who doesn‘t want to install Windows 10 and degrade performance on rather modest computers.
The answer is AVS Video Editor.
Why record your screen on Windows 8 / 7 / XP
There are four most common reasons to create videos taken from the desktop of your personal computer:
- Make tutorials with explanations,
- Save the full video call or conference,
- Capture gaming process,
- Send screen records to tech support.
You can capture a screen with or without audio, a particular window or area, and even draw in real-time. Here is how to do it with AVS Video Editor.
How to record screen with AVS Video Editor (Windows 7, 8, 10, XP)
Follow these simple steps to create a clip with the content on your desktop using AVS Video Editor.
Step 1. Open AVS Video Editor and click Capture screen.

Step 2. Choose Full screen to record every file, folder, and even the side panel.
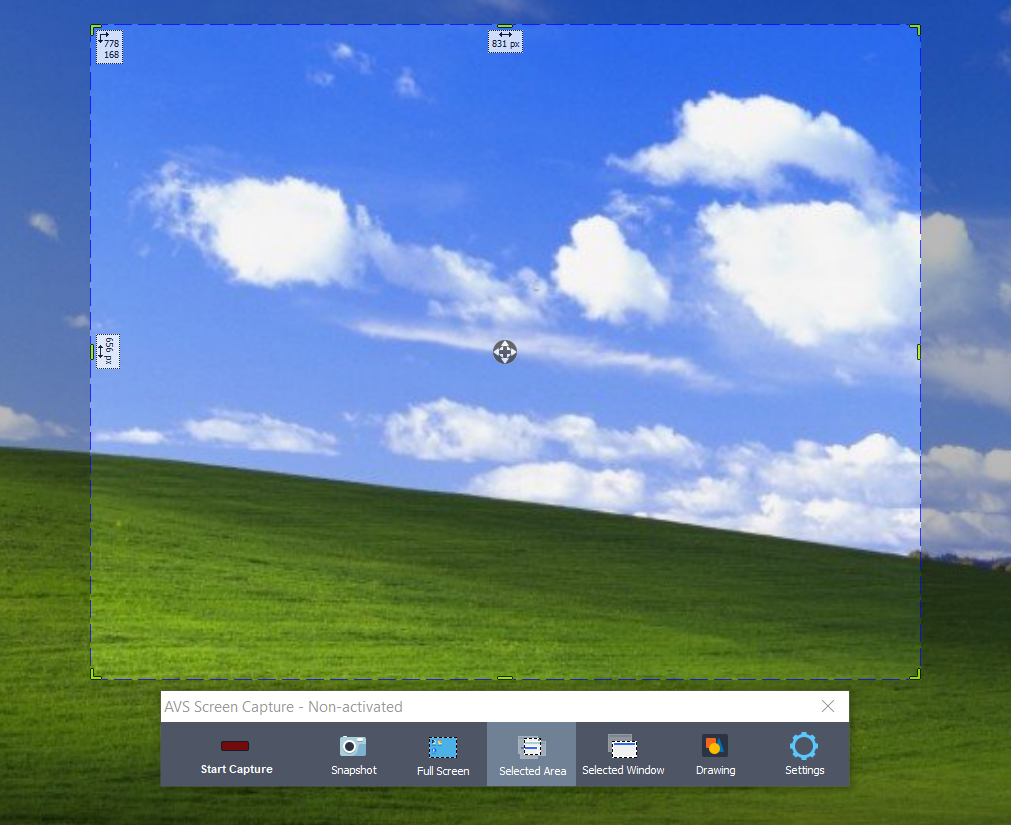
Want to hide some details and only show the active window? Click Selected window.
You can also demonstrate a custom area in the video file. Click Selected area.
Step 3. Tap on Start Capture.
Step 4 (optional). Click Drawing and select the desired drawing tools, color, and thickness.

Now you can underline elements on the screen and illustrate anything like in Khan Academy lessons.
Step 5 (optional). To record the screen without your voice, go to Settings -> Audio and uncheck Record audio.
Start making descriptive tutorials with screen recordings in AVS Video Editor today!
Watch this video to explore how to capture a screen while playing a video game with AVS Video Editor.
In AVS Video Editor, screen capturing is possible even on older Windows versions, such as XP or Vista.
How to record screen with Wondershare DemoCreator (Windows 7, 8, 10)
In DemoCreator you can also capture a screen on Windows, but starting with Windows 7 and later versions.
Step 1. Run the app and click Get Started to make necessary adjustments.

Step 2. Enable Audio in the corresponding tab, if needed. Optionally, you can alter the area for capturing, frame rate, video quality, etc.
Step 3. Click Capture and then a recording button in the opened window.
Apart from screen recording, Wondershare offers a full pack of multimedia apps within the annual plan. Prices start from $61.99.
Recording screen with OBS Studio (Windows 8, 10)
OBS Studio is a professional solution for online streaming and screen recording. It is cross-platform and available for Windows 8, 8.1, and 10.
The interface of OBS Studio may seem complicated to novices, but screen capturing is just that easy.
Step 1. Open the app, go to Sources, click the plus button to add the Display Capture option.
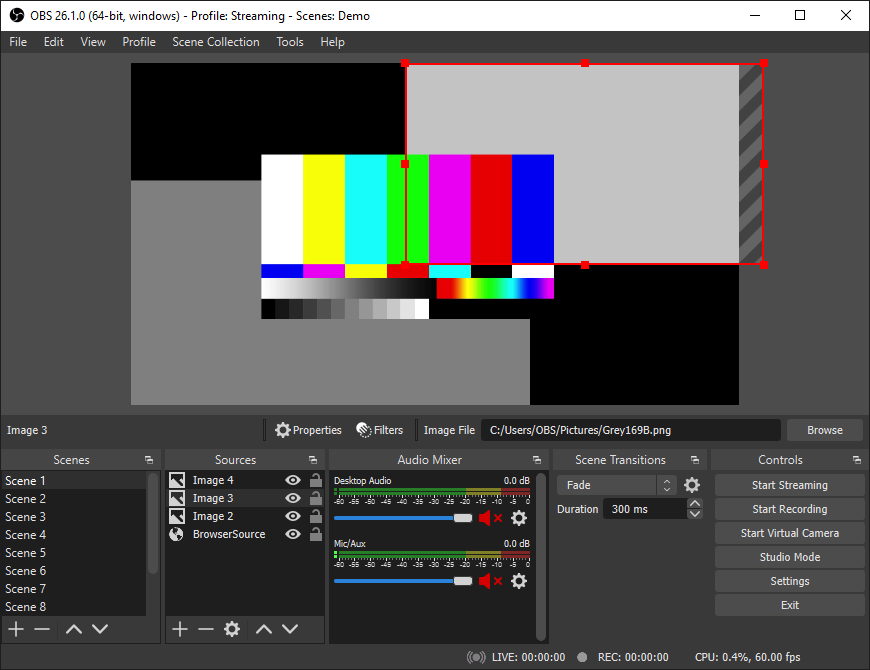
Step 2. Do the same to choose the audio you want to be recorded.
Audio Input Capture stands for your voice coming to a microphone. Audio Output Capture is every sound on a computer.
Step 3. Click Start Recording.
Recording screen with ScreenRecorder (Windows 7, 8, 10)
Microsoft offers a native app to record screen on Windows 7 and later versions for free. Go to the official website of Microsoft to download and install the executive file.
Step 1. Run the program and choose the part of your screen you want to record.
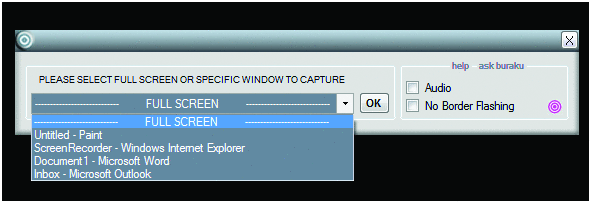
Step 2. Check the Audio box to enable sound in the output video.
Step 3. Click OK and then Start to capture the screen in WMV.
Conclusion
Now you know how to record what is on your screen on Windows 8, 7, and XP using four different apps — AVS Video Editor, Wondershare DemoCreator, OBS Studio, and ScreenRecorder. It can be useful for video tutorials, materials for self-paced learning, recording video calls, and much more.
Longer videos can require a lot of storage. Read our recent blog post about how to reduce video file size.
Useful links
How to create demo and guides in AVS Video Editor. Learn more
How to add music to the footage in AVS Video Editor. Learn more
Crop clips on any operating system. Learn more
Top 10 Windows software for editing movies. Check now

Video files are often too large for your computer storage capacity. Most email services have rather strict size limits for attachments. Sharing bulky clips on the Internet takes hours.
There are many reasons to reduce video size. Today we’ll go across five easy ways to do it on Windows and Mac.
How to reduce video file size by changing format (Windows)
Some formats make clips especially large, such as AVI or MP4. They keep the image quality close to the original but are too big for online sharing or storing on a device.
AVS Video Converter allows switching between popular multimedia formats. Here’s how to make a video smaller to email it, for example.
Step 1. Upload your clip.
Step 2. Choose the preferred format, such as WebM.
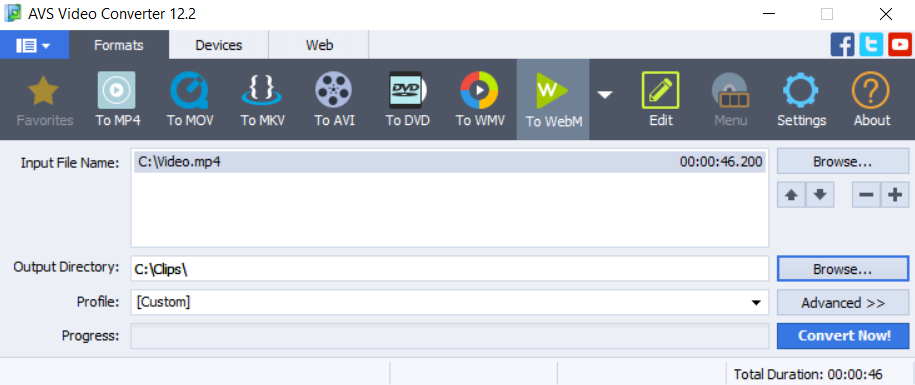
Step 3. Click Convert Now!
Get free AVS Video Converter for your Windows computer today!
How to decrease video file size by changing parameters (Windows)
In AVS Video Converter you can also reduce audio or video quality to save a clip in the same format, but with a smaller size.
Step 1. Open a clip and pick one of the profiles for your smartphone, tablet, or PC.

We recommend choosing PC – Standard Quality.
Step 2. Go to Advanced>> and check the size of the output file. Lower quality parameters of audio or/and video, if needed.
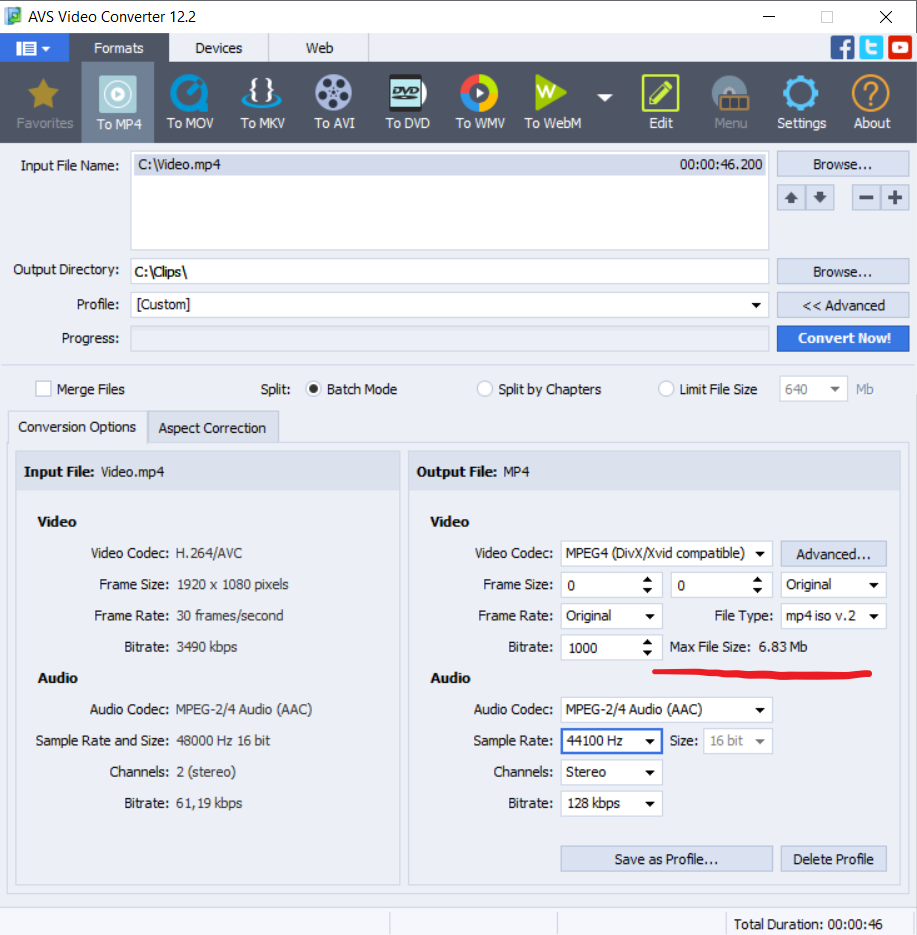
Step 3. Save the file on your computer.
This video will walk you through the whole process of conversion with changing parameters:
Get free AVS Video Converter for your Windows computer today!
How to shrink video file size by deleting unnecessary parts (Windows)
Your clip probably contains only one important scene. The rest is not essential. However, it makes the file much larger, so why not just cut out irrelevant content?
In AVS Video Editor you can remove unwanted parts from a clip.
Step 1. Upload a video and place a slider on a timeline where your clip should begin. Click the Split button.
Step 2. Put a slider where the clip will finish. Click the Split button.
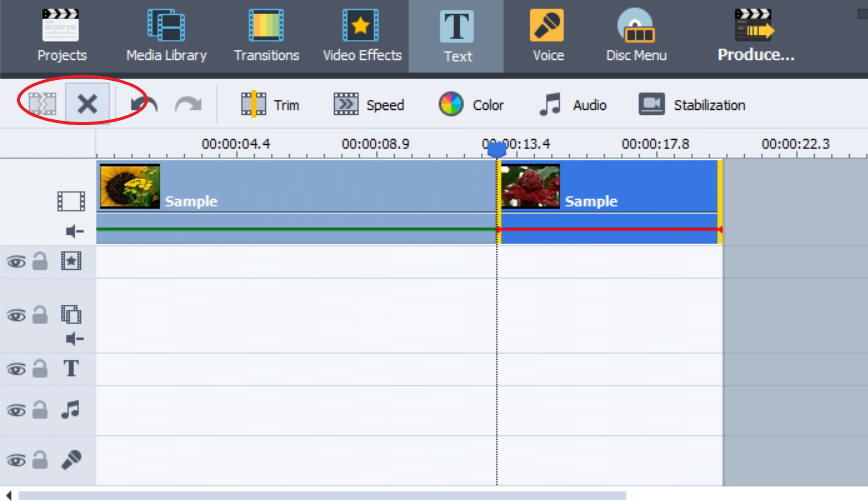
Step 3. Select unwanted parts and tap on the Remove button.
Get AVS Video Editor today and discover all editing features for popular formats!
To trim a clip on Mac, you need the free editing software for Apple computers called iMovie.
Step 1. Hold the R key and select the most important part of a clip.
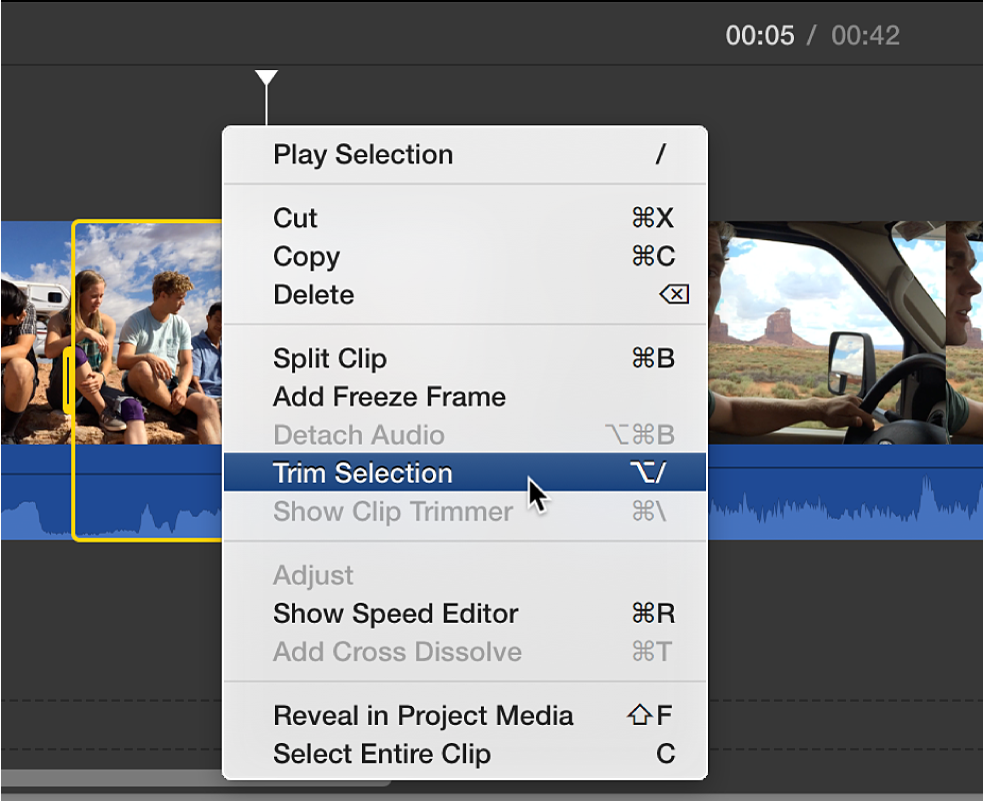
Step 2. Control-click the track and choose Trim Selection.
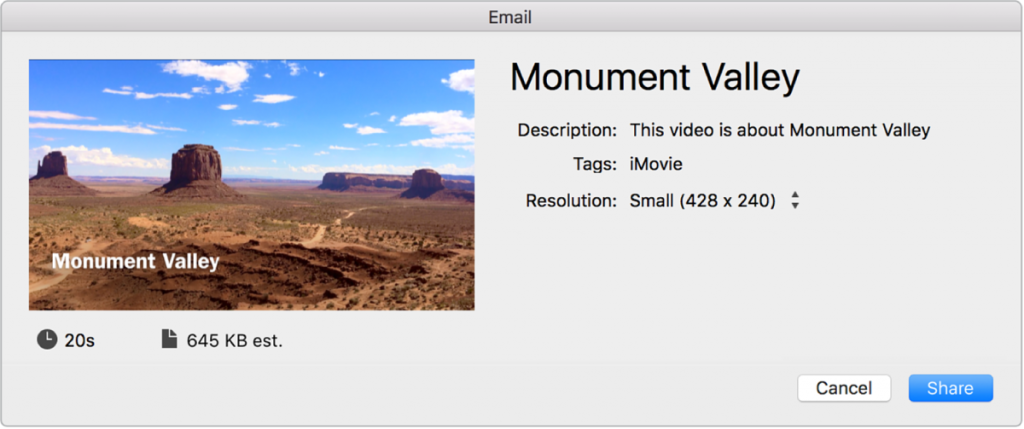
How to make a video file smaller to email it (Mac)
With iMovie, you can also compress a video before sending it per email. The option will impact the quality of a file.
Step 1. Upload a clip and click My Movie.
Step 2. Select the necessary part and add it to the movie by clicking “+”.
Step 3. Go to File -> Share -> Email and choose Small.
How to reduce video file size without losing quality (Windows / Mac)
Another popular way to make a clip more lightweight is zipping. The option is available for both Windows and Mac users and will add a clip to an archive.
ZIP compression is lossless. After the extraction of your archive, the parameters of a video remain the same as in the original clip.
Step 1. Right-click a file and choose Send to -> Compressed folder (Windows) / Compress name (Mac).
Step 2. Use the archive with a video.
Conclusion
We explored how to resize video for Instagram, YouTube, Facebook, or TikTok, as well as for sharing per email or on the Internet, storing in the cloud or on your PC.
Windows and Mac computers allow converting videos to lightweight formats, changing video parameters, cutting out excessive content, and adding video to an archive.
Useful links
Update AVS4YOU to the latest version. Download
How to add music, soundtrack, or voiceover. Read blog
Top 10 editing software for Windows, Linux, and Mac. Read blog

Visuals are the key part of every video project, but often it is not enough. Videos look better and more professional with music or studio voiceover. Read this article to discover apps to add music to video and produce a killer clip at home without much effort.
Reasons to add music to video
The original sound in the footage is never flawless. Cracking, buzzing, surrounding voices, and different volume levels in multiple videos. Muting is definitely not the best way out. Here are some ideas on how adding music to clips may help.
- Voiceovers. Sync the audio track recorded with the lavalier microphone or add your voice recorded in a home studio at a high-quality level.
- Songs and backing music. Make a brilliant short clip for Instagram or TikTok with your famous song. Replace the audio track completely or just add background music to a video.
- Funny sounds. We love jolly jumping and falling sounds from cartoons since childhood, don’t we? Add them to your clips to make them more humorous.
Today you can easily add music to videos online, on Windows, Mac, and mobile devices!
How to add music to YouTube video
The video editor on YouTube Studio allows choosing free stock melodies and songs from the steadily growing library. The option is available even for monetized clips.
Here is how to add music to videos on YouTube.
Step 1. Open YouTube Studio and find the desired video.
Step 2. Go to the Editor tab on the left-side panel.
Step 3. Choose Add a track and search for suitable tunes.
That’s it — just click on Save to confirm the changes.
YouTube does not support adding your own music to video right on the platform. Consider other methods listed below, if you want to play custom music.
How to add music to video online
There are lots of services over the web that allow you to add music to video easily, for example, Veed.io. Just open the editor and insert music!
Step 1. Upload a file from your computer, YouTube via a link, Dropbox, or even record it from scratch.
Set the audio volume to 0%, if you want to replace the video sound completely.
Step 2. Go to Upload —> Upload audio
Step 3. Configure the audio track by moving it on the timeline. You can regulate the volume, speed, and duration of your music.
Click on Export to save your file.
Veed.io allows producing 10-minute and shorter videos with music for free. For longer clips, a paid subscription is required. Prices start from $12 per month.
This method has some obvious drawbacks. A stable Internet connection is needed to upload and download the file. Any interruption may end in loss of editing progress.
Web services are not always good at data security. You don’t know for sure whether your video will be completely removed after editing. Leaks and disclosure of media materials are also frequently occurring troubles.
Want to accelerate adding music to videos and secure the editing process? Choose a proper desktop solution for Windows or Mac!
Add music to video on Windows
AVS Video Editor lets you add music to YouTube videos on Windows 10/8/7/XP/Vista. Just follow these simple steps below.
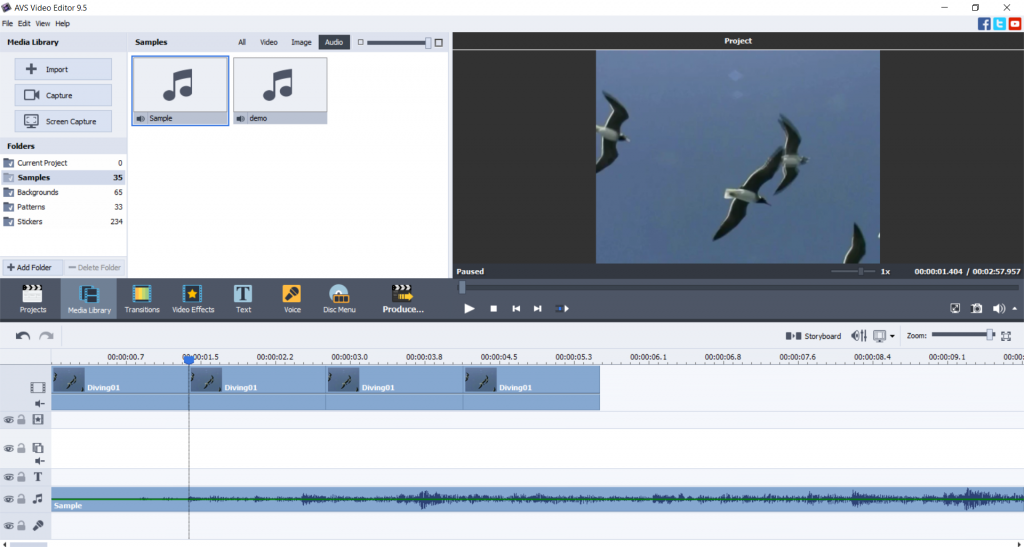
Step 1. Run AVS Video Editor, open a video, and go to Media Library —> Audio. Import tracks to the library.
Step 2. Drag the necessary music file to the timeline.
To adjust audio levels click on the Volume and Balance button at the timeline.
Done! Now you can save your video project and share it with friends.
Test AVS Video Editor today and add music to videos on Windows easily:
Mac
Apple provides users with the free editing software iMovie. Usually, you have it pre-installed on any iMac and Macbook. Here is how to insert music in a video free on Mac.
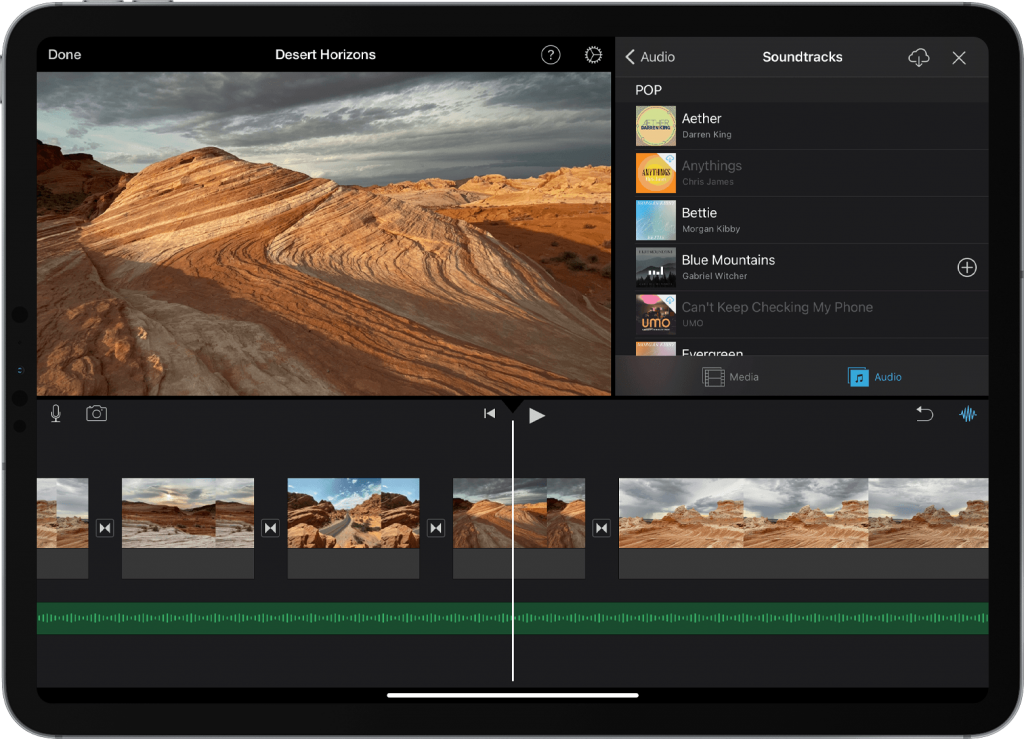
Step 1. Drag a video to the timeline and select audio files in the upper toolbar.

Step 2. Browse to find the clip you want to add to your project.
Save your file on Mac as usual.
iPhone / iPad
iOS devices also have iMovie pre-installed. The process of adding music to videos is similar, just some minor changes in the interface.
Follow these steps to add music to video on iPhone or iPad.
Step 1. Open a video in iMovie, tap the Add Media button, and choose Audio.
Step 2. Upload an audio file. Choose Soundtracks to browse the library, iCloud Drive to search music in storage, or My Music to open local files.
Step 3. Click on the item and again on the Add Media button.
Android
Play Market offers numerous multimedia apps for Samsung, Xiaomi, Huawei, ASUS, and other Android devices. Here is how to add music to video on Android in Kinemaster.
Step 1. Open a video, then tap on the Audio button, located in the media panel to the right.
Step 2. Select the Add(+) button to choose a music file you want to add.
Export the ready video.
Conclusion
Many available apps allow adding music to your clip on any platform or device, including Windows, Mac, iOS, and Android. You can even insert audio to footages online or on YouTube.
Choose the software that is compatible with your computer or smartphone.
Useful links
Get the latest update of the AVS4YOU suite. Download
Check top 10 video editors for any operating system. Read blog
Make an engaging YouTube intro. Read blog

Today video content reigns in many industries and boosts sales of thousands brands worldwide. In this article we gathered the best video editing software for commercial and home use.
Here you‘ll find a video editing app for every taste and wallet.
Adobe Premiere Pro CC
Adobe Premiere is arguably the best video editor for Windows with advanced capabilities for video montage. With a large set of professional solutions for design, graphics and footages Adobe contributed to the visuals in some notable films, such as Avatar, Deadpool and Terminator: Dark Fate.
Adobe Premiere Pro СС has industry-leading creative tools, integration with other apps and services, 4K/8K and virtual reality editing features. It runs on Windows and Mac machines and its prices start from $20.99/mo.
Adobe Premiere is certainly the best choice, if video editing is your job or absolute hobby and you have rather deep knowledge of advanced multimedia tools. Otherwise it would hardly be a sensible investment.
Premiere Pro comes with Premiere Rush for video editing on portable devices under iOS and Android. For those planning a career in video production Adobe offers to become a certified professional.
Vegas Movie Studio
Another award-winning, easy to use, yet powerful video editing software with a comprehensive set of tools. Fast rendering through CPU/GPU, numerous effects and transitions, detailed work with colors — in fact, it includes most features needed for both amateurs and pros.
In Vegas Movie Studio you can apply effects and transitions, use advanced colour grading, colour match, motion tracking, Lens Correction plug-in and more. The Platinum and Suite plans include SOUND FORGE Audio Studio for editing songs, background noise removal or even creating your own sound.
The prices start from $49.99 and it is a one-time purchase. The basic Vegas Movie Studio plan still has drawbacks. Pretty fundamental features like color correction and white balance are only available for the Platinum and Suite pricing plans.
Vegas Movie Studio is a good option, if you want some advanced features for 4K, edit videos on a non-regular basis and do not want to pay for a monthly subscription.
MOVAVI

Movavi Video Editor is a user-friendly yet powerful video editing software available for Windows and Mac. It’s designed for people who need to put together videos quickly without having to spend weeks learning complicated tools. The program works equally well for creating short clips for social media, YouTube tutorials, or more polished presentations and marketing videos.
The editor includes a wide set of features: apart from common trimming, cutting, and applying transitions and titles, there are handy AI-driven features such as automatic subtitles, background removal, and noise reduction. There’s also fast motion tracking and timeline playback speeds up to 100x for timelapse videos.
Movavi offers a built-in Effects Store with thousands of filters, stickers, sounds, visual effects, and transitions. Finished projects can be saved in 4K or directly uploaded to YouTube or TikTok without extra steps.
The software has a free trial, and full access is available via subscription or a one-time license at a reasonable price (starts from $19.95). Thanks to its mix of simplicity and modern features, Movavi Video Editor has become a popular choice for creators: from beginners making home videos to small businesses looking to improve their content.
DaVinci Resolve
DaVinci Resolve provides users with numerous professional video editing features. Dive into color correction, visual effects, motion graphics and audio post production. This solution was used by Hollywood directors in popular movies, including La La Land, Deadpool 2, and Star Wars: The Last Jedi.
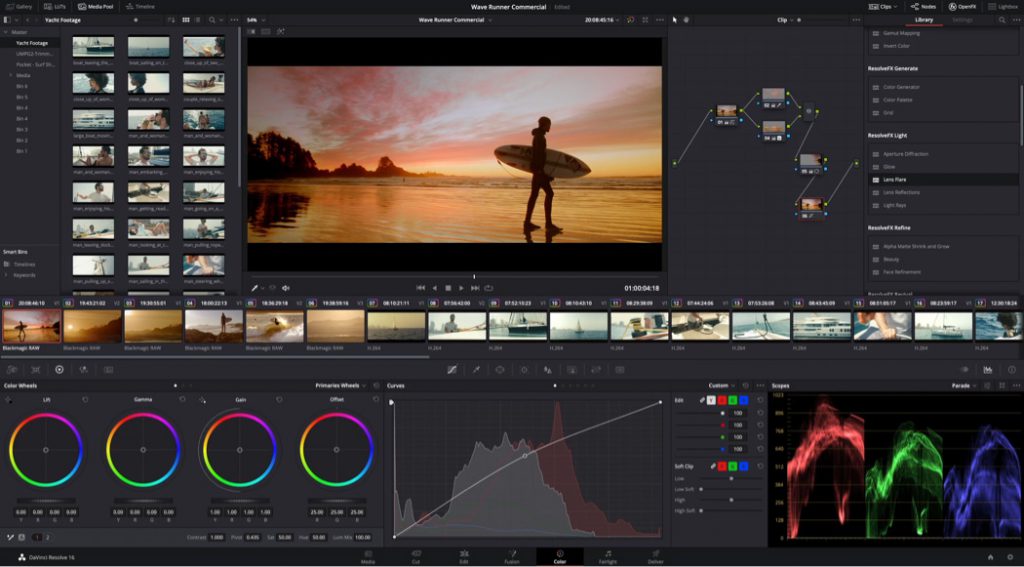
The solution has the steadily growing library of effects and transitions. There are tools for creating soundtracks, applying titles, cutting, trimming, delivering videos over the web. DaVinci Resolve supports all popular video and audio codecs and allows multi-user collaboration. With this top free video editing software content makers produce high-resolution videos.
Although most of the tools may seem too complicated for beginners, DaVinci Resolve offers free trainings to master all necessary functionalities. The solution is compatible with Windows, Linux, and Mac computers.
DaVinci Resolve has the paid Studio plan with Neural Engine, stereoscopic 3D tools, dozens of extra Resolve FX filters and Fairlight FX audio plugins, advanced HDR grading and HDR scopes. This option is suitable for commercial use and costs $295.
Professional editing features, loyalty of celebrities, and cross-platform operability makes DaVinci Resolve one of the best free video editing software solutions in class.
Blender
Blender is an open-source and free video editing software for professionals. Almost 20 years contributors support the solution and push the modern 3D animation technologies in movies. Some popular childern of Blender users are Next Gen, Spring, Cosmos Laundromat, and Agent 327.
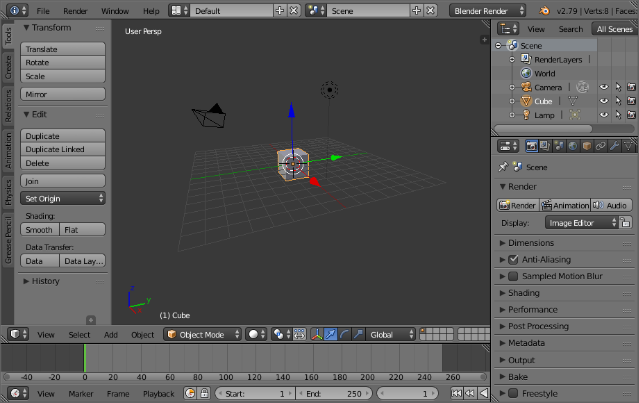
Blender has powerful rendering engine and a huge set of modelling tools, including creating, transforming, sculpting and editing. 20 built-in brushes and Dynamic topology allow advanced sculpting. The focus of Blender is animation — here you get character animation pose editor, Non Linear Animation (NLA), forward/inverse kinematics for fast poses, sound synchronization.
There are also basic video editing tools. Blender provides 32 slots for videos, images, audio, scenes, masks and effects. You can adjust layers, transitions, keyframes, filters etc. Still the solution is hardly used for such simple edits.
Blender is supported by any platform, including Windows 8 and 10, Linux, and Mac. The app is entirely free. No additional paid versions.
Blender is the best free video editing software for animation professionals. The interface seems to be rather complicated for beginners. But experienced players can use the powerful technologies and tools for truly spectacular videos.
Lightworks
Another advanced video editing solution with an impressive portfolio in Hollywood. Lightworks helped produce Pulp Fiction, The Irishman, The King‘s Speech, The Wolf of Wall Street and many other popular movies.
Lightworks supports any video format, has tools for basic trimming, multicam editing, integrates a large stock video library from Pond5 and royalty-free music. The solution offers numerous advanced visual effects, presets, animations, Boris FX and graffiti text effects.
Color correction is really precise. Moviemakers can adjust tones, balance, use color curves. You can share the project for collaboration and manage access rights.
For file management Lightworks can be integrated with Dropbox, Amazing Music Tracks, pCloud.
Lightworks is supported by any platform, including Windows, Linux, and Mac. The system requirements are pretty high, which is expected in such a video editing solution. Ideally, your computer needs Intel i7 chipset, at least 3 GB RAM, and sophisticated NVIDIA graphic card.
Lightworks is one of the best free video editing apps, but there are some limits compared to the competition. The free plan is suitable for basic edits and exports videos up to 720p only. To unlock the full set of tools and features you need a monthly subscription for $23.99/mo or one-time purchase for $389.99. Such investments are not affordable for everyone.
Windows Movie Maker
Windows Movie Maker is one of the most popular video editing apps for Windows. This editor is developed by Microsoft and included in any Windows computer by default for free. Some features and tools are only unlocked in Pro version.
Free Windows Movie Maker is good for simple video projects and allows trimming, joining videos, images, adding music and text, etc. You can apply effects, transitions, animated pan-zoom, photo filters, and output HD videos. Soundtracks can be selected from users‘ library on the computer.
Today Pro version of Movie Maker costs $14,99 and enables customizable video output settings: bitrate, output format, hardware/software encoder mode. Built-in music library and professional transition effects for photos and videos are also included.
Wondershare Filmora
Filmora is a video editor available for Windows and Mac. Among the main tools are transitions, motion elements, filters, up to 100 layers for songs and text, and the basic ones to remove unwanted scenes.
Filmora offers advanced visual editing with accelerated rendering even in 4K resolution. You can stabilize videos, correct colours and fisheye distortion, create freeze frames, adjust speed control and more.
Audio tools include background noise removal, keyframing, and tuning sound with audio equalizer.
Filmora is available for a free trial or as a yearly subscription from $39,99.
Shotcut
Shotcut is an open-source and free video editing software. The app has a wide format support, numerous audio and video features, and editing tools. Shotcut is available on Windows, Linux, Mac, and even FreeBSD.
Shotcut lets you work on multimedia files of any format, supports modern codecs, allows audio and webcam capturing. With this app you can produce high-resolution 4K videos.
Visual editing is easy with 3 color wheels, color correction, grading, fading, smooth transitions, and dozens of filters.
Simple editing features include trimming, cutting, adding music tracks, detaching sound from clips etc. With a multitrack timeline you can merge visuals, audio, and text into a short movie or intro.
The app is entirely free. No additional paid versions offered.
iMovie
Apple equips their devices with free software, including video editor iMovie. Users can make high quality videos on iMac, MacBook, iPhone, and iPad. The editor has an intuitive interface and offers all necessary features for polishing up your 4K video and audio tracks.
iMovie provides moviemakers with necessary tools, including stunning effects, transitions, adding text, applying soundtracks. You can trim clips, fade visuals, change green-screen background, use picture‑in‑picture and split screen effects.
YouTube bloggers can easily and fast create trailers. Just choose from a range of templates, add logo, slogan, and credits. Decorate the result with 13 creative high-resolution video filters.
The entire functionality is included by default. No paid version needed for additional capabilities.
iMovie is available on any Apple device and belongs to the best free video editing software out there. Especially good for non-commercial use.
AVS Video Editor
AVS Video Editor offers a rich set of editing tools, including colour correction, stabilizing shaky videos, adjusting aspect ratio, trimming, cutting, blurring, etc.The app supports all popular formats and HD video editing, the processes are faster due to the integrated video cache technology and GPU acceleration.
In AVS Video Editor you can create multi-screen videos, add music and text, choose from 300+ effects and transitions. After videos are ready, save them with YouTube presets to apply recommended file parameters automatically.
The unlimited AVS4YOU subscription costs $59,99 and also includes other multimedia apps: video converter, audio editor and converter, media player, etc. See full list >>
Want a quick jump into easy editing? Try AVS Video Editor with advanced editing functionalities:
Useful links
How to choose a proper video editor. Read blog
The best 4K video editors in 2021. Read blog
The best YouTube Studio alternatives. Read blog

Long time without updates, right? We worked hard in recent months to release a big summer update with new features, codecs, formats, and crucial bug fixes. Here is what we added.
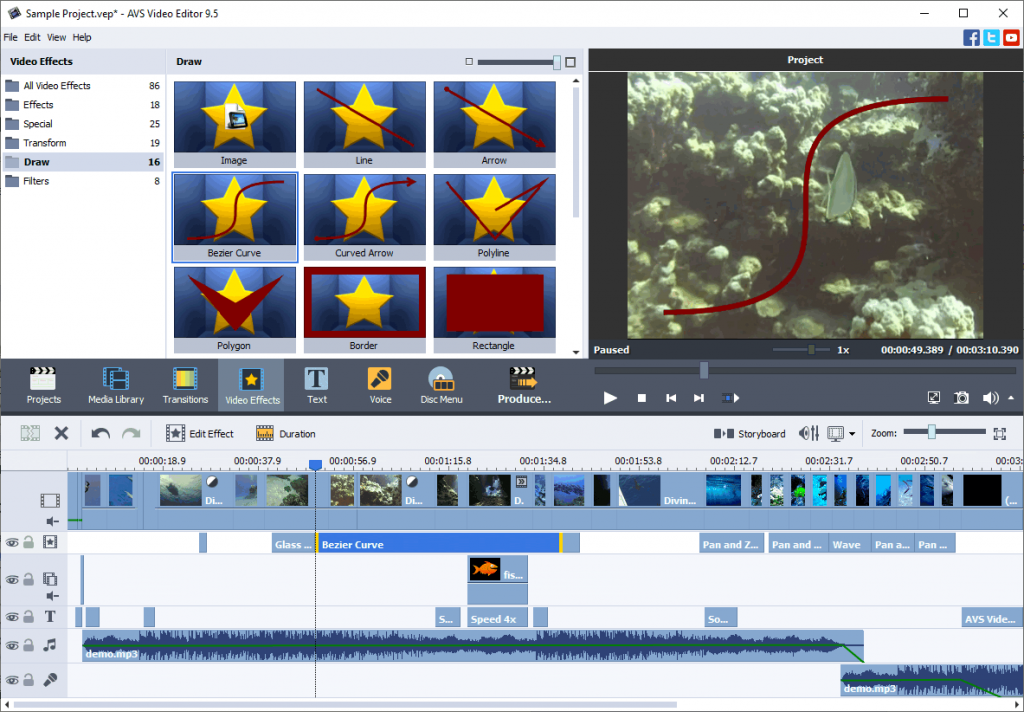
Smooth motion in visuals
Smooth the curve of a motion with Bézier Curve or Curved Arrow. Find both in the Effects folder in AVS Video Editor.
Add HEIC images
HEIC is an image format used on Apple devices, such as iPhone and iPad. With the same quality as JPEG it requires about 50% less space on your smartphone or tablet.
Import HEIC pictures from mobile devices and add them to your projects in AVS Video Editor on Windows 7, 8, 10.
Use free AVS Image Converter to convert HEIC images to other popular formats (JPEG, PNG, TIFF etc.).
Open and import OPUS audio
From this version, AVS4YOU software supports OPUS audio files in MKV and WEBM videos. OPUS is a royalty-free lossy audio standard that delivers a high sound quality at low bitrates.
Edit and convert MKV and WEBM footages with audio encoded using OPUS or import sound from such videos in AVS Audio Editor.
Produce high-quality videos
Work with AVI files compressed using H.265/HEVC, the most sophisticated video codec in 2021. Edit and save MP4/MOV/MKV/AVI files encoded with H.265 in AVS Video ReMaker. The highest quality remains.
This codec is used for producing 4K videos and live streaming by popular content makers on the Internet. Clips keep the image quality to the standards.
Try improved screen capture
We enhanced the screen capture performance and now it runs much faster. The default format is now AVI, which guarantees better visual quality and synchronization of video and audio.
Use updated presets
We added new screen capture presets with 30 fps for video and 48000 Hz for audio. Many clips and tunes over the web use these parameters, for example the Instagram app.
HD/FHD/4K slideshow presets are updated for MOV, MP4 and MKV in AVS Video Editor.
In this version, we fixed many minor bugs and enhanced usability to ensure better experience when working in AVS4YOU software. Get updated to try all new features yourself!
Useful links
What are video codecs and why you need one. Read post
Why AVS Video Editor is a must-have for beginners and pros. Read post
How to protect videos with watermarks. Read post
How to accelerate Windows, Google Chrome and AVS Video Converter. Read post
Need help? Feel free to contact us via the support form.