Category: Без рубрики

Want to merge pictures and videos in one file? Need to overlay a picture on a clip?
This comprehensive guide explains the most common questions around photos in your movies.
Why add pictures to a video?
There are many reasons to consider photos in your next project.
- Movie with photos and clips. Create a story about your holiday or travel, use images and clips, burn it onto a DVD to enjoy watching with your family on a weekend.
- Overlay an image on a video. Make a multiscreen movie with photos and clips. Or insert additional graphics to protect copyright.
- Convert a PowerPoint presentation to a video. This method helps create a movie from a presentation without separate image files from it.
- Produce a slideshow. Let your photo collection be displayed automatically without manual switching between files.
Whatever idea you have, popular multimedia software lets you combine pictures and videos on Windows, Mac, and mobile devices.
How to overlay a picture on a video?
To overlay means to cover the surface of your clip with an image. We use this option to show multiple photos on a multiscreen or to add a watermark to a clip.
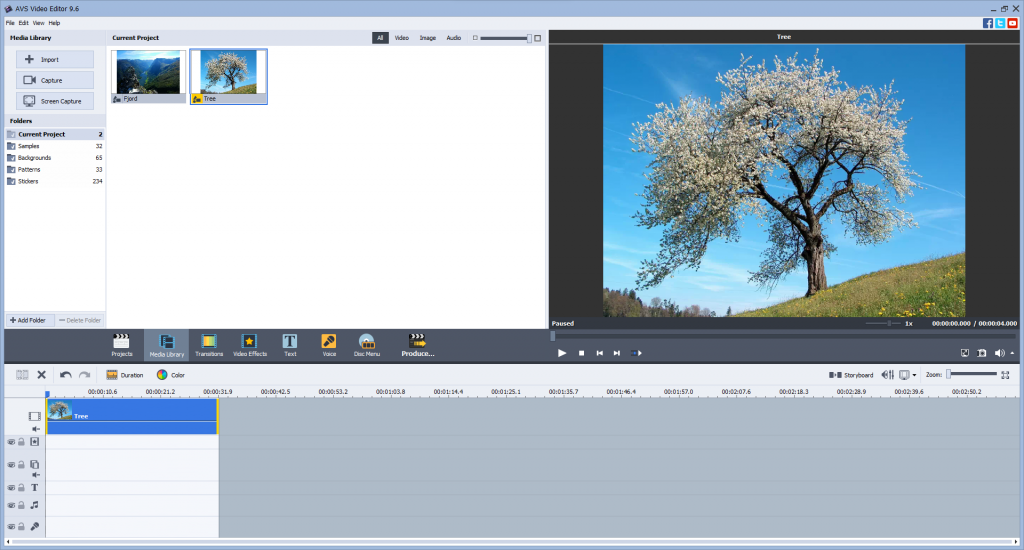
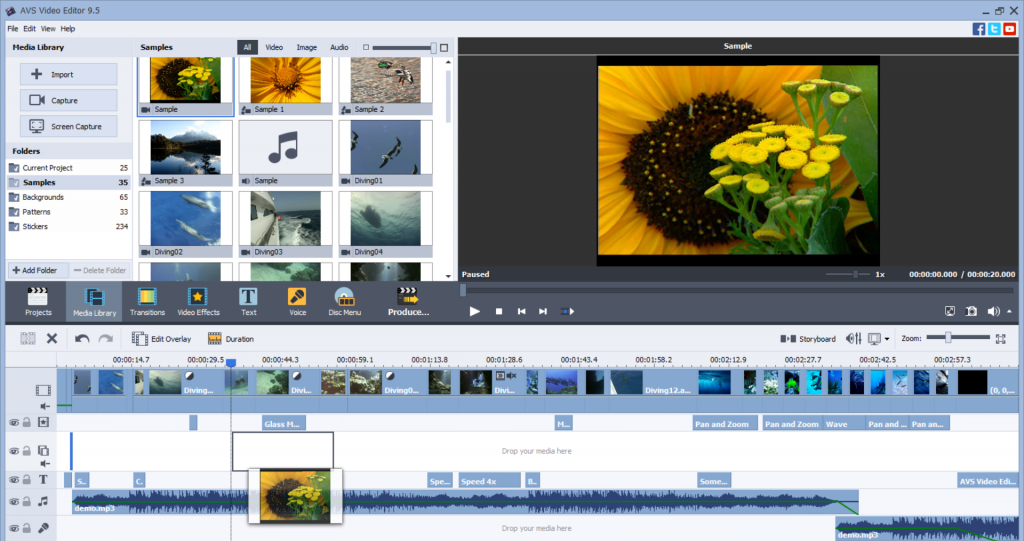
Add picture to video on Windows
AVS Video Editor is one of the best Windows software for overlaying pictures on a movie.
Here’s how it works:
How to overlay a picture on a video:
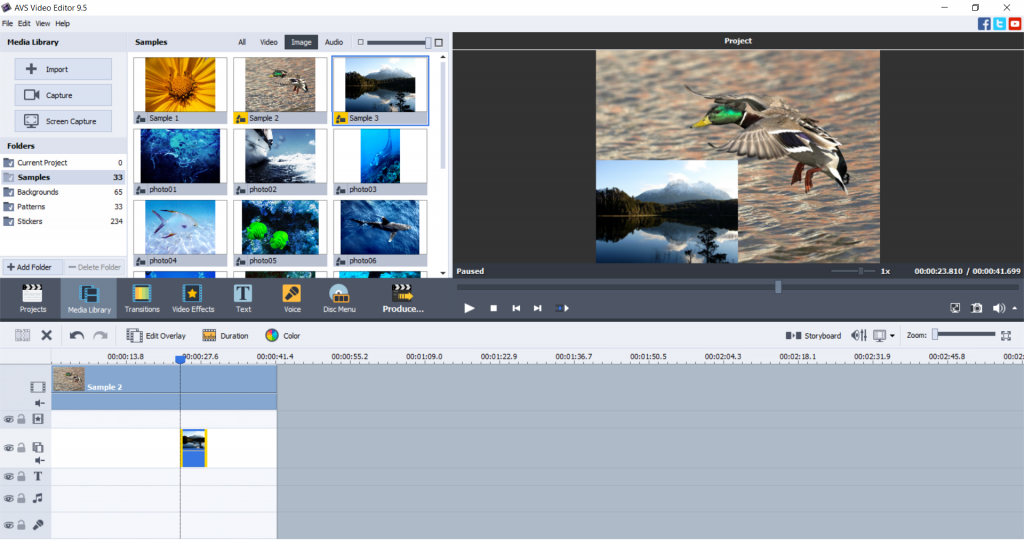
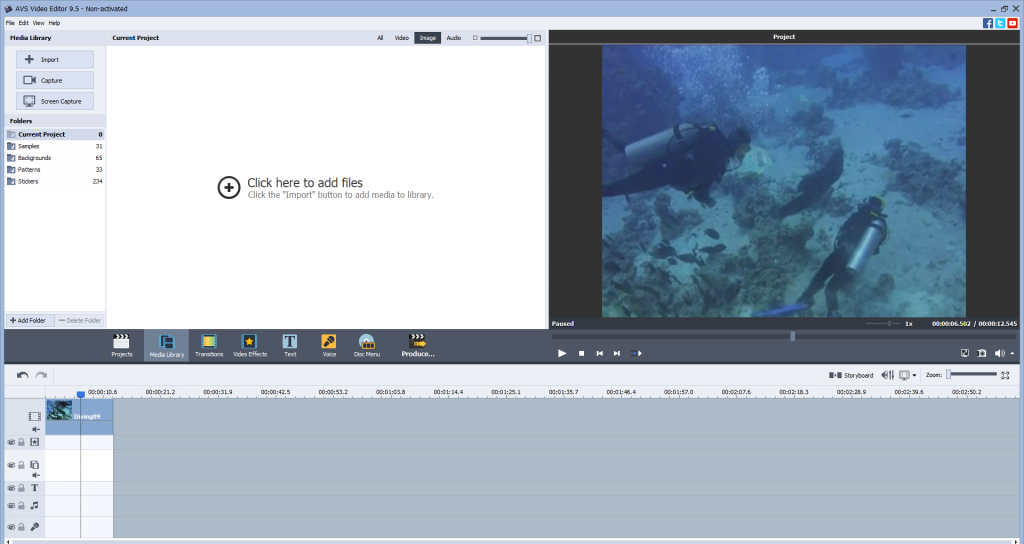
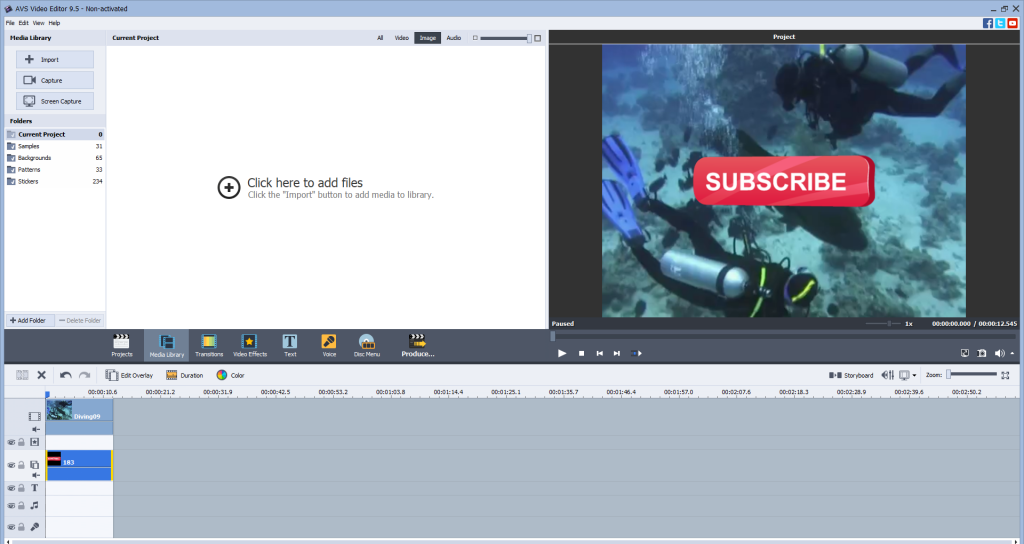
- Open Media Library —> Image.
- Place the file to the Overlay line.
Try more features in AVS Video Editor today — just follow the link below:
Add picture to video on Mac / iOS
Apple provides users with a free editing software, iMovie. Usually, you have it pre-installed on any iMac and MacBook.
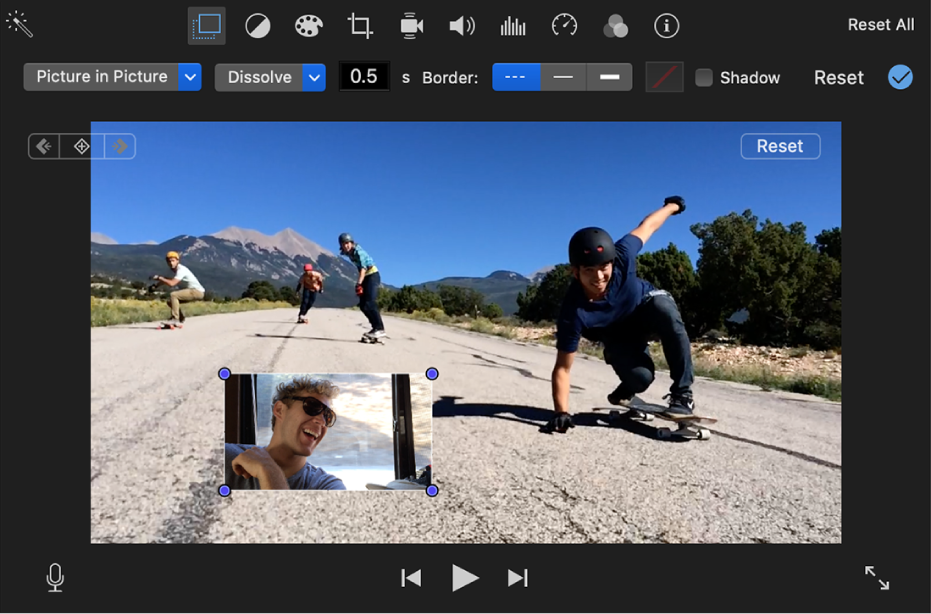
That‘s how to overlay a picture on a video in iMovie for Mac.
- Select an image and drag it above a video on the timeline. Release the mouse button when the green “+” icon appears.
- Choose Picture-in-Picture in the left-side menu.

- Move and resize the image on the screen as you need.
On an iPhone or iPad, follow these steps.
- Upload the photo to the Library.
- Tap the photo —> More Options and choose Picture-in-picture.
Learn more about overlaying on different devices in our dedicated guide.
How to make a video and picture collage?
Creating videos from pictures only or combined with clips is also pretty straightforward on Windows and Mac.
Create a slideshow with pictures on Windows
Open AVS Video Editor and proceed with these steps.
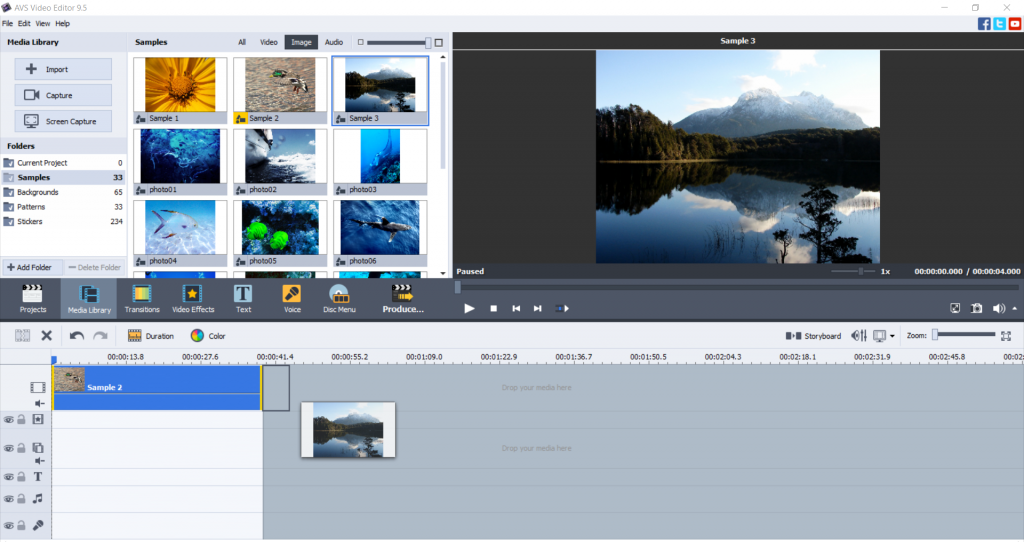
- Open Media Library —> Image.
- Drag’n’drop the desired file to the first track of the Timeline.
- Need to add a video to your project? Switch to the Video cog in the Media Library and choose one.
Additionally, you can add music to your output movie. This makes it even more entertaining.
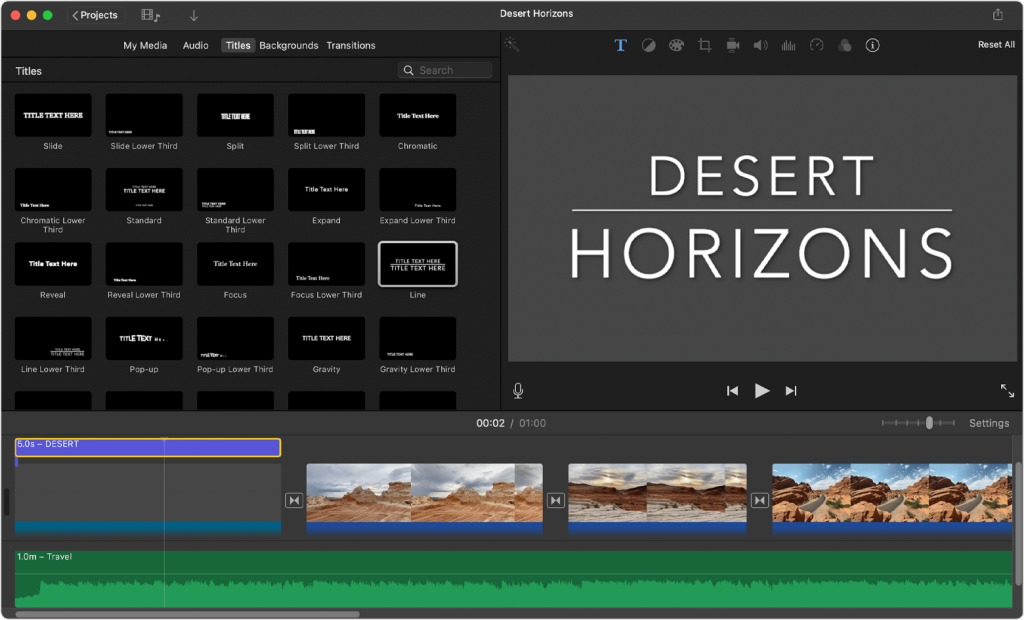
Create a slideshow with images on Mac / iOS
To make a video with pictures in iMovie, open the app and go to iMovie Library on the left-side panel.
Drag pictures from the library to the timeline.
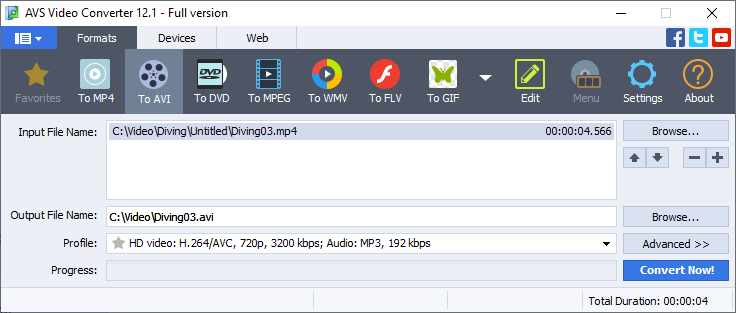
How to save PowerPoint presentation as a video?
You don‘t need to purchase the paid version of PowerPoint to simply convert a presentation to a video.
Install the free AVS Video Converter and follow these steps.
- Drag and drop the presentation from your desktop to AVS Video Converter.
- Choose the necessary output format. MP4 is the default option.
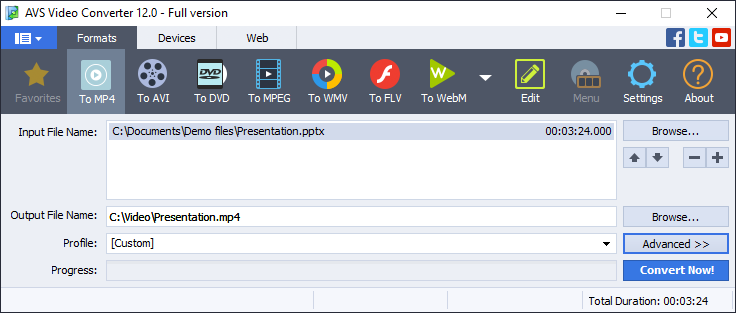
- Click Convert Now!
After conversion, press the Open Folder… button to find your new video file.
Get AVS Video Converter today — it is free and supports all popular media formats!
Want to save each slide in a presentation as a separate image? Use free office software, such as ONLYOFFICE Desktop Editors.
How to add pictures to video online
There are lots of services over the web that allow you to easily combine clips and photos, for example Veed.io.
Click the Choose Video button to open the editor‘s interface. Then proceed with these steps:
- Upload a clip from your computer, cloud storage, or use a YouTube link.
- Go to the Upload section on the left-side toolbar.
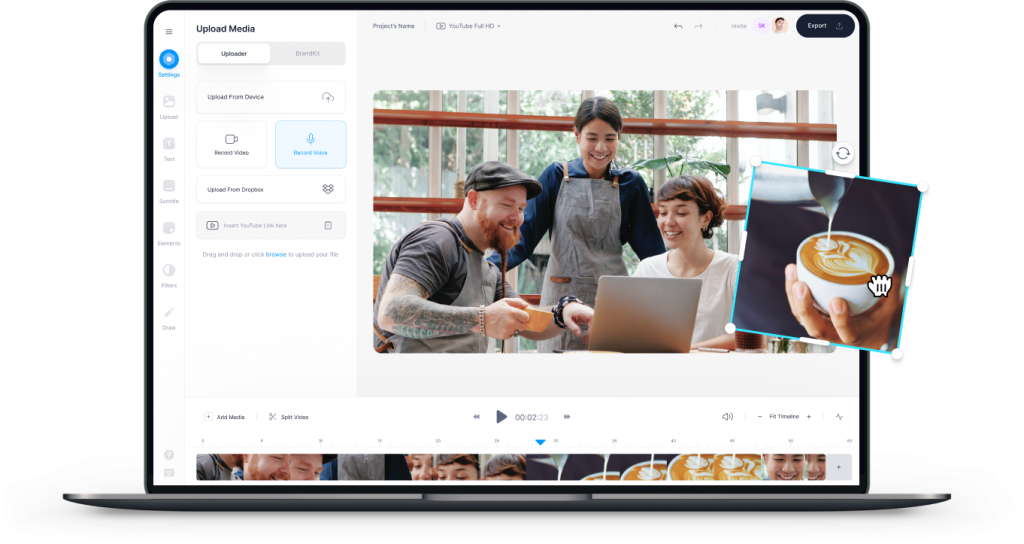
- Choose Upload image. Select necessary pictures and then drag‘n‘drop them to the timeline.
- Export and download the output file.
However, the online approach has some drawbacks. The editing session requires stable Internet connection, and you need to expose personal files to a web service.
Conclusion
You‘ve learned how to put a picture on a video on Windows, Mac, iOS mobile devices, and even online. It‘s easy, right?
Check useful links below to get some handy tips and tools for your slideshows and movies!
Useful links
Update AVS4YOU to the newest version. Upgrade now
How to make a blurry clip clearer. Read post
What is embedding and why it matters. Read post
Different video formats: what is the best and how to convert. Read post

When recording a voiceover or a song, many factors can have impact on the sound quality. A most important among them is gain — an audio attribute determining the way your system is reacting to the input signal.
In this article, we’ll explore what gain is, why it matters for everyone working with audio production, and see differences between gain and volume.
What is gain?
Gain is the level of an input signal before its processing, be it voice, noise, scratching, or music. Imagine you‘re playing a guitar. Gain is how loud the guitar sound is for the recording software.
Guitar amplifiers may have such option to control the input sound.

The same was true for microphone preamps, software and effects imitating amplifiers when analog tech has been widely used.
Audio gain vs Volume
Many beginners in audio production use the terms gain and volume interchangeably. They are two totally different parameters though.
As we have learned from the definition, gain is the level of input audio. Volume is the level of the output audio.

In audio hardware, volume is just how loud your songs or recordings are being played back in headphones or speakers. By changing the volume, you can’t modify the tone of your recording or impact the way it sounds. With audio gain control software, you definitely can.
What happens, if gain levels are too low (high)?
When gain in audio is too low, unwanted noise may sound louder than your music or voice. As a result, you‘ll get annoying sizzling instead of a clean audio file.
Higher gains usually cause distortion. If you want a clean tone in your audio, definitely try to avoid unreasonably high gain levels.
Each popular audio recording software indicates different gains in colors. Green is the lowest, Red is the highest. Try to aim at the middle or set limitations for gain levels in your software or hardware.
How to control gain in AVS Audio Editor
AVS Audio Editor is an example of audio gain control software for Windows.
Here, you can make the input signal louder or quieter by moving the slider on the Record tab.

If you‘ve already recorded an audio file and want to increase or decrease volume, go to the Effects tab.
Amplification modifies amplitude in your recording to change the sound volume.

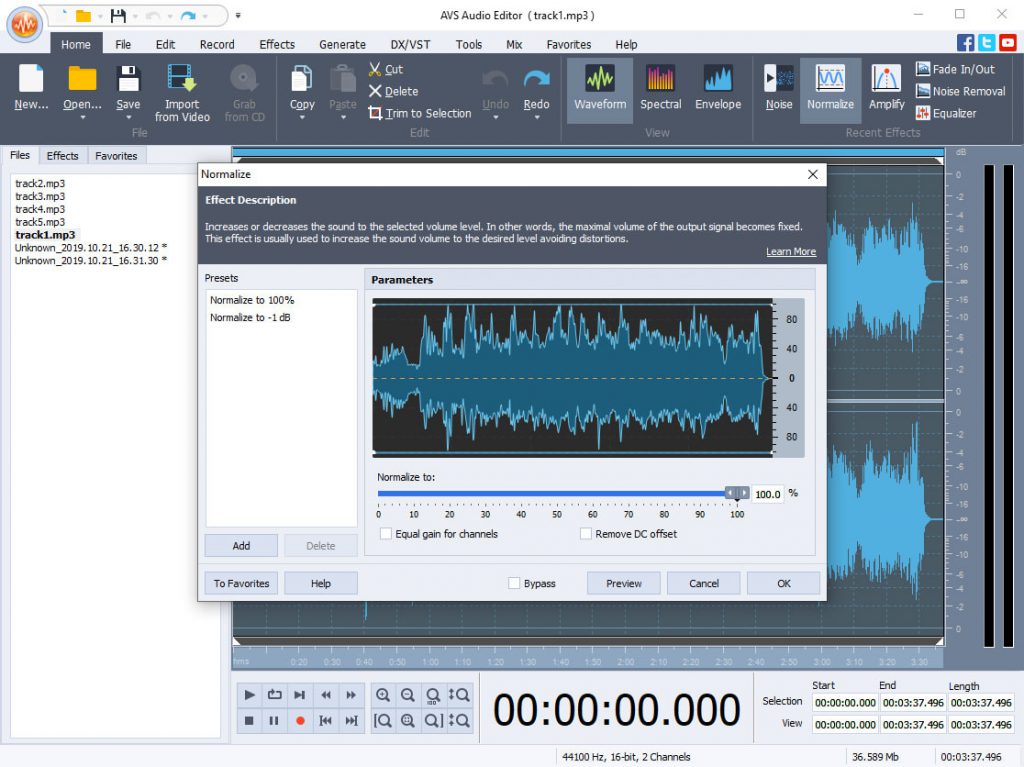
You can also normalize audio. Technically, that means to set limitations for higher volume levels. The output signal isn‘t able to go beyond the specified values.
The effect helps regulate volume of different tracks merged into one.

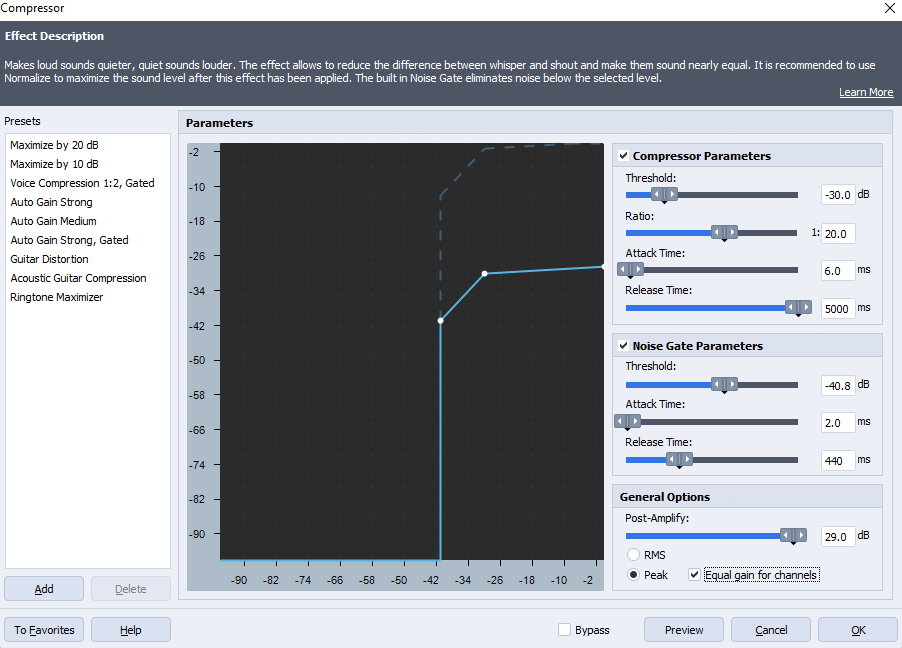
Finally, the Compressor effect with ready-to-use presets makes different volume levels, such as whisper and shout, sound nearly equal.
Discover all options for audio gain control and volume modification in AVS Audio Editor.
The entire AVS4YOU multimedia suite is currently available with large discounts. Save 70% today!
Useful links
What is sound energy (+35 examples from everyday life). Read post
How to remove audio from a video file. Read post
How to add the Echo effect. Read post
How to clean up voice tracks. Read post

This article explains the sound energy without complicated physics formulas.
What is sound energy?
Sound energy is a product of any vibration. Whether speech, trembling guitar strings, or started car engine, any sound can be depicted as a wave using specialized software.
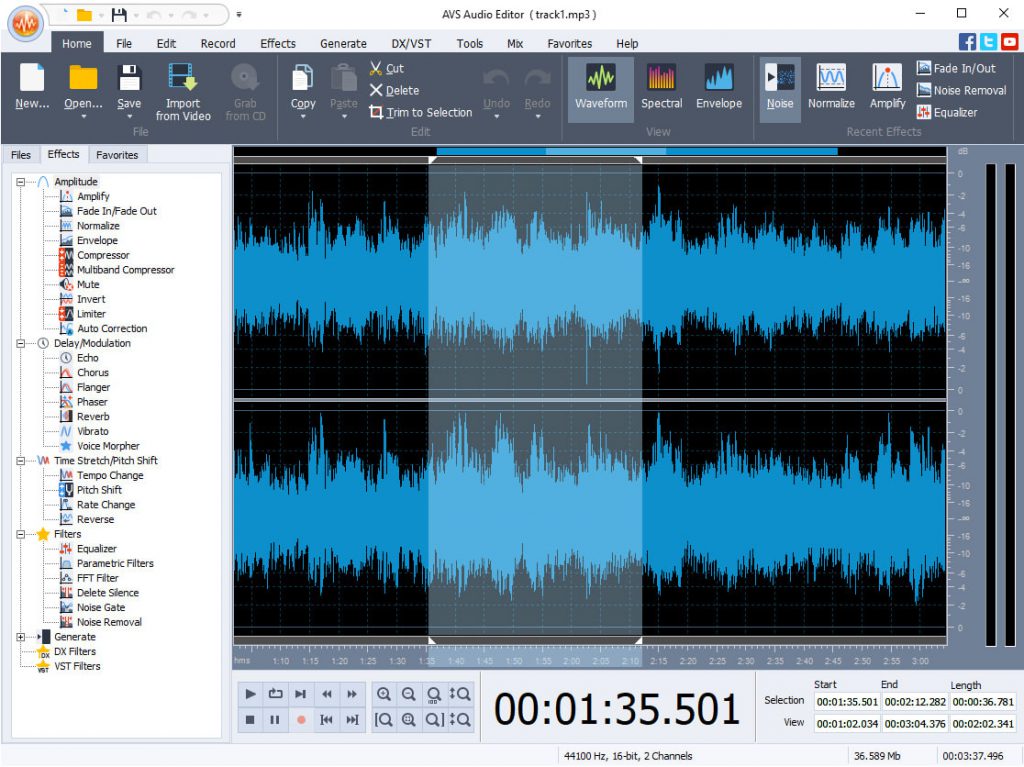
When you upload a song to AVS Audio Editor, the app represents it as a waveform:
Invisible to our eyes, this wave funnels into our ear canals each time we hear a song. In other words, instrumental music and voice were recorded with a microphone and turned into electricity.
The medium where a sound is produced, for example woods or a small room, acts as storage for kinetic and potential energy.
Kinetic energy is a sound itself whenever released.
Example: screaming.
Potential energy describes energy that a sound possesses because of the location where it is produced.
Example: in a small room, your scream will be much louder than in the woods. The potential energy of your scream in a small room is higher.
Sound energy examples
Because sound energy emerges with literally everything that can produce sounds, real-life examples are countless.
At home
Open the tap on the kitchen and hear the water going down.

Now try to fill a glass with water. Sounds different, right?
Here are some other common examples:
- Opening door
- Cat purring..or dog barking
- Vacuum cleaner
- Clock
- Air conditioner
- Shuffling feet
- Cell phone vibration
- Pencil writing
- Mouse clicks
In the nature
One of the best examples here is sea waves. Remember that gentle sea whispering and then a louder splashing the shore?

But nature is full of other familiar sounds, including:
- Rustle of autumn leaves
- Blowing wind
- Rain
- Thunder
- Waterfall
- Birds in the morning
- Snow crunching
From humans
The best example is coughing, which is obviously produced by a vibration.

Among other sounds that people produce intentionally or accidentially are:
- Singing
- Laughing
- Screaming
- Whistling
- Sneezing
- Hiccuping
- Snapping fingers
How do we use sound energy?
There are many ways people can use sounds to make their life safe and comfortable. Let’s look at some examples.
- Vehicle or train horns — they prevent numerous accidents.

- Alarm clock
- Alerts
- Medical ultrasound
- Music
In specialized software like AVS Audio Editor there are many features for slicing ringtones, recording audiobooks, mixing music tracks.
Annoying examples of sound energy
Not every sound is good for hearing. Some of them cause discomfort and even can be dangerous for health.
- Drill is definitely among the most unpleasant noises for a human ear.

- Industrial noise
- Vynil scratching
- Hissing in audio recordings
Such audio defects can be easily fixed in multimedia editors, such as AVS Audio Editor.
Some examples can be used for music or movie production. There are many libraries over the web with such royalty-free audio files, for example on Clipchamp.
Managing sound energy in AVS Audio Editor
In AVS Audio Editor, you can edit songs and recordings, as well as their parameters:
- Cut, trim, split, and merge audio files
- Remove noise, crackling, and hissing
- Improve audio quality
- Regulate volume levels and normalize audio
- Apply 20+ ready-to-use effects to make recordings sound differently
Get AVS Audio Editor today and discover all included features.
The entire AVS4YOU multimedia suite is currently available with large discounts. Save 70% today!
Apple users might consider an audio editor for Mac.
Useful links

Got many Christmas videos and winter landscape photos? Turn them into a memorable movie with the updated AVS4YOU suite.
Here are its main new features.
Yellow Magenta effect
Add brightness to your festive pictures and videos — try the new Yellow Magenta effect:

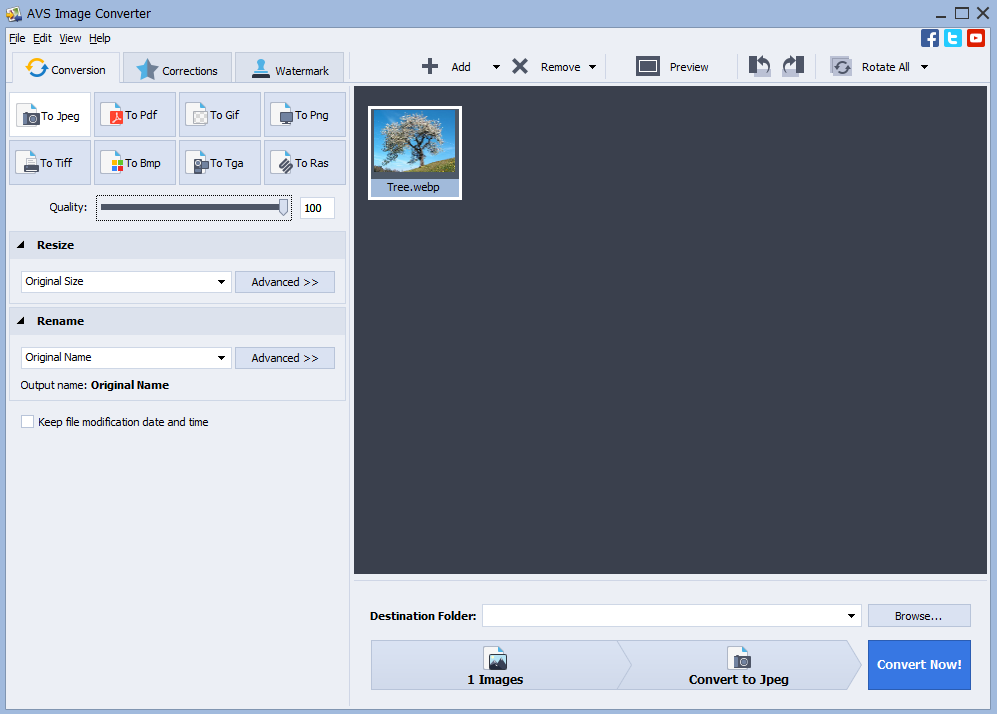
WebP images
Add WebP images to your video projects. This format preserves higher quality at a smaller file size.
WebP support is available for Windows 11, 10, 8, and 7.
Use free AVS Image Converter to convert WebP images to other popular formats (JPEG, PNG, TIFF etc.).
Support of videos encoded with AV1
From now on, you can open AVI, MP4, MKV, and WEBM files encoded with AV1 codec (Intel Core 11 Gen or newer required).
This coding format is royalty-free and perfectly suitable for transmitting videos over the Internet. Read more about codecs.
Improved hardware acceleration
AVS4YOU now supports hardware acceleration for videos encoded with H.265/HEVC 10-bit and 12-bit, and VP9 10-bit.

Intel Core 7 Gen is the minimum requirement for proper functioning. Newer generations of the processor are also supported.
Decoding video files with the H.265/HEVC codec 12-bit requires at least Intel Core 11 Gen.
Restructured presets
We removed some similar and outdated video presets. Now the options are more transparent and easier to find.
There are also improved HD/Full HD presets for Android devices.
Splitting audiobooks into chapters
Free AVS Audio Converter allows dividing MP3 and M4B audiobooks into chapters.
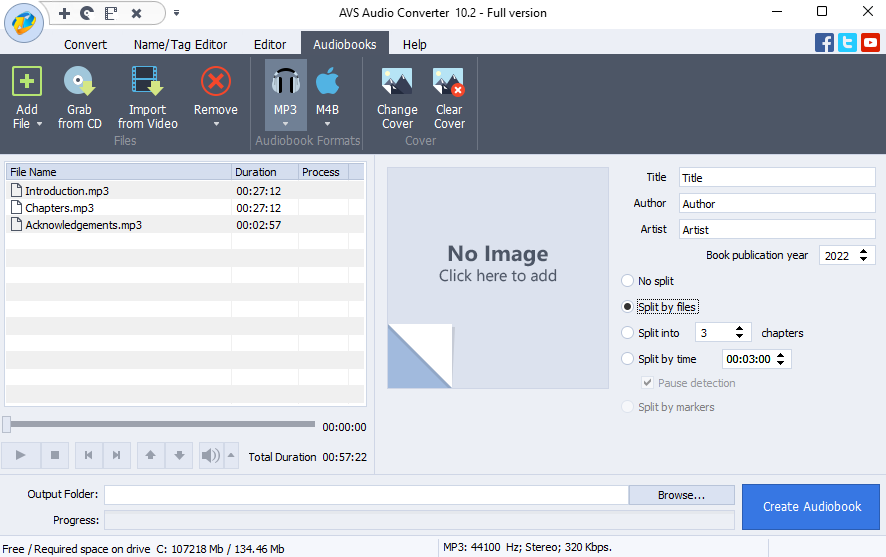
You can split them by markers or create a separate audio file for each chapter (MP3 only).
Proper performance & usability
The update contains extended formats support and major bug fixes for better user experience. Among them are:
- Improved playback of TS, MTS, and M2TS videos with subtitles
- Faster HEIC images processing
- Fixed uncompressed AVI encoding
- Enhanced MP4, M4A, and MOV support
- Windows 11 skin
- Less space occupied by installation files
Upgrade your AVS4YOU today — just click the button below.
License expired?
Save 30% additionally by purchasing the unlimited AVS4YOU subscription! Redeem this coupon code until January 31, 2022: UNLIM2022
Need assistance? Reach out via contact form.

The Internet is prone to data breaches and impersonation — the major British cybersecurity provider IT Governance reports 116 billion cases worldwide in May 2021 only. Your videos are intellectual property, and you definitely do not want them to be redistributed without permission.
How to secure your authorship? One of the most common ways is to apply a watermark. Today we’ll see how to add watermark to video on Windows, Mac, iPhone, Android, and online.
Contents
What is a video watermark and why it matters?
Surprisingly, a watermark has nothing to do with water. You must have seen watermarks on banknotes or postage stamps — they are signs that become visible when light falls on them. These signs verify the authenticity of the banknote and let you know it is not a fake one.
Watermarks in videos are somewhat similar. It is a text or image embedded in a video at some part of the screen. Watermarks are normally semitransparent and remain visible throughout the whole video.
The most common use cases are copyright protection and branding:
Copyright disclaimer. To add a watermark to YouTube videos means to limit their royalty-free distribution and modification. Even if someone embeds your video without permission, your logo or name will be shown on a screen.
Such watermarks are common for stock video platforms, such as Shutterstock.

Promotion. Companies often produce commercials, tutorials, and organize webinars. To increase brand recognition, they put a watermark at the corner of a video.
Some clips need watermarks for both purposes.
Add watermark to video on Windows
AVS Video Editor lets users easily add a watermark to YouTube videos, both in image and text format.
Image with a logo
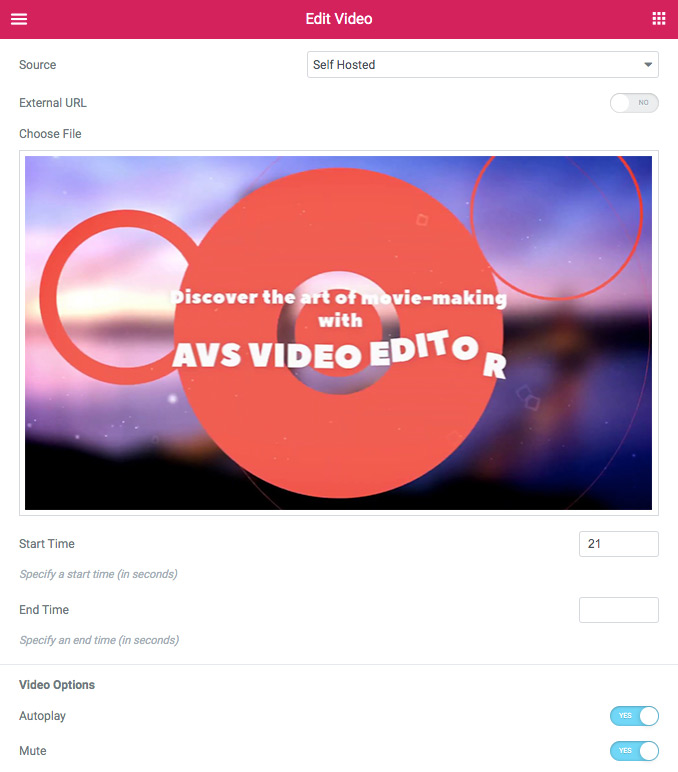
Upload a video to AVS Video Editor and follow these steps.
1. In media library, open the Image category and click the Import button.
2. Select an image you want to use as a watermark and drop it to the timeline.
3. Adjust the duration by moving the borders of a watermark bar to the right and left.
4. Click Edit Overlay and adjust the transparency of a watermark.

Here you can also rotate the image, change its size and position.
5. Save your video.
See each step in the official tutorial:
Text on the screen
Place a clip on the timeline and do the following to add a text watermark.
1. Click the Text button, choose one of the text samples, and drop it to the timeline.
2. Adjust the duration by moving the borders of a watermark bar to the right and left.
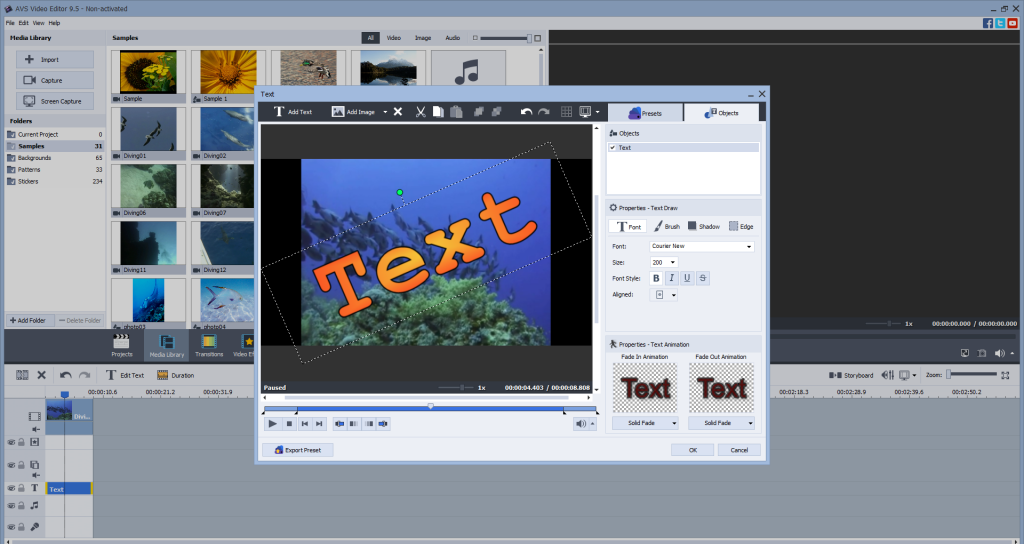
3. Click Edit Text and type your text.
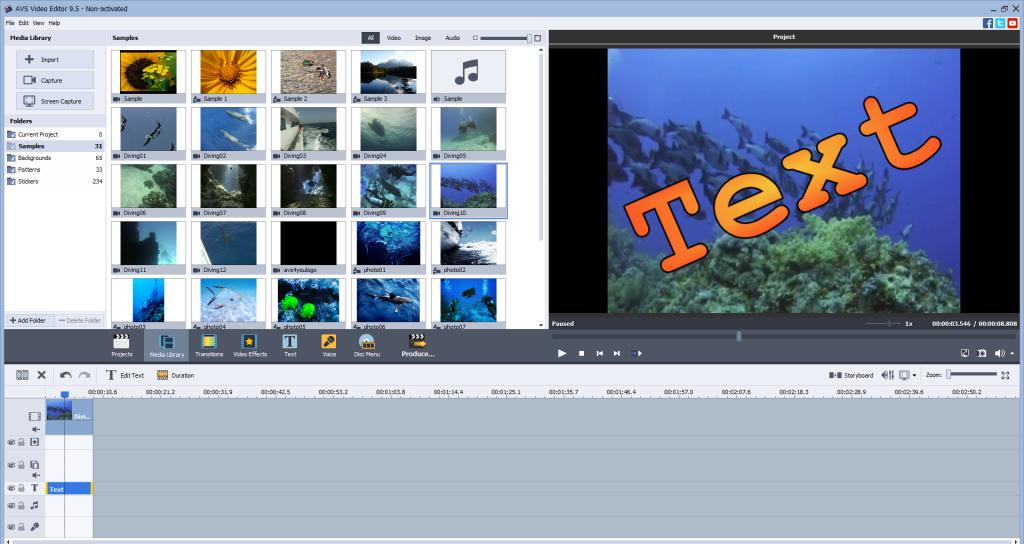
Here you can also customize text properties, including font, size, alignment, etc.
4. Save your video.
See each step in the official tutorial:
Discover all options for text and image watermarks in AVS Video Editor.
The entire AVS4YOU multimedia suite is currently available with large discounts. Save 70% today!
How to add a watermark to video in iMovie (Mac)
iMovie is a free native video editing software for Apple computers and laptops. There’s no dedicated watermarking feature, but you can use the picture-in-picture effect.
Open a clip in iMovie and proceed to the steps for inserting pictures.
- Add an image to iMovie and drop it to the timeline.
- Adjust opacity, starting time, duration, and other parameters of a photo.
- Move the dots on the corners to adjust size and position.
- Save your video.
Text can also be added to protect your clip on Mac.
- Go to Titles and choose a sample.
- Drop it to the timeline and enter your text.
- Customize duration, position, and other parameters of a watermark.
How to put a video watermark on iPhone
With iMovie for iOS, you can also protect videos with watermarks on your Apple mobile devices. Open a clip in the iMovie app and follow these steps.
- Tap the Plus button and add an image as picture in picture.
- Customize the watermark parameters, such as size, position, rotation, etc.
- Save or share a clip.
This tutorial walks you through the entire process:
To add a text watermark on iPhone, just tap the Text button on the toolbar and set the necessary parameters.
Add watermarks to videos on Android
Android users can choose between many third-party apps on Google Play or dedicated application stores to apply a watermark.
That’s how it works in InShot Video Editor & Maker.
- Upload your clip and tap the image button.
- Customize the image parameters, such as size, position, rotation, etc.
- Save a video.
To add text watermarks, just tap the T-icon and enter your text.
How to add watermarks online
Many services let you add a watermark in video online free, for example Veed.io.
- When you have a clip uploaded, click Upload Image, and find a watermark file in your storage.
- Place an image where you need it.
- Export your clip.
This method is simple, but hardly suitable for everyone with a rather slow Internet connection or those who don’t want to expose personal files online.
Closing words
Today you learned how to protect videos with watermarks on every device, including Windows and Mac computers, iPhone, and Android smartphones. Remember, there are also many pieces of worthwhile video editing software with no watermark applied.
Follow the links below to learn how to make your clips look spectacular.
Useful links
Embedding videos: complete guide. Read post
Apply the picture-in-picture effect. Read post
Make blurry videos clearer. Read post
Add pictures to a video. Read post

Want to learn how to convert file types of videos? It is easier than you think — today we’ll walk you through the whole process on Windows, Mac, iPhone, Android, and even online.
Contents
What is a file type and why change it?
In this article, we use the terms video file type and video format interchangeably. From the technical standpoint, it is the parameter of a file that determines the image and audio quality, memory consumption, compression type, codecs, etc.
Video formats have different extensions. They are a few letters you see after the file name and a period. Common examples are MP4, AVI, MKV, MOV, and others. Do not try to rename a file or change its extension— that won’t convert a video format.
Some video file types are royalty-free. That means they can be used without paying fees to the intellectual property owner. Others are proprietary and have compliance requirements for distribution.
These are the most common reasons to change video file type.
- Large file size. AVI and MP4 files can possess many gigabytes on your computer. They are too bulky for emails, streaming and sharing online. You can embed a video or reduce file size before sending.
- Low compatibility. Not all devices support any video file type. Many people use converters to turn the native Apple’s format MOV into the omnipresent MP4.
- Poor quality. Video formats have different resolution, aspect ratio, frame rate, and other parameters that influence the overall quality. With multimedia software, you can make blurry videos clearer, improve the image of a clip, and make a movie fit for larger TVs.
- Extract audio. Audiophiles prefer to listen to live concerts, especially when they are recorded in an authentic quality. Conversion is the way to save a live show as a song or create your audiobooks.
- Make GIFs. Animations are still a fun alternative to emoji today. You can create a GIF by changing video file type.
In the table below, you can compare the most popular video formats.
Video file type | Description | File size* | Quality |
MP4 | — International standard | ≈ 35 MB | High |
AVI | — Proprietary | ≈ 200 MB | Very high |
MKV | — Royalty-free format | ≈ 30 MB | High |
WMV | — Native Microsoft’s format | ≈ 12 MB | Normal |
FLV | — Developed by Adobe | ≈ 75 MB | Normal |
MOV | — Lossless | ≈ 650 MB | Very high |
AVCHD | — Professional high-definition videos | ≈ 210 MB | Very high |
WEBM | — Royalty-free format | ≈ 3 MB | Relatively low |
*The values are approximate. The actual video file size depends on many factors, such as resolution, codes, frame rate, audio quality. We tested lossy and lossless 1920×1080 clips with 24 fps.
Now you’re familiar with some common video formats, their pros and cons. Let’s try to change video format on various platforms.
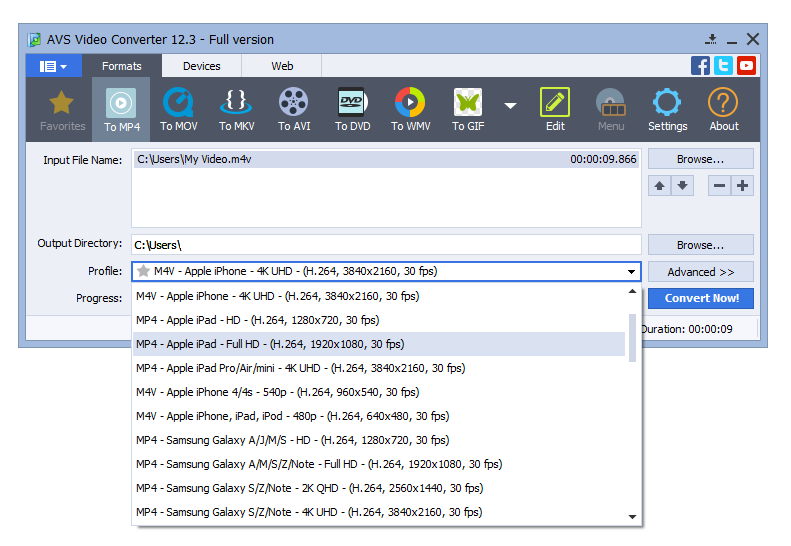
Change video file type on Windows
Free AVS Video Converter is one of the best ways how to change video file type on Windows 10 and other versions. You can convert a clip to another format or extract an audio track.
How to convert video format in Windows 10
- Upload a file to AVS Video Converter.
- Choose the output format on the main toolbar, for example AVI.
- Optional. Open Profile and apply the desired parameters for a video from the dropdown list.
You can select presets for devices like iPhone or Samsung Galaxy, services like YouTube or Vimeo, or just choose the necessary video and audio quality.
- Click Convert now!
By clicking the Open folder button after conversion, you’ll find an output video file.

Get AVS Video Converter free of charge:
This tutorial demonstrates how to change type of video file in Windows 10 using AVS Video Converter:
You can turn a simple clip into the DVD format and create the professional disc to watch on a TV screen. With AVS Video Editor, adding a menu for a future DVD is also possible.
See how to change video extension in Windows 10 and make the clip fit for your TV:
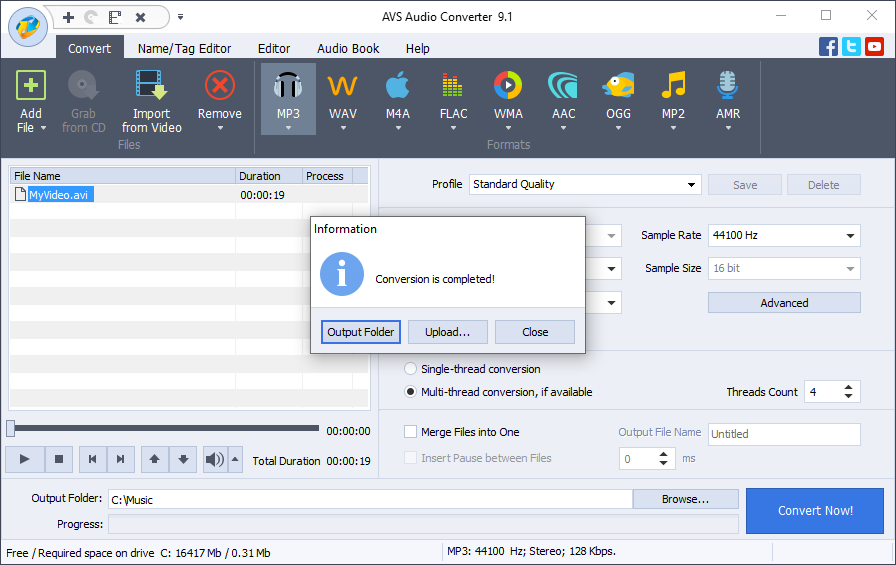
Change a video file to audio
AVS Audio Converter is a free app for making audio files from live concert recordings and talks.
- Upload a clip to AVS Audio Converter.
- Choose the desired audio format, for example MP3.
- Open Profile to choose the appropriate quality.
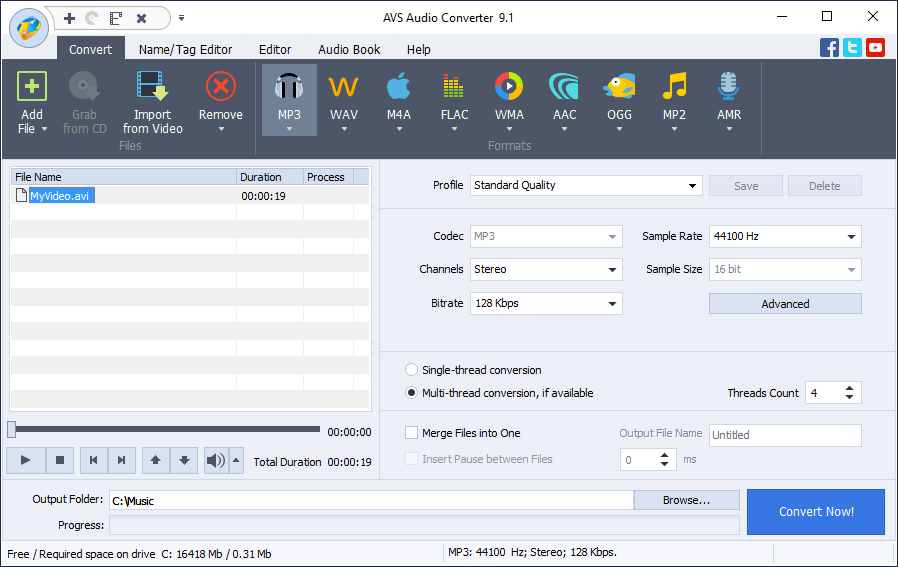
You can also customize sample rate and size.
- Click Convert Now!
By clicking the Output folder button, you’ll find a new audio file.
Get AVS Audio Converter free of charge:
The entire AVS4YOU multimedia suite is currently available with large discounts. Save 70% today!
How to change video file type on Mac
iMovie is a free native video editing software for Apple computers and mobile devices. Here, you can export MOV and M4V clips to widely supported MP4.
- Open a clip in iMovie for Mac.
- Go to File → Share → File.
- Edit the settings for quality and resolution, if necessary. Click Next.
- Choose where to save the output MP4 clip and click Save.
In this tutorial, you can see how to change video format from MOV to MP4 using iMovie on Mac:
If you need to turn clips into other popular formats, third-party converters in the App Store may do the trick.
To save an audio track from a clip in iMovie, follow the first two steps but set Format as Audio Only. Your file will be saved as M4A audio.
M4A is not supported everywhere, but you can convert M4A to MP3 free.
How to convert format on iPhone
iMovie has somewhat limited functionality on Apple’s smartphones and tablets. To convert clips, you need a third-party app, such as Video Converter: Format Editor.
- Select your input file.
- Choose your output video or audio format, e.g., AVI or MP3.
- Click Convert.
The app is free, but offers in-app purchases. You can choose among multiple alternatives from other vendors, or transfer the clip to a PC and convert it using the appropriate software.
How to change format on Android
Android users can choose between numerous converters on Google Play or dedicated application stores.
That is how to change video format on Samsung and other popular smartphones with Video Converter by Inverse.AI.
- Upload your clip to the app.
- Choose the desired video or audio format, e.g., AVI or MP3.
- Click Convert.
The output file will be saved on your mobile device. You can choose among multiple alternatives from other vendors, or transfer the clip to a PC and convert it using the appropriate software.
Change video extension online
Many free services over the web let you change video file type online, for example Veed.io.
- Choose the input and output file types.
- Upload a clip.
- Click Convert File and download the result.
The official tutorial demonstrates how it works step-by-step:
This method is simple, but hardly suitable for everyone with a rather slow Internet connection or those who don’t want to expose personal files online.
Some popular output formats are often unavailable in online converters.
Closing words
Today you learned how to convert video file types on every device, including Windows and Mac computers, iPhone, and Android smartphones. Some platforms provide native software, but there are many more free video converters with no watermark where you can change clip format.
Check handy tips on producing different types of video content in the links below. Intros, overlays, presentations, slow motion, and clips with stunning music.
Useful links
Make an impressive YouTube intro. Read post
Apply the picture-in-picture effect. Read post
Convert a PowerPoint presentation to a video. Read post
Create slowed down videos on any platform. Read post
Add soundtracks to clips. Read post
What does it mean to embed a video? This question is sometimes confusing for beginners in content making. In this article, we‘ll learn why you really need to embed YouTube clips on your website or blog, in socials, office files, and emails instead of simply uploading them from the desktop.
Below you‘ll also find illustrated step-by-step guides on how to embed a video on popular online platforms, mail messages, text files, and presentations.
Contents
What does embedding a video mean and why it matters
Embedded clips are useful for anyone working with content, particularly for SEO and digital marketers. This method of sharing clips will help you deliver better visual quality, save storage and comply with requirements on email services, spare time for manual uploading.
What does it mean to embed a video? Simply put, it is a piece of code with a link to a clip hosted on some sharing platform, such as YouTube. It is generated automatically on each service and looks like this:
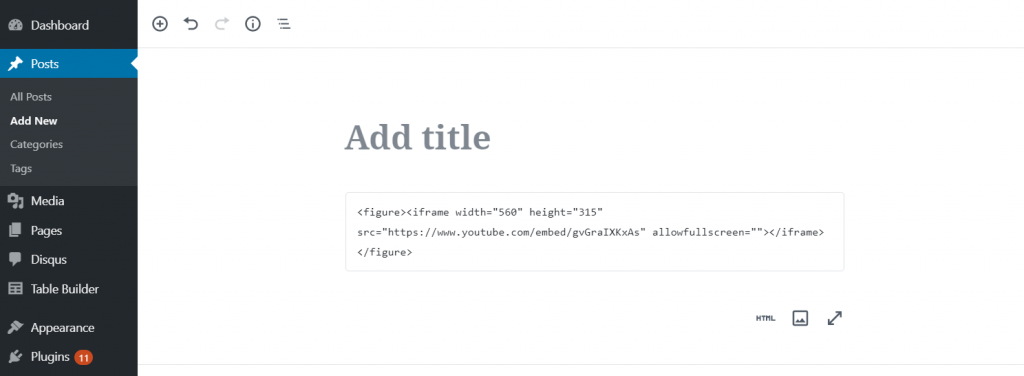
You don‘t necessarily need a third-party platform to store clips. If you have a content management system (CMS) like WordPress, just add a video to your media library and embed it using a third-party tool, e.g. Elementor.
Visitors of this page will be able to play a clip by clicking the thumbnail. Here‘s what it looks like in a draft:
That is all about the technical perspective of the subject. But what does embedding videos do for your website? Why is it necessary?
Improved SEO
One of the priorities for any content maker is search engine optimization (SEO) that positions your website or blog on the first page of search results against the required keywords. Search algorithms of Google are not subject to disclosure but experts recommend embedding YouTube clips and images from external sources to promote an article. Another important factor of ranking is the thumbnail of the embedded video — it can improve searchability and the overall look of the clip.
New traffic from socials
By embedding a video from YouTube, Facebook, or other popular video hosting platforms, you win traffic to the source channel. This parameter improves your social media marketing even if you focus on your website.
Saved storage
When you embed a video hosted on a sharing platform, you save storage space on the computer. Large AVI and MP4 files can possess many gigabytes of a hard disk drive.
Higher visual quality
Uploading a clip from a computer will compress the file resulting in its poorer visual quality. Embedding a video is the best way out if you want to deliver the best viewing experience and make the content more competitive.
Less time spent drafting an article
Embedding means just copying and pasting the code of a video to the HTML text of your article on WordPress or elsewhere. Hence it is much quicker than simple uploading. No fast Internet connection or advanced HTML skills are required.
We learned why embedding videos is important. Let us see how it works on popular platforms for sharing clips.
How to embed a video on your website
Today you‘ll find lots of video hosting platforms where you can upload clips for further embedding into your website or blog. In this paragraph, we‘ll give an overview of the four services that are most widely known.
From YouTube
With over a billion users watching videos daily, YouTube is the second most visited website in the world. It is free and familiar to most Internet users. Anyone can sign up and start uploading clips or streaming in real time right away.
- Open the desired video on YouTube.
- Click Share and specify the starting time, if needed.
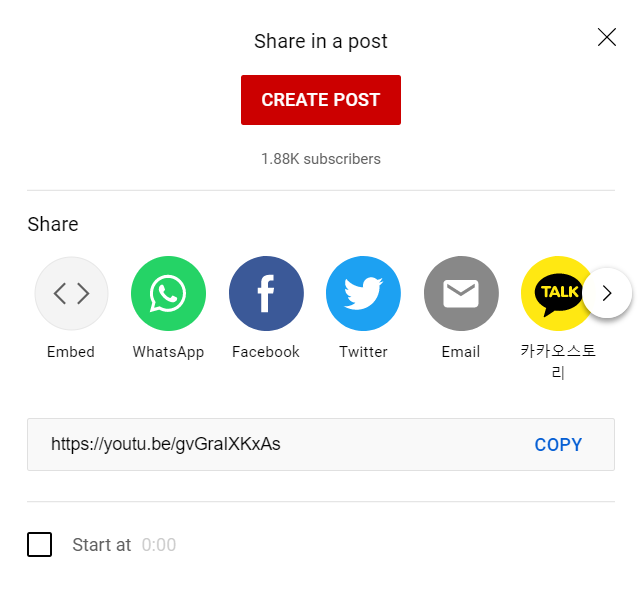
- Click Embed and copy the code on the right side.
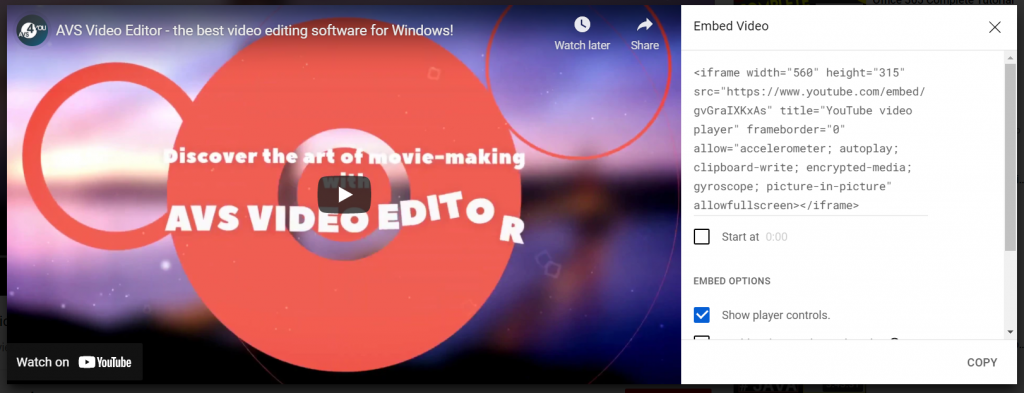
- Paste the code to the HTML text of a web page.
From Vimeo
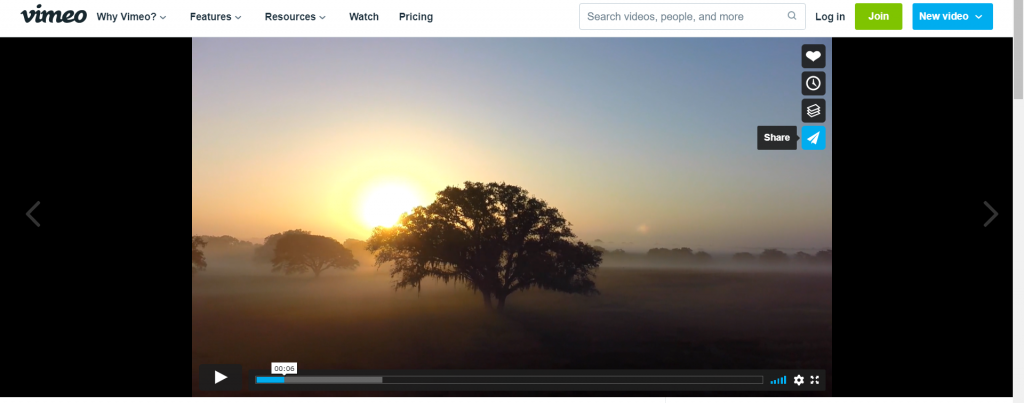
Another big online video sharing platform Vimeo has an audience of more than 230 million people. Creators have to register and choose one of the pricing plans that provide various volumes of storage and streaming capabilities. Vimeo engages professional filmmakers and does not contain ads.
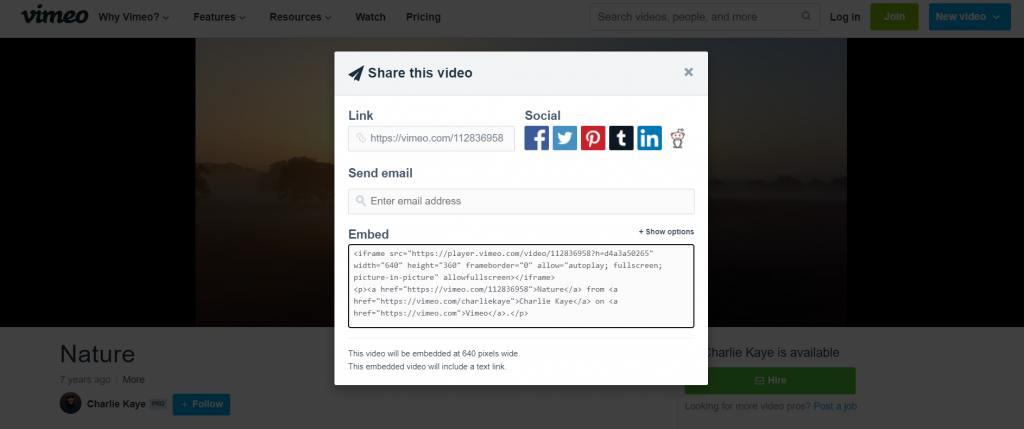
- Open the desired clip on Vimeo.
- Click Share on its right side.
- Copy the code and paste it to the HTML code of an article.
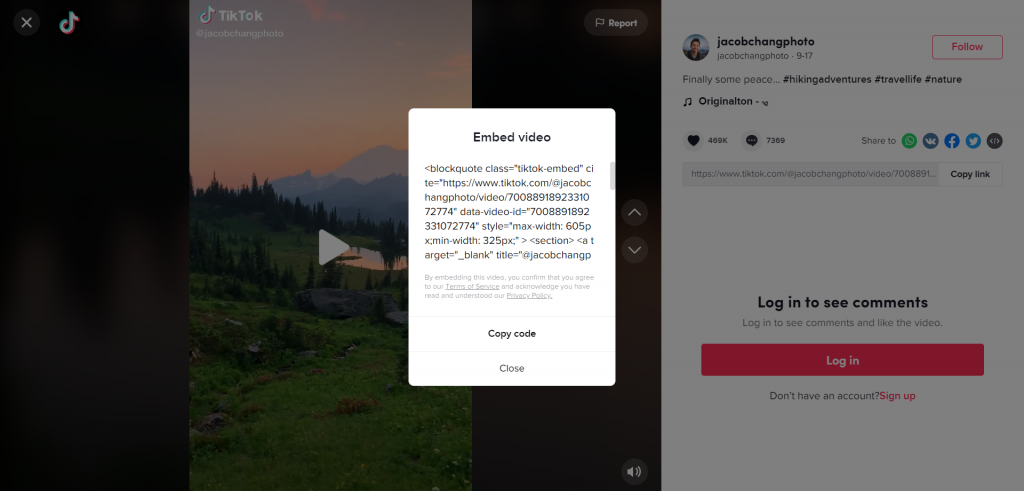
From TikTok
TikTok is a young booming video sharing service. Users post shorter clips often with music and additional text. Many vids became viral in 2020 and brought content makers high income. TikTok is free and mostly visited from mobile devices.
- Open the desired clip in the TikTok app.
- Tap the Embed button in the right area.
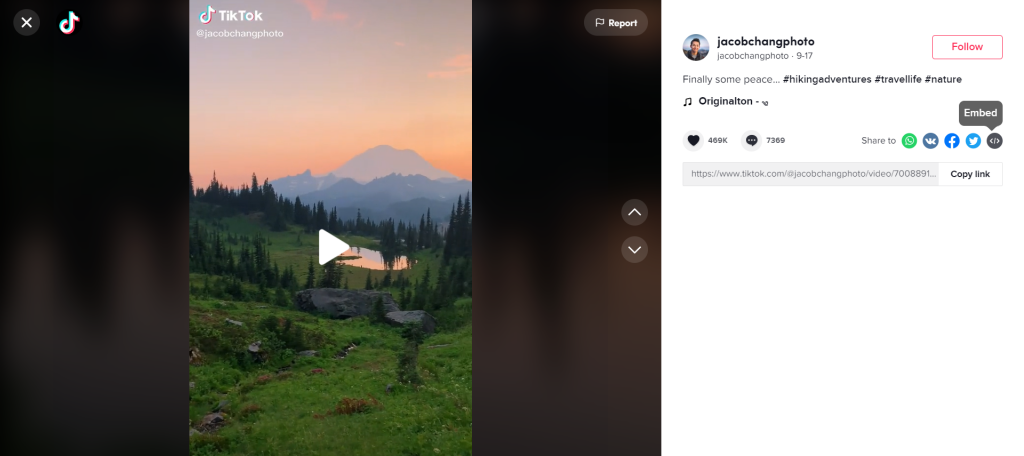
- Copy the code and paste it to the HTML code of an article.
From Instagram
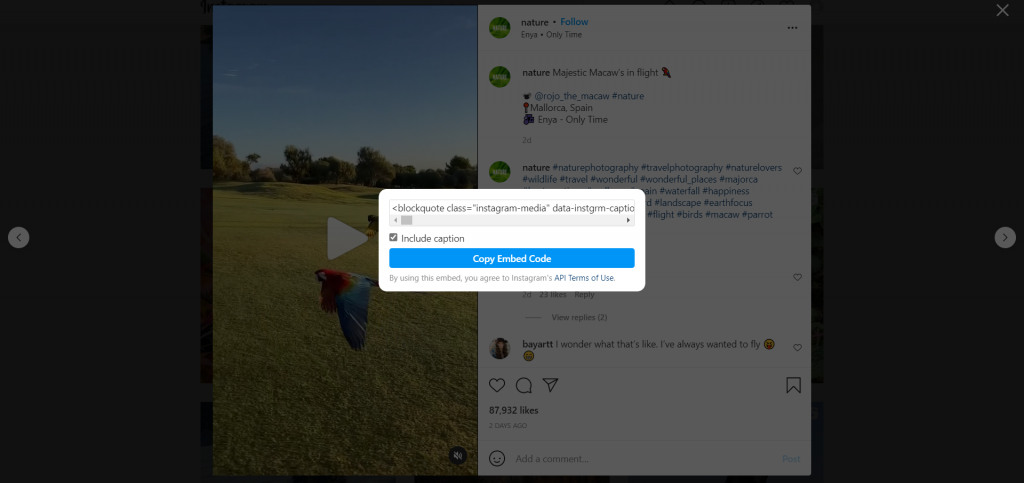
Instagram is where people create and share photos, videos, stories, and even messages. Many creative businesses choose the network as their number one promotion channel, for example, flower delivery or coffee houses. Instagram photos and videos can be embedded into your website or blog.
- Open Instagram in a web browser and find the desired clip.
- Click the three dots at the bottom right of a video.
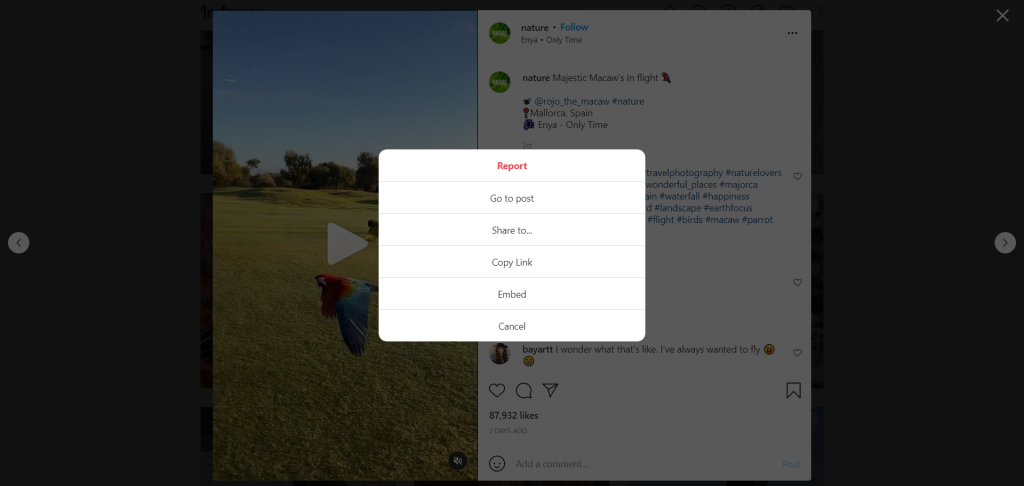
- Click Embed.
- Copy the code and paste it to the HTML code of an article.
From Facebook
This social network is mostly about people interaction and communication rather than videos. However, one of the most consumed content on Facebook is still videos. The behavior of watching videos here is different from those on other platforms.
- Open the desired video on Facebook.
- Click the Ellipsis button on the right-side panel.
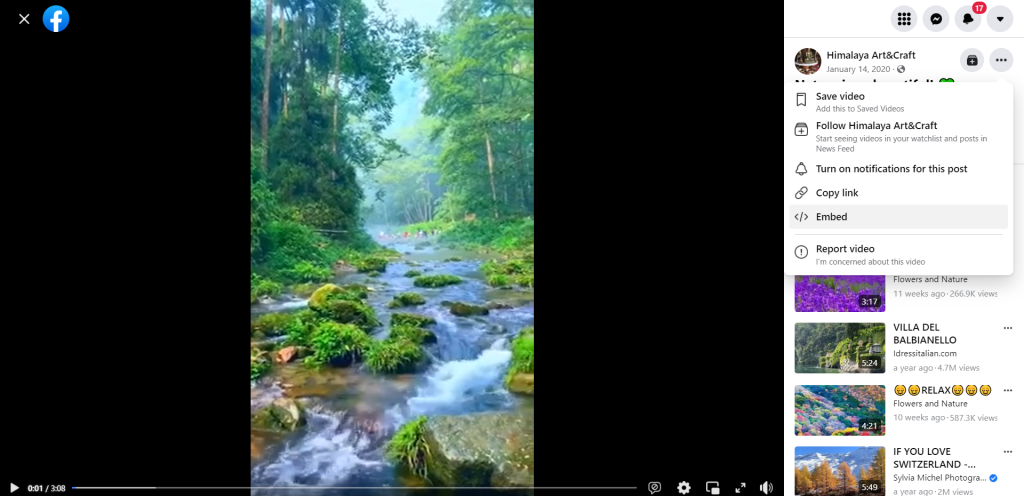
- Click Embed and specify the starting, if necessary.
You can also share the video with a source and description — just activate the checkbox nest to Include full post.
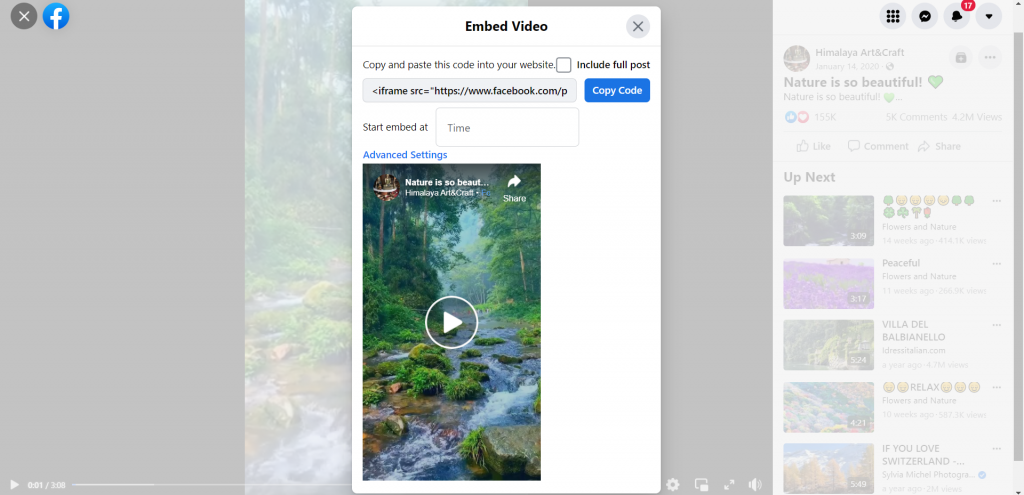
- Copy the code and paste it to the HTML code of an article.
As you can see, the different interfaces of popular online video sharing platforms have similar ways to embed a clip into your website or blog. All you need is simply copy and paste the code to a content management system like WordPress.
How to embed a video in social media
Another use case of video embedding is sharing clips on social networks. In most cases, it is easier than embedding in blogs and on websites.
Still one of the most visited social platforms, Twitter allows exchanging shorter messages with media files, namely images and videos.
- Open a video on a sharing platform, e.g. YouTube.
- Click Share and copy the URL of a video.
- Paste it to your post.
The clip will be embedded in the feed. Another way is to post to Twitter right from YouTube.
- Open a clip, click Share and choose Twitter.
- Edit the description to the post, if needed.
Watch this tutorial to see the process of embedding a video on Twitter step-by-step:
As we mentioned above, Facebook can also be used as a video sharing platform. That is, many people simply upload clips to their accounts. But what if you want to embed a YouTube video to Facebook feed?
- Open a video on a sharing platform, e.g. YouTube.
- Click Share and copy the URL of a video.
- Paste it to your post.
The clip will be embedded in the feed. Another way is to post to Facebook right from YouTube.
- Open a clip, click Share and choose Facebook.
- Edit the description to the post, if needed.
Watch this tutorial to see the process of embedding a video on Twitter step-by-step:
Sometimes you may want to add some videos to your portfolio or share an interesting case with LinkedIn contacts.
- Open a video on a sharing platform, e.g. YouTube.
- Click Share and copy the URL of a video.
- Go to your LinkedIn post, find and click a small box with a plus sign next to one of the paragraphs.
- Choose Video and paste the URL in the corresponding field.
In this tutorial Dane Golden from HEY.com shows how to embed a YouTube video to a LinkedIn post:
Tumblr
This microblogging website allows posting multimedia and share it to friends. Embedding a YouTube video to Tumblr will add view counts to your channel.
- Open a video on a sharing platform, e.g. YouTube.
- Click Share -> Embed and copy the coding.
- Paste the code into the Embed a video section on Tumblr and choose Create Post.
This social news aggregator includes thousands of communities where people discuss everything from politics to gardening.
- Open a clip, click Share and choose Reddit.
- Choose a community, where the video should be embedded.
- Click Post.
Watch this tutorial to see how you can embed a YouTube video in Reddit:
Medium
Medium is not really a social network, rather paid blogging platform where experts exchange their opinions and how-to articles.
- Open a video on a sharing platform, e.g. YouTube.
- Click Share and copy the URL of a video.
- Paste it to your post and click Enter.
Embedding a video is simpler in social media, the process is similar in each network. It attracts traffic to your channel and forwards content to subscribers over the large scope of socials.
Embedding a video in email
Email is still one of the primary communication channels in the business. Many email services have rather strict limits on the size of attachments. Most likely you won‘t be able to attach an MP4 file lasting half a minute.
No matter if you use Gmail, Yahoo!, Apple Mail, or other services, just copy the video URL from the sharing platform and paste it to the body of your message.
Recipients won‘t be able to view a clip from the mail service. They need to open YouTube or other source platforms via the link in your message. Nevertheless, this method helps send larger video recordings.
How to embed in office editors
Whether it is a digital catalog or a presentation, you may want to embed a video into an office file. Most popular suites provide such capability.
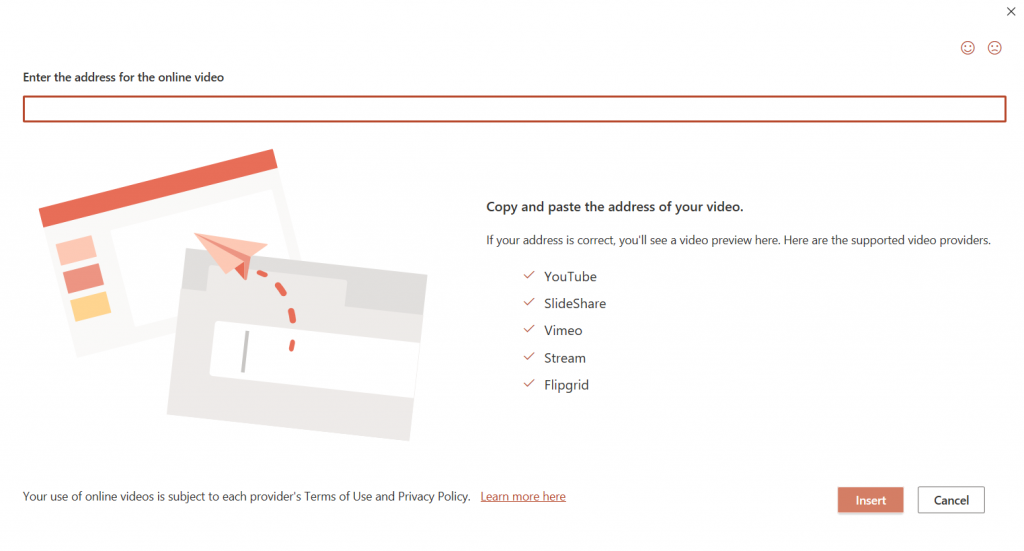
Microsoft 365
Microsoft Word and PowerPoint let you embed videos from PC, library, and online platforms.
- Open a text document or a presentation.
- Go to the Insert tab.
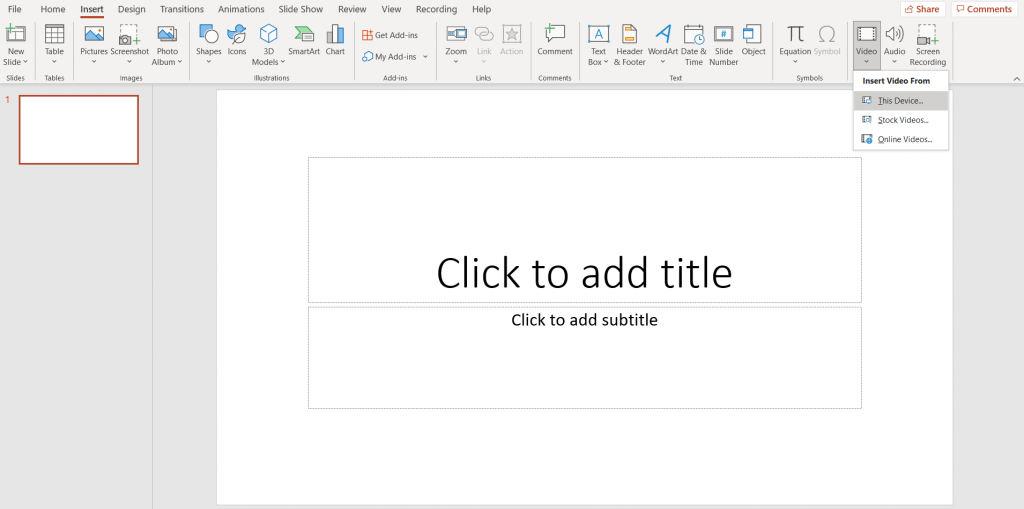
- In text documents, click Online Videos and paste the URL.
In presentations, click Video -> Online Videos and do the same.
Google Docs
Free online office suite by Google also supports embedding videos.
- Open a text document or a presentation.
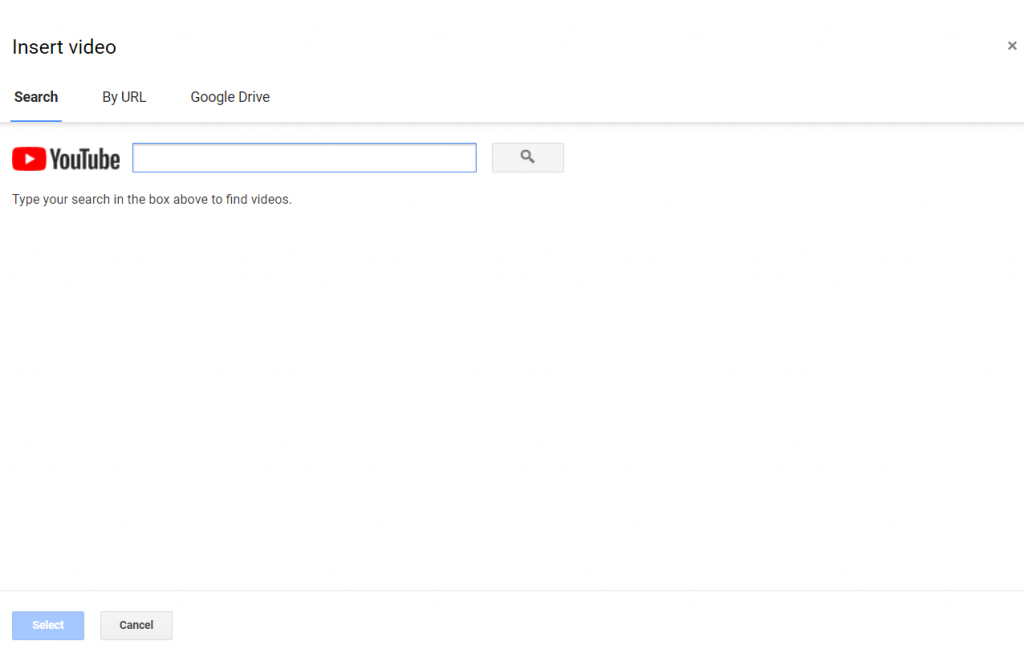
- Go to the Insert tab and choose Video.
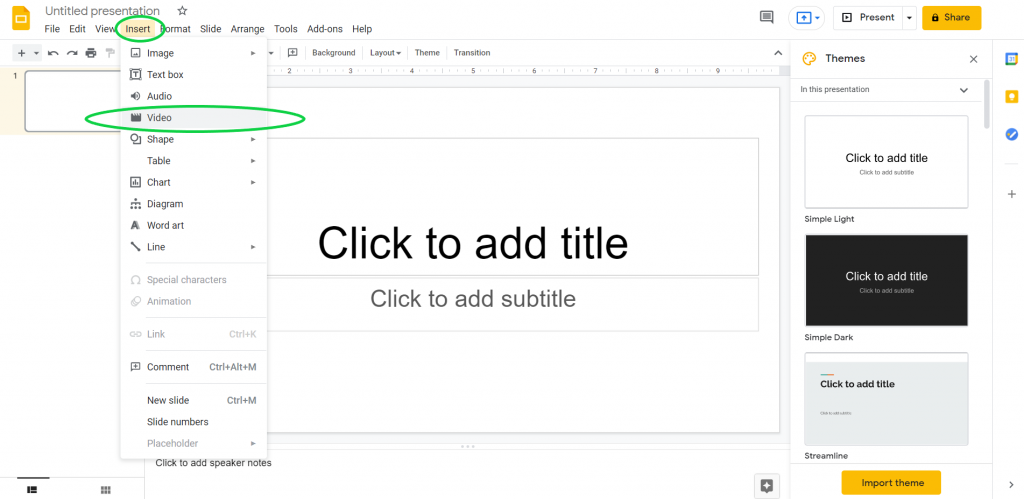
- Search the desired video on YouTube. Alternatively, switch to By URL and insert a link to your clip.
ONLYOFFICE
This office suite provides desktop document editing on Windows, Linux, and macOS for free.
- Open a text document or a presentation.
- Go to the Plugins tab and choose YouTube.
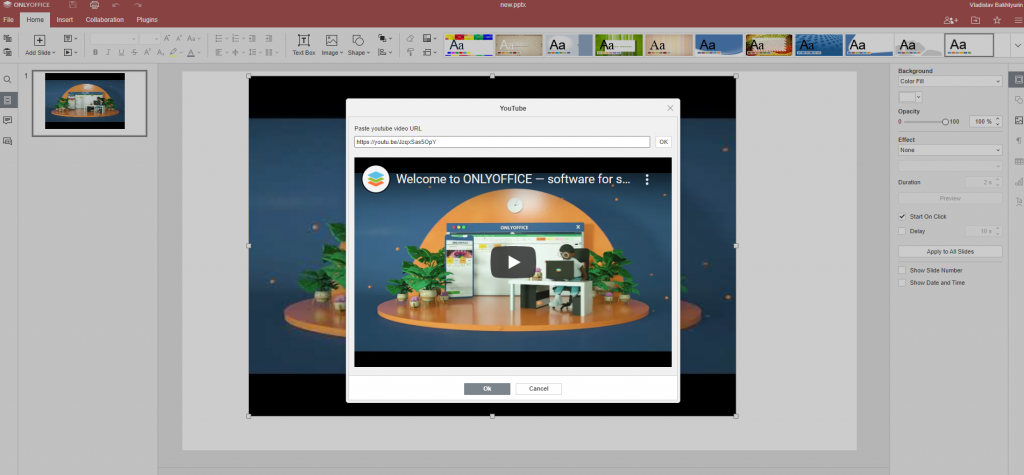
- Enter the URL of a preferred YouTube video.
Keynote
All Apple devices have the pre-installed free office software on board, including presentation editor Keynote.
- Open a file in Keynote and go to Insert —> Web Video.
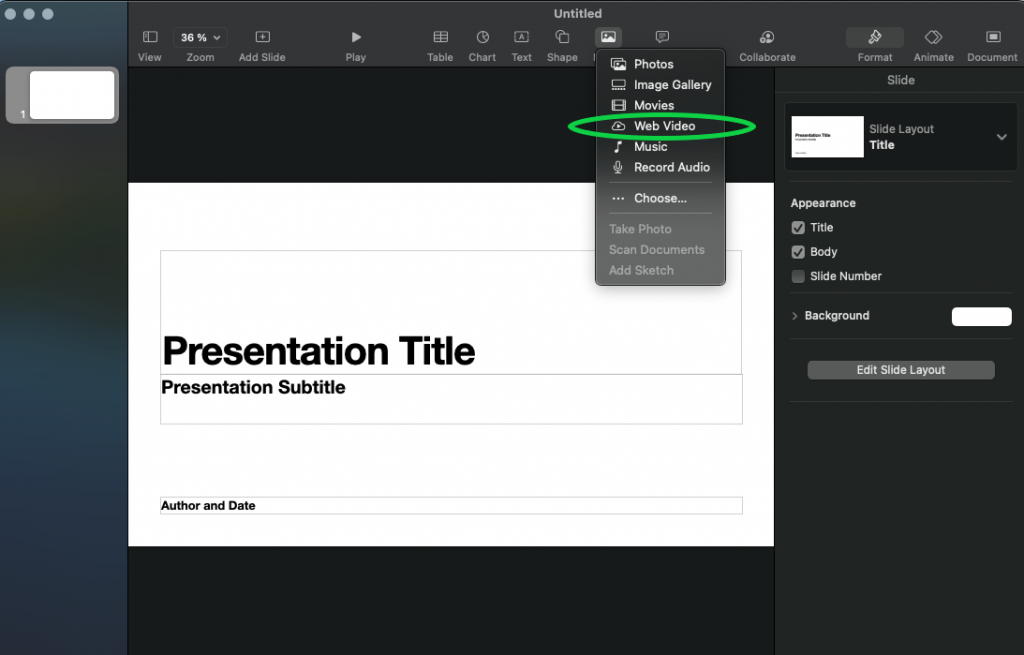
- Enter the URL of a preferred YouTube video.
Embedding videos in office suites is another method to share larger clips per email. A text document or presentation with embedded videos is much more manageable in size.
Final words
In this article, we learned what does embedding videos mean and how to do it on websites, blogs, social media, emails, and office editors.
It will help you improve website SEO, win YouTube traffic, send larger video files, spare storage place on a computer, and time for uploading.
In the useful links below, you‘ll find handy tips for making and posting YouTube and Facebook clips.
Useful links
What is YouTube native editor? Read post
Best YouTube editor alternatives in 2021. Read post
How to make a YouTube intro. Read post
How to make a spectacular Facebook clip. Read post
How to reduce video file size. Read post

In the past, video production was about high-end equipment and big budgets. Nowadays, effective video production is more about the video production process and using your video editor to its fullest potential.
Keeping up to date with video production trends helps you to create timely and quality content. In this article, we’ll review current video trends and how to achieve them by using the video production software of your choice.
Contents
Demand for videos to be posted on online platforms
Due to the pandemic, many people choose (and are required) to stay at home. So it is no wonder that they’re turning to online platforms for entertainment. TikTok revealed in a CNBC article that it has 1 billion active global users. The pleasant and convenient nature makes it obvious why people are eager to keep watching online videos.
To keep users engaged with online content, video editors, video producers, and content producers should offer a variety of content with exceptional value. This is possible with the help of the best video editing software with an intuitive interface, various tools, and sharing options.
AVS Video Editor is a video editing software online which boasts features enabling you to produce professional-looking videos with its color correction settings, video stabilization, chroma key effect, and HD video formats. Apart from these creative tools, AVS Video Editor lets you publish your creative work on YouTube, Vimeo, and other video hosting websites or social networks.
Demand for various video lengths
In Cisco’s 2021 forecast, streaming and downloading internet video was expected to take a large share of bandwidth and growth of up to more than 81% of all consumer Internet traffic. This “internet video” traffic includes short-form Internet video (e.g., YouTube), long-form Internet video (e.g., Vimeo), Internet video to TV (e.g., Netflix), online video purchases and rentals, webcam viewing, and web-based video monitoring.

Even with the rise of Tiktok and ephemeral stories, the statistics shows that long-form videos are still part of the big picture of video production. If you are a video producer, this leaves you lots of room to experiment with different types of video content. It could be a 2-minute video, a 15-second Instagram Story, or even an episode lasting 30 minutes.
Every platform has its own set of rules, which means that your content needs to be formatted accordingly to accommodate the different social media platforms. AVS Video Editor is your best bet for this. Its web file parameters allow users to adjust the video for Vimeo, Facebook, Flickr, or iOS and Android devices. With this feature, repurposing and cross-posting on different platforms will be hassle-free. In terms of trimming, cutting, and cropping parts of your video, it will be a breeze with AVS as it has an easy-to-use timeline where you can click, drag, and trim clips.
The art of silent video
Since the internet is flooded with videos uploaded every minute, most people prefer not to watch videos on social media with sound on as they mindlessly scroll. Facebook and Instagram users can turn off autoplay audio for all videos in their settings. Hence, there is a great need to create accessible videos.
One way to make your content accessible is by providing captions or subtitles. Moving captions encourages viewers to pay attention as it is an interactive element.
Additionally, captions are helpful for users who scroll on silent and the hearing impaired. Based on World Health Organization’s statistics, over 5% of the world’s population has hearing needs.
So you wouldn’t want to ignore this segment of your viewership.
Video editing online made it possible to develop accessible content for various groups of users. That said, you should be on the lookout for video editing software that lets you add captions to videos with ease. In AVS Video Editor, you can insert captions easily with just a click and by dragging on the working area.
To bridge the gap for visually impaired users, you may also use AVS Video Editor to add custom backgrounds with neutral colors or create contrast. To customize a background, you have to upload a picture or a video. Drop it to the corresponding line on the working area, and this will be the new background of your video already.
Rise of remote video productions

In the wake of the global pandemic, companies are still eager to make videos. This led to remote video production becoming increasingly popular as this is the only way to produce videos safely.
The top concern for remote video productions is coordination. The process likely starts with planning the content, followed by the negotiations and the shoot itself. The point is that this process can be lengthy, complicated, and stressful. One thing that you can tick off early from your remote video production concerns is finding a video editor that suits the needs of your crew despite the restrictions on in-person gatherings. Each team has its respective points to consider in video editing software.
Money making in videos
There’s one thing that will remain abundant in 2021: video content. One graduate school paper tackled how today’s internet world has changed from the previous decades. Video creators have various ways to generate revenue from videos.
Right now, live streaming is taking center stage, shoppable videos are on the rise, and vloggers continue to make a constant stream of income out of producing videos. In an era when video monetization is booming, it encourages video producers, editors, and creators to be more creative and to up their games.
Finding the best video editing software that works for you is part of this equation. You also have to find people with the relevant experience or skills depending on the type of content you want to produce. Let’s take history as your niche. If history is your niche, then you must have people on your team with a history degree. All it takes is to manage your team and keep yourself updated on the current videos that are being monetized and pinpoint what specific editing tools you need to achieve such content.
More educational content
Over the last decade, there has been an increase in the use and production of educational videos. With the continuing disruption by the pandemic, students are increasingly consuming this type of content. For educational content, it is best to use animations, transitions, and video elements to capture the students’ attention.
AVS Video Editor is worth considering as it is packed with many editing tools that you can use to add a picture to a video for explaining purposes. You can also use it to add music to YouTube videos by just importing your audio. Additionally, you can choose from its library containing 300+ effects and transitions.
Put these trends into action
The above-listed trends are just some of the many uprising trends in video production. Considering the current scenario, may you be inspired to rethink your approach in video production, incorporate these trends, and see how it will work for your endeavor. Catching up with these trends shouldn’t cost you much. It can be overwhelming to choose from the vast array of editing software available online, but the only way to move forward with this is to have a thorough look at its features. Try AVS Video Editor with its advanced editing functionalities and put these video trends to use.
Whether you want to create a split-screen clip with multiple frames played back simultaneously or to shoot a clip for YouTube demonstrating e.g. gaming process in the main area and yourself in a smaller window at the corner, you need to apply picture-in-picture. This effect is based on video overlay. In this article, you‘ll learn how to add a clip on top of another clip.
Contents
Why overlay a video on a video?
Before we review the tools for adding picture-in-picture effect in solutions for Mac, Windows, iOS, and Android, let us think of some common scenarios for choosing this functionality.
- Reaction video. As the name suggests, it is a clip where you react to something, e.g. a horror movie. Viewers must see the subject content on the main screen, whereas your window can be placed at the corner.
- Game review or walkthrough. That can be a pre-recorded video or live streaming on Twitch, where you complete missions in a game and comment on each one. Viewers can still see you in the window at the corner.
- Software tutorial. Somewhat similar to game walkthroughs in the universe of software. The audience can see the working area and the speaker at the same time.
- Unpacking video. In such clips, you demonstrate opening anything, e.g. a smartphone. Many people watch them when considering a purchase. The picture-in-picture effect is also widely used here.
- Multi-screen clip. The collage of two or more videos shown on the same screen simultaneously.
- Simulated Zoom conversation. That could be an idea for a humorous clip about remote work or study.
- Collaborative video. Make a clip with you and your friends singing a song together — even if each of you records a separate video.
This list is not an exhaustive one and can be extended with your unique ideas. Fortunately, most multimedia editing suites offer functionalities to create a video overlay.
How to overlay videos in iMovie
If you have a Mac, you can use native multimedia editing software iMovie to add a video overlay. The suite is free and easy to start with for non-professionals.
- Open a clip and click the Video Overlay Settings button.

- Choose Picture in Picture in the left-side drop-down menu.

- The clip appears in the background — now you can move and resize it.
- Click the Apply button to save changes.
That is how to add a video overlay in iMovie on Mac. If you need to apply the picture-in-picture effect on an iPhone, read the corresponding guide further in this post.
How to add a video overlay on Windows
Most popular multimedia editing suites worldwide provide Windows users with the necessary tools to make overlays for clips.
AVS Video Editor is one of the best options if you want to learn how to overlay two videos together on Windows 11 and previous versions, including Windows XP and Vista.
- Choose a clip and put it on the timeline.
- Open Media Library —> Video. Click import to add your clips.
- Place the file to the Overlay line.
- Move and resize a clip on the screen to your liking.
Watch this tutorial by one of our users to see how to make video overlays on Windows:
Get AVS Video Editor today to test the picture-in-picture effect and other features!
How to overlay videos on iPhone
iPhone lets you make clips using the front and back cameras simultaneously. As the result, you have a ready-to-share video overlay — no post-editing needed!
Learn more in this tutorial by CNET:
For everyone, who has already taken two clips separately and wants them to be played back on the same screen, iMovie provides corresponding editing capabilities for Apple smartphones and tablets. That is how to overlay videos in iMovie on iPhone or iPad.
- Place the first clip on the timeline.
- Tap the Plus button to choose the second clip.
- Tap the Ellipsis button to choose the overlay type: a small window, a half of the screen, or replace the background completely.
- Go to Overlays to change the type.
This short tutorial will walk you through the whole process of how to overlay two videos on an iPhone or iPad.
Have a desktop editing solution? Transfer the clip to your Windows or Mac computer to edit it and add an overlay.
How to overlay a video on a video with Android
Similarly to iPhone, Android smartphones allow dual recording. In this method, both front and back cameras shoot at the same time and a video overlay is filmed initially. No further editing is needed.
Here is how it works on Samsung devices (Vlogger Mode):
The functionality may perform differently on the devices from other vendors. Check the provided user guides for your smartphone or tablet.
Here is how to create a video overlay in Image & Video Overlay from multiple clips recorded separately.
- Open the first clip in an app.
- Tap the button at the bottom center to upload an overlay clip.
- Move and resize a clip as needed.
In this intro video, the developer shows the simple way of how to overlay one video over another on Android.
Google Play offers many alternative third-party apps to make video overlays on Android of various versions. You can also transfer the clip from your Android smartphone to Windows and Mac computers to work on them in popular editing suites.
Closing words
Now you know how to overlay videos in iMovie, on Windows computer, iPhone, or Android smartphone. Share the result with your friends and check the useful links below to find handy tips for awesome clips.
Useful links
Add a picture to a clip on Windows, Mac, and mobile. Read post
Make blurry clips clearer. Read post
Zoom in clips on PC and Mac. Read post
Free video overlays. Download
Get the latest update of AVS4YOU software. Download

Videos do not always look flawless, especially when filmed using a smartphone and without additional equipment. Every sudden movement can make clips look blurry. Want to make the visual part of your movie clearer? This article is right for you.
Note that our post is not about color correction. If you want to learn how to make dark videos brighter and clearer, read this guide.
What are blurry videos and how to avoid blurriness?
By blurring, we understand the process when some parts of a video are out of focus and become therefore scarcely visible. This can be a result of unexpected and fast movements when filming a clip without the proper equipment.
Sometimes you don’t need to make a blurry video clear and can even apply the tilt-shift effect in multimedia editing software to achieve blurriness. This is usually done when you want to make a focus on a particular part of a video, take macro pictures, or disable some confidential information in a clip, such as vehicle registration plates, passwords in software tutorials, etc.
In this post, however, we want to learn how to edit a video to make it clearer. These best practices will help you film a clip that will probably not require fixing.
Check the focus. Calibrate your lens and make sure the autofocus functions the way you expect it to. Direct the camera to the objects or people you want to film and wait a couple of seconds until it is ready — you will recognize it by a clear image without vague elements.
Use additional equipment. Lenses for landscape photography elevate the overall quality of your clip, tripods eliminate shaky videos, good lighting facilitates the calibration process. With this equipment, your clips will need less editing afterward.
Shoot in well-illuminated places. Excessive light or darkness both lead to poor color balance and vague parts in clips. Find the balance before making content.
Enable high resolution. Make sure your camera does not use lower resolution settings by default. Configure resolution to enhance the video quality.
Clean the lens. The most obvious, but true-to-life tip is to be scrupulous about hygiene, even when it comes to cameras. Clean your lens with a specialized wet wipe to avoid blurriness.
But what if you’ve already taken a nice video and it still contains vague elements? How to make a blurry video clear? There are apps to do it yourself on iPhone and Android smartphones, Mac and Windows computers.
Quick tip: individuals and companies that have many footages and not much time to edit them might consider video editing services.
How to make blurry videos clear on Android
Above 70% of mobile devices worldwide have Android as an operating system. Therefore, many videos are taken on smartphones from popular vendors, such as Samsung, Huawei, Xiaomi, etc. Users can choose between many third-party apps to fix blurry clips on Android.
Here is how to make a video look clearer with Alight Motion — Video and Animation Editor.
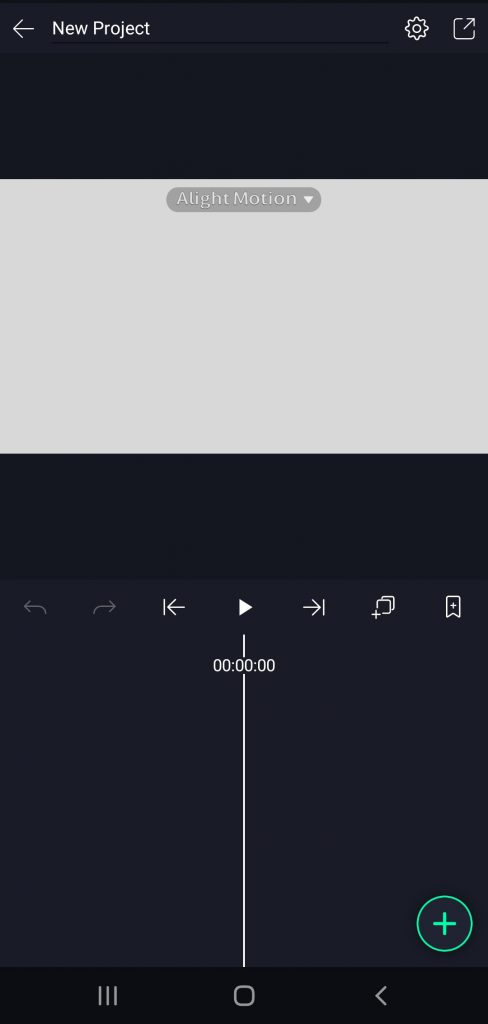
Step 1. Open the app and tap the Plus icon at the center to start a new project.
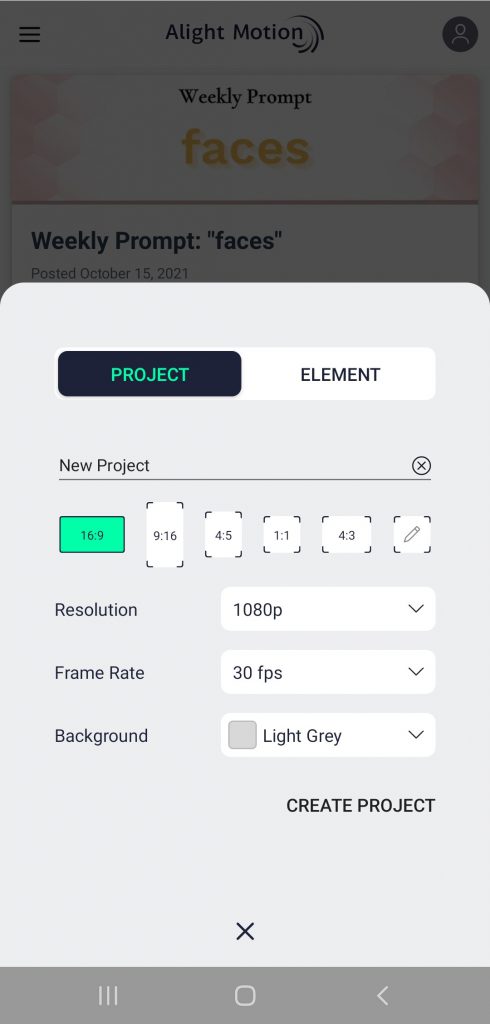
Choose the desired resolution, frame rate, and background for your project.
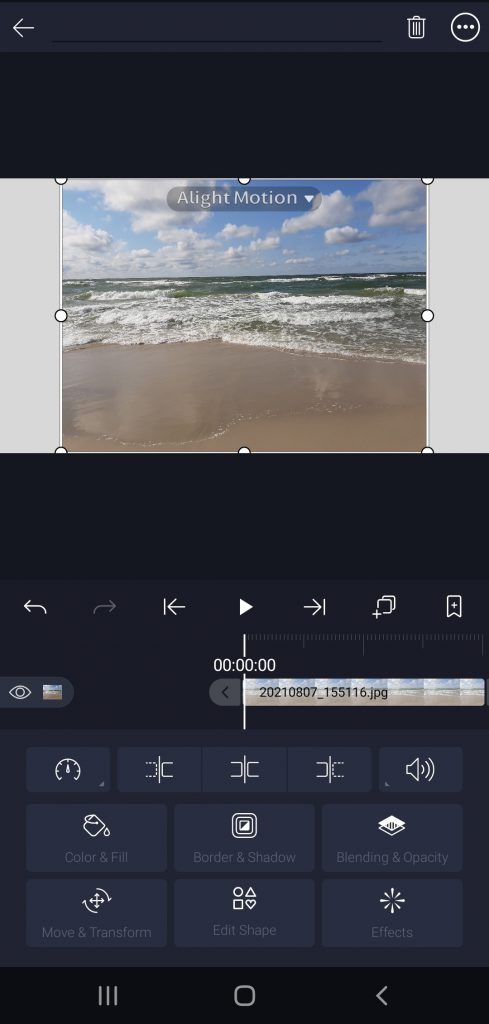
Step 2. Tap the Plus icon at the bottom left corner and switch to Image & Video to upload a clip.
Step 3. Tap Effects -> Add effect -> Blur and choose Sharpen.
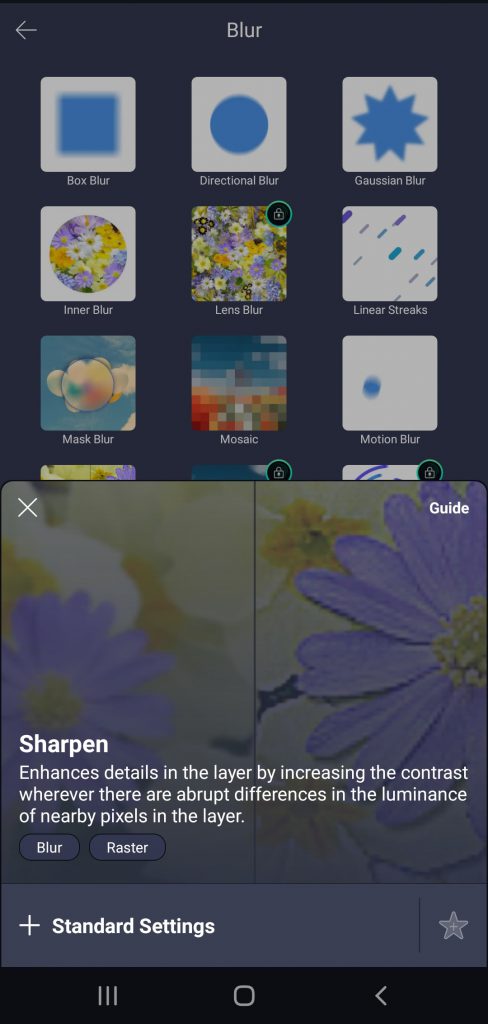
Use standard settings for the effect.
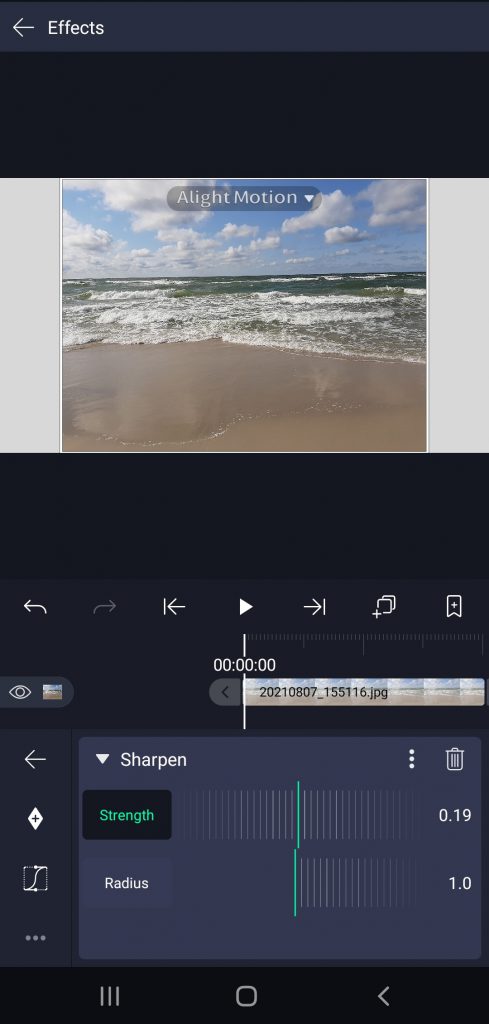
Step 4. Regulate the strength and radius of sharpening by moving the corresponding sliders.
Google Play offers many alternative third-party apps to make videos clearer on Android of various versions. You can also transfer the clip from your Android smartphone to Windows and Mac computers to work on them in popular editing suites.
How to make a video clear on iPhone / iPad
There are enough forum discussions on the Internet where people ask how to make a blurry video clear on iPhone. Unfortunately, there’s no native sharpening tool for iOS devices in iMovie.
But you can use third-party apps to fix a vague clip, such as InShot Video Editor.
Step 1. Open the app and upload a file.
Step 2. Tap Adjust to see the full range of available effects.

Step 3. Choose Sharpen.
Step 4. Regulate the intensity of the effect.
Have a desktop video editing solution? Transfer the clip to your Windows or Mac computer to edit it and make it clearer.
How to make a blurry video clear on Mac
That may sound strange but currently iMovie for Mac doesn’t have sharpening capabilities as well. Fortunately, we can install third-party software with such tools.
One of the best options is Adobe Premiere Pro. Here you can easily make a blurry video clearer on Mac in a couple of minutes!
Step 1. Open Premiere Pro and upload a file.
Step 2. Go to the Effects tab at the left bottom corner of the screen. Open Video Effects -> Blur & Sharpen -> Sharpen.
Step 3. Drag’n’drop the effect to the timeline.
Watch this detailed tutorial by Phil Ebiner to learn how to make videos clearer on Mac without iMovie.
Adobe provides customers with a full-stack multimedia suite, but you can also purchase Premiere Pro separately for $20.99 per month. The solution is used by filmmakers in studios internationally, but it is hardly affordable for anyone who just wants to make a blurry video clearer.
How to make a blurry video clear on Windows
Many popular multimedia editing suites for Windows 11 and previous versions let you make blurry videos clear by using sharpening. Here’s how it works in AVS Video Editor.
Step 1. Open AVS Video Editor, upload the clip, and place it on the timeline.
Step 2. Go to Effects and choose Sharpen. Add the effect to the corresponding line.
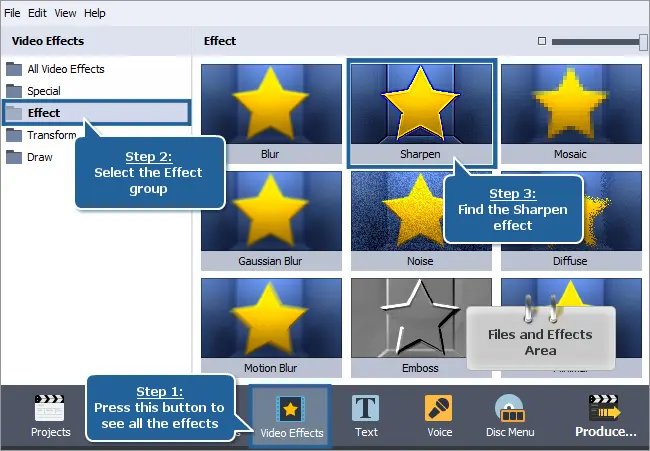
Step 3. Move or extend the effect bar to change the application area and duration.
Here’s how the image looks like before and after applying sharpening.


Step 4. Right-click the effect and choose Edit Effect. Regulate the size and coarseness of sharpening with the corresponding sliders.

Get AVS Video Editor today to fix blurry videos on Windows 11 and previous versions!
AVS Video Editor is one of the best editing software for Windows 7, 8, 10, and 11. The app is also supported by previous versions Windows XP and Vista.
Closing words
Now you know how to make blurry videos clear on a mobile device and computer. Check useful links below to find handy tips for awesome clips.
Useful links
Zooming in a video on PC and Mac. Read post
Slowing down a video online, on Windows, Mac, and mobile. Read post
Improving clips in AVS Video Editor. Read post
Tips for making cinematic clips. Read post
Get the latest update of AVS4YOU software. Download