Category: Без рубрики
Speeding up a video is a very common and indeed simple task, if you have good software. This article gives you a hint on how to make your clips faster on Windows.
How to speed up in AVS Video Editor (all Windows)
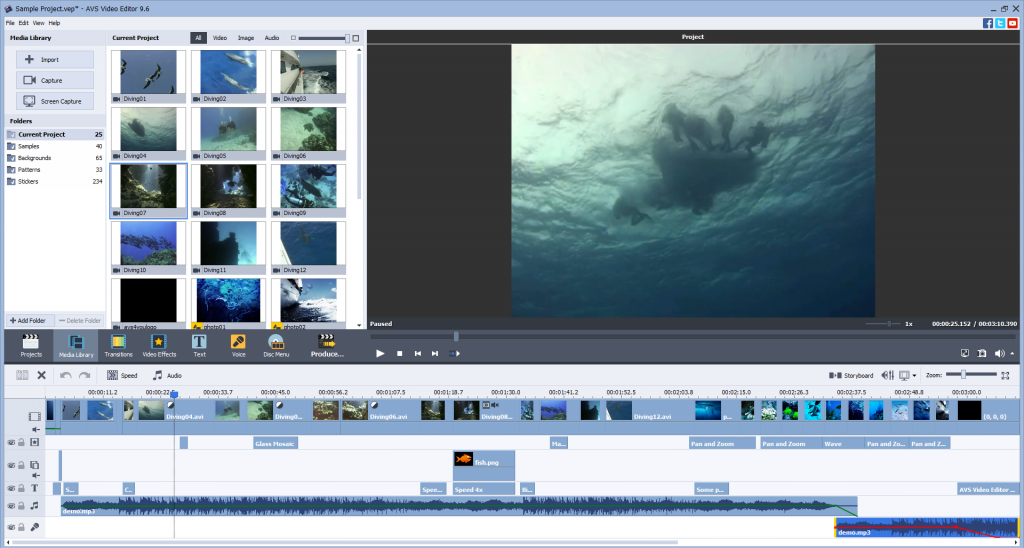
AVS Video Editor is a stable app for editing movies that works on older Windows versions (XP and Vista) and newer ones up to Windows 11. Speeding up video playback here is pretty straightforward.
- Upload your file and drag‘n‘drop it to the timeline.
- Select your clip on the timeline.
- Click the Speed button.
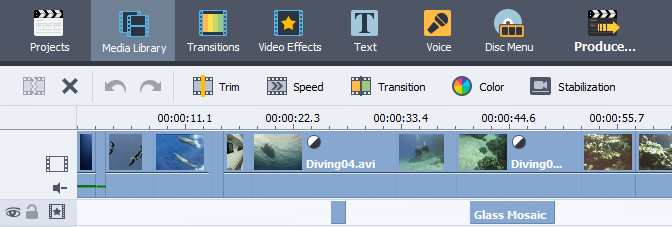
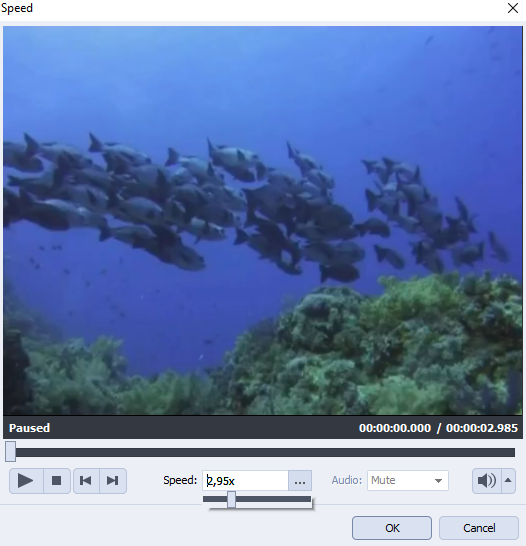
- Adjust the speed of your video with a slider. Higher values result in a faster playback.
Easy, right? This is just one of numerous features for easy video editing on your Windows computer.
Try AVS Video Editor today:
The entire AVS4YOU multimedia suite is currently available with large discounts. Save 70% today!
How to speed up with Movie Maker (Win 7 and older versions)
On Windows 7 and previous versions, you can double up the speed of your video. Here are the steps:
- Put the clip on the timeline.
- Go to Tools —> Video Effects.
- Choose Speed Up, Double.
Officially discontinued in 2017, Movie Maker has been replaced by Video Editor in Windows 10 and Clipchamp in Windows 11. If you have one of these OS, refer to a corresponding guide below.
How to speed up in Video Editor (Win 10)
This is a successor of Movie Maker in Windows 10 and the process of changing video speed is quite similar.
- Drag‘n‘drop a clip on the storyboard.
- Click the Speed button under the video preview.
- Move the slider to the right before reaching the desired speed.
This method is easy and free, but isn‘t relevant for any version of Windows.
How to speed up in Clipchamp (Win 11)
Unexpectedly, Microsoft has introduced Clipchamp as a default app for Windows 11. The most disappointing news was perhaps that some features require a paid subscription ($9/mo).
Still, you can make your video 2x/4x/8x/16x as faster in Clipchamp.
- Put and click your clip on the timeline.
- Click Speed and set it as Fast.
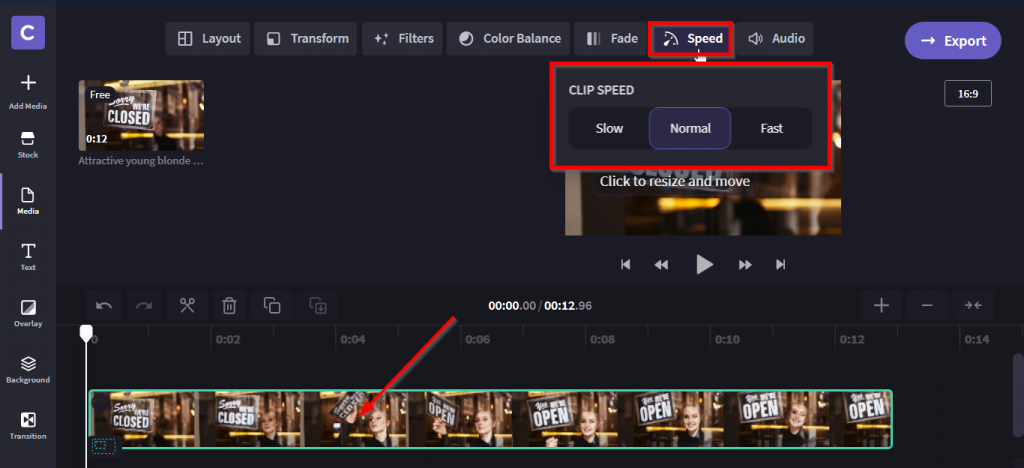
- Regulate the acceleration using the slider.
Besides, you can change video speed and duration online with Clipchamp, but in this case you‘ll want a stable Internet connection.
How to speed up in Windows Media Player (all Windows)
Users that have Windows 7 and later versions can use Windows Media Player to watch videos at a custom speed. This method doesn‘t affect video files though — they will be restored to the default state whenever you quit the app.
Here‘s how to play a clip faster:
- Open a video in Windows Media Player.
- Right-click on the app and go to Enhancements —> Play Speed Settings
- Move the slider to make the playback faster or slower.
Important: some people can‘t find the media player on Windows 10. Watch this guide to see how to access it:
How to speed up with Adobe Premiere Pro (all Windows)
Adobe Premiere is an app for professional movie editing. Used in many video production companies from all continents, it provides you with virtually endless editing capabilities, including video playback acceleration.
- Place and right-click a clip on the timeline.
- Choose Clip Speed / Duration.
- Enter the value in percents. Higher percentage results in a faster speed.
Also, you can check this step-by-step guide from the Adobe team:
While Premiere Pro is brilliant for big-budget movie production, it‘s way too expensive for a simple speeding up a video. Make sure you‘ll need at least some of the advanced features before purchasing ($20.99/mo).
Speeding up a video on Windows is available in any movie editor for this operating system. This is a basic editing feature — consider more from our guides below.
Useful links

Want to learn how to reverse audio online, on desktop, or in the popular social media channels? Our easy guides from this post will show you around the best ways to do that on various platforms.
Reverse audio on desktop (Windows / Mac)
Popular desktop applications allow seamless audio editing even without Internet connection.
AVS Audio Editor
In AVS Audio Editor, you can reverse audio files on Windows 11, 10, 8, 7, and even older versions, such as Vista and XP.
- Upload a file.
- Select the part you want to reverse or the entire track.
- Go to Effects tab and click Reverse.
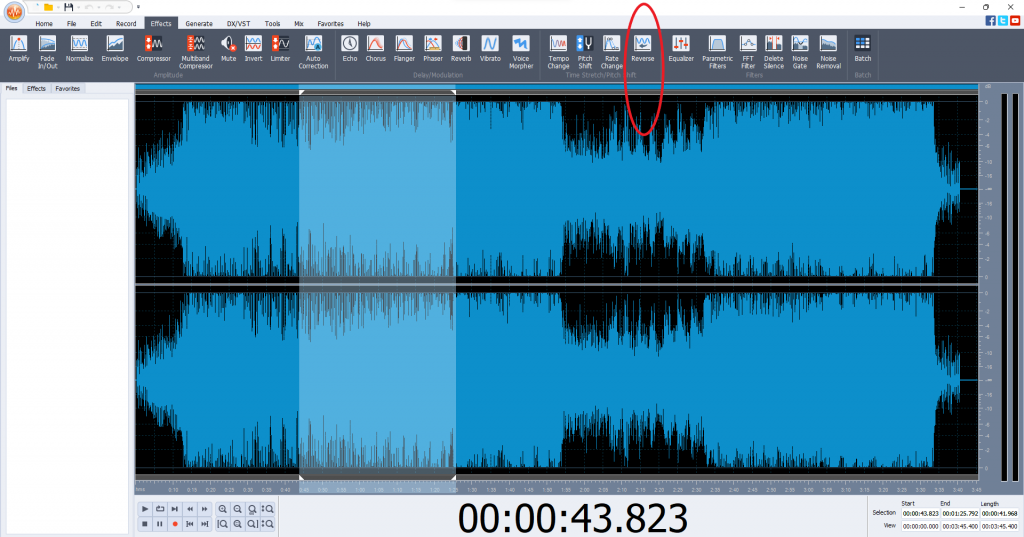
Then just save the output audio file or share it online.
Try AVS Audio Editor to discover more effects!
The entire AVS4YOU multimedia suite is currently available with large discounts. Save 70% today!
Logic Pro X
Mac users often prefer Logic Pro X to reverse music files. The app is easy, has advanced tools, free trial, and a flat cost of $199.99.
- Upload a track and double-click it.
- Go to the File tab.
- In Functions (dropdown menu on the left side), choose Reverse.
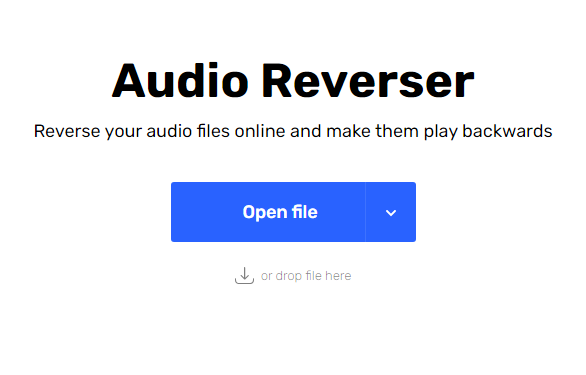
Reverse audio online
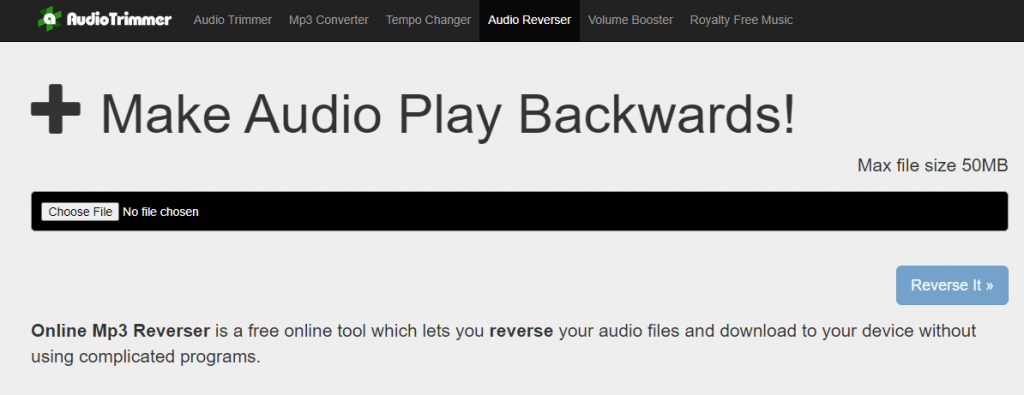
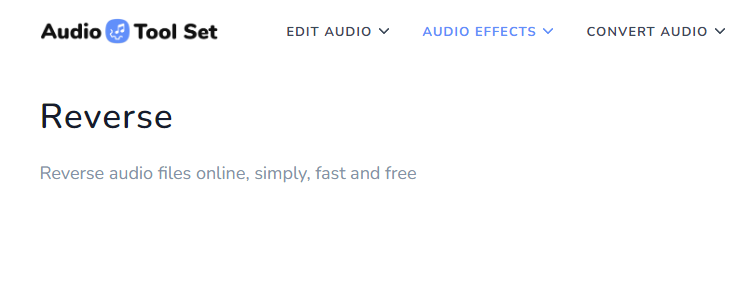
Most of the free online services for reversing tracks have the same concept. You upload a file, magic happens, and then you download the output. Here are some recommended online websites for that.
123Apps
Online Mp3 Reverser
Audio Tool Set
Pixiko
The online approach is easy and fast, but also has some drawbacks. Not every service allows reversing only a part of your track, and there’ll often be size limitations on the uploaded tracks.
Besides, the editing session requires stable Internet connection, and you need to expose personal files to a web service.
In social media
If you plan to share your video with a reversed track online, you probably don‘t even need to install any third-party services.
How to reverse audio on TikTok
Reverse videos are pretty trendy on TikTok — here‘s how to make one.
- Record or upload your video.
- Tap Effects and find the Time option.
- Choose Reverse to preview your video and soundtrack played backwards.
- Hit Save and post the vid when ready.
How to reverse audio on Instagram
While there’s no native functionality to play videos and sound backwards on Instagram, one of the best ways to achieve this is the CapCut app for iPhone.
- Upload the video.
- Scroll the toolbar, find and tap Reverse.
- Save the clip and post it on Instagram.
How to reverse audio on Snapchat
Snapchat is known as one of the most popular social networks in the US and worldwide. Here’s how to reverse audio and video.
- Record your video.
- Swap right until you see the Reverse option (3 arrows).
- Post the clip.
Note that you can‘t do that with uploaded videos, the guide only works for video instantly recorded in the Snapchat app.
For pre-recorded video files, use the guide for Instagram above.
Closing words
Whether you need to play an audio file backwards or reverse a video with sound, there are many apps with such feature for Windows, Mac, iPhone, and even online. We recommend using desktop apps to ensure unlimited operations for tracks and better privacy.
Also, check handy tips for audio editing below.
Useful links

This release includes some functionalities you asked us to add. Look what’s new in the latest version of AVS4YOU.
AV1 codec
One of the most important news is the support of AV1 8 bit video for NVIDIA 30x.
VP9 codec
Another update around codecs is the support of VP9 12 bit video for Intel Gen 11 & 12.
Better fMP4 and dash support
We improved the support of fMP4 and dash video and audio.
New presets for H.264 conversion
We added MP4 and MOV presets for H.264 conversion with Main/High profiles and Intel hardware acceleration.
Applying actions to multiple files / objects
From now on, you can change duration of transitions, slides, image, or color objects in bulk. That essentially facilitates working with videos.
Audio tracks, subtitles and aspect ratio can also be applied for multiple files at once.
New formats: TSV and TRP
Video format support is extended and now comprises TSV and TRP.
Download the update with all these features today — just hit the button below:
The update also includes enhanced usability, more stable performance, and bug fixes. Updating is highly recommended.
Subscription expired?
Get the unlimited access to AVS4YOU software with a 50% discount till June 5, 2022. Just redeem this code when purchasing AVSUPD2022.
Useful links

Among numerous video file formats out there, MP4 is believed to have the best quality at possibly smaller size. In this article, we’ll explore whether it’s true and which extension is the best for having a lightweight output movie.
Any video can be converted into another format to compress size using free software, such as AVS Video Converter.
What is the smallest video format?
There’s no format that by definition produces smaller files. The size depends on multiple factors, such as codecs, compression ratio, resolution, quality etc.
Most likely, a smaller file means less authentic quality. If you need an impressive watching experience, don’t reduce the video size. But smaller clips are always suitable for sharing via Internet — even with a slower Internet connection.
Still, before converting to another format you need to make sure that your device or software is compatible with the output extension.
Is MKV smaller than MP4?
MKV (Matroska Multimedia Container) supports additional features and unlimited number of audio and subtitle tracks in one file. This is why MKV files are often larger than MP4 clips and scarcely used on mobile devices.
However, codec plays the key role here. If MKV uses a sophisticated codec with a higher compression ratio, the output file can be smaller than MP4. The overall quality and resolution are the same or even better than in MP4.
Is WebM smaller than MP4?
The WebM format was initially designed for sharing clips on the Internet. Logically, such videos have more compression and lose some of the original quality. But WebM is definitely smaller in size than MP4 movies.
WebM is the best idea if you need to quickly share a video over the web, while details and exclusive watching experience is not the top priority for your audience.
Is AVI smaller than MP4?
AVI is always noticeably larger than MP4 videos. This format is one of the most suitable for full-length movies and perfect watching experience. Such quality is achieved by using less compression than in other extensions. AVI video files can actually be lossless.
Is MOV smaller than MP4?
MOV is a video format developed by Apple and believed to have the better quality than MP4 due to less compression used during encoding. Hence, MOV is usually larger in size.
This format is a good choice if the clip will be played back on Mac.
Is FLV smaller than MP4?
Some of us remember the Adobe Flash Video format (FLV). It’s quality is reportedly equal, but sometimes just a bit larger in size than MP4 videos. Besides, FLV has been outdated for some years now, so if you want to share clips on the Internet consider converting FLV to other popular extensions.
Is WMV smaller than MP4?
Developed by Microsoft in 1999, WMV is the format which many users worldwide still prefer for videos. WMV is frequently smaller than MP4 and saves a good video quality.
We’ve reviewed the most popular alternatives to MP4 nowadays. The best options for saving disc space are WebM and WMV. But bear in mind that quality can be lower than expected.
How to make video smaller in size?
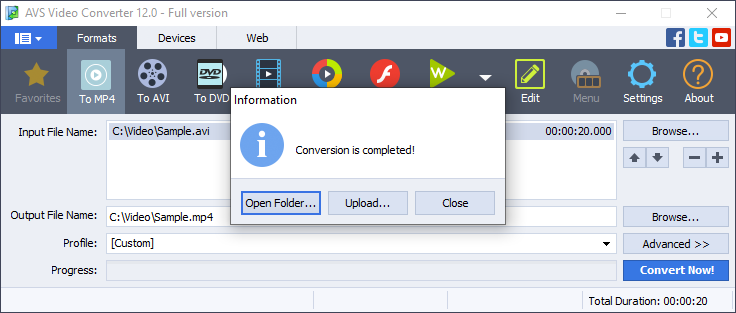
In any free video converter, you can change a format of your movie to make it smaller and easier to share. Here’s how it works in AVS Video Converter.
- Upload a file to AVS Video Converter.
- Choose the output format on the main toolbar, for example WebM.
- (Optional) Open Profile and apply the desired parameters for a video from the dropdown list.

You can select presets for devices like iPhone or Samsung Galaxy, services like YouTube or Vimeo, or just choose the necessary video and audio quality.
- Click Convert now!
By clicking the Open folder button after conversion, you’ll find an output video file.
Get AVS Video Converter today — it’s free:
Useful links

Discord is initially a platform for gamers and communities of enthusiasts to communicate for free. Participants can either exchange text messages or speak to each other. Discord does not provide any native tools for recording conversations, but fortunately many apps have such functionality.

Before we proceed to the top software to record Discord audio, make sure you won’t break the law by using these apps. In some regions, you must have an explicit consent of other individuals before recording voice calls. Obviously, no one wants internal conversations to be revealed — remember about everyone’s right to privacy.
Why record Discord audio call?
In many occasions, having a recording of your conversation on Discord will be absolutely legal and useful.
One of the most popular reasons to record Discord calls is to create a series of podcasts. This is still a booming format to reach your audiences, both youngsters and adults. In Discord, you can organize a team talk with participant from different parts of the world, convert the session into an audio file, and then share it on the largest platforms, such as Apple Podcasts or Spotify.
Some communities would prefer Discord for remote assistance and tech support. They need call recordings of each call to discover the most frequent flaws in their product and improve the service quality.
Whatever reason to record Discord calls you have, popular apps turn this task into play.
5 cool ways to voice record on Discord
There are numerous applications to record your voice calls for each platform, including Windows, Mac, and even Linux.
1. AVS Audio Editor
AVS Audio Editor is among the easiest ways to record Discord audio calls on Windows. It allows capturing high-quality sound, further editing and saving in numerous formats.
Step 1. Open the app and go to the Record tab.
Step 2. Choose your microphone for recording audio.

Step 3. Enter the audio channel on Discord.
Step 4. Back to AVS Audio Editor, click Record (red circle) to begin. The recommended audio parameters are pre-defined — simply click OK.
Just that easy! To finish the audio capturing, hit the Stop button, edit the output and save as MP3, FLAC, WAV, AAC etc.
Get AVS Audio Editor today and record any Discord audio channel!
The entire AVS4YOU multimedia suite is currently available with large discounts. Save 70% today!
2. Audacity
You can also use Audacity to record Discord audio calls on Windows, Linux, and Mac. The solution is free and open-source.
Step 1. Open Audacity and go to Edit -> Preferences.
Step 2. Go to Devices and choose your microphone for recording.

Step 3. Join the audio conversation on Discord and hit the red button to start the recording.
Step 4. To stop the process, hit the black square and save an output audio file.
Thanks to cross-platform operability, many non-Windows users prefer Audacity on their machines for seamless audio production.
3. Elgato
For rather advanced game streamers, Elgato Sound Capture is also a brilliant way to record Discord audio calls.
Step 1. Set up microphones and have Elgato Game Capture HD ready.
Step 2. Click on Team Chat on the top toolbar.
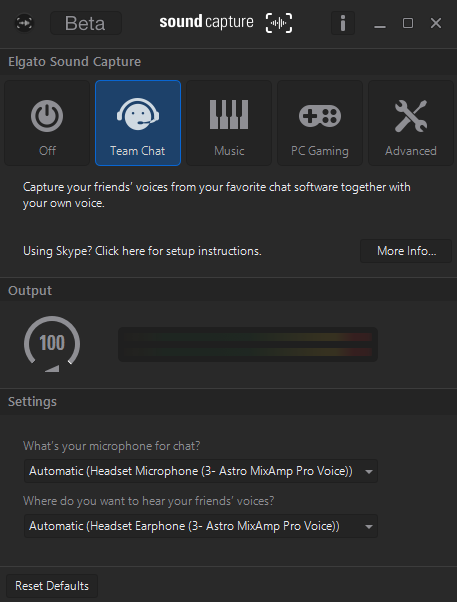
Step 3. Configure the input (your microphone) and output (your speakers) sources.
Step 4. Start the recording in Elgato Game Capture HD. Here you can monitor, stop, and save the audio conversation for further sharing.
Elgato is the best option if you have hardware from this brand.
4. OBS
OBS is a free and open-source solution which allows to record Discord audio. It‘s cross-platform and recommended to users with some experience in multimedia content production.
Step 1. Open OBS and hit „+“ sign in the Sources window.
Step 2. Click on Audio Output Capture.
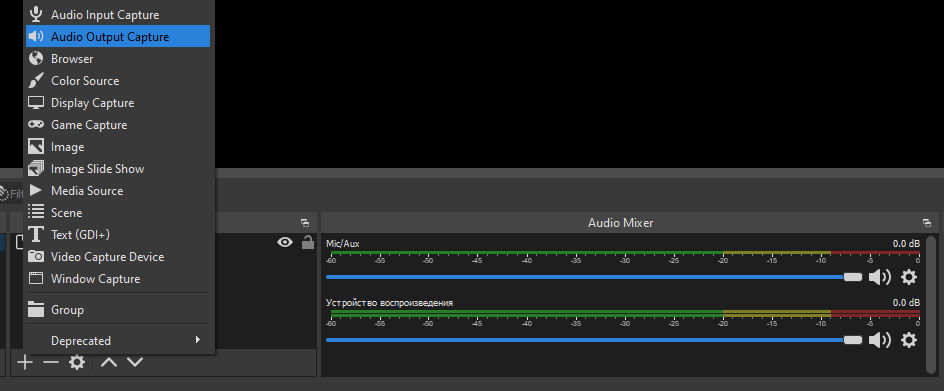
Step 3. Choose the name for your audio source and save it.

Step 4. In Properties, choose speakers or hearphones as an output audio device.
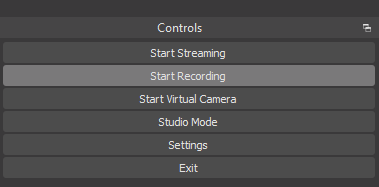
Step 5. In the Controls menu, hit Start Recording and proceed with your Discord audio call.
Step 6. Finish the recording and open File -> Show Recordings to browse your output audio capturings.
The OBS interface may seem daunting for the beginners. Experienced users love this software though, especially for its countless adjustment and customization options.
5. Craig
Craig is a voice recording bot for Discord, which is among the easiest ways to capture audio during your conversation. Here‘s how it works.
Step 1. Invite Craig bot to your Discord server and grant all necessary permissions.

Step 2. Join an audio channel and type :craig“, join.
Step 3. The recording starts right away. You‘ll hear the alert that the bot has started capturing audio.
Step 4. Type :craig:, leave to finish recording on this channel.
Type :craig:, stop to finish recording on all channels.
Step 5. The bot will send you download links for your output audio capturings.
Because Craig is entirely online-based, some users worry about possible privacy issues. In general, it‘s a fairly easy way to record Discord calls without additional installations and diging into technical documentation.
How to choose the best solution?
So many applications let you record Discord audio conversations! What‘s the best option and how to choose the best one?
In fact, they‘re all awesome and work similarly good. Base your choice on the platform you have — Windows, Linux, or Mac.
Another thing to keep in mind is your expertise in sound production: some apps are feature-rich, but rather hard to navigate and use without the deep understanding. The other solutions can be more user-friendly and suitable for the simplest tasks — they‘ll be the best options for occasional recordings.
Useful links
When printing or designing an image in colors you’re most likely to come across CMYK and RGB. But what do these acronyms mean? They are truly significant terms for anyone working with visual materials.
We’ll explore the difference between RGB and CMYK in this article.
What is CMYK?
CMYK (Cyan, Magenta, Yellow, Key/Black) are colors for printing. They’re all white at the beginning and reduce brightness during the printing process to produce the pigments of the desired color. Such pigments will further be printed onto a paper as small dots.
All CMYK colors mixed result in the pure black.

The most popular formats where you can use CMYK are PDF and Adobe InDesign.
CMYK is a limited set of colors that does not allow reproduction of some shades because there are no such colorants in nature. Hardware limitations can also cause a color shift.
What is RGB?
RGB (Red, Green and Blue) are colors for digital images, including everything you see on web pages and social media. They’re mixed and illuminated by a source of light within a computer to produce any desired color.
When mixed up at an equal intensity, RGB colors become pure white.

The image formats with RGB include popular JPEG, PNG, and GIF.
RGB is an unlimited set of colors that allows you to reproduce any shades, but only on the screen of electronic devices, not on paper. Just compare: RGB can reproduce 16 million colors and shades, while CMYK outputs 16,000 only.
CMYK vs. RGB
The main difference between the two color models is the scope of application. CMYK for printed materials, RGB for Internet pages.
But what if we break the rules? How will this impact the output picture? Here are some important things to know about.
Do printers use RGB or CMYK?
Digital images can display an infinite number of colors and shades, while printers are limited by hardware specifications. To make sure pictures look authentic in the printed materials, the best practice is to use CMYK for physical printing.
In theory, you can print out an image with RGB colors but the original quality is not guaranteed. We recommend to use CMYK for business cards, photos, posters, brochures, merch, and other printed materials.
Which mode is better for digital?
As mentioned above, RGB is the standard for digital screens. It works perfectly well for photos shown on an HD TV screen, web design, YouTube videos, images on social networks.

The common wisdom for Internet environment and modern electronic devices is to use RGB, because a color shift is unlikely to happen.
When you need both color modes?
Graphic designers usually work with both CMYK and RGB. There are occasions when you need to have a product catalog printed out and in a digital format (e.g. PDF). We want to distribute the paper version on networking sessions during forums, while PDF must be available on the official website.
In this case, we could use CMYK only to ensure original colors in a printed brochure. But the digital version won’t be impressive enough. Likewise, RGB would work for a digital catalog but possibly result in shifted colors in the printed version.
Neither of the color models is better or more advanced. They’re both good for different tasks.
Useful links
Handy color correction tips. Read blog
How to add a picture to a video. Learn more
Making spectacular videos for Facebook. Learn more
How to make a blurry video clearer. Learn more
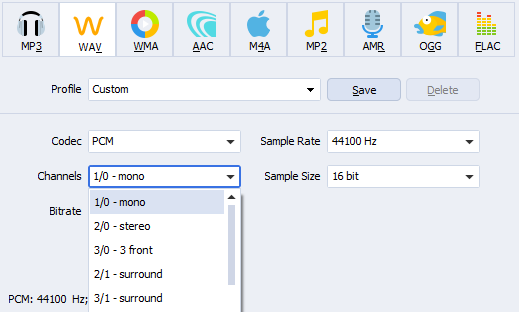
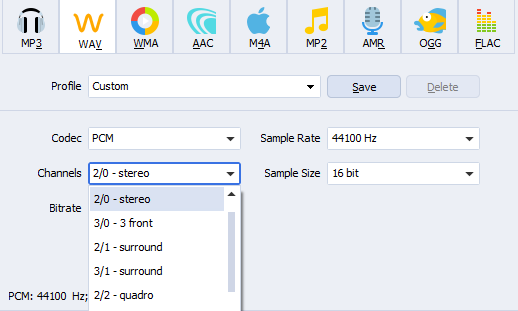
What is mono audio?
Mono is any sound recorded or played back using one audio channel or 2 channels with 100% identical signal (called dual mono). The recording may contain voice, multiple music instruments, and audio effects — they’ll be transferred though one channel in mono.
Back in the days, radio broadcasters tended to use mono audio. Today, there are many devices that support stereo instead, which is definitely a choice of audiophiles. However, both models are still in use and have individual benefits.
What is stereo?
Unlike mono audio recordings, stereo tracks distribute sounds of voice, music instruments, and effects between two audio channels. Signals in a left and right channels should necessarily be different.

Such approach helps create the immersive sound for an outstanding listening experience in headphones. This is achieved thanks to using multiple microphones for voice and different instruments, and panning available with 2 channels only.
Many creators try to record high-resolution songs as stereo files. Is it actually necessary? Let’s find out whether the quality will be impacted greatly by using mono recording.
Is stereo better than mono?
Mono audio recordings may sound flat and not really impressive. This is because such songs lack panning and the sound seems to be static, while stereo simulates sound travelling through a medium. And that’s the most popular reason why people consider it outdated and useless. In reality, mono can be even better in some occasions.
Stereo creates more realistic sounds. It is certainly the best idea when you’re listening to music in headphones.
But stereo can cause phase cancellation in some situations. Imagine you’re watching a movie or listening to a song together with your best friend. You gave him/her one of the AirPods and…now hear sounds or speech your friend can’t perceive. Just because they’re in your earphone only!
Should you use mono audio?
In some cases, making a stereo recording is not necessary. Here are some examples when you need to choose mono.
- In podcasts, stereo is often converted to mono by podcast hosting platforms anyway.
- Ringtones or voice recordings are better stored in mono, as they take up less space and do not need a hi-res quality.
- If you are a musician and want to make a sample library, many of them can be recorded in mono.
- Vocals in studios are often recorded in mono because it gives them power and vibrancy.
- In a YouTube videos, there’s not much sense in recording your voice in stereo. Some amateur stereo recordings even have the sound travelling from side to side, which creates discomfort.
As you can see, mono is not always worse than stereo.
How to change mono audio to stereo (and vice versa)?
In many popular apps, such as AVS Audio Editor, you can easily switch from stereo to a single-channel recording and vice versa.
- Just open a recording in the program and click Save as.
- From the dropdown list next to Channels, select the appropriate option.
Please mind that the initial recording parameters are essential. If you’ve recorded a mono audio, changing it to stereo won’t make it sound as authentic as it could be when taken in stereo.
Switch between mono and stereo easily — get AVS Audio Editor today!
The entire AVS4YOU multimedia suite is currently available with large discounts. Save 70% today!
Useful links
How to normalize audio. Read guide
35 examples of sound energy. Learn more
Top audio recording software. See list
Full pack of AVS4YOU applications. Download

What does rendering a video mean?
Rendering is a broad term from the computer graphics and sound production universe. It’s a bit vague for any beginner, but don’t worry — the explanation is very easy. In simple terms, rendering is merging many different components into one file. Example: text and images on this blog page is being rendered by your browser right now.
In video production, rendering is the process of creating the final version of a movie. A piece of multimedia software integrates different content elements, such as video, audio, effects, transitions, text, images etc. The result may be a clip accompanied by music, subtitles, picture-in-picture effect and so on.
How long do videos get rendered?
There are multiple factors that can accelerate or slow down video rendering:
- Length of the output movie
- Complexity of elements
- Desired output quality
- Frame rate
- Video encoder format
- Software performance
- Hardware performance: CPU, GPU, RAM, SSD
Be ready to spend some extra time after finishing your project: one minute of an output movie is believed to take about one minute to render. However, the actual duration depends on your hardware capacity, RAM, and the project complexity — high-quality long videos with complex animation and effects will render longer than those of the modest quality and with less editing applied.
Does rendering impact video quality?
Let’s face it: rendering is a complicated word that describes a purely technical process. The only thing non-professionals should be aware of — rendering does impact video quality. Good news is that you can regulate quality.
In fact, the output movie quality fully depends on what parameters you choose at this stage. It lets your improve watching experience and ensure compatibility with devices or players.
That’s why rendering usually takes time to finish, especially when it comes to HD videos. Better quality also results in a larger file size.
Important parameters for video rendering
Some crucial video settings can be customized before rendering to ensure that the desired quality, size, and compatibility will be achieved.
Video codec
In rendering, video software uses different codecs to compress an output file and make its size suitable for storing and seamless sharing. While some of them are able to compress clips without quality loss, other codecs affect videos significantly.
Some well-known video codecs are HEVC/H.265, H.264 (AVC), AV1, VP9, DivX.
The choice of a codec has a great impact on many video parameters, such as compatibility and rendering time. Read our overview of video codecs and choose wisely.
Audio codec
The sound quality of voiceovers and songs in your movies depend on such codecs. They also compress audio tracks to the different extent.
Popular audio codecs today include Apple Lossless Audio Codec (ALAC), Free Lossless Audio Codec (FLAC), Windows Media Audio Lossless (WMAL).
Aspect ratio
Width and height of frames in an output video plays an essential role in rendering. A larger aspect ratio makes a movie compatible with modern TVs.
Multimedia software normally adjusts the aspect ration to common values — 1:1, 3:2, 4:3, 16:9.
Resolution
The total number of pixels displayed on the screen when you’re watching a movie. This parameter is important to make the output clips fit different screens.
The ideal option depends on your screen specifications, some examples of resolution are 1920×1080, 1366×768, 360×640.
Frame rate
Videos consist of a large number of images known as frames. Frames per second (FPS) is the speed of showing these frames. This is a key parameter for seamless viewing experience.
The remaining standard today is 24fps, but there are other options, such as 30fps and 60+fps. The latest is common for making slow motion videos.
The smaller FPS value means less time spent for rendering. But remember that it would also make your video less realistic. Low frame rates are considerable for low-budget tutorials where viewers need information and never care about cinematic experience.
Sample rate
This parameter reflects the number of samples an audio track carries per second measured in Hz or kHz. Higher sample rates deliver better sound quality but increase rendering time.
The widely used options are 44.1 kHz and 48 kHz.
Bitrate
Bitrate is a setting for both audio and video tracks in your project. Higher bitrate means more accurate colors, overall better image and sound quality. Common video bitrates for clips are 1440p, 1080p, 720p.
Among audio bitrates the most popular are 192 and 320 kbps.
So many parameters, right? But no need to customize them manually, the most multimedia software providers include ready-to-use presets. See how it works in AVS Video Editor in the next paragraph.
How to render video in AVS Video Editor
One of the most user-friendly editing software for Windows, AVS Video Editor offers many pre-defined settings for intuitive video rendering.
When you’ve finished a project, it would look like that:
Click on Produce and choose where you want this video to be stored.
Storing videos on a computer
Proceed with the File button if you simply want to save a video on a computer or a flash drive. A window with settings will appear. To choose presets for rendering, just select your device from the list.
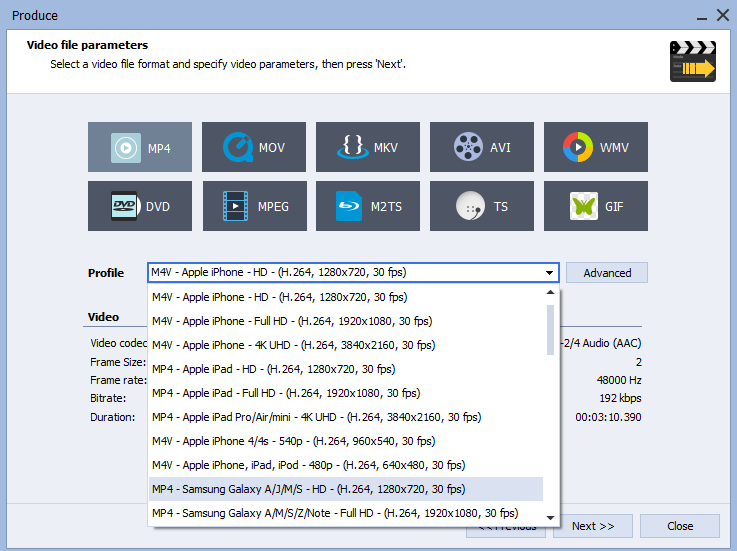
Experienced users may want to customize the settings manually. To do this, click on Advanced next to the Profile field.
Configurations become adjustable.
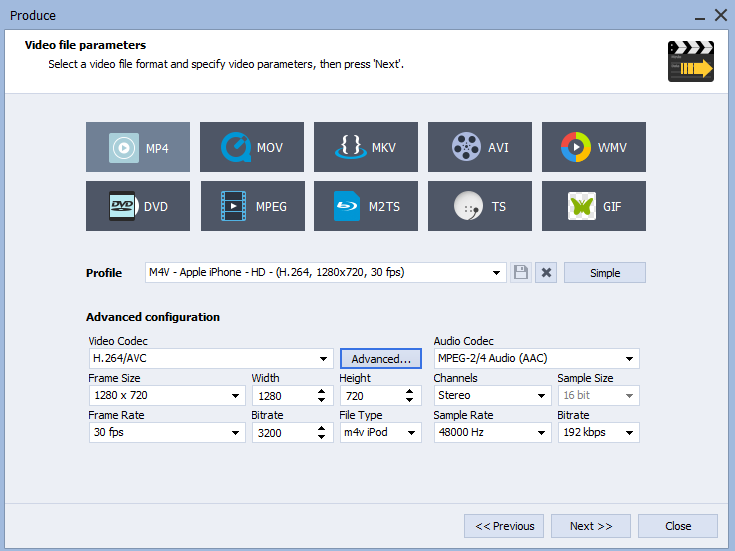
In this window, you can also choose the format for a future movie, for example MP4, MOV, MKV, AVI and others.
The format can make the video size larger. Read this article to learn how to reduce it.
Burning movie onto a disc
Simple as the previous one, this rendering method works with high-quality videos. The result will be a DVD, Blu-ray, or DivX disc that you can play back on a large TV screen.

Rendering time increases for this option but the output is worth waiting.
Making videos for particular devices
The Device option allows producing clips for Apple TV, gaming consoles, and a wide range of other devices and media players.

Sharing videos on the Internet
Hit the Web button if you plan to publish your clips on YouTube, Vimeo, Dailymotion, and other popular online platforms.
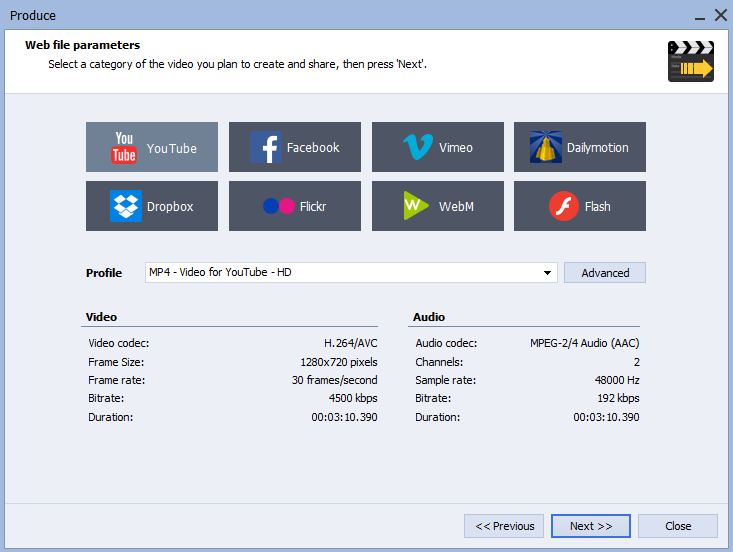
We selected the right parameters for you — now your videos are 100% compatible with the chosen web service!
Make video rendering easier — get AVS Video Editor today!
The entire AVS4YOU multimedia suite is currently available with large discounts. Save 70% today!
Useful links
How to make a good YouTube intro. Read guide
How to normalize audio. Read guide
How to change video file type. Read guide
How to add music to video. Read guide
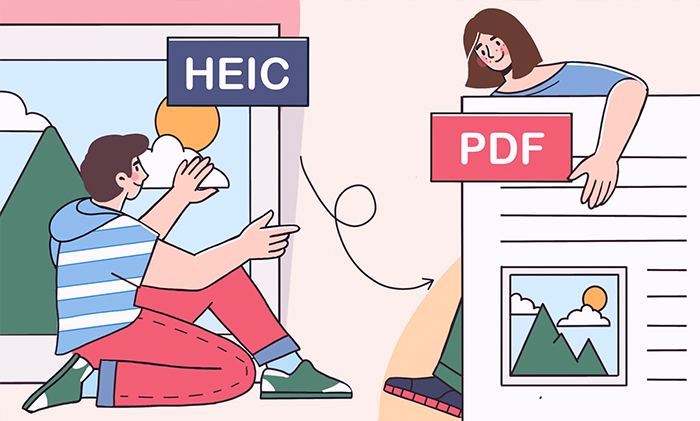
Want to share your iPhone photos to a non-Apple user? Convert them to a more widely supported format first!
In this article, we’ll learn when converting HEIC to PDF is useful, how to do it on Windows, Mac, and even online. At the end, we overview the top free applications to view PDFs on any operating system.
Why convert HEIC to PDF?
Before we proceed to guides and tutorials, let’s find out what these formats actually are about.
HEIC is an image format natively used by iPhone. The advanced file compression allows storing more photos of the same quality at a smaller size compared to the popular JPEG format.
PDF (Portable Document Format) is a document format developed by Adobe. Such files can contain text, images and videos, clickable links. With Adobe Acrobat, you can create, merge, edit, fill out, sign PDF files on Windows and Mac.
Here are some common benefits of converting HEIC images to PDF documents.
- Digital photo albums. One big file accessible from any device instead of hundreds of separate pictures. Some music studios and video game developers provide such albums as collectables to their loyal fans.
- Product line catalog. Companies need to showcase their product lines to prospects. Again, merging images into a PDF file works perfectly. Texts and additional graphics can be applied later on.
- Send documents in the standard format. PDF is a pretty standard format for electronic document exchange. Sometimes you can just take a photo of a contract and email it as a document.
- Emailing a picture to non-iPhone users. HEIC is not so popular and can be incompatible with some devices or software. Conversion makes sure recipients will be able to view your images.
In any case, you can easily turn HEIC to PDF on any popular operating system. Find guides below.
Convert HEIC to PDF on Windows
AVS Image Converter is one of the best free options to change HEIC to PDF.
- Upload your HEIC image to the app.
- Choose To PDF.
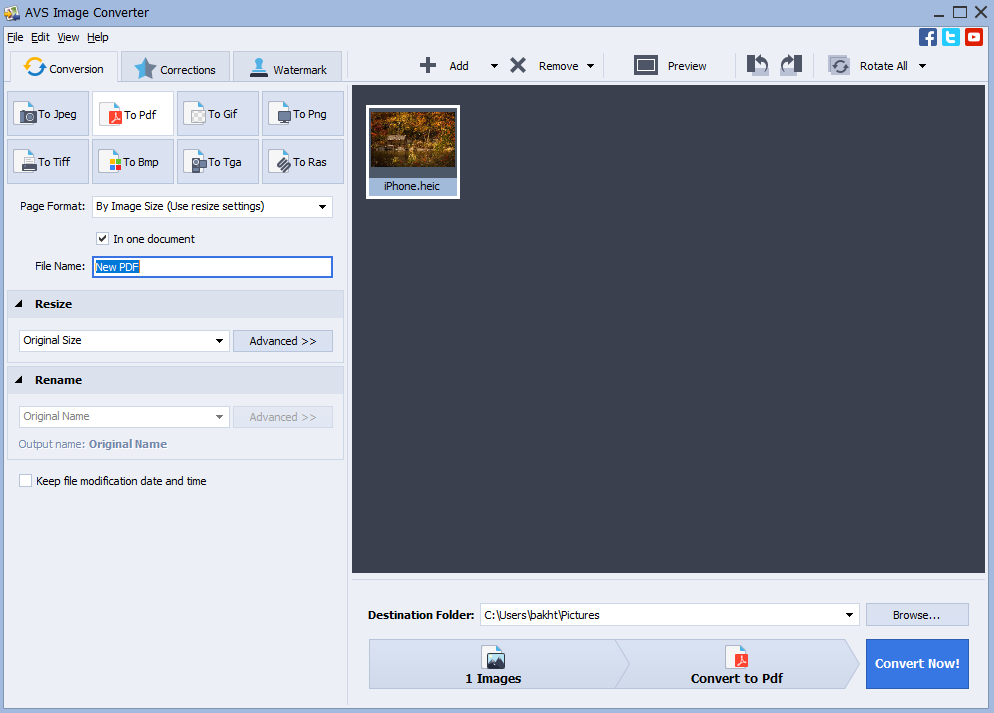
- Click on Convert Now!
To find your output PDF, click on Open folder in the opened window.
Download AVS Image Converter today — it’s free!
The entire AVS4YOU multimedia suite is currently available with large discounts. Save 70% today!
Сonvert HEIC to PDF on Mac
Mac owners can use integrated software Preview to turn HEIC to PDF.
- Open your HEIC file in Preview.
- Go to File ⇾ Export and select PDF in the dropdown list.
- Click Save.
Convert HEIC file to PDF online
Numerous free services over the web let you change HEIC to PDF without installing third-party apps. Just one popular example is Convertio.
- Drop files to the upload area. You can choose them from Dropbox or Google Drive too.
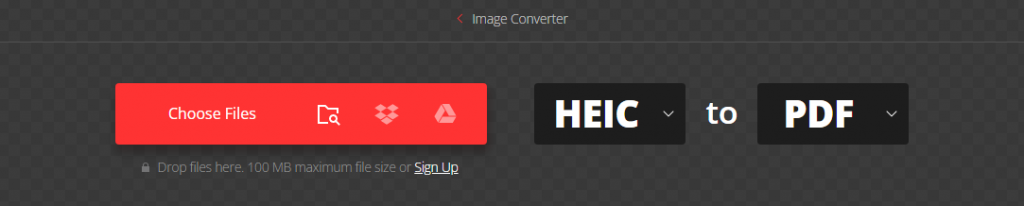
- Click on Convert and wait until the process is complete.
- Download the output PDF file.
The online conversion also has disadvantages. You need to expose personal images to a web service, processing many images simultaneously requires stable Internet connection and time — free plan limits concurrent conversions to 25 only.
Frequent users may consider a subscription from $5.99/month.
Top 5 free PDF readers for Windows and Mac
After converting HEIC to PDF, you want to make sure that it opens correctly. These free applications help you check the output files on any platform.
Adobe Reader
View PDF documents with these native freeware solution by Adobe. Compatible with Windows and Mac.

Here you can also add comments to pictures and print them.
For editing and signing, Adobe Acrobat Pro subscription is necessary.
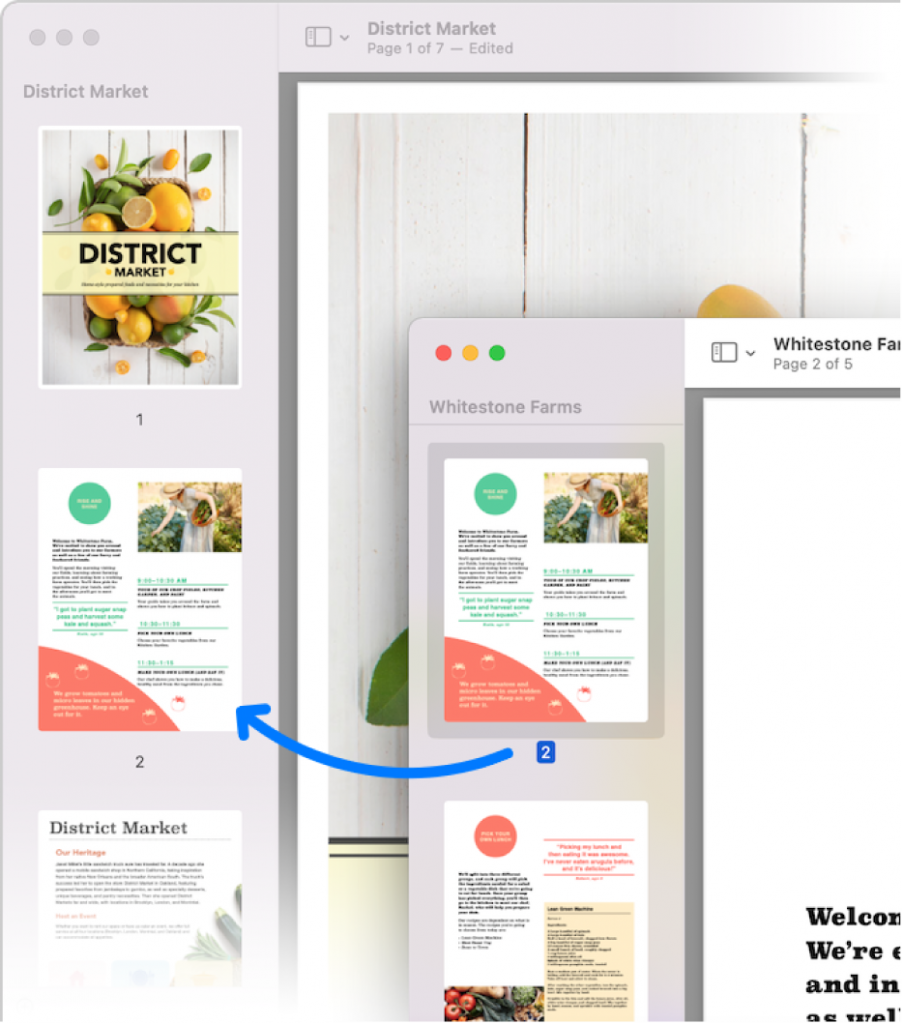
Preview
This Mac application opens PDF files for viewing. No third-party software needed.
Google Drive
As any other popular cloud storage, Google Drive supports viewing PDF documents.
To save space on your desktop and share PDF documents faster, you can just open access for recipients on Google storage.
ONLYOFFICE Desktop Editors
This app is a free Microsoft Office alternative for Windows, Mac, and Linux. Here you can open PDF for viewing on your desktop without paying additional fees.
Google Chrome / Safari / Microsoft Edge
In fact, any web browser out there is capable to open PDF files. Since everybody has a browser, there won’t be compatibility issues when sharing documents.
Final words
HEIC is a perfect format for storing iPhone photos but sometimes you need to merge multiple pictures in one file. Also, opening HEIC images is daunting for non-Apple users. In both cases, a good way out is to convert HEIC to PDF.
Many software developers worldwide offer free image converters for Windows, Mac, and even online. Afterwards, you can view an output file in one of top popular free PDF readers.
Need a PDF reader or other office software? Check free downloads on Moo Soft.
Useful links
How to add a picture to a video? Read guide
Top color correction tips. Learn more
Get the latest AVS4YOU update. Download

Audio normalization is a technique for increasing the volume of a recording by a certain amount until it meets the desired sound level. The result of normalization is an overall louder file or its selected area.
Imagine some tracks are too quiet, and you constantly regulate the volume instead of comfortably listening to music. Normalization makes loud and quiet songs sound the same.
How to normalize audio in AVS Audio Editor
AVS Audio Editor is one of the best Windows apps for audio normalization.
- Choose necessary audio files and add them to AVS Audio Editor.
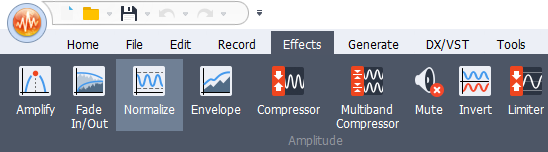
- Go to Effects and click on Normalize.
- Define the volume level. The most common value would be 0 dB or 100%.
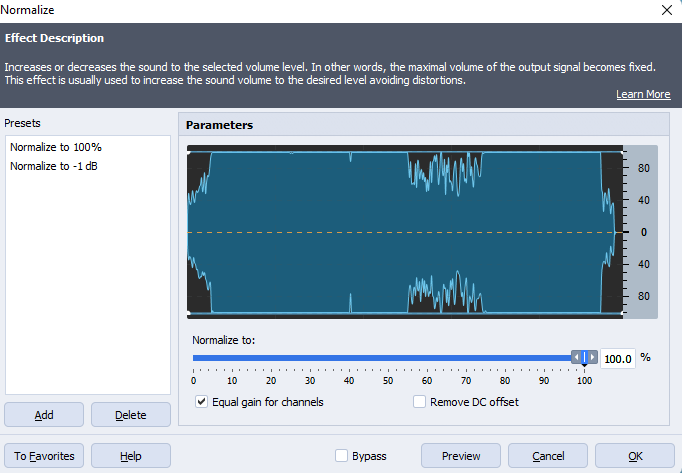
- Hit OK and select songs where the effect should be applied.
Preview the result and save your audio file(s). Now you can listen to music without changing volume for each track!
Get the latest version of AVS Audio Editor:
The entire AVS4YOU multimedia suite is currently available with large discounts. Save 70% today!
Online audio normalization
On the Internet, there are plenty of free services that allow normalizing recordings without additional app installations. One of the most popular is Audio Tool Set.
- Drag and drop an audio file to the timeline.

- Go to Effects and choose Normalize.
- Move the slider to set normalization values.
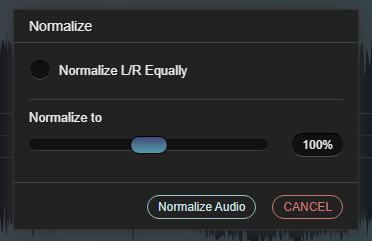
- Click on Normalize audio.
- Download the new file.
However, the online approach has some drawbacks. The editing session requires stable Internet connection, and you need to expose personal recordings to a web service.
How to normalize audio in Premiere Pro?
Adobe Premiere Pro is multimedia software for professionals, primarily used for video production. But even with a basic understanding of editing, you can normalize audio tracks in your movies without third-party apps.
- Right-click your clip(s) on the timeline.
- Choose Audio Gain.
- Check Normalize Max Peak to and enter the desired value in decibels (dB).
- Click OK.
This video tutorial by Web Guru walks you through each step:
Audio normalization on Spotify
When using Spotify, you can balance quiet and loud songs for a smooth listening experience.
- Click the arrow in the top-right and select Settings.
- Under Music Quality, enable Normalize volume.
- Choose between Loud, Normal, and Quiet options. Each is suitable for different environments.
Once the necessary setting is applied, your music won’t disturb anyone in quiet places. Also, you’ll not be distracted by the noisy surroundings.
Does normalizing audio affect quality?
Normalization modifies audio parameters, including the dynamic range and Loudness Units relative to Full Scale (also known as LUFS). Therefore, professional sound engineers or audiophiles sometimes report insignificant changes in the output quality.
When correctly applied, normalization does not make sound quality poorer. It just makes recordings louder.
All music streamed on the radio is normalized — otherwise some songs would be quieter than others.
Conclusion
Audio normalization is a pretty popular effect used for mixing sounds and music production. This is one of the obligatory mastering steps for recording music albums, TV and radio streaming, where multiple tracks must sound equally loud. You can also normalize audio files online and on a computer for changing volume of a voice-over, for example.
Although some people believe normalization may result in a poorer audio quality, following our instructions lets you avoid such troubles.
Apps from this post aren’t enough? Check other audio editing software.
Useful links
What is gain in audio? Read blog
How to add music to video on different platforms. Read blog
What is sound energy in everyday life? Read blog
Top 5 audio recording software. Read blog