Audio normalization is a technique for increasing the volume of a recording by a certain amount until it meets the desired sound level. The result of normalization is an overall louder file or its selected area.
Imagine some tracks are too quiet, and you constantly regulate the volume instead of comfortably listening to music. Normalization makes loud and quiet songs sound the same.
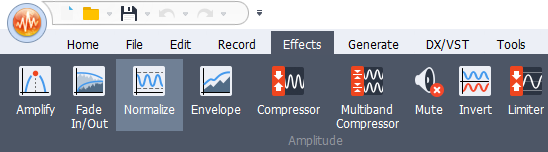
How to normalize audio in AVS Audio Editor
AVS Audio Editor is one of the best Windows apps for audio normalization.
- Choose necessary audio files and add them to AVS Audio Editor.
- Go to Effects and click on Normalize.
- Define the volume level. The most common value would be 0 dB or 100%.
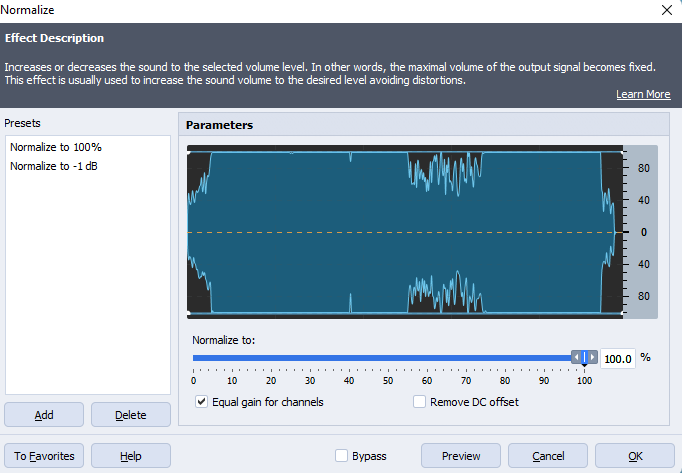
- Hit OK and select songs where the effect should be applied.
Preview the result and save your audio file(s). Now you can listen to music without changing volume for each track!
Get the latest version of AVS Audio Editor:
The entire AVS4YOU multimedia suite is currently available with large discounts. Save 70% today!
Online audio normalization
On the Internet, there are plenty of free services that allow normalizing recordings without additional app installations. One of the most popular is Audio Tool Set.
- Drag and drop an audio file to the timeline.

- Go to Effects and choose Normalize.
- Move the slider to set normalization values.
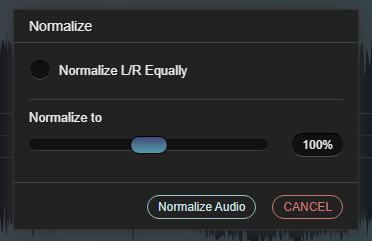
- Click on Normalize audio.
- Download the new file.
However, the online approach has some drawbacks. The editing session requires stable Internet connection, and you need to expose personal recordings to a web service.
How to normalize audio in Premiere Pro?
Adobe Premiere Pro is multimedia software for professionals, primarily used for video production. But even with a basic understanding of editing, you can normalize audio tracks in your movies without third-party apps.
- Right-click your clip(s) on the timeline.
- Choose Audio Gain.
- Check Normalize Max Peak to and enter the desired value in decibels (dB).
- Click OK.
This video tutorial by Web Guru walks you through each step:
Audio normalization on Spotify
When using Spotify, you can balance quiet and loud songs for a smooth listening experience.
- Click the arrow in the top-right and select Settings.
- Under Music Quality, enable Normalize volume.
- Choose between Loud, Normal, and Quiet options. Each is suitable for different environments.
Once the necessary setting is applied, your music won’t disturb anyone in quiet places. Also, you’ll not be distracted by the noisy surroundings.
Does normalizing audio affect quality?
Normalization modifies audio parameters, including the dynamic range and Loudness Units relative to Full Scale (also known as LUFS). Therefore, professional sound engineers or audiophiles sometimes report insignificant changes in the output quality.
When correctly applied, normalization does not make sound quality poorer. It just makes recordings louder.
All music streamed on the radio is normalized — otherwise some songs would be quieter than others.
Conclusion
Audio normalization is a pretty popular effect used for mixing sounds and music production. This is one of the obligatory mastering steps for recording music albums, TV and radio streaming, where multiple tracks must sound equally loud. You can also normalize audio files online and on a computer for changing volume of a voice-over, for example.
Although some people believe normalization may result in a poorer audio quality, following our instructions lets you avoid such troubles.
Apps from this post aren’t enough? Check other audio editing software.
Useful links
What is gain in audio? Read blog
How to add music to video on different platforms. Read blog
What is sound energy in everyday life? Read blog
Top 5 audio recording software. Read blog