Category: Uncategorized

Creating compelling video stories requires more than just great footage—it’s about setting the right mood to engage your audience emotionally. Special effects play a crucial role in achieving this by influencing colors, transitions, and audio. Whether you’re crafting a romantic scene, a dramatic moment, or an action-packed sequence, video editing effects can make all the difference.
With AVS4YOU powerful tools, you can effortlessly apply video special effects to enhance storytelling. This article will explore how different video effects and transitions shape mood, and how you can add them using AVS4YOU Multimedia Suite.
Why mood matters in video storytelling
Mood is the emotional heartbeat of a story—it’s what draws viewers in and keeps them engaged. Whether it’s a joyful montage, a dramatic confrontation, or a romantic moment, the mood shapes how audiences perceive and connect with your content.
Different moods evoke specific responses:
- Romantic scenes often use warm tones and soft lighting to create intimacy.
- Tense or action-packed scenes benefit from high-contrast visuals and dynamic transitions.
- Dramatic moments thrive on darker tones and intense lighting shifts to build suspense.
By strategically using video effects and transitions, you can amplify the emotions behind each scene and make your video more impactful.
The role of special effects in setting the mood
Special video effects are the visual and auditory cues that evoke emotions. They can include:
- Lighting and color grading: Use blue tones for tranquility, red for urgency, or warm tones for romance.
- Visual transitions: Smooth transitions can create a calming effect, while fast cuts add excitement.
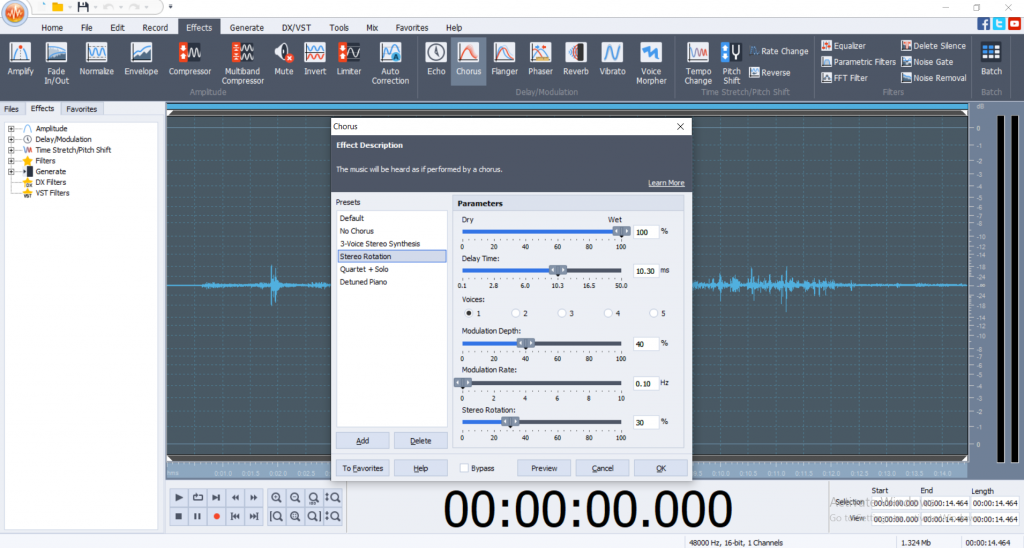
- Audio effects: Reverb, echo, and pitch shifts can emphasize mystery or romance, while sharp sounds can create tension.
For instance, a slow fade combined with soft pastel colors can signal nostalgia, whereas quick cuts with intense lighting changes can build drama.
How to add video effects using AVS4YOU tools
AVS4YOU offers a variety of tools to help you easily add video effects to your videos. Here’s how their apps can transform your storytelling:
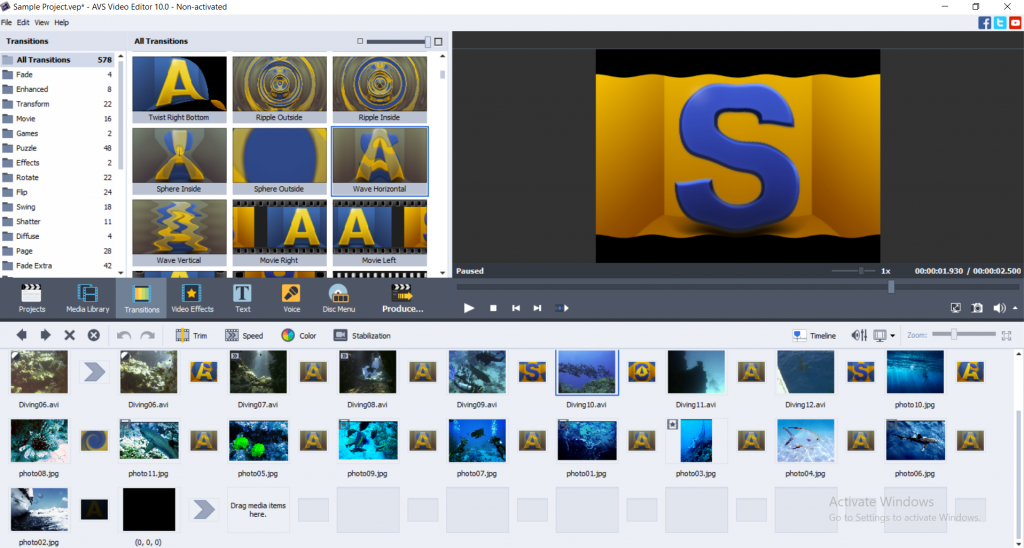
1. AVS Video Editor: perfect for filters and transitions
AVS Video Editor is packed with features that make mood creation a breeze:
- Filters: Apply specific filters to enhance tone of your video, such as black-and-white for a dramatic feel or warm sepia for a nostalgic vibe.
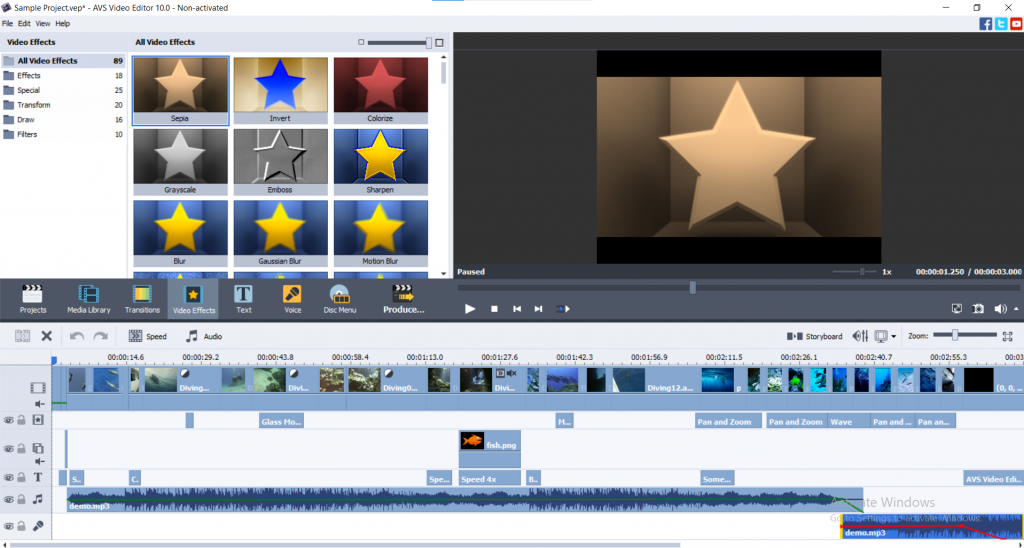
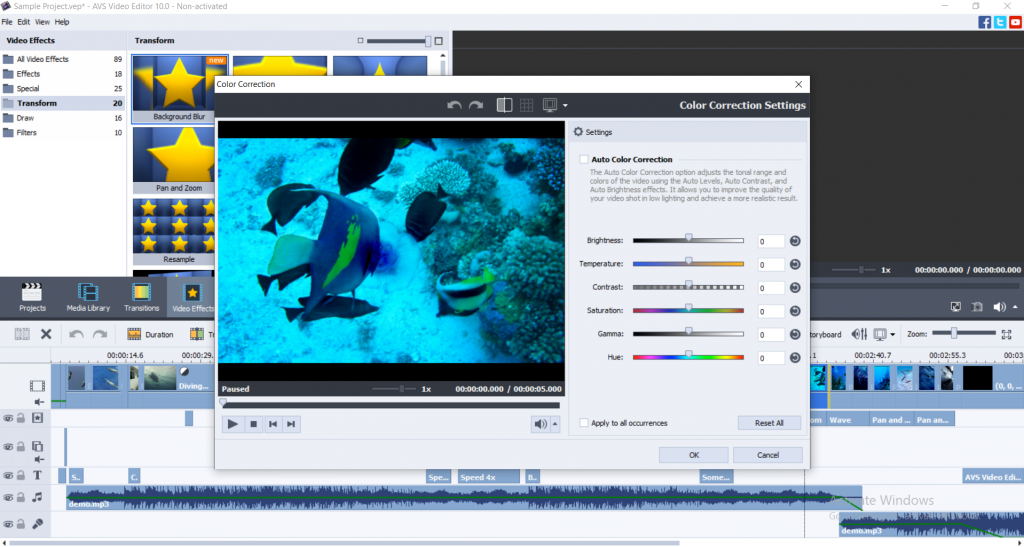
- Color correction: Adjust brightness, contrast, and saturation to set the perfect mood. For example, increasing contrast can create tension, while lowering it can soften the scene.
- Transitions: Add smooth crossfades or dramatic wipes to guide viewers through emotional shifts in your story.
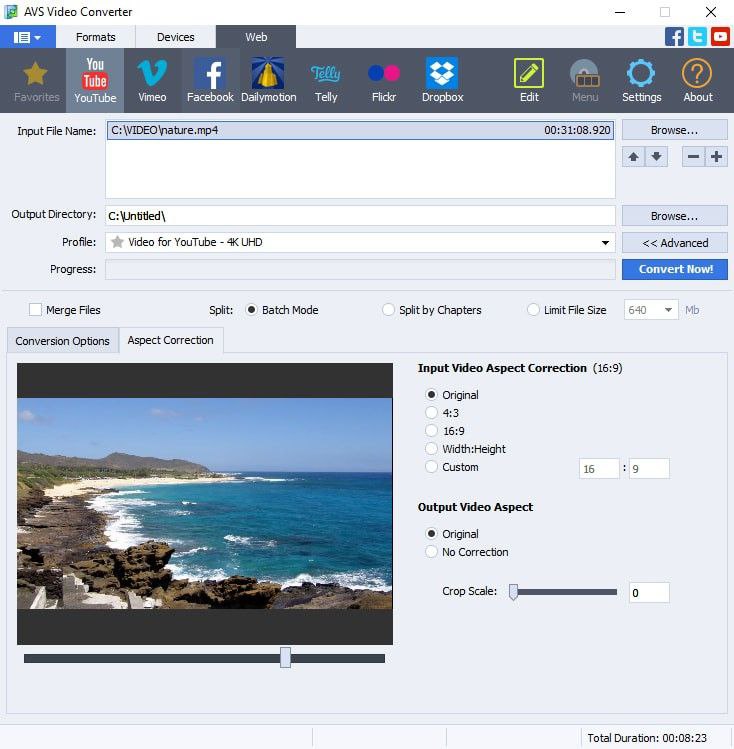
2. AVS Video Converter: set format and aspect ratio for mood
Beyond effects, AVS Video Converter ensures your videos are optimized for any platform. The right aspect ratio and resolution can influence how viewers perceive your content:
- Convert your video to fit the intended screen size and mood—wide aspect ratios can feel cinematic, while square formats are ideal for social media.
- Adjust frame rates for smoother or more dynamic playback to match the scene’s energy.
3. AVS Audio Editor: crafting atmospheres with sound effects
Sound is as crucial as visuals in setting the mood. With AVS Audio Editor, you can:
- Add reverb for an echoing effect to evoke mystery or nostalgia.
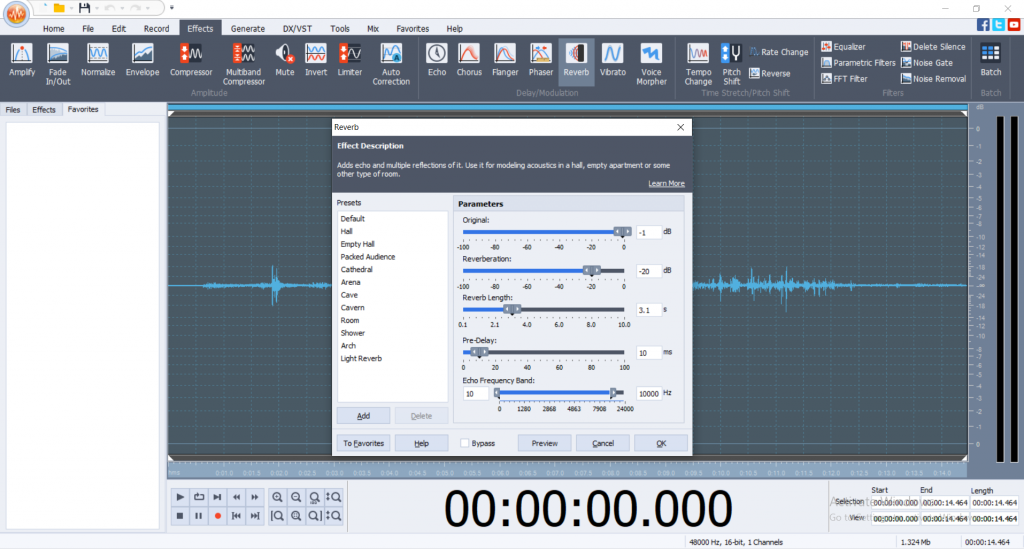
- Use pitch shifting to create otherworldly or suspenseful atmospheres.
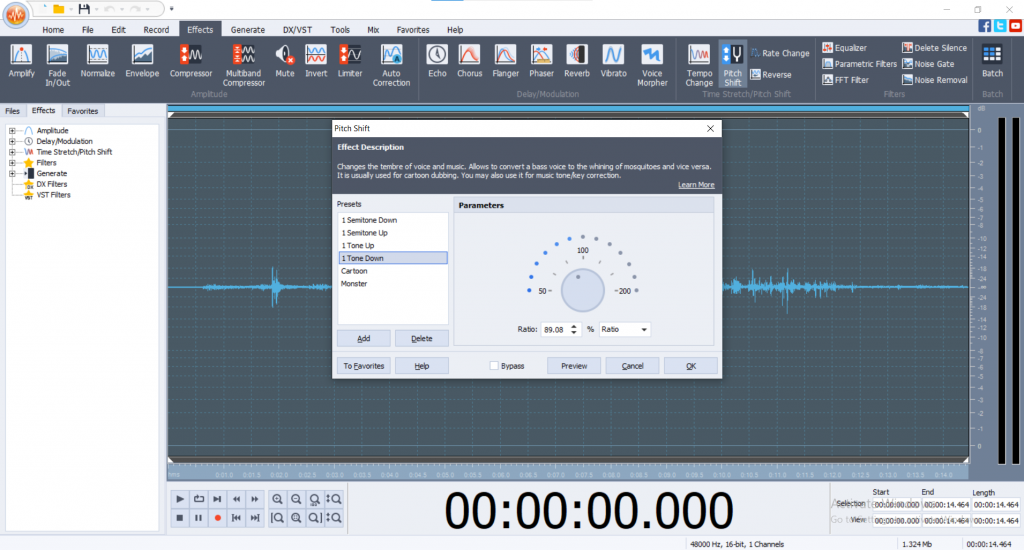
- Combine chorus and delay to craft romantic or dreamy soundscapes.
Pro tip: Pair sound effects with matching visual cues to create a seamless storytelling experience.
Practical tips for using AVS4YOU tools to set the right mood
To bring your story to life, here are specific tips for creating moods with AVS4YOU tools:
1. Romantic scenes
- Use warm tones with soft pinks, oranges, or yellows to create a cozy atmosphere.
- Apply gentle filters and slow transitions, like fades or dissolves, to evoke intimacy.
- Add reverb to background music for a dreamy quality.
2. Tense or action-packed scenes
- Go for high-contrast color schemes, such as sharp blacks and reds.
- Use quick cuts or fast zoom effects for dynamic energy.
- Incorporate sound effects like rapid drum beats or sharp notes to heighten suspense.
3. Dramatic moments
- Darken video with reduced brightness and increased shadows.
- Use abrupt transitions, such as wipes or flashes, to create intensity.
- Add dramatic audio cues, like thunderclaps or echoing voices, for impact.
Conclusion
Special video effects have the power to transform your storytelling by setting the right mood for every scene. Whether you’re crafting a romantic montage, an intense action sequence, or a heartfelt drama, AVS4YOU tools like AVS Video Editor, AVS Video Converter, and AVS Audio Editor make it easy to achieve professional results.
So, why wait? Start experimenting with filters, transitions, and sound effects today to create videos that captivate and connect with your audience.
Try AVS4YOU now and bring your stories to life with stunning special effects!
Useful links
5 tips to make your video look more cinematic
5 effects in AVS Video Editor to turn your footage into a blockbuster

Artificial intelligence (AI) has become a cornerstone of innovation in many industries, and the video editing world is no exception. AI video editing refers to the integration of AI technologies into video editing tools, enabling tasks to be automated, enhanced, and simplified.
From hobbyists creating social media clips to professionals producing polished films, AI video editing software is transforming workflows by making video editing faster, more accessible, and efficient. But what exactly is AI video editing, and why is it gaining so much traction? Let’s dive in.
What is AI video editing?
AI video editing software uses machine learning and algorithms to perform or assist with editing tasks that traditionally required manual intervention. These intelligent systems analyze video footage, detect patterns, and automate complex processes to save time and improve output quality.
Core functionalities of AI video editing:
- Automating repetitive tasks
AI can automatically handle tasks like trimming, cropping, and stabilizing footage, reducing the workload for editors. - Video enhancements
Features such as noise reduction, color grading, and resolution upscaling allow AI to improve video quality effortlessly. - Pattern recognition
AI tools can identify scenes, objects, or faces in videos, making it easier to organize and edit content.
What sets AI apart is its ability to learn from data and adapt. For example, AI software can recognize user preferences over time, further streamlining the editing process.
Benefits of AI video editing
AI video editing has gained popularity because it offers significant advantages for both professionals and beginners.
1. Time-saving
Traditional video editing can be time-consuming, especially when working with long recordings or large quantities of footage. AI simplifies this by automating tasks such as:
- Trimming and merging clips with precision.
- Applying transitions seamlessly between scenes.
- Auto-generating captions, saving hours of manual transcription.
For content creators or businesses with tight deadlines, these time-saving capabilities are invaluable.
2. Enhanced efficiency
AI enables editors to work smarter, not harder. Instead of adjusting settings for every clip, AI tools can:
- Auto-correct lighting and colors for consistent quality.
- Identify the best segments in footage, cutting down on decision-making time.
- Sync audio and video effortlessly.
These features minimize manual effort and maximize productivity.
3. Advanced features for creative editing
AI automatic editing video tools come equipped with advanced functionalities such as:
- Scene recognition: Automatically identifies and highlights important moments in footage.
- Auto-reframing: Adjusts video dimensions for different platforms, such as YouTube, Instagram, or TikTok.
- Smart effects: Suggests filters, transitions, and creative edits tailored to the content’s theme.
4. Accessibility for beginners
One of the biggest advantages of AI video editing softwareis its accessibility. For users without technical expertise, AI bridges the gap, making it easier to produce professional-quality videos.
For example, a vlogger with minimal editing experience can use an AI video editor to polish their videos, adding transitions, enhancing colors, and cropping footage for different platforms— all without the need for advanced editing skills.
AI video editing in practice: how it works
AI video editing involves a blend of automation and human creativity. While AI handles repetitive or technical tasks, users retain control over the final product, ensuring their unique vision shines through.
1. Key tasks handled by AI
- Footage organization: AI sorts through lengthy recordings to find key moments and eliminates unnecessary clips.
- Audio optimization: Background noise is removed, and audio levels are balanced automatically.
- Transitions and effects: AI identifies the right moments for transitions and applies them smoothly.
2. Human input in AI video editing
AI tools excel at making suggestions, but editors still guide the creative process. For instance:
- AI might suggest a specific color grade, but the editor can adjust it to suit their vision.
- While AI handles basic cuts, editors fine-tune the pacing to fit their storytelling style.
This synergy between human creativity and AI automatic editing video tools leads to faster workflows without compromising quality.
3. Real-world applications of AI video editing
- Social media content: Modern AI video editors simplify creating platform-ready videos, whether for Instagram Reels, YouTube Shorts, or TikTok. These tools automate tasks like resizing, applying transitions, and enhancing visuals, making it easier for creators to produce polished, engaging content quickly and efficiently.
- Event videos: AI quickly compiles highlights from weddings, conferences, or sports events.
- Business marketing: Companies use AI editors to produce promotional videos or explainer content quickly and cost-effectively.
Why AI video editing is the future
The demand for video content is skyrocketing, and AI video editing software is perfectly positioned to meet this growing need. Here’s why it’s set to dominate:
1. Personalized editing
As AI becomes more advanced, it will be able to tailor editing processes to individual preferences, offering highly customized suggestions for everything from transitions to effects.
2. Smarter scene understanding
Future AI video editing software will not only analyze footage, but also the context and emotion of scenes, enabling even smarter editing decisions.
3. Widespread accessibility
As AI video editors become more affordable and user-friendly, they will make professional-quality video editing accessible to everyone, from small businesses to independent creators.
In essence, AI is breaking down barriers, allowing anyone to create high-quality videos regardless of skill level or budget.
Conclusion
AI video editing is reshaping how videos are created, edited, and shared. With features like automated trimming, scene recognition, and smart effects, these tools save time, improve efficiency, and empower users of all skill levels.
Even if your current software doesn’t include AI, many emerging tools make video editing more intuitive and accessible for users. As AI technology continues to evolve, the future of video editing looks brighter—and smarter—than ever.
Useful links

Media players have become vital tools in 2025, transforming to meet the constantly changing landscape of digital content consumption. With the rising demand for high-quality video and audio streaming, seamless cross-platform compatibility, and extensive customization options, selecting an accurate media player has never been more pivotal than it is today.
This article delves deeper into the world of modern media players, evaluating their capability to meet diverse needs such as professional video editing, casual streaming, and media organization. By exploring key points like user interface, compatibility, performance, and customization, this guide aims to help readers make better decisions about the best media players available today for Windows, MacOS, Android, and iOS.
Criteria for selection
The selection of top media players is based on several key criteria:
1. User interface: A well-designed interface is essential for smooth navigation, intuitive use, and customization options such as adjustable themes and button layouts.
2. Supported formats: The player should support both common formats like MP4 and MP3, as well as advanced ones like 4K, HDR, MKV, and FLAC, for versatile media playback.
3. Compatibility: A good media player should work seamlessly across multiple platforms (Windows, macOS, Android, iOS) and allow synchronization of playlists and preferences for an uninterrupted experience.
4. Performance: Optimal performance is necessary, ensuring clear audio and visuals, resource efficiency to prevent lag, and reliability for handling large files and continuous playback.
5. Customization options: The ability to personalize the player through skins, themes, plugins, and adjustable playback settings enhances the overall user experience.
Best media players for Windows
Users of Windows have access to a wide array of media players, offering everything from advanced customization options to seamless playback for virtually any file format.
AVS Media Player
This is a lightweight media player compatible with all popular video, audio, and image formats, with a manageable interface and surround sound support, making it ideal for casual users.
- Key features and specifications: The player supports a comprehensive range of video and audio formats, including MKV, MP4, FLAC, and 4K playback.
- Strengths: Simple and neat interface, excellent for casual users.
- Weaknesses: Limited advanced customization options.
- Compatibility: Compatible with most modern video and audio formats.
- User interface: Uncomplicated and easy to navigate.
- Pricing: Free.

Get your AVS Media Player today. Try it now!
VLC media player
This is a highly versatile, open-source player known for its cross-platform compatibility and advanced playback features.With its support for streaming, DVDs, and a wide range of formats, VLC remains a go-to player for many users.
- Key features and specifications: Open-source, and compatible with virtually all file formats, including 4K and HDR.
- Strengths: Fully customizable, and supports streaming and plugins.
- Weaknesses: The interface might appear outdated to certain users.
- Compatibility: Works seamlessly with almost all file formats.
- User interface: Functional but not very modern.
- Pricing: Free.

PotPlayer
A Windows player rich in features and light in weight, offering smooth playback, extensive customization, and support for several formats and codecs.
- Key features and specifications: Lightweight, compatible with 3D video playback, and high-quality rendering.
- Strengths: Advanced settings and exceptional playback quality.
- Weaknesses: Casual users may feel overwhelmed due to advanced options.
- Compatibility: Handles all major video and audio formats.
- User interface: Fully customizable with themes and skins.
- Pricing: Free.

Top media players for MacOS
Users can enhance their entertainment experience on macOS with some top-tier media players, designed to deliver seamless performance, great visuals and unmatched versatility.
Elmedia player
A macOS media player with built-in streaming and subtitle support, offering both free and pro versions. Elmedia also allows users to stream content to devices like Apple TV, including 3D video and advanced audio settings.
- Key features and specifications: AirPlay, 4K playback, and advanced subtitles.
- Strengths: Smooth design, and integrates well with macOS features.
- Weaknesses: The free version has access to limited features.
- Compatibility: MKV, MP4, FLAC, and more.
- User interface: Polished and natural.
- Pricing: Free with a paid Pro version.

IINA
This is a modern MacOS exclusive media player designed for a seamless experience, featuring a sleek UI, gesture controls and dynamic customization. IINA integrates seamlessly with macOS, offering modern features like Touch Bar support and dark mode.
- Key features and specifications: Built for macOS, it offers Touch Bar and Picture-in-Picture mode.
- Strengths: Modern design, and seamless integration with macOS.
- Weaknesses: Limited support for plugins.
- Compatibility: Most popular formats.
- User interface: Modest and user-friendly.
- Pricing: Free.

Best media players for Android
Maximize the full potential of an Android device with these top media players, which offer smooth playback, diverse format support, and customized features for an enhanced viewing experience.
MX player
This is a popular Android media player that has a user-friendly interface for smooth video playback. It offers features like multi-core decoding, making it a great choice for Android users seeking high-quality playback.
- Key features and specifications: Multi-core decoding, hardware acceleration, and subtitle gestures.
- Strengths: Highly responsive, and excellent for video playback.
- Weaknesses: Ads in the free version.
- Compatibility: Many formats, including 4K.
- User interface: Neat and easy navigation.
- Pricing: Free with a premium version.

VLC for Android
This is the mobile version of VLC, preserving its extensive format compatibility, network streaming capabilities, subtitle synchronization, and ad-free experience for a better mobile viewing experience.
- Key features and specifications: All-in-one media player with zero ads.
- Strengths: Open-source, and compatible with streaming and subtitles.
- Weaknesses: Occasional bugs.
- Compatibility: Compatible with all popular formats.
- User interface: Simple but effective.
- Pricing: Free.

KMPlayer
This is a high-performance media player offering ultra HD and 8K resolution playback, customization, and cloud integration. It also comes with VR and 360-degree video support.
- Key features and specifications: 4K and 8K playback, with cloud storage integration.
- Strengths: Advanced settings and a high-quality playback.
- Weaknesses: Ads in the free version.
- Compatibility: Extensive format support.
- User interface: Modern and polished.
- Pricing: Free with in-app purchases.

Top-rated media players for iOS
Discover the best media players for iOS, made to deliver seamless playback, adaptable format support, and a user-friendly experience.
Infuse 7
A premium media player for Apple devices, known for its refined design, seamless streaming, and automatic metadata retrieval. It allows users to organize and stream media effortlessly from various sources, including cloud services.
- Key features and specifications: AirPlay, 4K HDR, and cloud integration.
- Strengths: Excellent UI, and seamless streaming.
- Weaknesses: Subscriptions are required for advanced features.
- Compatibility: Handles most major formats.
- User interface: Modern and neat.
- Pricing: Free with premium plans.

PlayerXtreme media player
This is an adaptable cross-platform media player with strong file management and streaming capacity. It also supports a wide range of file types, enabling users to manage their media libraries efficiently.
- Key features and specifications: Network streaming, subtitles, and media organization.
- Strengths: Easy to use, and robust format support.
- Weaknesses: The free version does not have advanced features.
- Compatibility: Wide range of popular formats.
- User interface: Polished and user-friendly.
- Pricing: Free with in-app purchases.

VLC for iOS
This is the iOS version of VLC, bringing its compelling playback features, wide format compatibility, and network streaming to Apple devices. It supports streaming from cloud services and local network drives, ensuring a seamless media experience on Apple devices.
- Key features and specifications: Open-source code, 4K, and HDR playback.
- Strengths: Ad-free and versatile.
- Weaknesses: Interface glitches at times.
- Compatibility: Nearly all formats.
- User interface: Straightforward but effective.
- Pricing: Free.
Concluding thoughts: choosing the perfect media player for your needs
In 2025, media players continue to play a significant role in enhancing digital content experiences.
For Windows users, AVS Media Player stands out for its simplicity, while VLC media player and PotPlayer offer more powerful features for advanced users.
On macOS, Elmedia player presents a neat experience, complemented by VLC and IINA.
Android users can depend on MX player for smooth playback, with VLC and KMPlayer providing robust alternatives.
For iOS, Infuse 7 stands out with its interactive design and features, while PlayerXtreme and VLC deliver a reliable performance.
Choose a media player that best works with your needs, whether it is for professional editing, seamless streaming, or enhanced customization.
Useful links

Dear AVS4YOU Users and Blog Readers,
As 2024 comes to a close, we want to express our heartfelt gratitude for your loyalty and to share our excitement for what’s ahead in 2025!
This year has been one of growth, technological innovation, and collaboration. None of this would have been possible without your ongoing support. Your feedback, suggestions, and engagement have been crucial in shaping the direction of AVS4YOU.
Here’s a quick overview of our latest developments.
Exciting Upgrades
We’re thrilled to highlight several key upgrades to the AVS4YOU package, all designed to enhance your experience and support your creative projects. Let’s take a look at what’s new:
- 5K/6K/8K Support
With higher resolution content becoming the new standard, we’ve raised the bar by adding support for 5K, 6K, and 8K video formats. Now you can edit, process, and export ultra-high-definition videos without sacrificing quality. - Unicode Versions
As our community grows more diverse, we’ve introduced Unicode versions for many of our programs. This update allows you to easily edit and process text in a wide range of languages. - Faster Video Caching
Efficiency is key in video editing, which is why we’ve optimized video caching in AVS Video Editor, allowing you to preview and edit your content faster than ever before. - Enhanced Multi-Core Support
Our improved multi-core processing ensures that AVS4YOU apps run more smoothly, handle larger projects with ease, and boost overall performance, whether you’re editing a short clip or working on a full-length production.
Future Plans for 2025
Wrapping up 2024, we’re not slowing down. The coming year promises even more exciting developments, and we can’t wait to share them with you. We’re continuously working to improve the user experience, optimize performance, and add new features to make AVS4YOU the ultimate toolkit for video and audio editing—and much more.
A Special Christmas Greeting
At AVS4YOU, we are incredibly fortunate to have such a passionate and supportive community. On this Christmas Eve, we want to send our warmest wishes to you and your loved ones. May this holiday bring you joy, peace, boundless creativity, and the inspiration for incredible projects, stunning slideshows, and engaging podcasts!
Merry Christmas and Happy New Year! 🎄
We can’t wait to make AVS4YOU even better in 2025, and we’re excited to continue this journey with you!
Warm wishes,
The AVS4YOU Team ❤️🎅

While creating a sports video you may want to add a scoreboard to make it look more spectacular and engaging for your audience. It may be quite tricky but this step-by-step guide will help you make a video with a scoreboard easily.
To start with AVS4YOU, you need to have it installed on your PC. Make sure that it is installed correctly. Once done, launch the program and Import media files for a new project. Let’s see how to create a sports scoreboard from scratch.
Creating scoreboard overlay in AVS Video Editor
Step 1. Introduce the score separator
Open your project in AVS Video Editor and add the first text object on the timeline. Set the necessary style and other parameters clicking on Edit Text and insert “:”. Make sure that there is enough space for entering numbers.

Step 2. Set the score numbers
Put a new text line, clone the first text object and place it on the second line. Go to the settings of the second text object and change the text to “0 “ (zero and three spaces). This is the left score value. The spaces are needed for leaving enough space around the colon.

Let’s select the desired Fade In and Fade Out animations which will help us save time in the future.

Repeat the second step and edit the text settings of the 3rd object. Introduce three spaces and 0. This is the right score value.

At this step it is recommended that you select the desired Fade In and Fade Out animations for the third text object. Please note that they should match the animations of the second text object.
Step 3. Change the score parameters
The scheme is ready. To increase the score, you need to duplicate the second or third text object and increase its value. After that put the text object at the right position on the Timeline, aligning the other text objects involved in the “count”, until you reach the point where the score changes again.
Repeat the previous step as many times as necessary unless you reach the desired score values.

How to make an animated scoreboard
To make the scoreboard look more striking, you can add animation.
Step 1. Apply Fade Out to the first score value
Let’s go back to the first value on the left, click on Edit and set the cursor to its final position.

Now, by pressing the “Previous frame” button or the Alt+Left combination, move the cursor one second from the final position to the left.

Click on Fade Out or use the key combination Ctrl+Alt+O. The settings have been defined earlier.

Let’s do the same with the first right value of the score.
Step 2. Add Fade In to the last score value
Click on Edit of the last right value. Put the cursor at the very beginning and move it one second from the initial position to the right to position 1.000 by pressing Next frame (Alt+Right). Apply Fade In (Ctrl+Alt+I) to the left value.

Let’s do the same with the last right value of the score.
Step 3. Set Fade In and Fade Out to the intermediate score numbers
For the remaining values which are different from the first and the last ones, you need to set both Fade In and Fade Out. To do this, simply combine the steps for the first and last value and apply them to the intermediate value.
Done! Repeat the previous steps as many times as necessary until you reach your desired intermediate score values.
Following these steps in AVS Video Editor, you will be able to build a simple or animated scoreboard perfectly with the right elements at hand.

Whether you’re a seasoned content creator or just starting your channel, understanding the nuances of scriptwriting cansignificantly enhance your video production quality. This article delves into the very basic tips for writing an effective YouTube script.
Why is writing YouTube video scripts is essential?
A script helps you organize your content logically. It ensures that your message is clear, concise, and well-structured. Without a script, you might ramble or lose focus, leading to a less engaging video.

Scripts maintain consistency in your delivery. Viewers appreciate a consistent tone, pacing, and style across your videos. Consistency builds trust and keeps your audience coming back for more.
Having a script saves time during filming. You’ll know exactly what to say, reducing retakes and editing time. Efficiency matters, especially if you’re producing regular content.
A well-written script keeps viewers engaged. Hooks, storytelling, and compelling language capture attention. Engaged viewers are more likely to watch your entire video and take action (like, subscribe, or share).
Scripts allow you to incorporate relevant keywords naturally. This improves your video’s discoverability on YouTube. Search engines can’t index spoken words, so written content matters.
Scripts guide your editing process. You’ll know where to insert visuals, transitions, and B-roll. Picture-in-picture videos, recap videos, and other creative edits become smoother.
How to prepare a good script for your video?
Here’s a step-by-step guide to help you craft an effective script.
Understand Your Audience. Before you start writing, know your target audience. Consider their interests, preferences, and what they’re looking for in your video.
Set Clear Objectives. Define your video’s purpose. What do you want to achieve? Whether it’s educating, entertaining, or inspiring, having clear objectives will guide your script.

Craft a Strong Introduction. Grab viewers’ attention from the start. Use a compelling hook or pose a question to pique curiosity.
Build Your Narrative. Organize your content logically. Outline key points or steps you’ll cover. Keep it concise and focused.
Keep It Conversational. Write as if you’re having a conversation with a friend. Avoid jargon or overly formal language.
Incorporate Visual Cues. Describe visuals, transitions, and any on-screen actions. Visual cues enhance engagement.
Conclude with a clear Call to Action (CTA). Summarize your main points and encourage viewers to take action (e.g., subscribe, like, or visit your website).
Review and Refine. Edit your script for clarity, flow, and coherence. Practice reading it aloud to ensure it sounds natural.
Free software for writing YouTube video scripts
Many applications offer writing text out there, we recommend you to use ONLYOFFICE Desktop Editors at no cost. Compatible with Windows and other operating system, it is an excellent choice for writing YouTube video scripts.

The interface is easy to navigate — all familiar tools are grouped in tabs. Here, you can apply formatting to your script, craft a template, insert references, protect scripts from unauthorized access using passwords, easily translate scripts into 130+ languages, and more.
Get ONLYOFFICE Desktop Editors for your platform today for free!
Besides, you can create video scenarios online in any browser.
Useful links
AVS4YOU summer release: What’s new?

Why create picture-in-picture videos?
Picture-in-picture (PiP) videos offer several benefits and creative possibilities. Here are some reasons to create them:
Enhanced Explanation: Overlaying an image or video on top of the main content allows you to provide additional context or explanations. For example, in tutorials or educational videos, you can show a close-up of specific details while explaining concepts.
Visual Comparison: PiP lets you compare two videos or images side by side. This is useful for product comparisons, before-and-after demonstrations, or showcasing different angles simultaneously.
Engagement: PiP videos capture viewers’ attention by presenting multiple elements at once. Whether it’s a reaction video, sports highlight, or news broadcast, PiP keeps viewers engaged.
Storytelling: Use PiP to tell a more comprehensive story. Overlaying related visuals can add depth and emotion to your narrative.
Branding: Display your logo, watermark, or branding elements in a corner of the video. It reinforces your identity without distracting from the main content.
Multicamera Editing: PiP is essential for multicamera setups. You can switch between different angles seamlessly, creating dynamic and professional-looking videos.
Remember, the key is to balance PiP elements so they enhance rather than overwhelm your content.
How to add picture to a video in AVS Video Editor?
AVS Video Editor is one of the most comprehensive Windows applications to insert a picture into a video. Follow these steps.

Step 1. Launch the AVS Video Editor on your computer and import videos by clicking Media Library.
Step 2. Add an image overlay by picking any picture from a library and placing it onto the Overlay line in the timeline.
Step 3. Adjust duration of the added image overlay using the timeline or by clicking the Trim button on the timeline toolbar.
Step 4. Customize position and size. Click on the image overlay in the timeline and use the handles to adjust its position and size within the video frame.
Once satisfied with your video, export the file in your preferred format (MP4 recommended).
Start creating appealing PiP videos for your social media today with AVS Video Editor.
The entire AVS4YOU suite with converters and editors for video, photo, and audio is available with massive discounts up to 70%.
Useful links
We are happy to introduce Major Summer release 2024 with a multitude of enhancements, unicode versions, bug fixes and UI improvements. Nowadays popular GoPro cameras and Samsung flagship smartphones can record 5K/6K/8K video which cannot be reproduced on TVsets and smartphones produced by other brands and older versions. It goes without saying that any manipulations with 5K/6K/8K video files such as trimming, cutting, merging and others are out of the question.
Following the latest video trends and market demands, the summer release aims at better performance on multi-core processors and wider compatibility with modern devices allowing to work with 5K/6K/8K video.
Let’s focus on the main release features.
Unicode versions
The previous update offered unicode versions of AVS Video Converter, AVS Image Converter and utilities. In this release unicode versions of all video programs are rolled out: AVS Video Editor, AVS Video ReMaker, AVS Video Recorder and AVS Screen Capture. If you have forgotten what is meant by a unicode version, you can read the previous release notes here.
Support of AMD AMF hardware decoder (experimental)
You can enable AMD AMF (Advanced Media Framework) hardware decoder on AMD GPU (integrated or discrete) for H.264/AVC, H.265/HEVC, VP9, AV1 video codecs. At the moment it supports Bit depth of 8-bits only.
By an experimental version it is meant that there is no guarantee that AMD AMF hardware decoder will be working like a clockwork on your computer. The more experimental data is gained, the faster we will be able to put it into production.
Support of 5K/6K/8K video
Bulky videos, filmed with GoPro cameras and Samsung brand new smartphones, with codecs H.264/AVC, H.265/HEVC, VP9, AV1, MPEG-4 are supported.
AVS Video Converter can open, reproduce video on preview, export audio and convert such files preserving the original resolution if you choose Frame Size – Original setting. Another option is to convert 5K/6K/8K video files lowering their resolution up to SD/HD/FHD/2K/4K.
AVS Video ReMaker allows to open, cut, merge 5K/6K/8K video and save output files with the original resolution whereas AVS Video Editor can export 5K/6K/8K video only to SD/HD/FHD/2K/4K.
All things considered, we recommend you using AVS Video ReMaker which power and capabilities are often underestimated. However, in this particular aspect AVS Video ReMaker outperforms AVS Video Editor allowing you to make quick edits with 5K/6K/8K video files.
Better performance on multi-core processors
The number of logical processors (LPUs) for H.265/HEVC and VP9 software decoders has been optimized, i.e. the maximum number is limited by the frame size. As a result, there is no excessive consumption of virtual memory which led to program crashes when opening heavy videos in the past. These changes ensure better stability, and in some cases even accelerated video decoding.
As for H.264/AVC common software encoder, the number of working threads has been optimized. It has proved to produce a positive effect on rendering so that virtual memory consumption is reduced and the likelihood of process crashes is significantly minimized.
Optimized video caching scheme
Video caching scheme has been optimized in AVS Video Editor. Now, if there is a queue of files comprising images and videos to be cached, images will be cached first according to their order in the project. After that videos will be cached on the basis of their file size, smaller videos come first.
Video caching can be put on hold automatically while a project is being opened in the program or if there is not enough virtual memory. It ensures better performance and stability.
Filter enhancements
You can select a specific area to which a filter will be applied in a rectangular, ellipse or polygon form in AVS Video Editor and AVS Video Converter, unlike in the previous versions when filters could be added only to the entire frame.
Audiobook covers
Now you can choose any cover from imported audio files for your MP3/M4B audiobooks or upload your own. Moreover, it is possible to save original covers for each chapter of a new MP3 audiobook. There can be many chapters in an MP3 audiobook, each of which having its own cover. In contrast, a newly created M4B aubook includes plenty of audio files, chapters, but there is only one output file with a single cover for the entire audiobook.
Enhanced support of media files
From now on you can work smoother with MP4/M4V/MOV/F4V/3GP video, M4A/M4B audio and HEIC image files that previously had issues during import and conversion. Problems such as crashes, freezes, image scattering, desynchronization will be minimized or completely fixed.
Critical bug fix
The internal error CUDA_ERROR_OUT_OF_MEMORY was fixed when initializing the NVIDIA decoder, which caused the application to freeze when opening video with HEVC 10-bit/12-bit, VP9 10-bit/12-bit codecs on the new NVIDIA drivers 551.x/552.x. The problem was detected in January – April 2024.
Subscription expired?
Get AVS4YOU Unlimited Subscription with a 50% discount till June 20, 2024. Just redeem this code Upd24May when placing an order online.

Creating a professional voiceover for videos can significantly enhance their impact and engagement.
In this article, we’ll explore how to achieve high-quality voiceovers using AVS Audio Editor, a versatile tool for audio processing. Whether you’re narrating a tutorial, adding commentary to a vlog, or producing an explainer video, AVS Audio Editor provides the necessary features to make your voiceovers stand out.
Before you record voiceover
Preparation is key for success in every activity. Here are six simple steps to help you create professional-sounding voiceovers.
1. Set up your recording space
Listen for ambient noise in your recording environment. While you can’t control external noises, you can minimize in-room noise (such as fans, vents, or electronic devices) by temporarily silencing them.

Record in a smaller room with soft surfaces to avoid echo. Carpets, blinds, couches, and foam panels can help improve acoustics.
Windows often cause unwanted sound when squeaking or unexpectedly slamming. Minimize outdoor noises to keep your recording space quiet.
2. Create a great script
Write a clear and concise script that aligns with your video’s content. A well-prepared script ensures smooth delivery and helps maintain focus.

3. Choose the right microphone
Invest in a high-quality microphone. Popular options include the Blue Yeti X, Rode NT USB Mini, or other USB microphones.
Ensure proper microphone placement and adjust settings, e.g., equalizer, compressor, and gain to eliminate background noise and enhance voice quality.
4. Stick to appropriate storytelling emotions
Deliver your lines with appropriate emotion and pacing. Match your voiceover to the video’s context.
Synchronize your voiceover with the visuals to create a seamless experience for viewers.
5. Practice and refine
Practice reading your script to improve your delivery. Pay attention to clarity, volume, and pronunciation.
Refine your voiceover by listening critically and making necessary adjustments.
6. Edit your voiceover
Use recording software like AVS Audio Editor to record and edit your voiceover. Our editor provides tools for noise reduction, equalization, and trimming on Windows computers.

How to record voiceover with AVS Audio Editor?
In AVS Audio Editor, you can easily record voiceover to further use it as a separate audio track. Our application is compatible with the latest and older Windows computers, from XP to Windows 11.
Step 1. Go to Record tab and make sure your microphone is set as an input source in the upper left corner.
You can also click Test Input to adapt volume levels and play with settings, such as balance and gain. However, we recommend beginners to stick to the default settings.

Step 2. Click the red circle icon in the toolbar.
Choose the sample rate, sample size, stereo/mono channels, a name for your recording. If these parameters are new for you, proceed with the default ones and click OK.
Step 3. Start speaking, the recording is on.
When you’re done, finish the process by clicking Stop button and save your voiceover.
Need a stable and user-friendly Windows application to record voiceover? Get AVS Audio Editor today!
The entire AVS4YOU suite with converters and editors for video, photo, and audio is available with massive discounts up to 70%.
After recording your voiceover
The last step is to synchronize your voice recording with a video using AVS Video Editor. Follow these simple steps.
Step 1. Open your project in AVS Video Editor and click Import to add audio files.

Step 2. Drag’n’drop your voiceover to the timeline and change its position, if necessary.
Now you can make final touches and export your video with voiceover. Click the button below to see AVS Video Editor in action.
Useful links

What is a recap video?
A recap video is a concise summary that captures the main points and highlights of an event. These videos can be used for various types of events, such as conferences, trade shows, webinars, or even teambuilding activities. By showcasing the magic of your event, recap videos have several benefits:
- Cost-Effectiveness: Recap videos leverage existing event content, making them a budget-friendly option.
- Increased Visibility: Shareable across digital platforms, these videos boost brand awareness and visibility.
- Audience Engagement: Remind attendees of their experience, encouraging them to watch on-demand content and sign up for future events.
- Attract Sponsors and Partners: Well-crafted recap videos can attract sponsors and partners for future events.
Considering these promising benefits, no surprise that vloggers and social media managers stick to recap videos.
How to prepare video material?
When shooting another video, let your creativity guide you. These are just common tips that may help plan out the future recap video.

Strong Start: Begin with an attention-grabbing moment from the event. Use dynamic shots or impactful sound bites to engage viewers right away.
Storytelling: Organize your video like a story. Highlight key moments, transitions, and emotions. Create a narrative flow that keeps viewers interested.
B-Roll Footage: Mix event footage with B-roll (additional shots) to add context and variety. B-roll can include venue shots, behind-the-scenes glimpses, or close-ups of details.
Music Selection: Choose background music that complements the mood of your recap. Upbeat tunes work well for energetic events, while softer melodies suit more reflective occasions.
Text Overlays: Use text overlays sparingly but effectively. Add captions, event names, or speaker introductions to enhance understanding.
Color Grading: Apply consistent color grading to your clips. This helps unify the visual style and gives your video a professional look.
Call to Action (CTA): End your recap with a clear call to action. Encourage viewers to subscribe, visit your website, or attend the next event.
Remember, concise storytelling and visual appeal are key to creating memorable recap videos.
Creating a recap video in AVS Video Editor
AVS Video Editor is a video editing software for Windows that excels in creating engaging recap videos. Our application offers an intuitive interface, making it accessible for beginners and experienced editors alike.
Step 1. Open AVS Video Editor and click Import to add your event footage, photos, and audio.
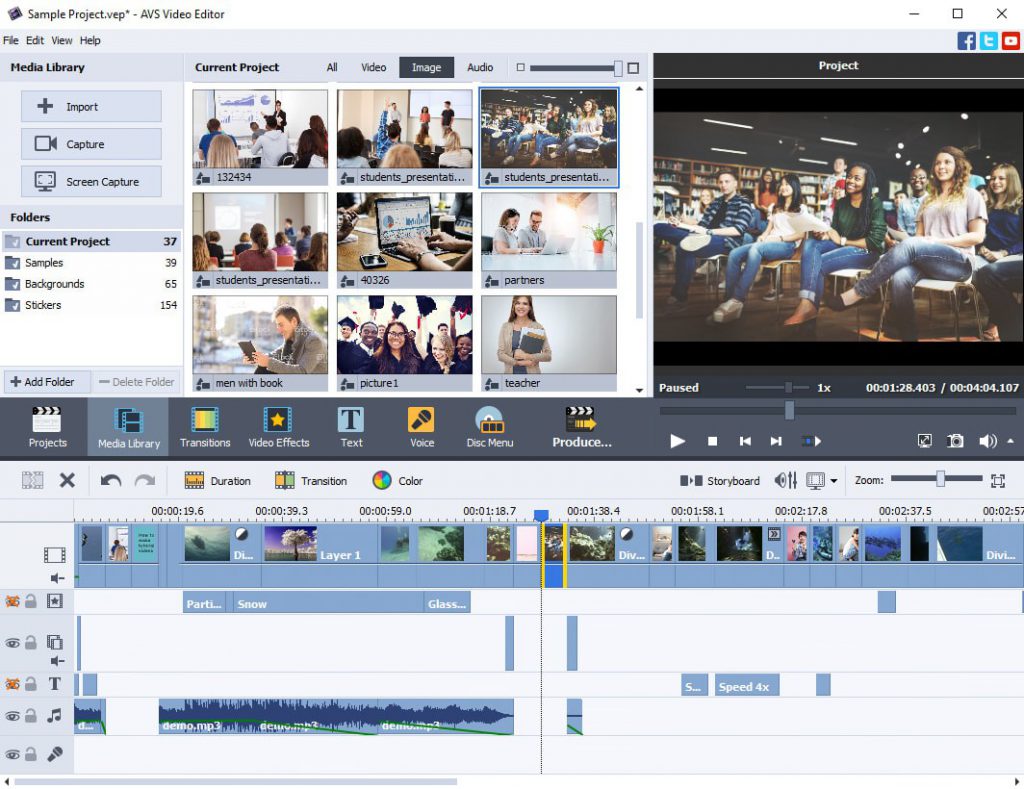
Step 2. Drag and drop your videos and photos onto the timeline and arrange their order.
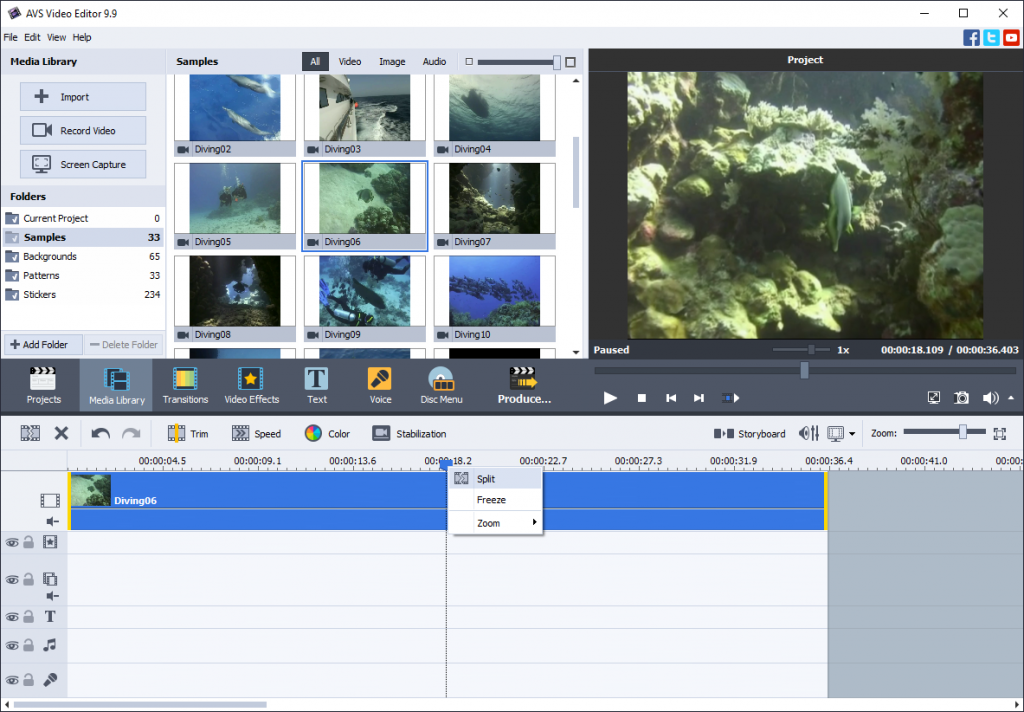
Step 3. Trim clips to the desired length. Select a video on the timeline, click Trim, and move the clip’s borders internally to cut off the beginning or the last seconds of a clip.

If necessary, you can split videos by right-clicking them on the timeline and choosing Split. Afterwards, you can cut off the unwanted parts of your footages.
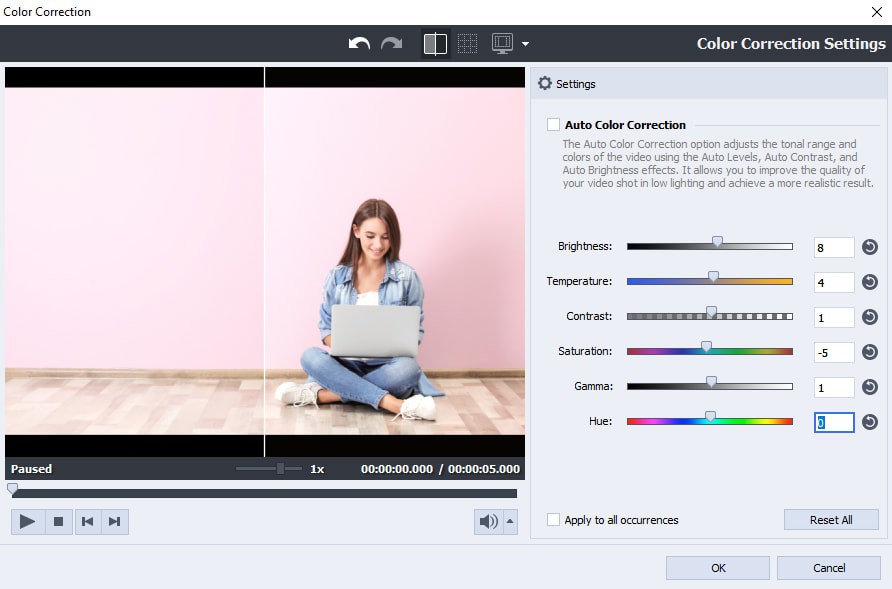
Step 4. Adjust color correction (Brightness, Temperature, Contrast, Saturation, Gamma, and Hue settings).
Add captions to describe what’s happening on the screen. Besides, consider including subtitles to your video.

Add background music, adjust volume, and apply fades. In this article, you can learn more audio editing basics in video projects.
Step 5. Export your recap video.

Start creating appealing recap videos for your home library or social media today with AVS Video Editor.
The entire AVS4YOU suite with converters and editors for video, photo, and audio is available with massive discounts up to 70%.