Category: Uncategorized

Introduction
AI-generated videos are becoming a powerful tool for content creation, helping creators and brands produce high-quality clips faster than ever. However, raw AI clips are rarely ready for social media right away.
Each platform, be it TikTok, Instagram, YouTube, Facebook, or LinkedIn, has its own technical requirements and audience expectations. A video that works perfectly on one platform may look cropped, compressed, or unprofessional on another.
This is why optimizing AI clips matters. Proper conversion, formatting, and enhancement can significantly improve engagement, visibility, and viewer retention. In this post, you’ll learn how to adapt AI-generated videos for social media and make them stand out.
Key specifications for popular social media platforms
Before creating your AI clips, it’s important to understand the basic video requirements of major platforms. Below is a breakdown of key specifications for the most popular ones:
| Platform | Aspect Ratio | Resolution | Duration |
| Instagram (Reels / Stories) | 9:16 | 1080 × 1920 | Up to 90 seconds (varies by format) |
| TikTok | 9:16 | 1080 × 1920 | Up to 10 minutes (recommended: 15–60 seconds) |
| YouTube Shorts | 9:16 | 1080 × 1920 | Up to 60 seconds |
| YouTube (standard videos) | 16:9 | 1920 × 1080 or higher | Flexible |
| 1:1 or 16:9 | 1080p recommended | Flexible | |
| 1:1 or 16:9 | 1080p recommended | Up to 10 minutes (shorter performs better) |
Each platform prioritizes different formats, so adapting your AI clips accordingly is essential for better reach and engagement.
Step-by-step guide to resizing and formatting AI videos
AI-generated videos often come in standard formats that need adjustment before publishing. Here’s how to convert them properly:
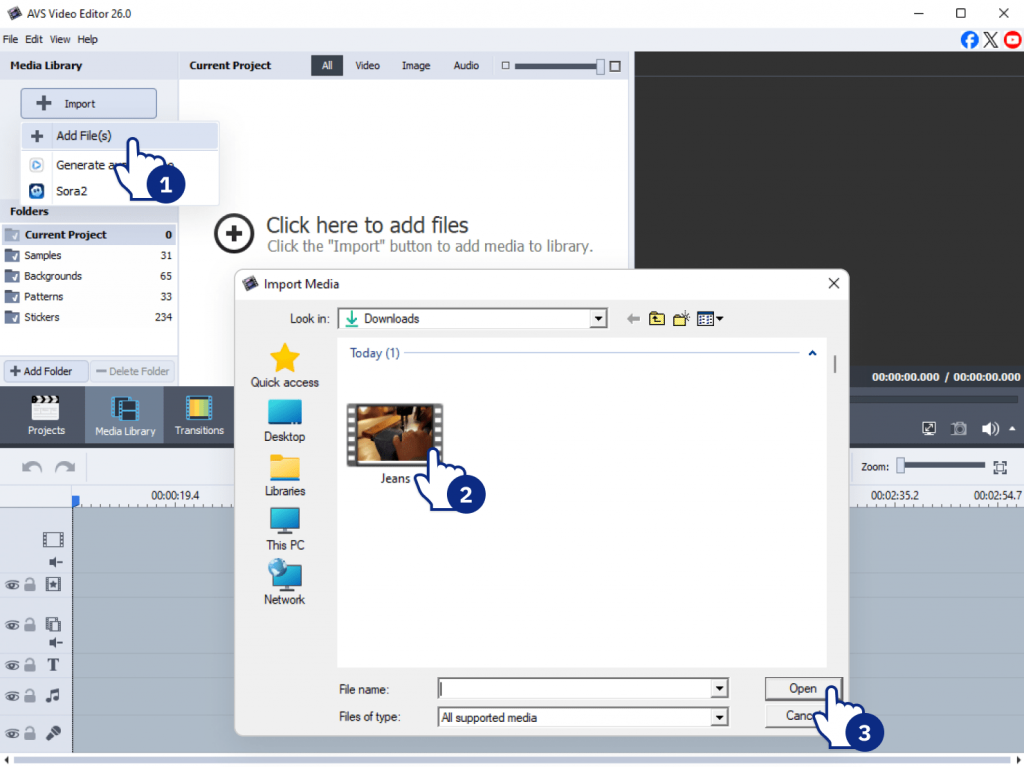
- Import your AI video
Open your file in AVS Video Converter.
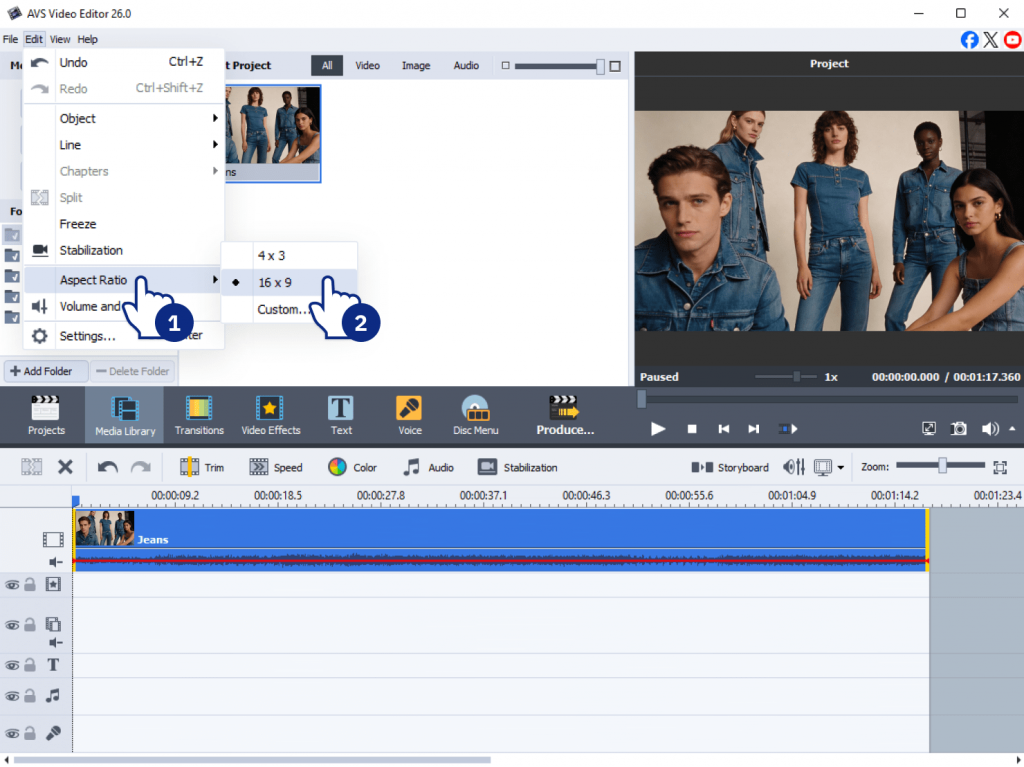
- Select the target format
Choose the platform-specific aspect ratio: 9:16 for TikTok and Reels, 1:1 for Instagram feed, 16:9 for YouTube
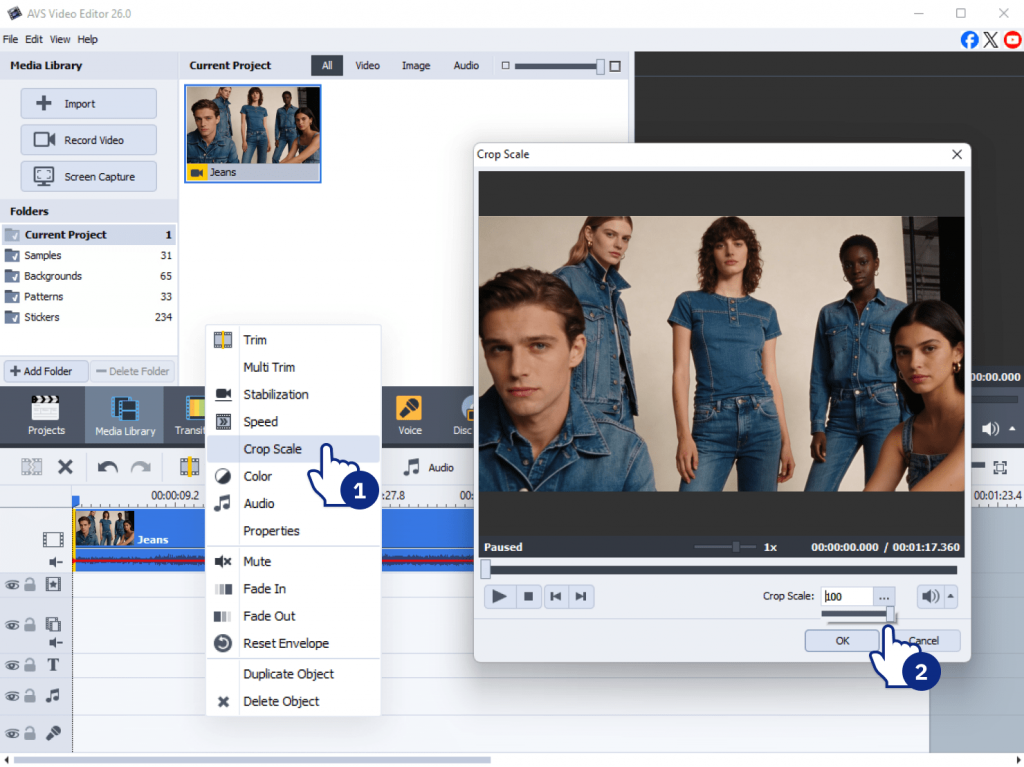
- Adjust resolution and cropping
Ensure important visual elements remain centered after resizing. Avoid cutting off key content.
- Choose the right output format
MP4 is the most widely supported format. MOV is also useful for high-quality exports on Apple devices.
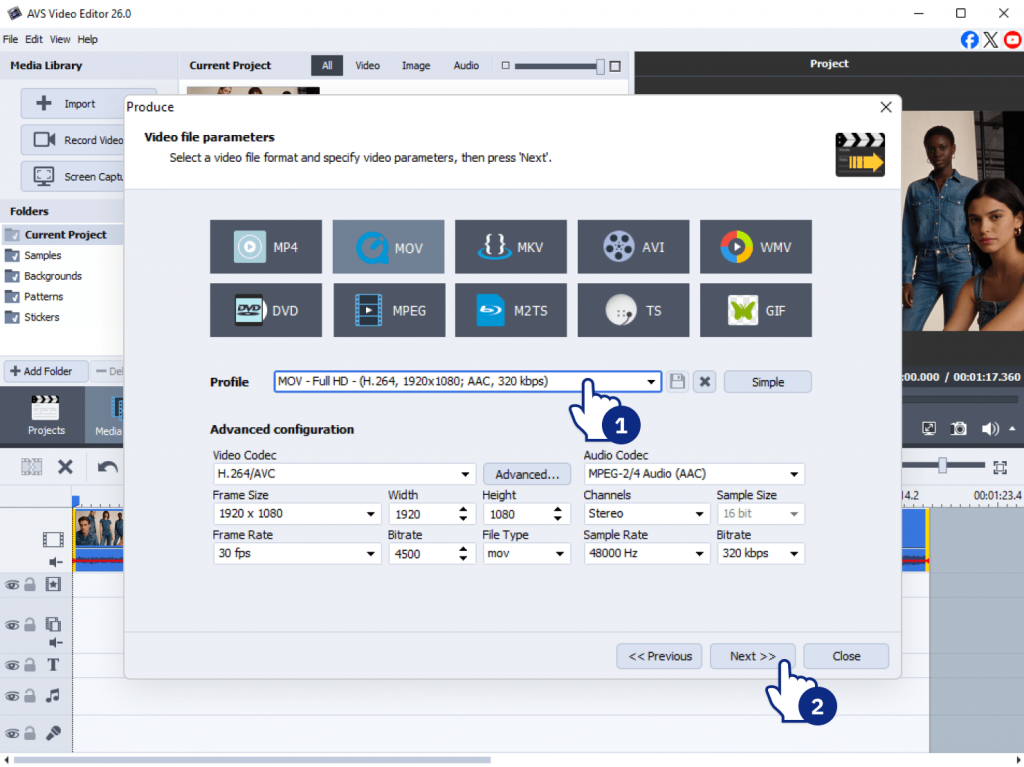
- Export the video
Save your optimized clip with the correct settings for your target platform.
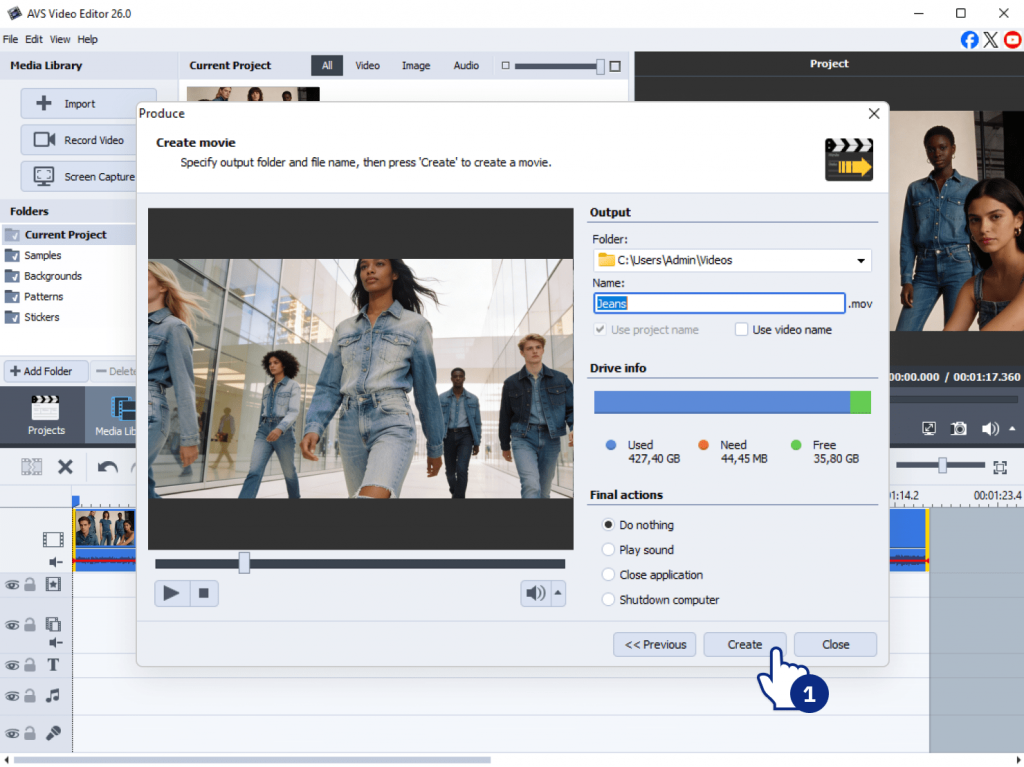
To maintain quality, avoid excessive compression during resizing. Always preview your video before exporting.
Enhance AI clips for social media engagement
Conversion makes your video playable, but video enhancement makes it watchable. Raw AI clips sometimes lack the dynamic elements needed to stop a scrolling user. For better viewer engagement, enhance AI clips with effects, clear captions, and strong branding elements.
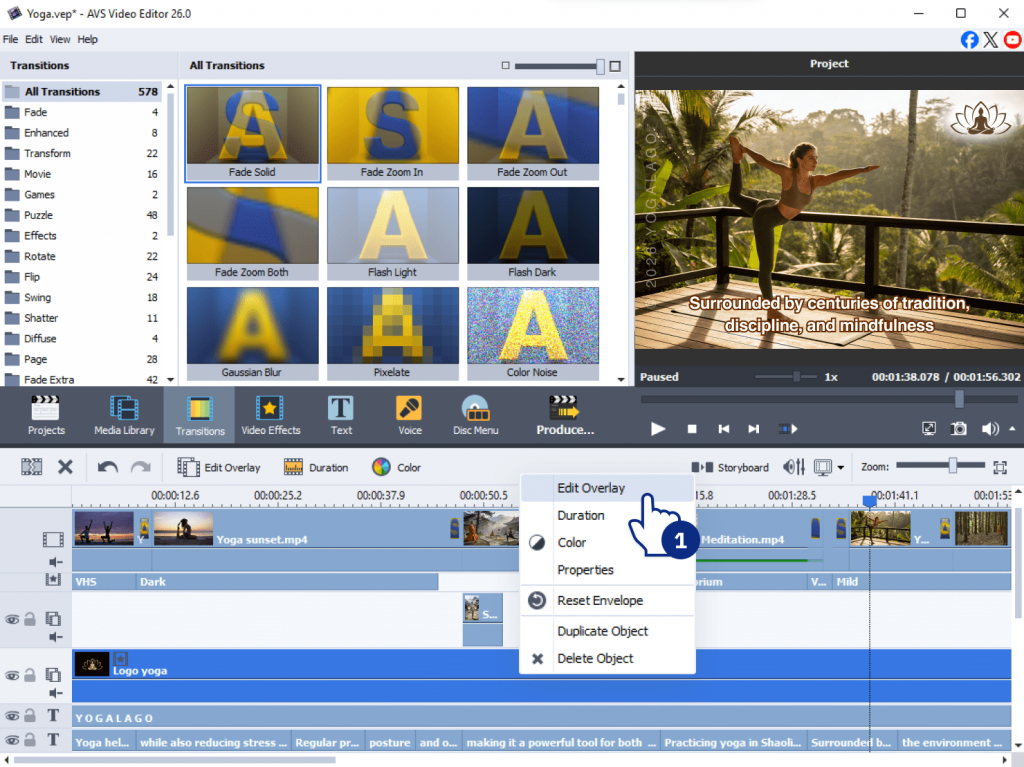
Visual effects: use filters, transitions, and motion overlays to make clips more dynamic.
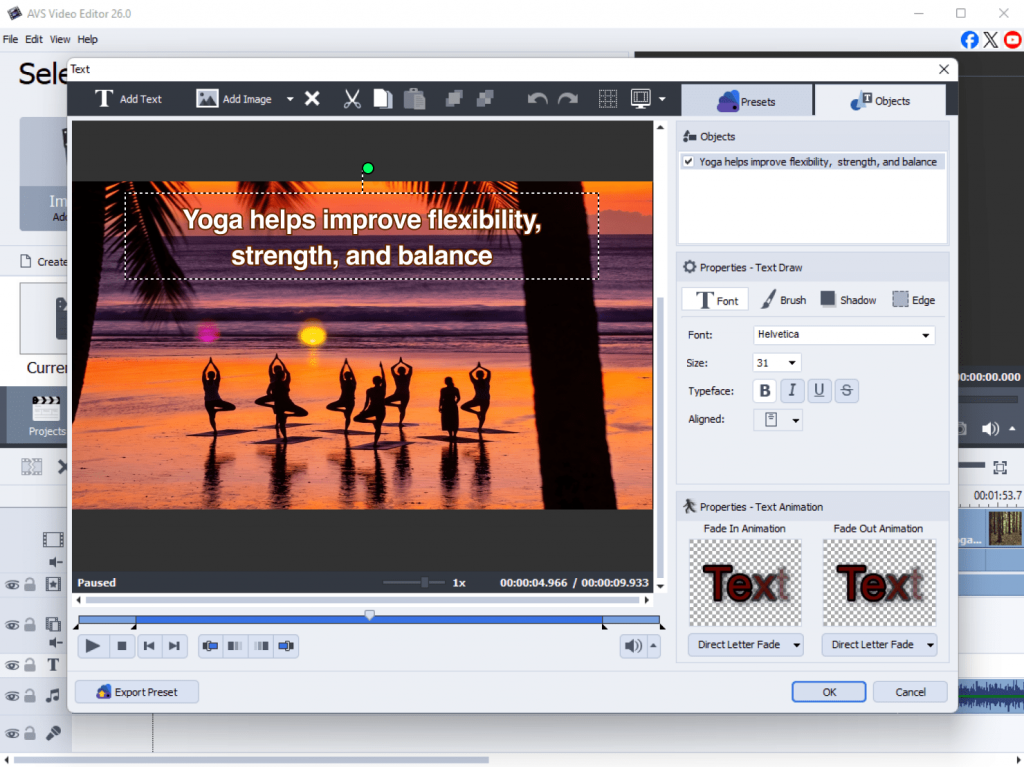
Text overlays: add captions, subtitles, or key messages to improve accessibility and retention.
Branding elements: include logos, brand colors, and watermarks to maintain identity across platforms.
AVS4YOU plugins allow you to add professional flair with just a few clicks. You might remove blur to make a generated landscape pop, or use a dynamic transition to move between scenes. These small improvements make your AI clips look like expensive, custom-produced assets. At the same time, AVS4YOU AI plugins speed up the process, helping you apply professional-grade enhancements without complex editing.
Optimize AI-generated video
Creating a beautiful video means nothing if it takes too long to load or fails to attract clicks. Optimizing your AI clips ensures they perform well in everyday use. You must balance high-definition visuals with efficient file sizes.
Key optimization tips include:
Compress without quality loss
Reduce file size to ensure fast loading while preserving clarity.
Design for mobile viewing
Most social media users watch videos on mobile devices, so prioritize vertical formats and readable text.
Use strong thumbnails
A compelling preview image significantly increases click-through rates.
Test across devices
Check how your video appears on different screens before publishing.
Real-life examples of social media-ready AI clips
Many brands are already using AI-generated videos effectively across social platforms, adapting content to fit both technical requirements and audience expectations.
Product demos
Companies use AI clips to showcase features in a visually engaging way. Instead of traditional filming, AI-generated scenes highlight product use cases, simulate environments, or demonstrate functionality in seconds. For example, short vertical clips work well for TikTok and Instagram Reels, focusing on quick, eye-catching moments, while longer horizontal versions can be used on YouTube for more detailed demonstrations.
Tutorials
Step-by-step guides created with AI visuals simplify complex topics and make them easier to follow. AI generates unified videos, animations, or even virtual presenters, which is especially useful for explaining software, workflows, or educational content. Adding captions and on-screen instructions improves accessibility and keeps viewers engaged, particularly on mobile-first platforms.
Behind-the-scenes content
AI-enhanced storytelling helps brands build stronger connections with audiences by showing how products or content are created. This includes AI-generated reconstructions, concept visuals, or stylized “making-of” sequences. Such content performs well on Instagram and LinkedIn, where audiences value authenticity combined with creative presentation.
Successful campaigns usually repurpose the same AI-generated content across platforms. They adjust aspect ratios, edit video length, and refine tone, making clips more dynamic for TikTok, more polished for LinkedIn, or more informative for YouTube. This flexible approach lets maximize reach while keeping production efficient.
Turn AI clips into social media content with AVS4YOU
AI-generated clips are a powerful starting point, but they need proper conversion and enhancement to perform well on social media.
To recap:
- Adjust video formats based on platform requirements
- Use AVS Video Converter for resizing and formatting
- Enhance content with effects, text, and branding
- Optimize for performance, especially on mobile devices
Experimenting with different styles and formats will help you discover what resonates most with your audience.
To streamline your workflow, explore AVS4YOU tools for video conversion and enhancement and turn your AI clips into high-performing social media content.
Useful links

Why AI plugins are the future of branded content
Branded content has become a core part of modern marketing. Audiences expect fresh visuals every single day across various platforms. But producing high-quality videos and images requires expensive gear, large teams, and hours of editing.
Fortunately, artificial intelligence offers a smarter way to work. By using enhaned features of AVS4YOU AI plugins, you can scale your marketing efforts without sacrificing quality. From generating videos with Sora 2, to creating avatar-based content with HeyGen, to applying distinctive visual effects, marketers and creators can produce memorable branded content more efficiently.
The role of AI in crafting unique brand stories
AI plugins do not only automate routine tasks, but they also unlock new creative possibilities.
Here’s how they elevate branded content:
1. Turn ideas into videos instantly
Sora 2, a text-to-video tool, allows you to generate professional-quality clips from simple prompts. Instead of starting from scratch, describe your idea and refine the output.
2. Create avatar-based content at scale
With HeyGen, you can produce videos featuring virtual presenters. This is ideal for tutorials, product explainers, or social media content without hiring actors or filming setups.
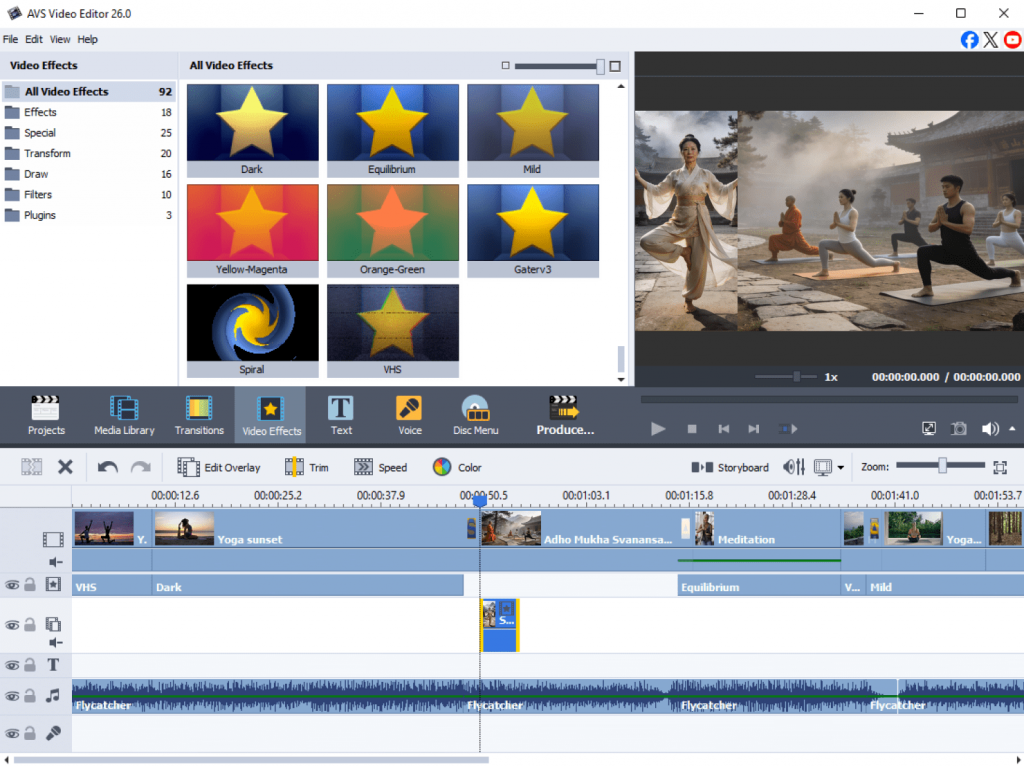
3. Reinforce brand identity with visual effects
VHS or Spiral creative effects help define your visual style. Whether you want a nostalgic look or something more dynamic, these effects make your content recognizable.
4. Restore and enhance existing footage
Older or low-quality videos can be enhanced by applying Effect Restoration Gaterv3. This is especially useful for campaigns that rely on archival material or repurposed content.
This results in faster production, more consistent branding, and greater creative flexibility.
Step-by-step guide: How to develop digital assets with AVS4YOU AI Plugins
Here is a practical example how to create branded materials.
Step 1: Define your brand’s visual style
Before creating content, clarify how your brand should look and feel.
- Choose a consistent color palette and tone
- Decide on a visual direction: clean, bold, retro, cinematic
- Select effects supporting your identity
For example:
- Use VHS for a nostalgic, retro aesthetic
- Use Spiral for energetic, modern visuals
This ensures all content feels cohesive.
Step 2: Generate video content with Sora 2
Start by creating a base video using a text prompt.
Here is an example prompt:
“A serene beach at sunset with our brand logo drawn in the sand, soft waves, warm lighting.”
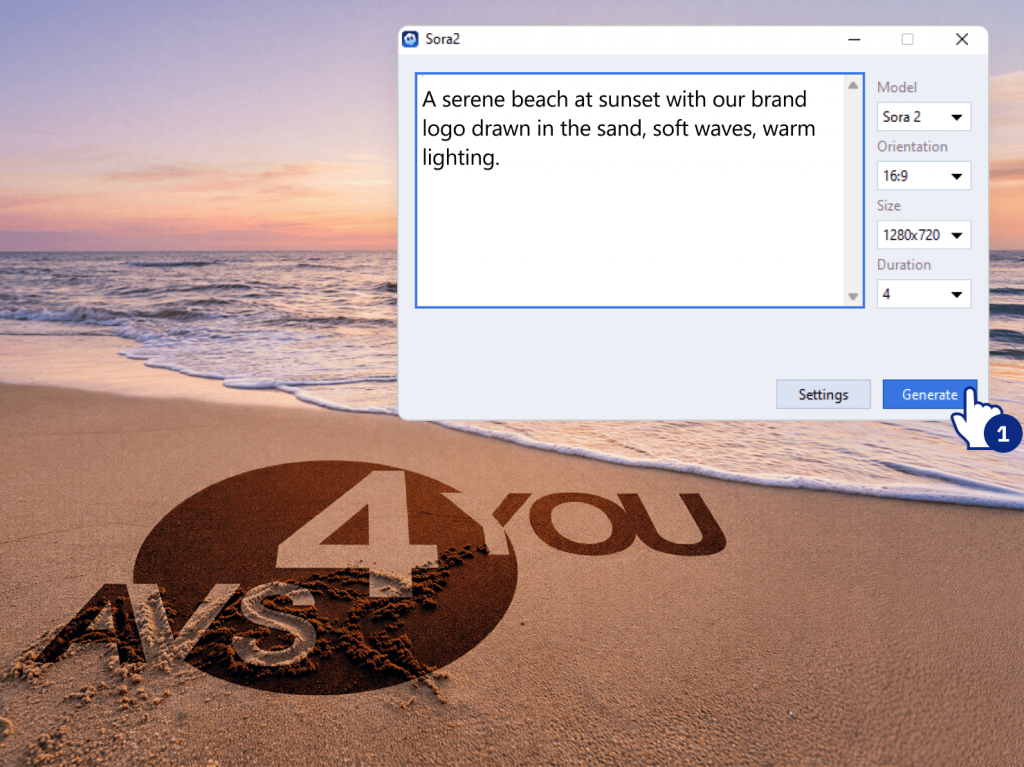
From there, customize resolution (HD, 4K), duration, choose the output format (social media, website, ads).
Tip: The more descriptive your prompt, the better the result.
Step 3: Create avatar-based videos with HeyGen
Next, add a human element using AI avatars.
- Write a short script (intro, explanation, CTA)
- Choose an avatar style to fit your brand
- Add branded backgrounds or overlays
The most common use cases are product tutorials, marketing messages, social media clips.
This is a fast way to produce professional-looking videos without filming.
Step 4: Enhance existing media with Effect Restoration Gaterv3
If you already have footage:
- Upload old or low-quality clips
- Apply restoration to improve clarity and sharpness
- Adjust brightness, contrast, and detail
This step is especially useful for legacy campaigns, customer testimonials and heritage storytelling.
Step 5: Apply creative effects for branding
Finally, add finishing touches.
- Use VHS for intros or flashback sequences
- Apply Spiral for transitions or high-energy moments
- Keep effects consistent across videos
Use effects sparingly so they enhance your message rather than pull attention away from it.
Tips for effective branded content creation with AI plugins
Follow these best practices to get better results:
- Write clear prompts
Be specific about setting, mood, colors, and motion. - Use effects strategically
Too many effects can overwhelm the viewer. - Combine tools for stronger output
For example, generate a scene with Sora 2, then add an avatar with HeyGen. - Test and iterate
Try different styles and formats to see what works best for your audience. - Stay consistent
Maintain the same tone, colors, and visual identity across all assets.
Real-life applications of AI plugins for branding
AI plugins are flexible and work across many scenarios:
Social media campaigns
Create short, eye-catching videos with dynamic visuals.
Tutorials and explainers
Use avatar-based videos to simplify complex topics.
Heritage and storytelling campaigns
Restore old footage to highlight your brand’s history.
Product launches
Combine effects and transitions to spark excitement.
A powerful approach is combining Sora 2 for visuals and HeyGen for presentation. This blend helps create first-rate, engaging resources with minimal effort.
Transform your brand’s content with AVS4YOU AI plugins
Artificial intelligence is fundamentally changing how marketers approach video and image production. AVS4YOU’s AI plugins offer an incredibly efficient way to generate, enhance, and stylize your media. They eliminate the traditional barriers of high costs and steep learning curves, putting studio-quality tools directly into your hands.
If you want to improve your marketing strategy and craft engaging visuals faster, it’s worth exploring what AVS4YOU tools can do.
Useful links

In recent years, AI-powered tools have revolutionized how creators work with old photos and videos. Unfortunately, over time media files turn into faded, distorted images that no longer reflects the original picture.They often suffer from such frustrating issues as blurry faces, annoying scratches, flickering light, and hissing audio. In the past, fixing these issues required expensive software and hours of manual frame-by-frame work. Today, artificial intelligence allows creators to automatically sharpen soft images and repair damage without special skills.
In this guide, we will explore how to use AVS4YOU, specifically AVS Video Editor for video and AVS Image Converter for photos, to restore old recordings using AI. We will focus exclusively on sharpening, repairing, color and audio correction.
Prepare your media for restoration and repair
Before starting, it’s important to assess your media files carefully:
Check quality. Import your video or photo and examine it critically. Are the colors completely washed out? Is the audio just static? Is the image slightly soft or riddled with scratches?
Select files wisely. Slightly blurry or scratched media is refined beautifully, but extremely corrupted or unrecognizable footage may look the same, without any improvement.
Set realistic expectations. AI will reduce noise (grain) and sharpen edges, but it won’t create details that never existed. The goal is improvement, not perfection. Not every file will be perfect after restoration because results depend on the original source.
Taking these steps ensures you focus your efforts on files that will benefit most from AI repair and sharpening.
How to improve video quality with AI in AVS Video Editor
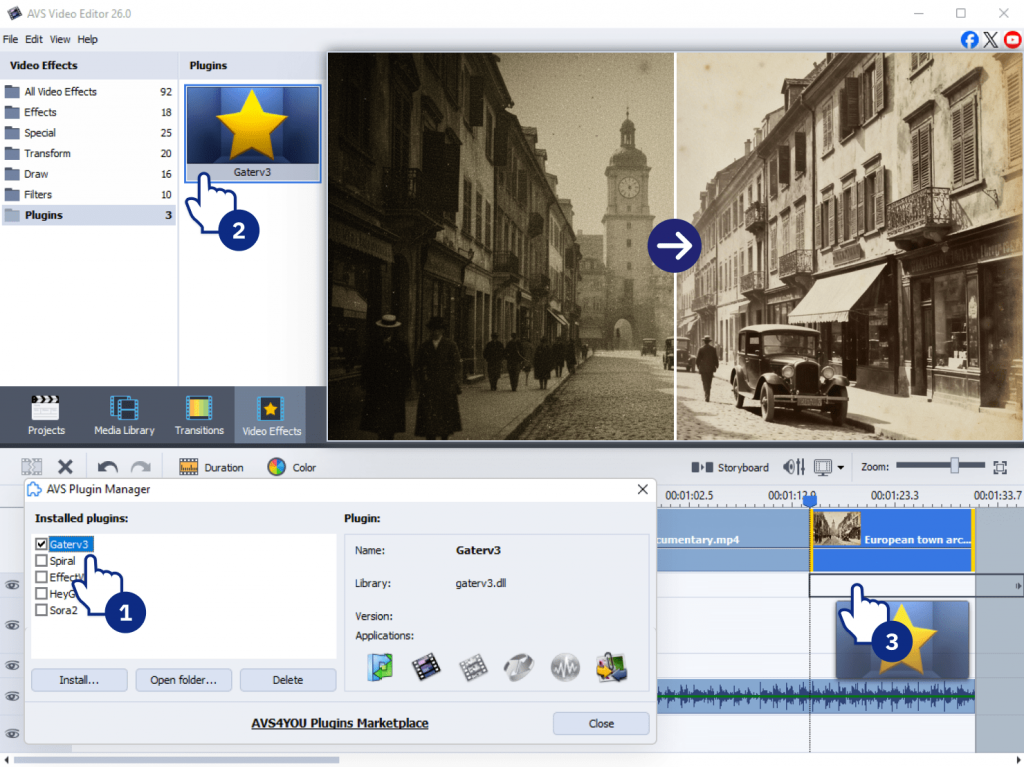
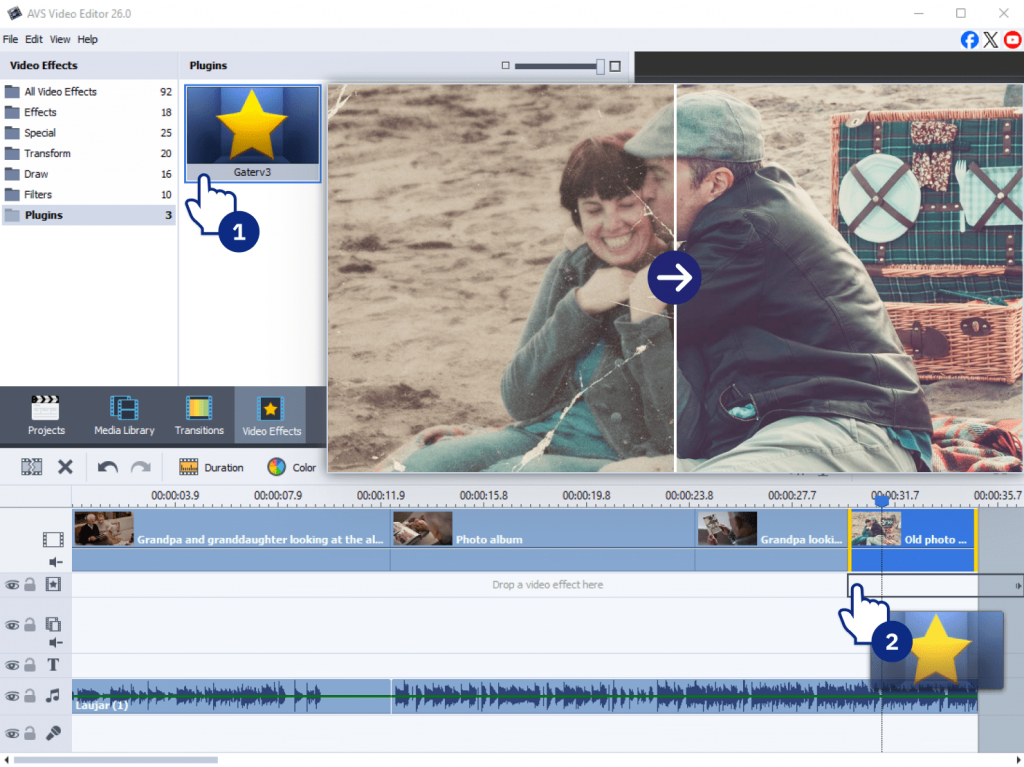
Old videos are often affected by blur, softness, or loss of detail. AVS4YOU’s Restoration Gater v3 offers an easy solution:
Apply Restoration Gaterv3 automatically
The Effect Restoration Gaterv3 is specifically designed to tackle blurry or damaged video frames. It analyzes the image and intelligently reconstructs edges to make footage look crisper without requiring any manual fine-tuning on your part.
How to apply it:
- Open your video in AVS Video Editor.
- Find the Effect Restoration Gaterv3 in the effects menu.
- Apply it to your clip with a single click.
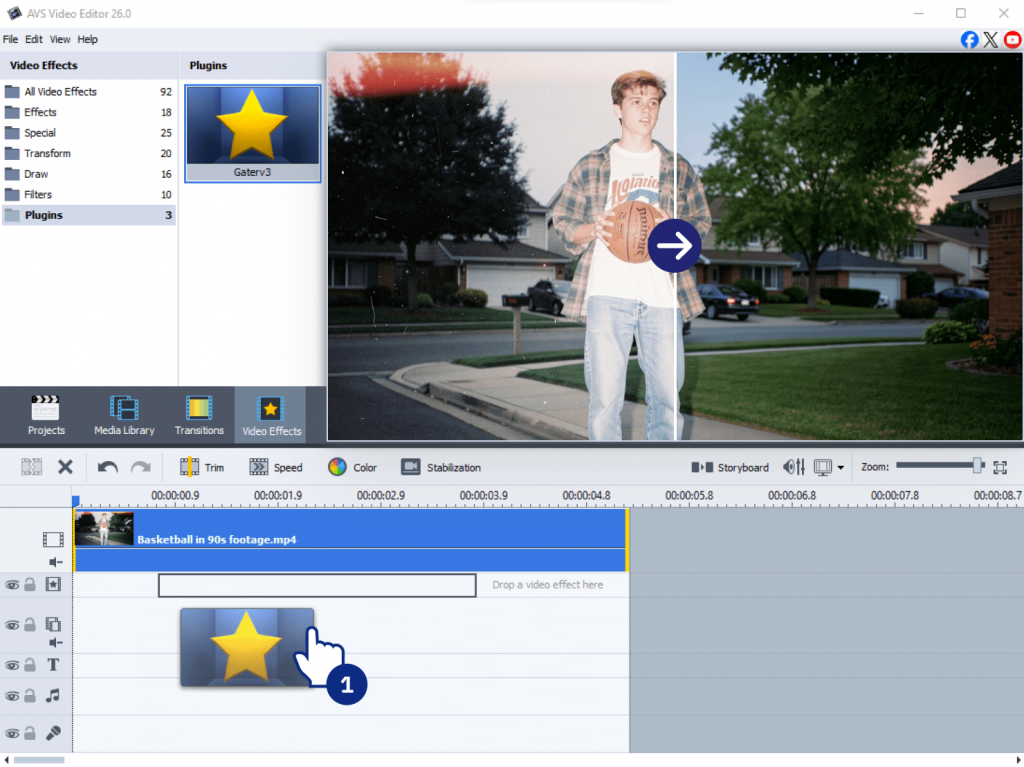
The AI engine automatically assesses the video and applies optimal sharpening and repair settings. You do not need to adjust sliders or experiment with values. Avoid applying the effect multiple times to the same clip, as this can introduce artificial-looking artifacts. One automated pass is typically sufficient for optimal results.
How to repair video in AVS Video Editor
Sharpening makes things clear; repairing fixes things that are broken. Old media typically has physical or digital defects, for example scratches, flicker, or background hiss.
Video restoration techniques
Here are the most common issues and how to solve them in AVS Video Editor:
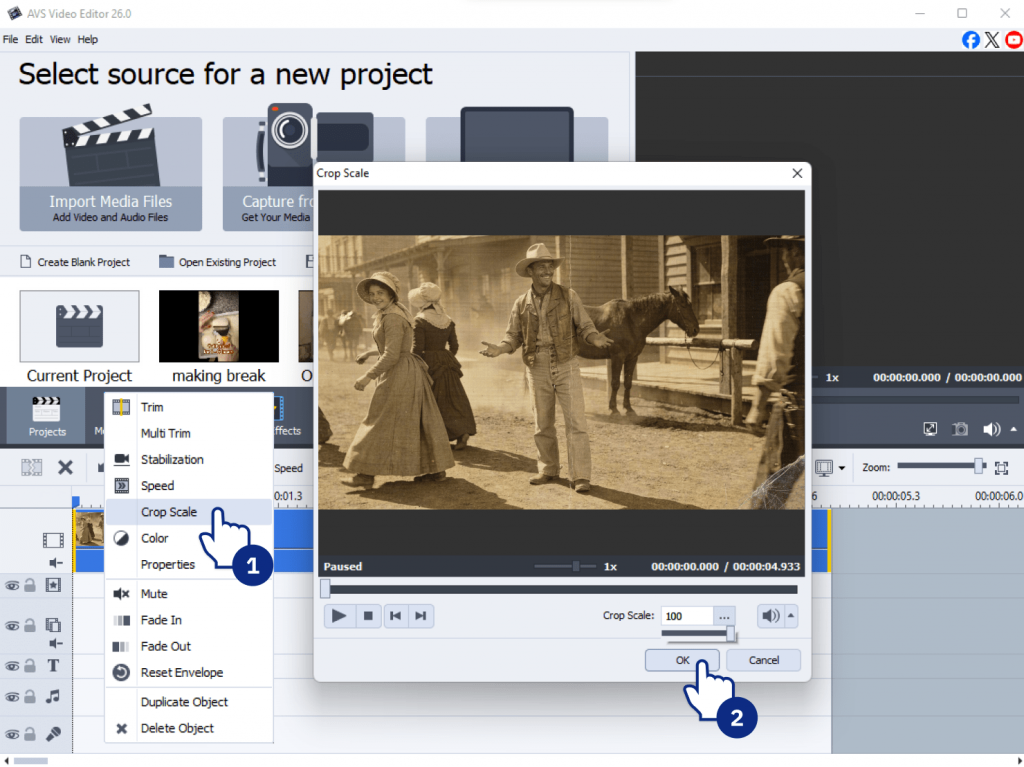
Remove scratches and artifacts
Use the crop or zoom tools to cut out any damaged edges. If there are any minor imperfections, apply a subtle blur effect to conceal them.
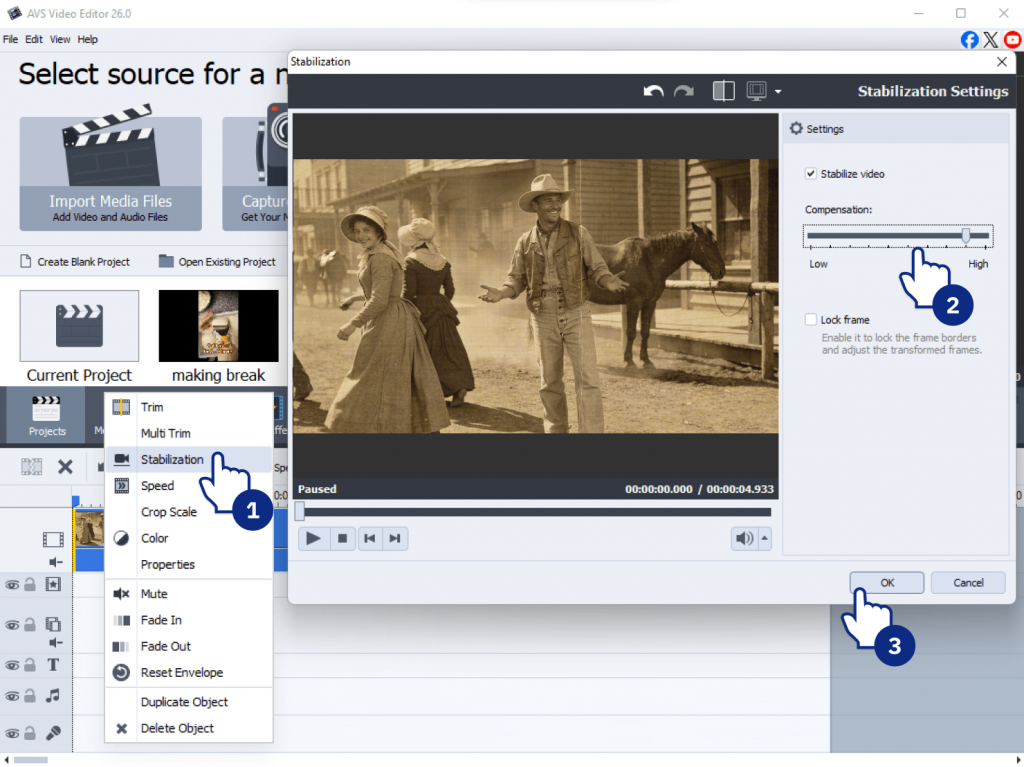
Fix flicker or jitter
Old film reels or shaky home videos can be nauseating. Add video stabilization to steady the frame and reduce jitter so that old footage looks smoother and less shaky.
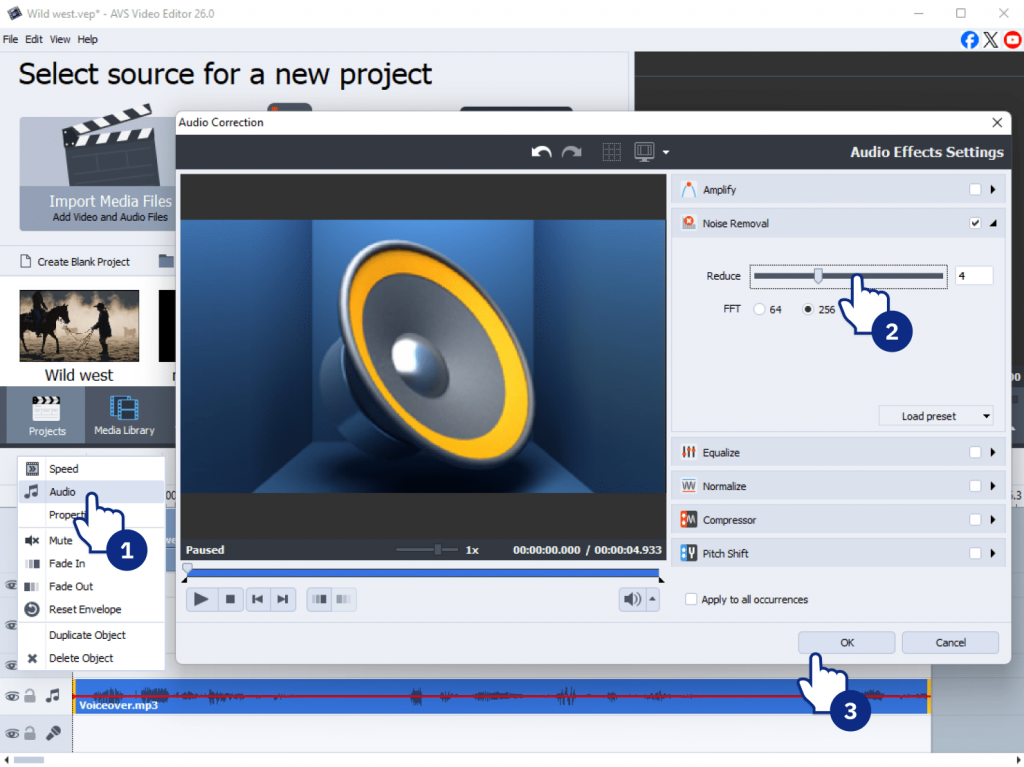
Clean up audio
Old tapes are notorious for hiss and distortion. Use the Noise Removal audio effect to isolate and eliminate background hum, wind noise, or tape hiss.
Suggested repairing workflow
We recommend you following these simple steps to improve the quality of old recordings:
1. Identify problem areas
Watch your clip and note where issues occur (e.g., “0:45 has a flicker”).
2. Apply Restoration Gaterv3
Apply the effect to the clip on the timeline to automatically handle general noise and blur.
3. Preview results
Always check in the preview mode how the corrections you make affect overall quality.
4. Apply manual fixes if needed
If flicker or jitter remains, add stabilization. If audio hiss persists, apply noise reduction.
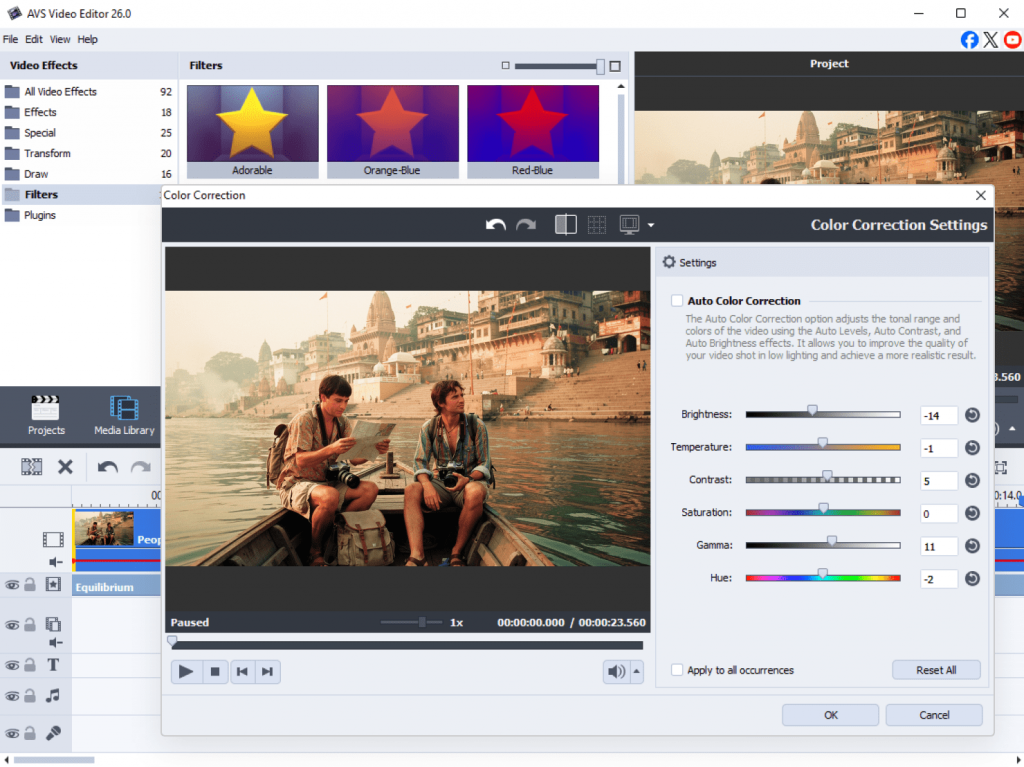
Enhance color and audio
Once the video is stable and clean, it is time to make it beautiful.
- Correct faded or uneven colors for natural-looking footage.
- Adjust brightness, contrast, gamma, hue, and saturation to restore vibrancy.
- Improve audio clarity using noise reduction and normalization to ensure clean sound.
How to restore old photos with AI in AVS Image Converter
The same AI technology that repairs video is also available for still images. AVS Image Converter includes the Effect Restoration Gaterv3 specifically for improving old or damaged photos.
Common photo issues solved:
- Blurry or soft images
- Scratches and dust spots
- Grainy or noisy backgrounds
- Faded or uneven colors
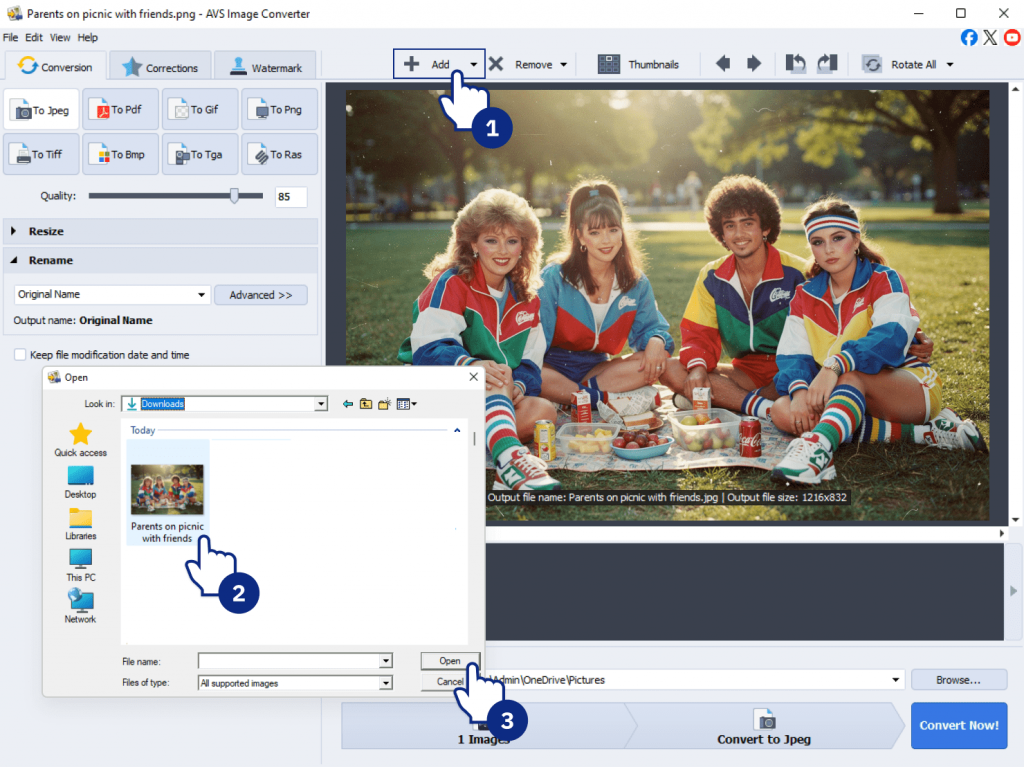
How to restore a photo:
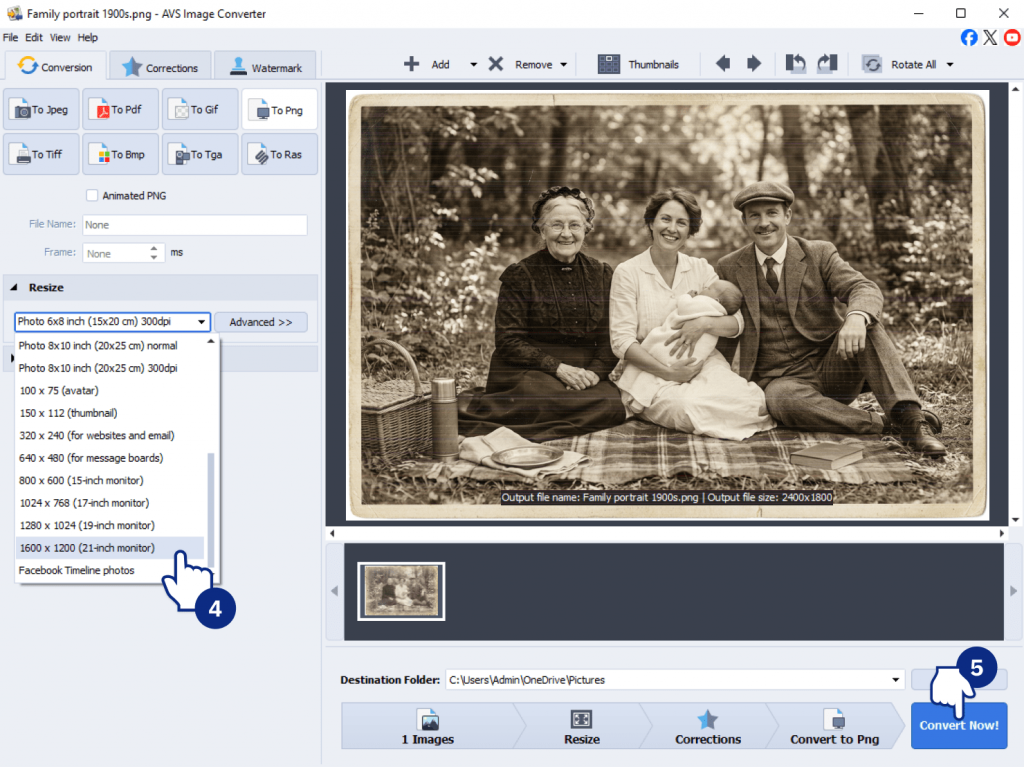
- Open your image in AVS Image Converter.
- Apply the Effect Restoration Gaterv3.
- The AI automatically analyzes the photo and applies sharpening and noise reduction.
- Preview the result. If needed, apply additional color correction tools to adjust brightness, contrast, or saturation.
No manual fine-tuning of sharpening parameters is required because the AI handles the technical work automatically, letting you restore old photos in seconds.
Best practices for AI video restoration and repair workflow
AI is a tool, and like any tool, you need a strategy to use it effectively.
1. Start with small test clips
Do not render the whole 2-hour movie at once. Cut a 30-second segment that represents the worst part of your video. Apply Restoration Gaterv3 to this test clip to understand how the AI behaves before committing to the entire file.
2. Work in stages
Resist the urge to do everything at once. Follow this scenario:
- Repair: Apply Restoration Gaterv3 to handle scratches, noise, and blur automatically.
- Stabilize: Fix flicker or jitter if needed.
- Enhance: Adjust color and audio.
3. Keep backups of original media
Always keep the original, untouched file. If you accidentally over-process or want to try a different approach, having the original means you can always start over without re-importing from source.
4. Encourage experimentation
AVS4YOU offers lots of handy editing tools. Try combining Restoration Gaterv3 with different color filters or audio effects to achieve the optimal result for your specific file.
Following these practices ensures that restoration is safe, effective, and consistent.
Conclusion: Video repair made simple
Thanks to AI powerful technologies, restoring old media is now easier than ever. Though the final results still depend on the original quality, even subtle improvements can significantly enhance your photos and videos. For best results, follow a simple workflow: start with repair, then apply sharpening, and finish with color and audio enhancements. This workflow helps avoid overprocessing and achieve a more natural look.
Ready to restore your old photos and videos? Begin with a small file to test different settings in AVS4YOU, then move on to larger or more complex footage as you refine your approach.
Useful links
Introduction
AI video tools are transforming the way content is created. RunwayML, Pika, and Sora are widely used to generate videos from text, images, or reference clips. However, raw AI-generated videos rarely meet professional standards. Flickering backgrounds, jittery motion, inconsistent colors, and weak audio are still common challenges.
The secret to producing high-quality AI videos lies in a hybrid workflow which combines AI generation with professional post-production. AVS4YOU Multimedia Suite offers all the necessary features to turn AI content into publish-ready videos.
In this guide, you’ll learn practical tips and best practices for generating and optimizing AI videos so that they look professional with minimal effort.
Generating AI videos the right way
Define your purpose and platform
One of the most common mistakes when creating AI videos is skipping the planning stage. It’s easy to jump straight in, but without a clear goal, the result often doesn’t fit the platform you’re publishing on.
For instance, a horizontal video won’t perform well on TikTok or Instagram Reels, where vertical format works best. The same goes for technical settings. Even a good-looking clip can appear poor after upload if the resolution or frame rate isn’t correct.
A better approach is to decide upfront where your video will be used. Then set the right aspect ratio, resolution, and frame rate before generating anything. It’s a small step, but it saves time and helps you create excellent video right from the start.
How to write AI prompts
Many users feel desperate because it is not easy to get the desired result with AI. Most of the time, the problem isn’t the tool, but the prompt.
As simple prompts, for example, “a city at night” are too vague, the AI fills in the gaps. In many cases the result leaves much to be desired. The more clearly you describe the scene (lighting, mood, movement, style), the better the output will match your idea.
It also recommended using higher-quality settings if possible. Faster modes save time, but they require more fine-tuning later.
If you want to improve your prompts, you can read our complete guide here.
Use the best setup for AI video generation
A well-written prompt alone cannot guarantee results because they depend greatly on the quality of the input. Low-resolution or highly compressed images give the AI less detail to work with, making it difficult or sometimes impossible, to remove all imperfections. To avoid this, use top-notch images or reference clips whenever possible.
Review AI generated videos before optimization
After generating your video, don’t jump straight into editing. AI clips may have subtle issues such as flickering, jitter, or awkward frame transitions affecting quality.
Take time to review each clip. Decide what’s usable, what needs trimming, enhancement, or replacement. This quick check saves time and makes your final video cleaner and more polished.
Optimize AI generated videos
Once your AI video is generated, the next step is optimization. Most AI tools don’t produce perfect footage, so post-production is essential for enhancing video quality.
Stabilize motion
From time to time AI struggles with smooth movement, which leads to creating jittery clips or unnatural camera pans. This is especially noticeable in fast-moving scenes or complex camera angles. Video Stabilization in AVS Video Editor smoothes out micro-jitters so that the footage will appear more natural.
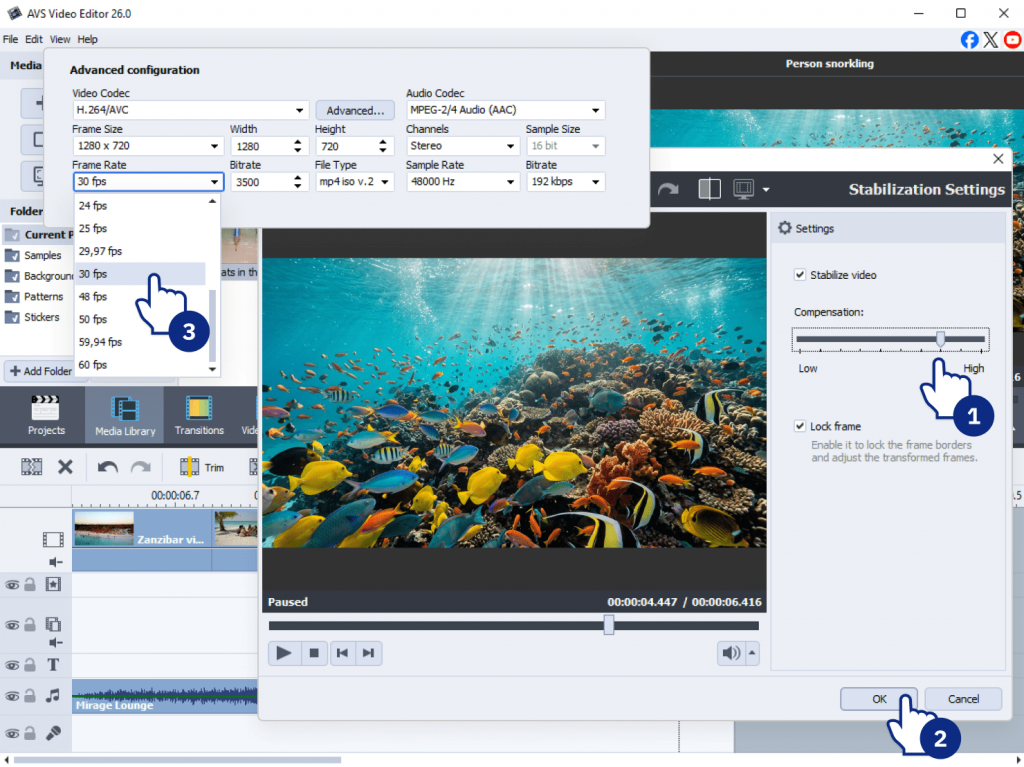
Another helpful technique is frame rate conversion. If your clip was generated at a low frame rate, for example, 12 fps, converting it to 24, 30, or even 60 fps interpolates missing frames, giving the motion a stable, realistic look.
Clean up AI video
AI-generated videos sometimes produce small glitches such as flickering backgrounds, distorted objects, or “melting” textures. These little errors can distract viewers, but you don’t have to delete the whole clip.
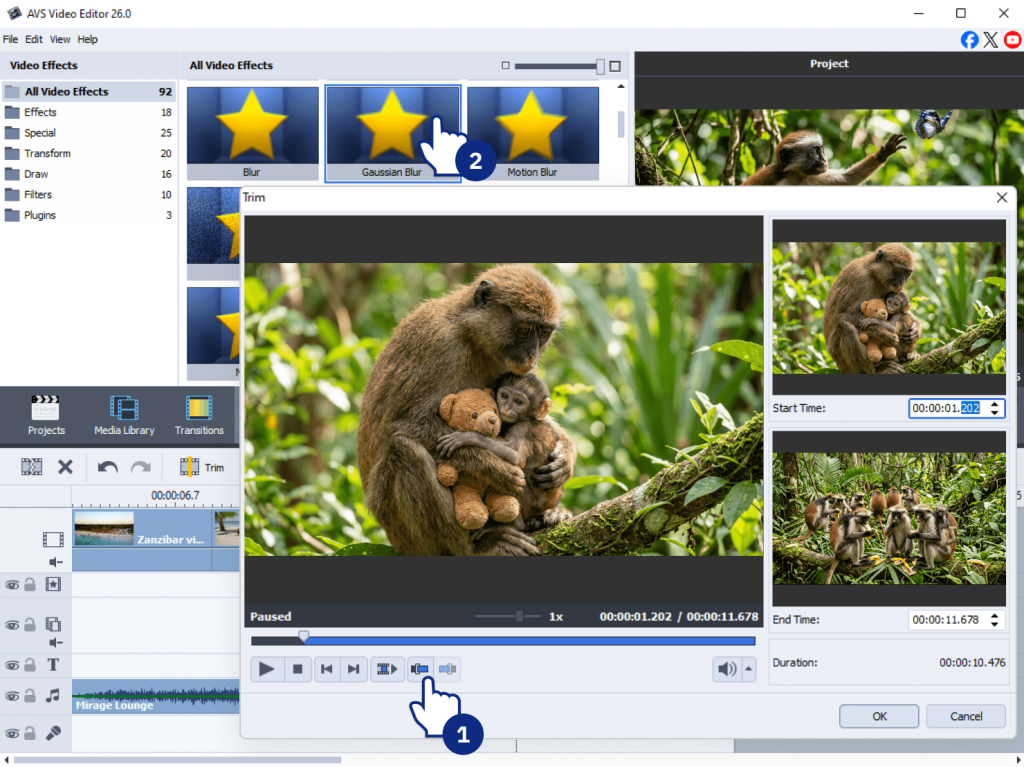
A practical approach is to use the Cut and Cover technique:
- Trim the 1–2 seconds where the artifact appears.
- Overlay graphics or B-roll to cover problem areas.
- Apply subtle blur effects (Mosaic or Gaussian) to hide distorted faces, logos, or backgrounds.
These steps let you fix the parts that could spoil the viewer experience.
Master color correction
In many cases AI-generated clips have uneven colors. You might see washed-out blacks, overexposed highlights, or sudden shifts in color between shots.
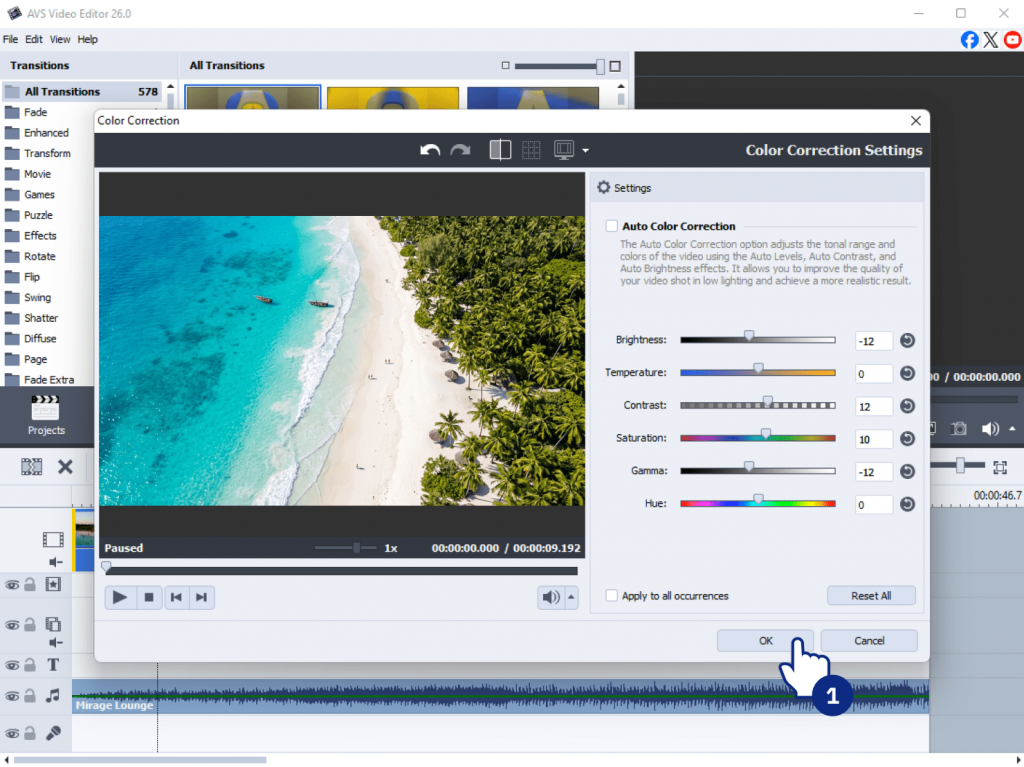
Here are color correction tips:
- Adjust black and white levels using the Histogram.
- Slightly increase saturation to enhance the natural feel of the footage.
- Match color tones between clips for a well-balanced look.
A few minutes of careful grading will turn flat AI footage into first-rate video.
Optimize audio
No matter how good your visuals are, poor audio can ruin everything. AI-generated voiceover may sound robotic, or have unwanted background hiss.
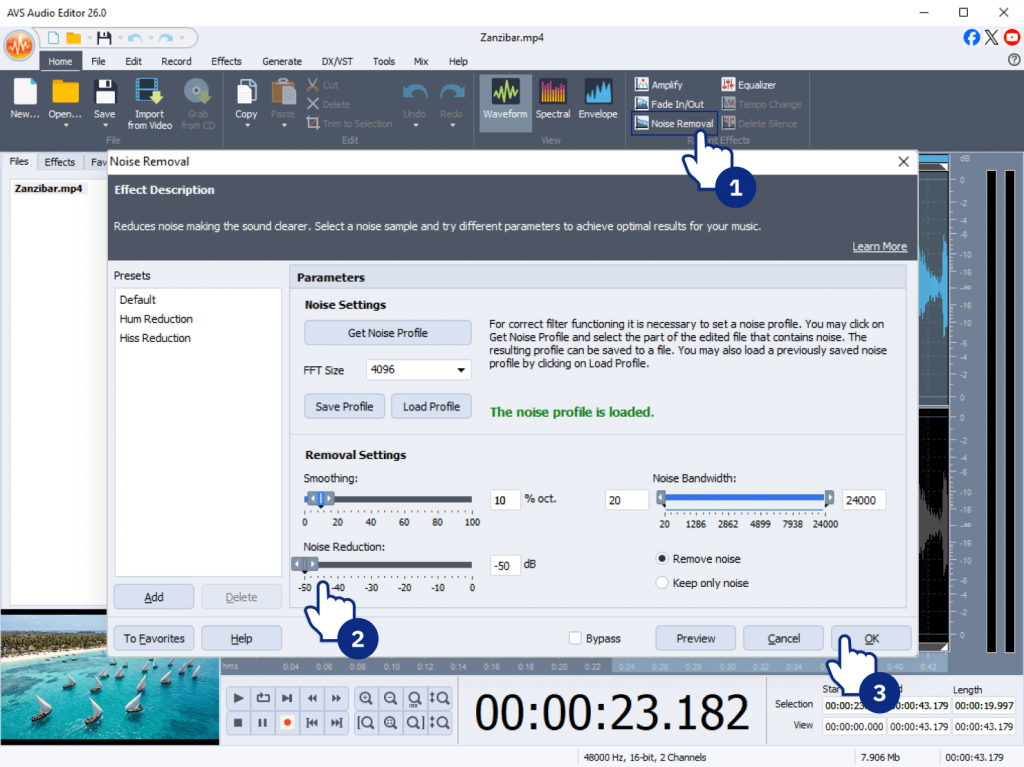
Here’s how to fix it:
- Use the Noise Removal feature in AVS Audio Editor to clean up background hiss.
- Replace the audio with a clear voice recording, if needed, for better clarity.
- Normalize volume to keep the sound balanced from start to finish.
Optimized audio not only improves the quality of your AI-generated music video but also makes the entire clip more enjoyable to watch.
Final tips and takeaways
Creating exceptional AI videos demands a blend of creative vision, meticulous planning, and professional post-production. A reliable workflow is as follows:
- Plan the content and where it will be shared
- Generate AI video using detailed prompts and flawless inputs
- Review clips for artifacts or inconsistencies
- Optimize motion, visuals, color, and audio
- Export the created video file
Experimenting with different prompts, AI settings, and effects helps you discover the best approach for your content. By combining AI generation with professional editing tools, you can turn raw footage into polished, engaging videos suitable for any platform.
Try AVS4YOU yourself
If you want to see the difference, try using AVS Video Editor to refine AI-generated videos. With the right workflow, you will improve video quality, stabilize motion, clean up visual glitches, and craft highly compelling content.
Explore tutorials, test different prompts, and start creating AI videos to engage your audience today.
Useful links

Introduction
AI video editing is quickly becoming part of everyday content creation. Tasks that once took hours, for example, enhancing footage, polishing images, or applying complex effects, now are done in minutes.
AVS4YOU AI plugins easily handle these operations. They are integrated directly into the software and simplify complex workflows without requiring advanced skills.
However, having excellent tools isn’t enough. It’s creative ideas that turn simple edits into engaging videos. In this article, we’ll explore ten creative projects that showcase exactly what you can achieve with the AVS4YOU AI plugins. Get ready to be inspired.
What are AVS4YOU AI Plugins?
AVS4YOU AI plugins are built-in extensions designed to facilitate video generation, automate repetitive tasks and enhance files smarter and faster. They are available in AVS Video Editor, AVS Video Converter, and AVS Image Converter. The current plugins support a range of tasks:
- Generate video clips from text prompts
- Restore old or low-quality footage
- Apply stylized visual effects
- Enhance sharpness, color, and detail
They are especially useful for beginners who can pick them up quickly, work efficiently, and experiment easily.
10 Creative project ideas using AI
Here are ten practical ways to use the new AVS4YOU AI plugins for your next video project.
1. Turn text prompts into short social media videos
Creating short-form video content often requires constant filming, editing, and idea generation. With AI, you can skip most of that process and generate ready-to-use clips directly from text descriptions.
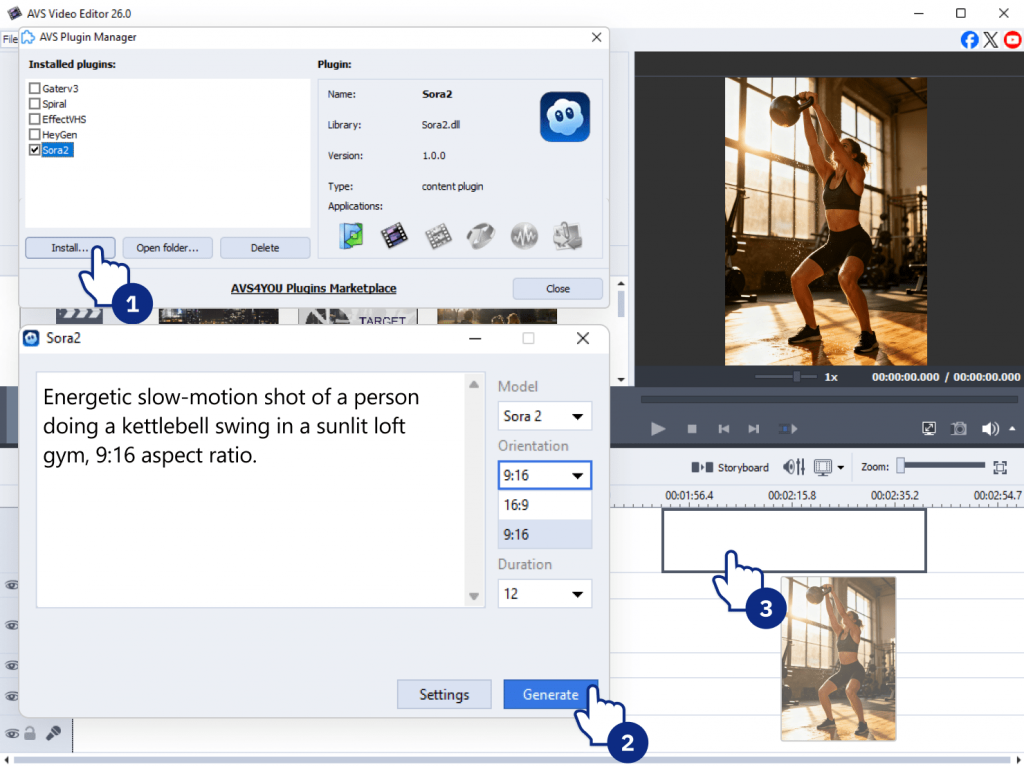
AI Plugin/Effect: Sora2 Video Generator
Example: You’re a fitness coach promoting a new workout. Instead of filming, type a sample prompt “Energetic slow-motion shot of a person doing a kettlebell swing in a sunlit loft gym, 9:16 aspect ratio.” The plugin generates a short, high-quality clip which is placed directly into your timeline.
Why it works: Ideal for content creators, social media managers, and marketers who need to publish frequently without spending hours on production. It also helps test content ideas quickly before investing in full production.
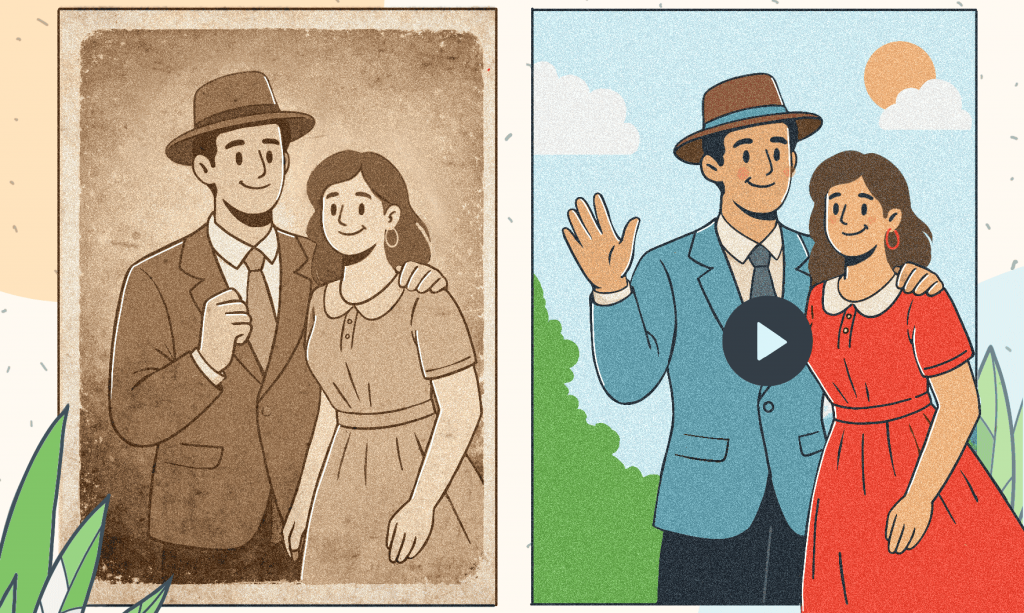
2. Restore and enhance old family videos
Old footage often suffers from low resolution, faded colors, and visual noise. AI restoration tools are able to significantly improve these issues, making videos clearer and more watchable.
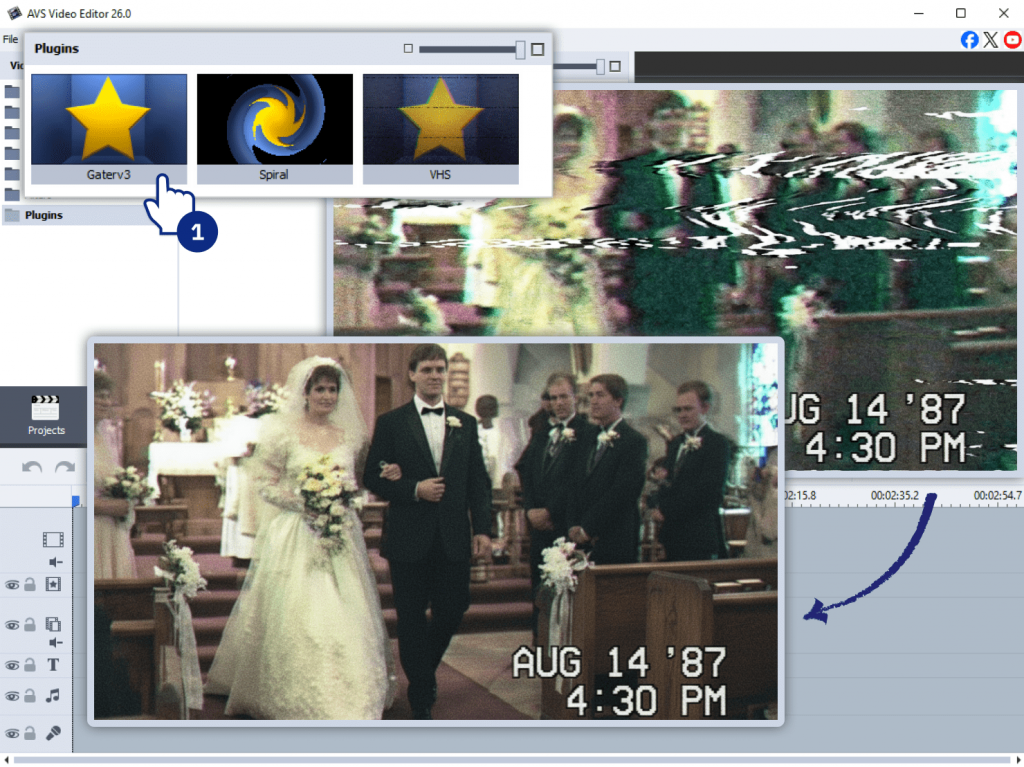
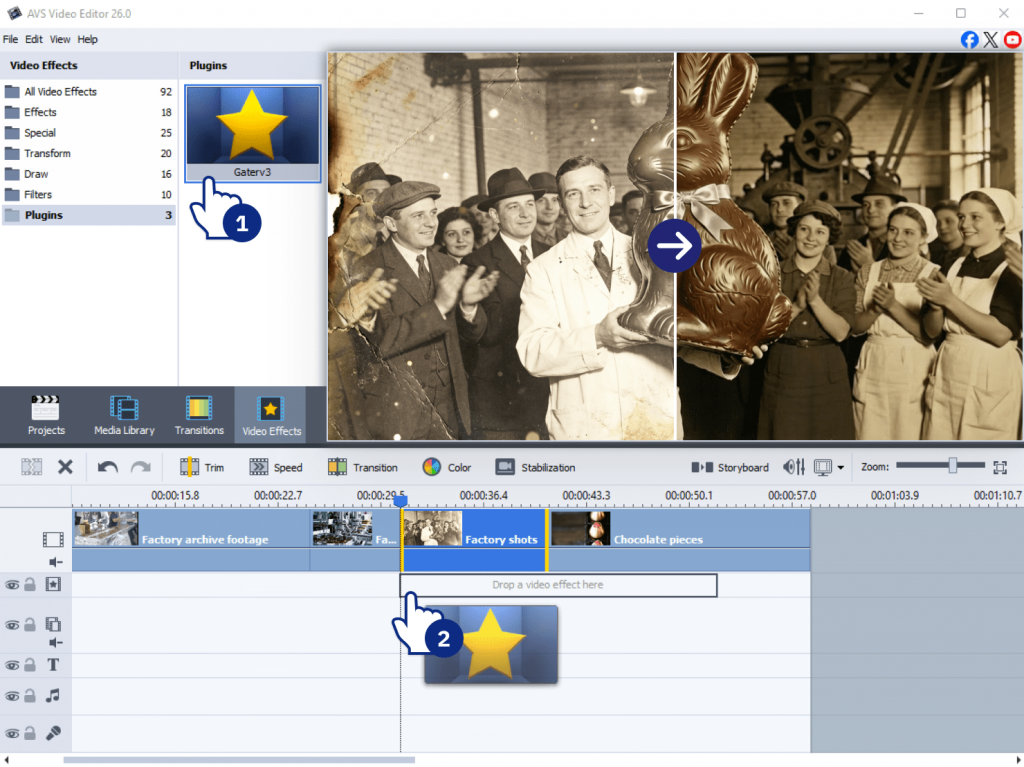
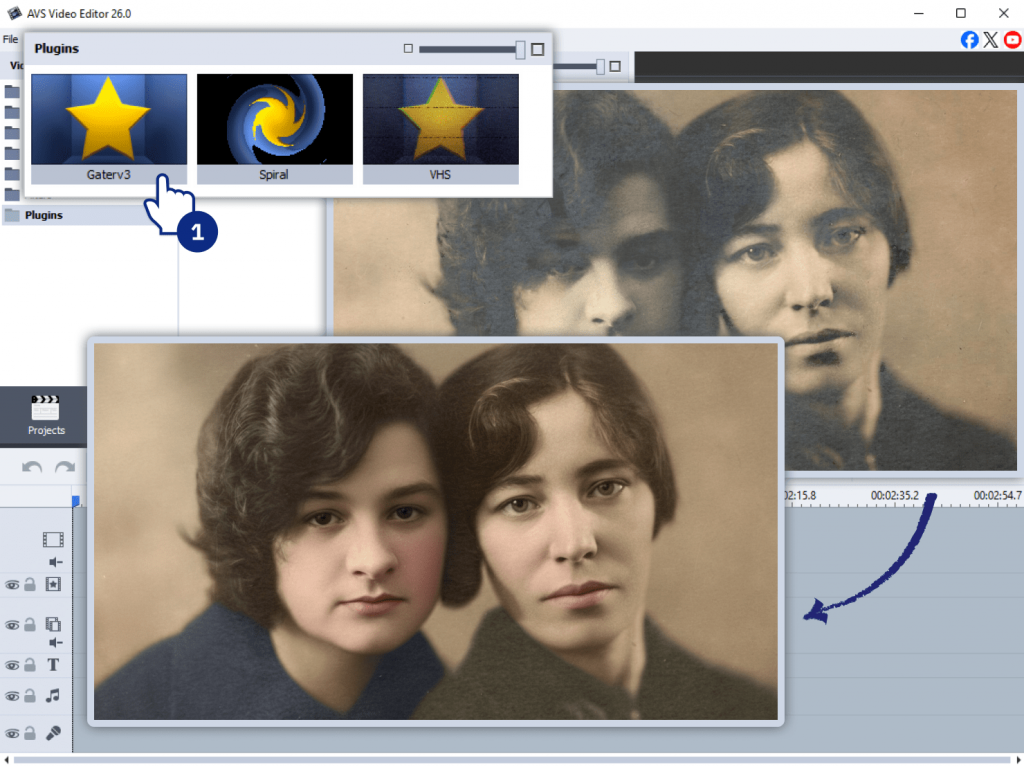
AI Plugin/Effect: Effect Restoration Gaterv3
Example: You have a digitized VHS tape of your parents’ wedding from the 1980s. The footage is noisy, colors are faded, and it’s slightly blurry. By applying the Restoration Gaterv3 plugin in AVS Video Editor, the AI automatically reduces the noise, sharpens details, and corrects the color. As a result, it looks crisp and vibrant.
Why it works: Perfect for preserving personal memories or creating meaningful family archives. It’s also useful for documentary-style content where historical footage needs improvement.
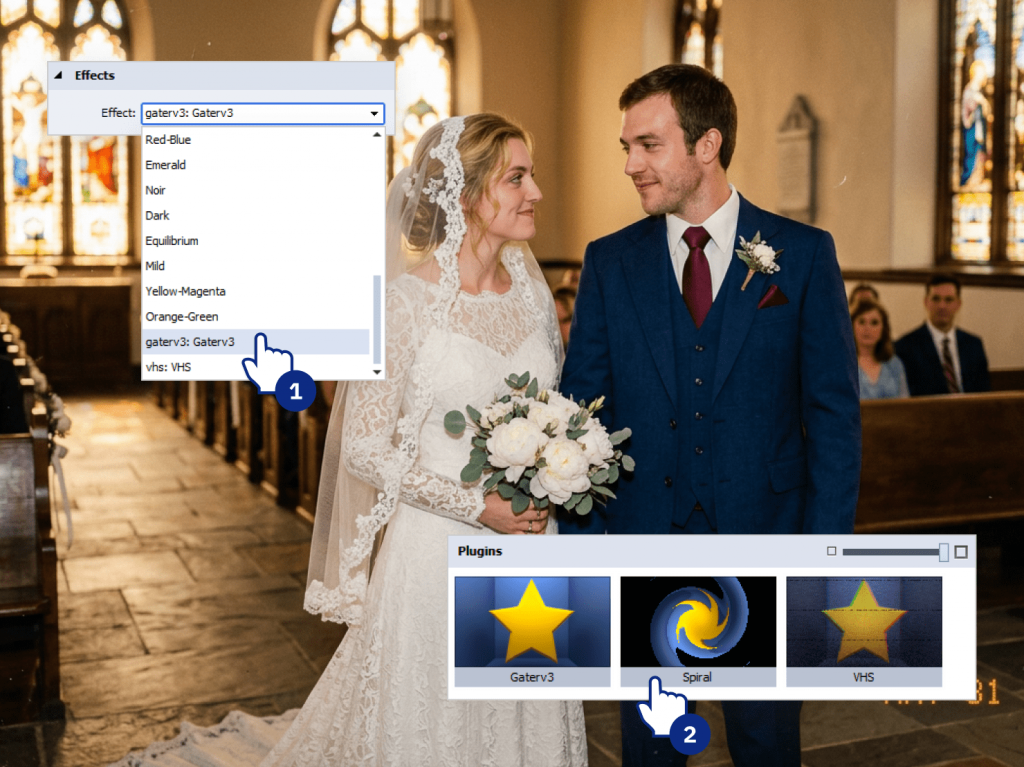
3. Create retro VHS-style music clips
Nostalgic visuals are in trend across various platforms. AI effects can replicate analog imperfections such as grain, distortion, and color shifts to achieve an authentic retro effect.
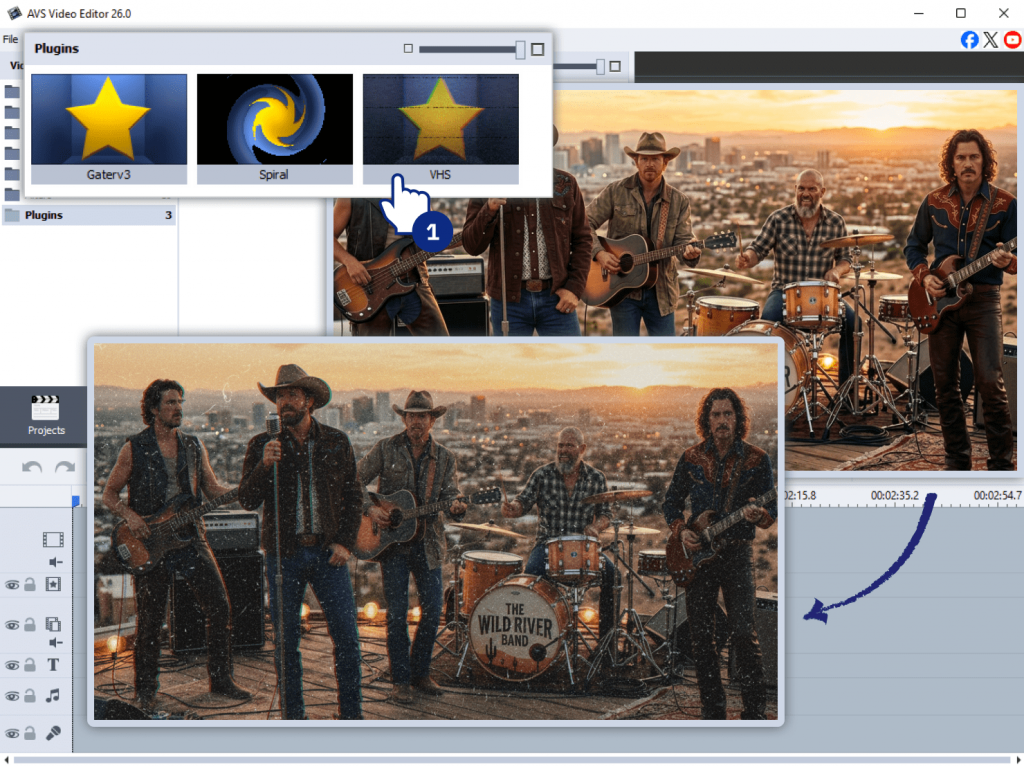
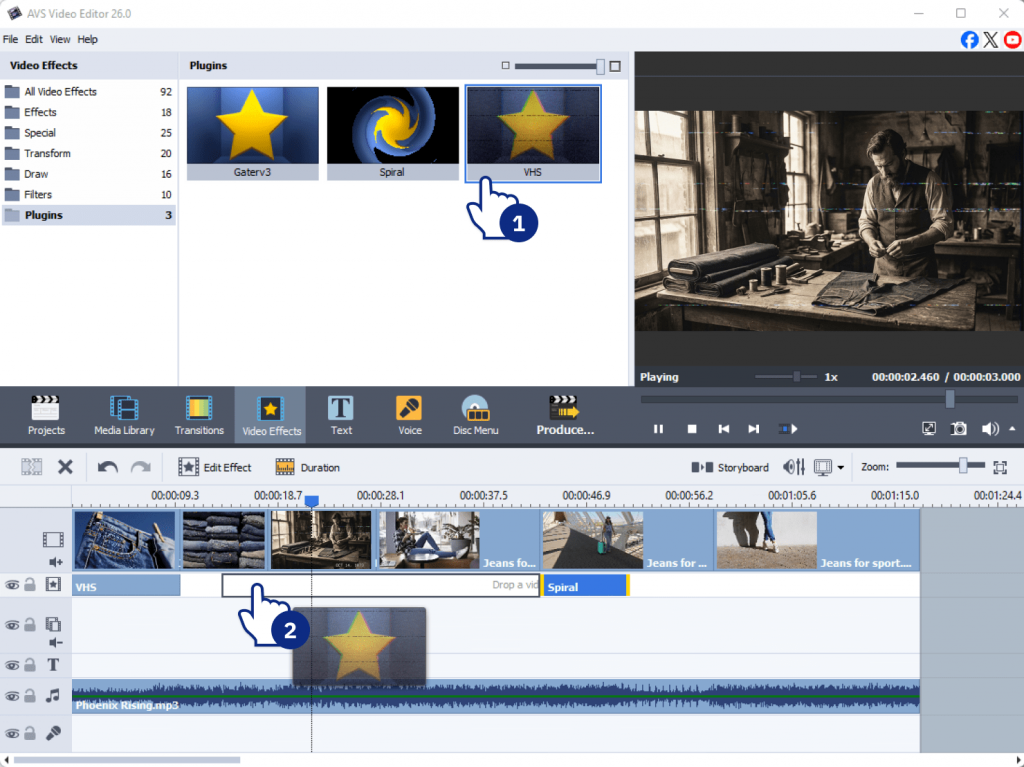
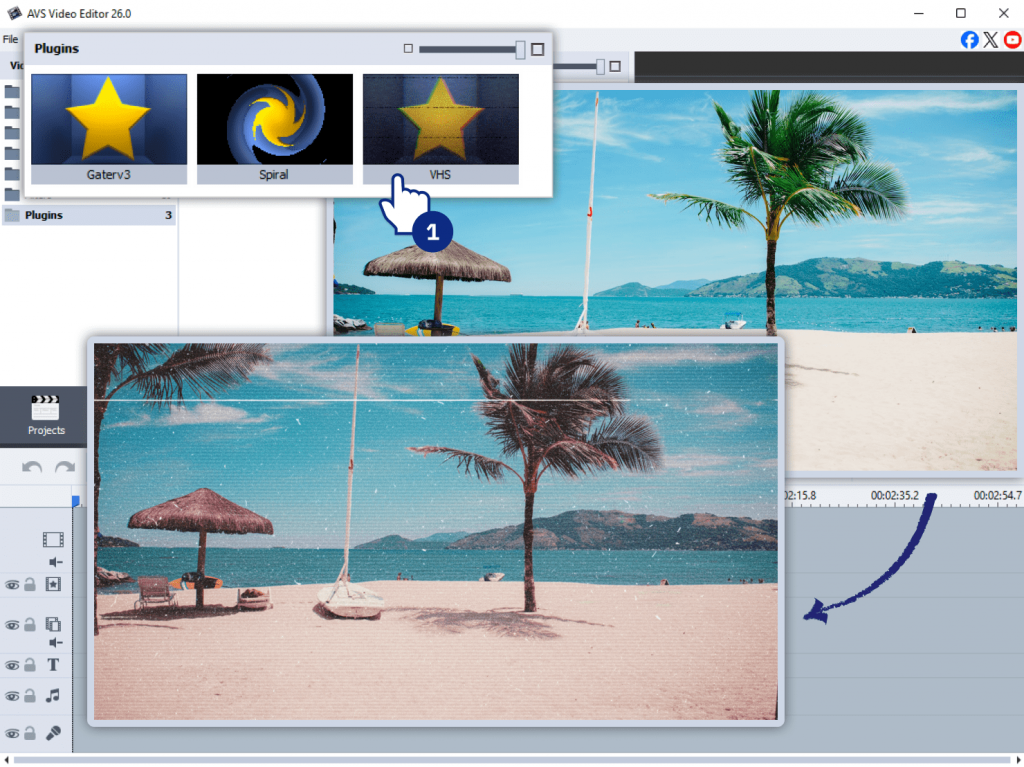
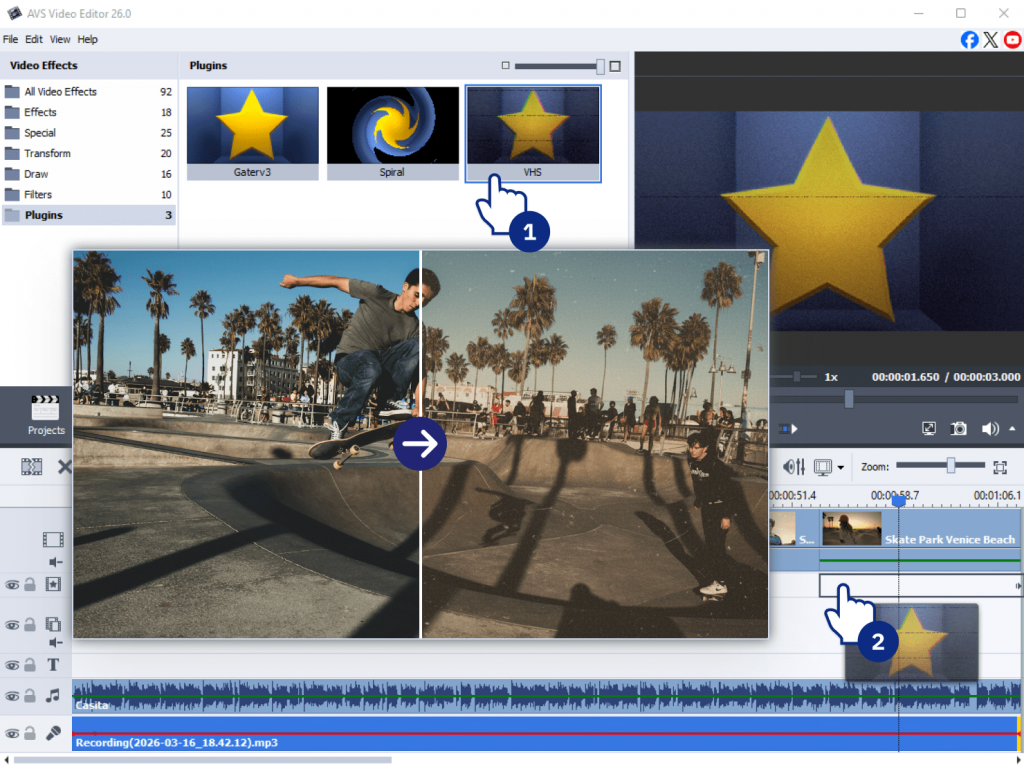
AI Plugin/Effect: Effect VHS
Example: A local band wants a music video that feels like a lost 90s recording. Import a modern video file into AVS Video Editor and apply AI-based VHS effect. It adds original analog artifacts such as tape noise, color bleeding, and tracking errors, instantly transporting the viewer back in time.
Why it works: Appeals to audiences who enjoy a vintage look. It’s widely used in music videos, creative edits, and social content where style matters as much as the message.
4. Make cinematic travel highlight videos
Travel videos can easily look flat without proper editing. AI helps enhance colors, stabilize footage, and even generate additional scenes to enrich storytelling.
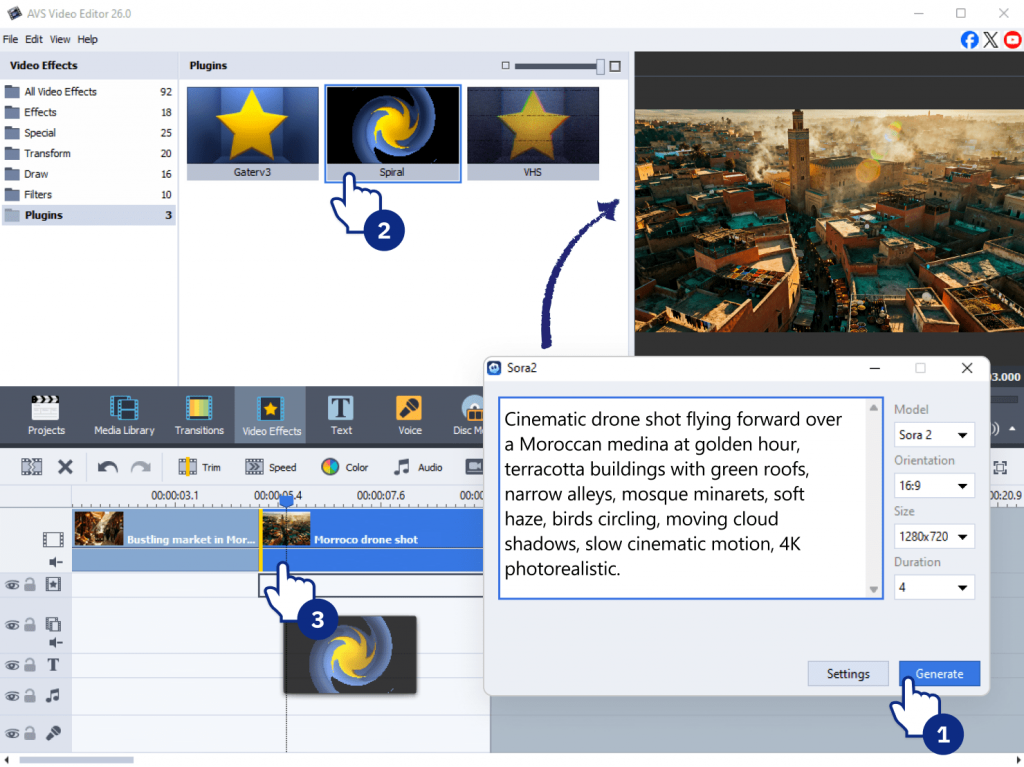
AI Plugin/Effect: Combine Sora2 Video Generator with Effect Restoration Gaterv3 and Effect Spiral, plus standard color enhancements.
Example: You’ve shot some nice but simple video of a bustling market in Morocco. For post-production use the Sora2 plugin to produce a cinematic aerial shot of the city which you didn’t actually capture. Then, apply the Effect Spiral as a dynamic transition between scenes, creating a fast-paced, engaging video.
Why it works: Great for travel bloggers, tourism boards, and avid travelers who want to elevate their vacation memories into compelling visual stories.
5. Produce product teasers for small businesses
Small businesses often lack time or budget for professional video production. AI allows them to craft promotional content quickly and efficiently.
AI Plugin/Effect: Sora2 Video Generator
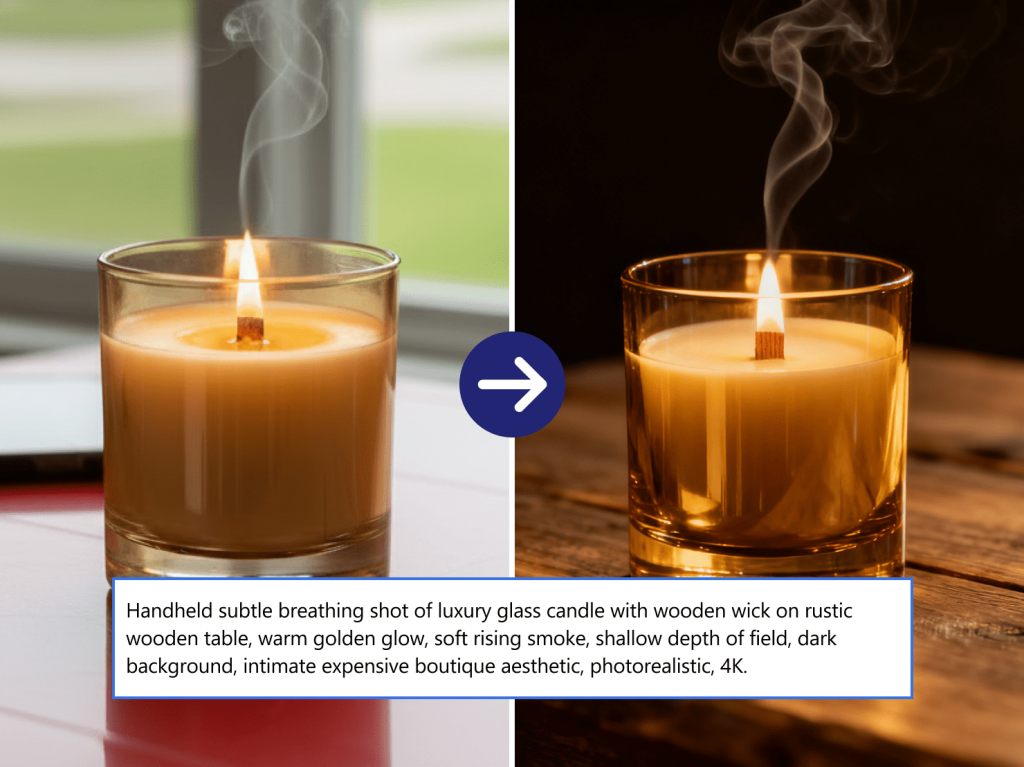
Example: A small Etsy shop selling handmade candles needs a video teaser for an upcoming launch. The owner takes a few photos of the candle and uses a prompt in the Sora2 plugin, for example, “Cinematic dolly-in shot of a lit candle on a rustic wooden table, with warm, cozy lighting and smoke gently rising” to generate a captivating video clip.
Why it works: Enables entrepreneurs to create marketing content on demand. It’s especially convenient for testing different visual styles or campaign ideas without additional costs.
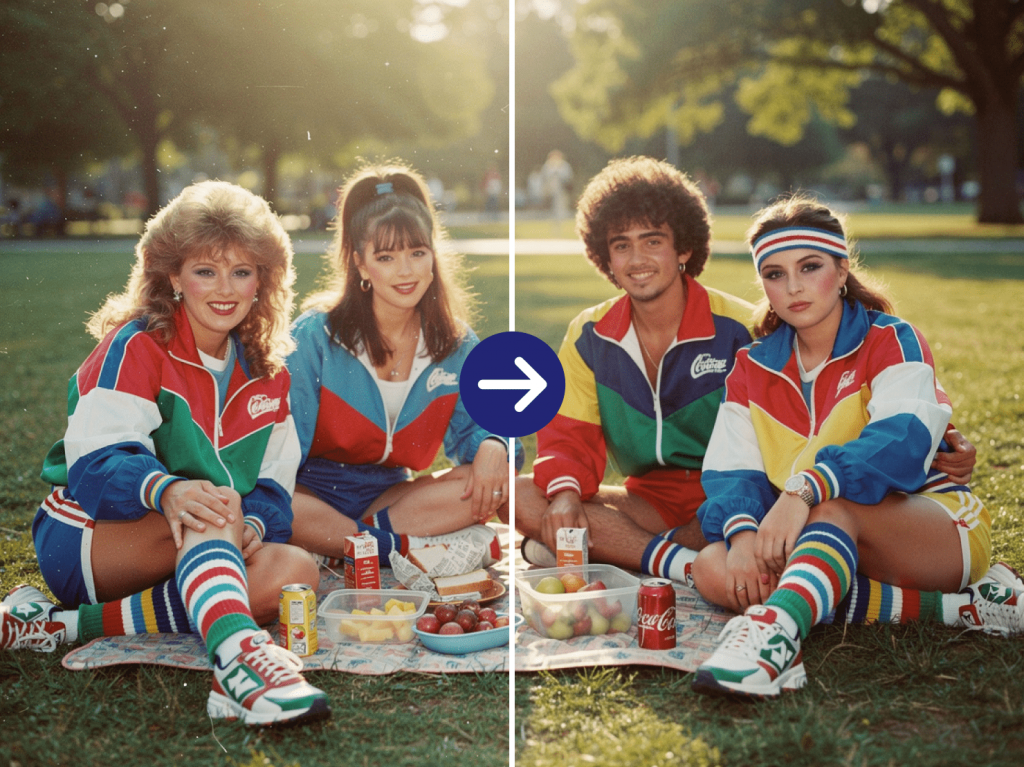
6. Build before-and-after videos
Transformation videos are highly engaging because they clearly show progress or improvement. AI tools simplify the process of improving footage quality to maximize the “before vs. after” contrast.
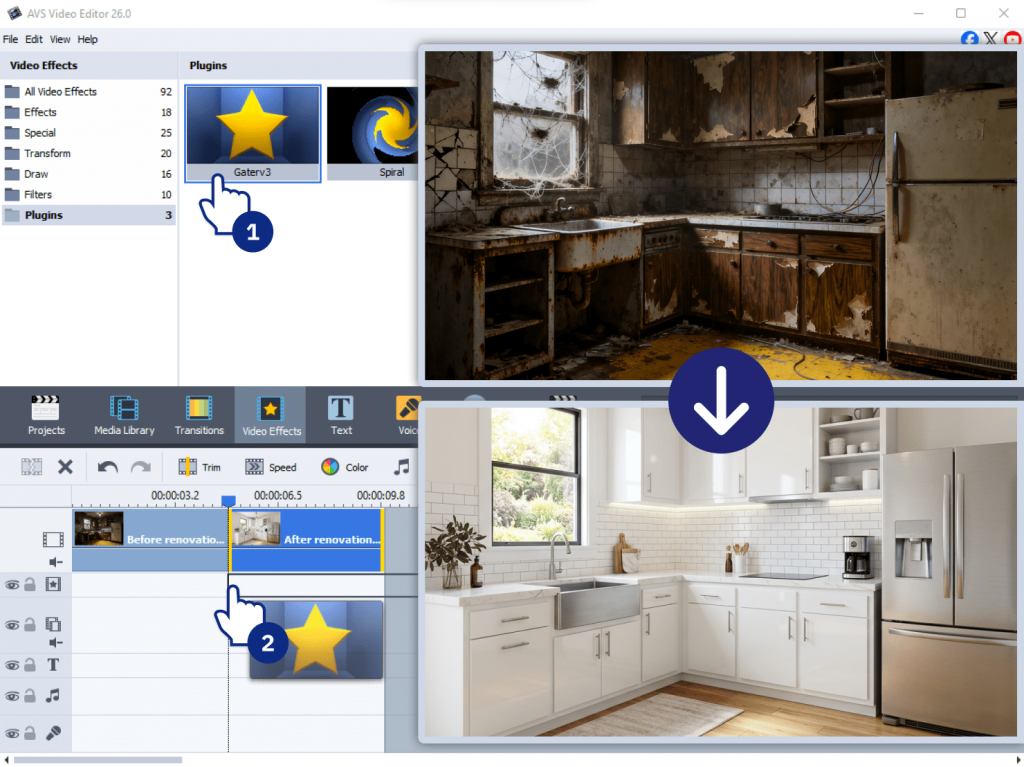
AI Plugin/Effect: Effect Restoration Gaterv3 for the “after” part of the video.
Example: A home renovation company wants to showcase their work. They film a “before” video of a dilapidated kitchen. After the renovation, they film an “after” video. By using the Restoration plugin to sharpen and color-grade the final “after” footage, the difference is even more dramatic.
Why it works: Popular across niches from fitness and beauty to real estate and design. These videos are simple to produce but perform well on social platforms.
7. Design animated slideshows from photos
Static photo collections can feel outdated. AI effects and transitions turn them into dynamic visual stories.
AI Plugin/Effect: AI effects + transitions
Example: For a 50th wedding anniversary, you have a collection of scanned photos from the couple’s life. First, use AVS Image Converter’s AI effects to enhance and color-correct the old photos. Then, in AVS Video Editor, apply the Effect Spiral to create a lively, animated transition between images, so that the slideshow feels much more modern and captivating.
Why it works: Great for personal use, presentations, or social sharing. It adds movement and emotion without requiring advanced animation skills.
8. Generate background visuals for presentations
Instead of spending time searching for stock footage or creating visuals, AI-generated images help you build more engaging and well-balanced presentations faster.
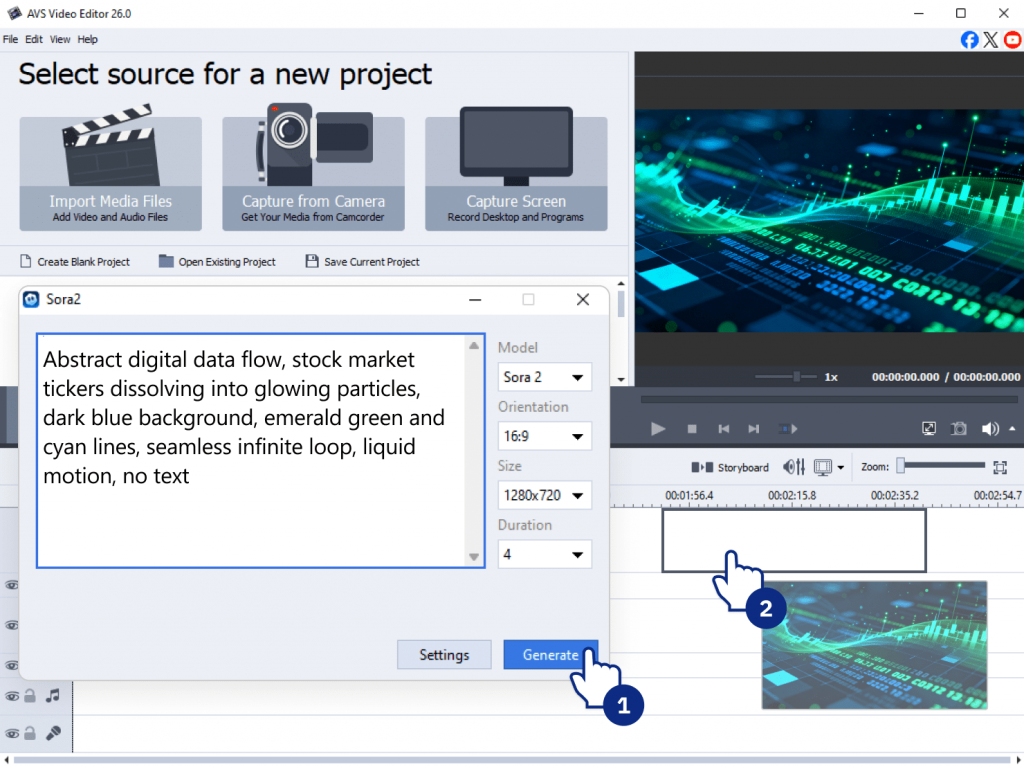
AI Plugin/Effect: Sora2 Video Generator.
Example: A financial analyst needs to give a presentation on “Global Markets in 2026.” A static image is replaced with a 10-second loop generated using the Sora2 plugin. Here is a sample prompt for creating a professional, immersive background: “Abstract digital animation of flowing data and stock market tickers, dark blue and green color palette, seamless loop.”
Why it works: Convenient for professionals, educators, and content creators who want clean, custom slides matching their topic without searching for external assets.
9. Create seasonal greeting videos in minutes
Seasonal content is time-sensitive, and quick production is essential. AI enables you to generate themed videos without starting from scratch.
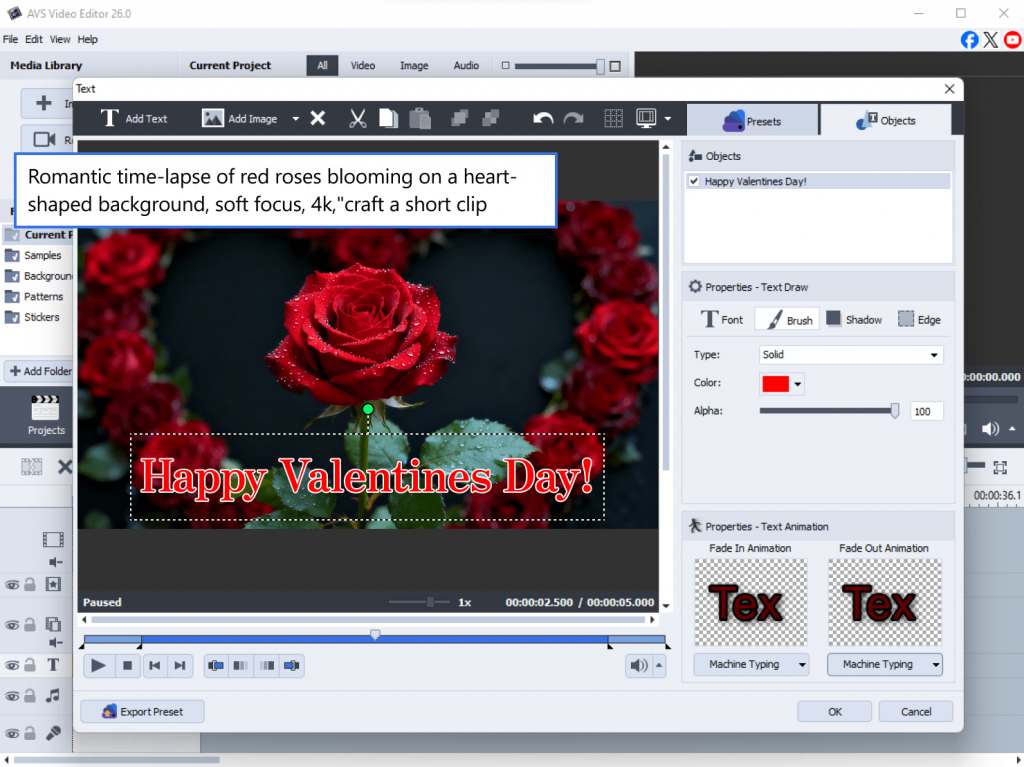
AI Plugin/Effect: Sora2 Video Generator combined with text overlays
Example: It’s the day before Valentine’s Day and you forgot to make a video for your partner. In this case quickly open AVS Video Editor, use the Sora2 plugin with the prompt “Romantic time-lapse of red roses blooming on a heart-shaped background, soft focus, 4k,”craft a short clip, and add a simple “Happy Valentine’s Day” text overlay.
Why it works: Perfect for businesses and individuals who need fast, relevant content for holidays and special occasions.
10. Repurpose blog posts into short AI videos
Written content can be transformed into video format to reach a wider audience. AI simplifies this process by generating clips to deliver the right message and create a special atmosphere for the occasion.
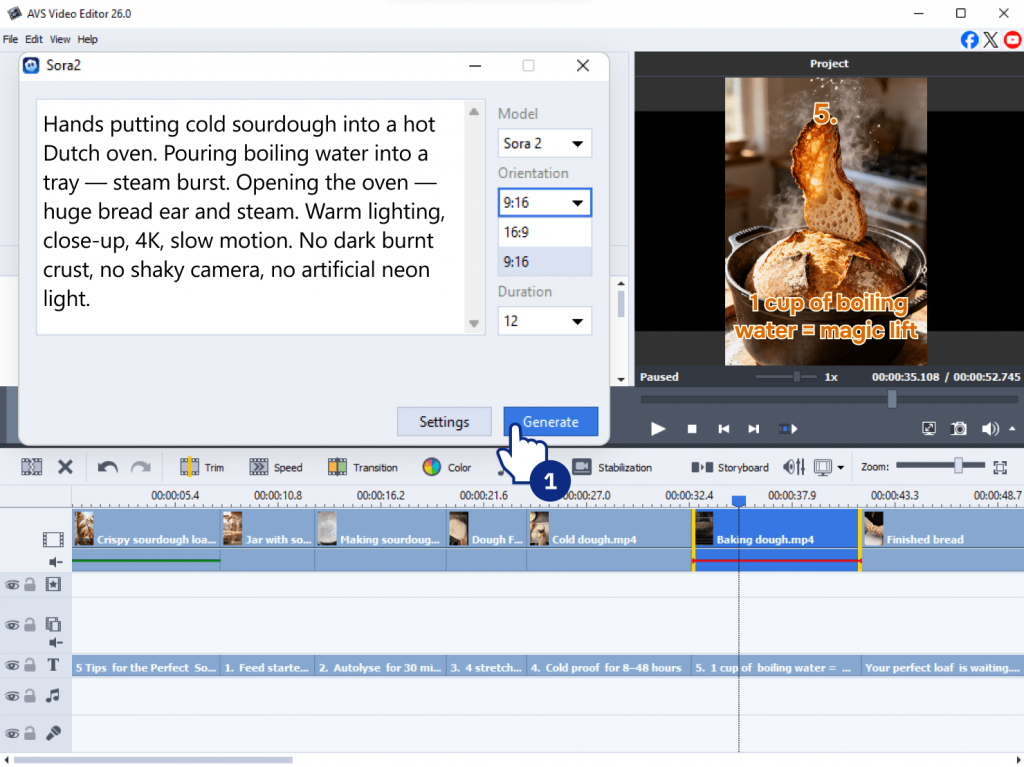
AI Plugin/Effect: Sora2 Video Generator to visualize the highlights of the article
Example: A food blogger publishes a deep dive into “5 Tips for the Perfect Sourdough.” Instead of just sharing a link, they create a short explainer video summarizing the post. They use the Sora2 plugin to produce cinematic clips highlighting the article’s main points (e.g., “Steam rising from a freshly baked artisan loaf”). Using AVS Video Editor, they arrange these clips on the timeline and overlay a short text from the blog to make a quick video summary.
Why it works: Ideal for marketers and content creators looking to maximize the value of existing content and adapt it for YouTube Shorts or LinkedIn.
Tips for improving AI video editing results
To get the most out of your AI-powered workflow, keep these best practices in mind:
- Experiment with different prompts to get better outputs
- Combine AI-generated clips with manual edits for more control
- Apply effects to maintain a balanced look
- Use proper export settings (resolution, bitrate) for your platform
Build your own AI-powered video projects
AVS4YOU offers a Plugins Marketplace where you can explore additional AI tools and effects. Try different combinations, test new workflows, and refine your style over time. The more you experiment, the better your results will become.
You can also explore related blog posts for deeper guides and use cases.
Useful links
FAQ
What is AI video editing?
AI video editing uses machine learning to automate tasks such as generating footage, enhancing quality, and applying effects.
Can AI restore old videos/images?
Yes, absolutely. Effect Restoration Gaterv3 in the AVS4YOU suite is specifically designed for this. It reducesnoise, corrects colors, sharpens blurry details, and improves the overall quality of old or damaged footage.
How does text-to-video work?
Text-to-video generators, such as the Sora2 Video Generator plugin, work by using a large AI model trained on millions of videos and images. When you type a descriptive prompt, the AI interprets your words and generates a new, short video clip based on your description.
Is AI video editing suitable for beginners?
Yes. Most AI tools are designed to simplify editing and reduce manual work.
Can I use these AI plugins for commercial projects?
In most cases, yes, depending on licensing terms. Please, check the terms of service and usage plans of OpenAI and Heygen to ensure the commercial use is available.
How long does it take to generate a video from a text prompt?
Generation time can vary depending on the complexity of the prompt, the resolution, and the current load on the AI provider’s servers. It can take from a few seconds to a couple of minutes.
What kind of prompts work best for the text-to-video generator (Sora2)?
Descriptive and specific prompts work best. Include details about the subject, action, setting, lighting, mood, and camera movement for the most accurate and impressive results .
Do I need a powerful computer to run these AI plugins?
No, you don’t need a supercomputer. Sora2 and Heygen AI plugins do the heavy work in the cloud. Your computer just sends the prompt and gets the finished video, so it doesn’t need much power. However, the most important requirement is a stable internet connection.
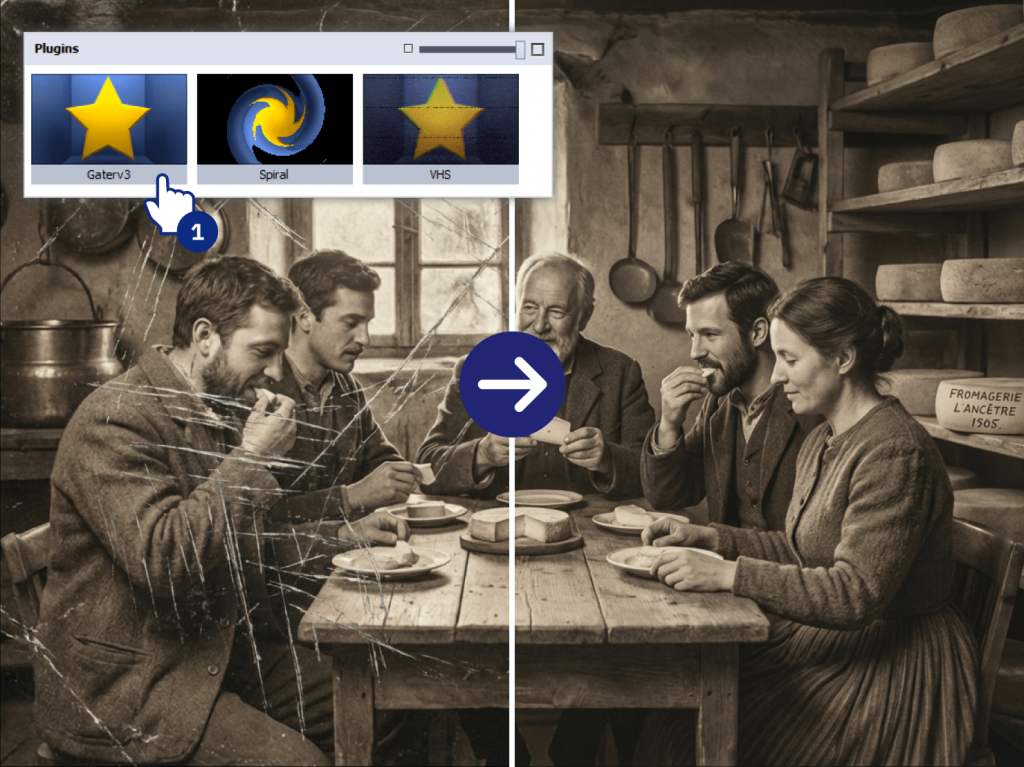
Without doubt, everyone has plenty of old family photos, or a folder of digitized scans stored on a PC or in the cloud. But even digital copies often suffer from the same problems as their physical counterparts. They become yellowed with age, blurry from an old camera, or grainy from poor lighting. Although electronic images are protected from physical deterioration, they can’t be completely restored.
Naturally, digitizing old photos is only the first step. You have to restore their quality using specialized tools. Now with AVS4YOU AI-based effects (Restoration Gaterv3, VHS Effect, and Spiral Effect) it is easier to repair and stylize old media. Let’s take a closer look at how to turn your faded snapshots into lively, post-worthy photos.
AI for transforming old media
AVS4YOU AI-powered effects are built to enhance visual quality. Thesy aren’t simple filters that lay a static effect over your image. The AI intelligently analyzes images to fill in missing details, reduce grain and noise, sharpen edges while keeping faces natural.
The result is authentic enhancement—your photos look clearer and brighter without appearing artificial.
Restoring damaged photos with AI (Gaterv3)
Typically, older photographs suffer from graininess (noise) caused by film sensitivity, blur due to slight camera movements, and, in the case of early digital cameras, blocky artifacts caused by JPEG compression.
The Effect Restoration Gaterv3 plugin solves these problems. It applies AI algorithms to smooth noise, recover fine details, and sharpen images intelligently. First of all, make sure that you have installed the plugin from the AVS4YOU Plugins Marketplace or check it in the Plugin Manager. After that just add the restoration effect to your original photo in the same way as other image effects, and let the AI do the work.
Creating mood with AI effects
Once the technical flaws are fixed, you can stylize photos. AVS4YOU offers AI effects to change mood and style, turning a simple photo into a piece of art.
The nostalgia of analog: Mastering VHS effect
Retro aesthetics are more popular than ever. The rough, imperfect texture of analog video creates nostalgia and a genuine feel that polished digital footage often misses.The Effect VHS plugin recreates the analog video feel with:
- Analog tape noise and color degradation.
- Tracking errors that make the image wobble.
- Chromatic aberration (color fringing).
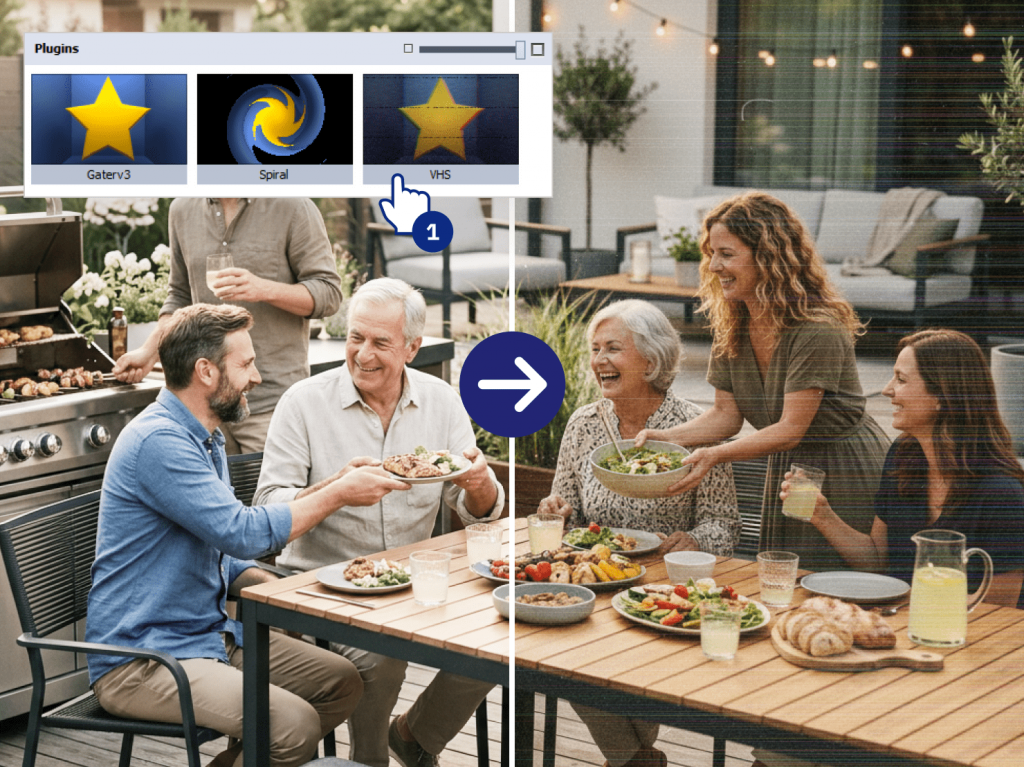
Use Case: Imagine turning a modern digital video of a family BBQ into a “found footage” clip straight out of the 1980s. Or, take an old scanned photo and apply the VHS effect to give it an authentic period feel, as if it were pulled from a family vacation tape.
Dynamic visuals: Using the Spiral effect
For those looking to create engaging social media content or dynamic video transitions, the Effect Spiral is a must-try. Available in AVS Video Editor and AVS Video Converter, this effect adds a radial twist and outward explosion animation.
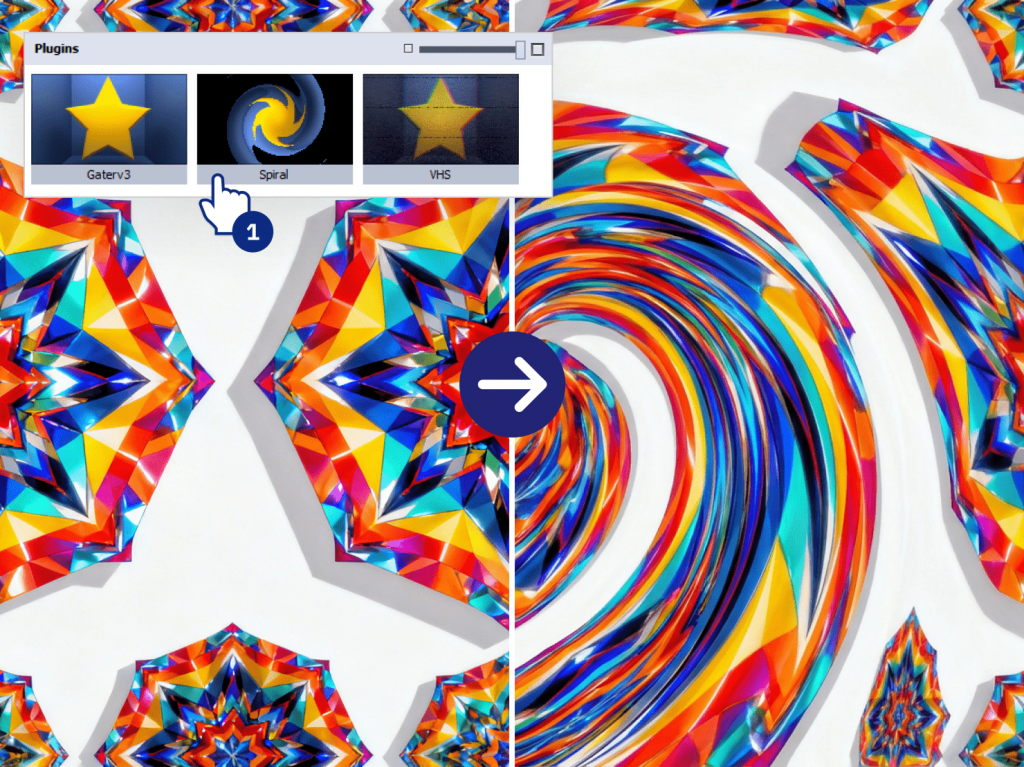
It’s perfect for creating hypnotic transitions or adding energy to a static image, making your video projects feel more professional and dynamic.
A Step-by-step guide: How to restore an old photo with AVS4YOU
Here is a practical guide how to restore and restyle a single old photograph.
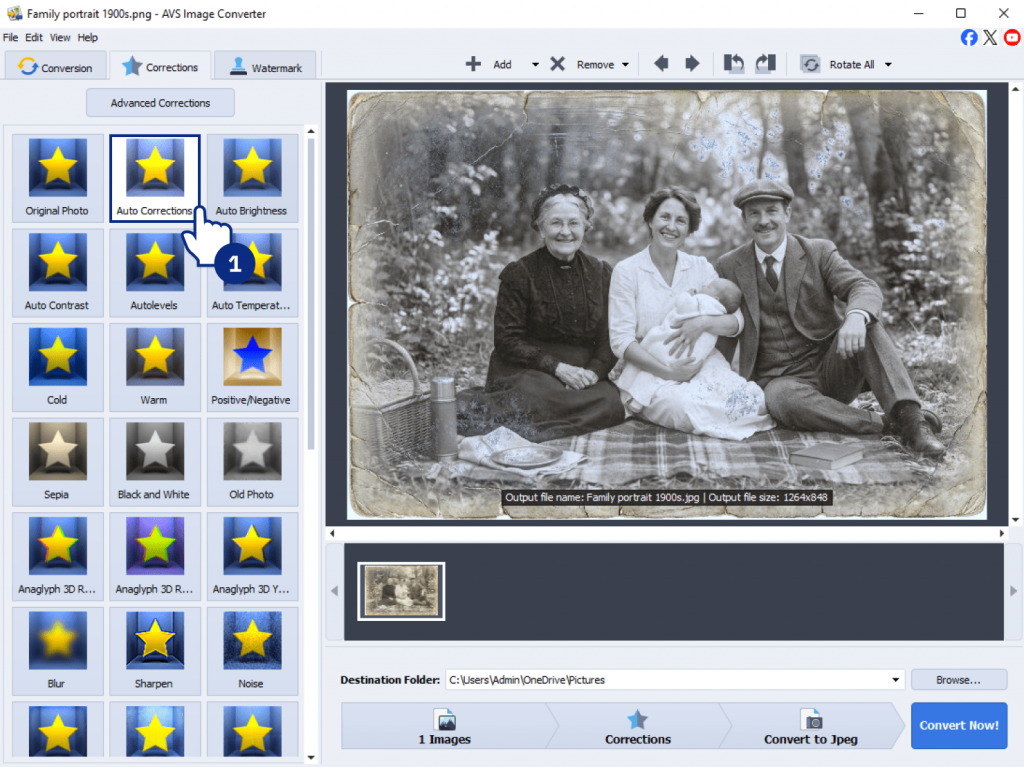
1. Fix the basics
Open your scanned image in AVS Image Converter and use the Auto Correction tool. It instantly corrects the brightness and contrast of your faded scan, giving you a clean, balanced base to work from.
2. Repair with AI
Next, apply the AI Restoration Gaterv3 plugin. Let the AI analyze the image to intelligently reduce noise and sharpen blur. You’ll be amazed at how it clears up the grain without making the image look plastic.
3. Add the final touch
Apply the Effect VHS plugin to give the restored image a stylized, retro video feel. If you plan to use this photo in a video slideshow, add the Ken Burns effect to simulate camera movement. For a more cohesive look, you might opt for a subtle filter, for example, Mild or give it an retro feel with the classic Black-and-White effect.

4. Save and share
Once you’re happy with your restored and styled image, export it. With AVS4YOU, you can save it in any format to share on social media, print for framing, or include in a family video project.
Wrapping up
Restoring an old photo is a time-consuming process that requires various enhancement tools and careful adjustments. Thanks to AI image effects, it has become much easier to achieve the desired result. AVS4YOU software combines intelligent AI restoration for complex refinements with a rich collection of visual effects to improve the final look. Let AI handle noise reduction, sharpening, and detail recovery, while you can focus on creative side.
Unlock the full potential of your media by exploring the AVS4YOU Plugins Marketplace today. Bring your old memories back to life with the power of AI.
Download AVS Image Converter via button below:
Useful links

Introduction
With the rise of ai text to video tools, the creative process has changed. Today, video content creation platforms such as Sora and HeyGen, integrated into AVS Video Editor via AI plugins, allow you to generate videos from a simple description.
In this new era, a key shift is sweeping the entire video production industry. The most valuable skill for a creator is no longer technical editing, but the art of description. The quality of your video depends directly on the clarity of your instructions. If you want cinematic, coherent, scroll-stopping clips, you need to master the ai video prompt.
This guide explains how to write effective AI prompts, improve your results, and create compelling videos.
What is an AI video prompt?
An AI video prompt is a set of instructions given to a text-to-video model. Unlike a search engine query where you might type “cat,” an AI video generator needs context, mood, and technical direction. It tells the AI what to show, how it should move, what it should feel like, what style to follow.
A weak prompt, for example, “Make a video of a dog” produces vague results, far from what you envisioned in your mind. In contrast, a good detailed prompt such as “Cinematic close-up of a golden retriever puppy playing in autumn leaves, golden hour lighting, shallow depth of field, 4k” brings a polished clip.
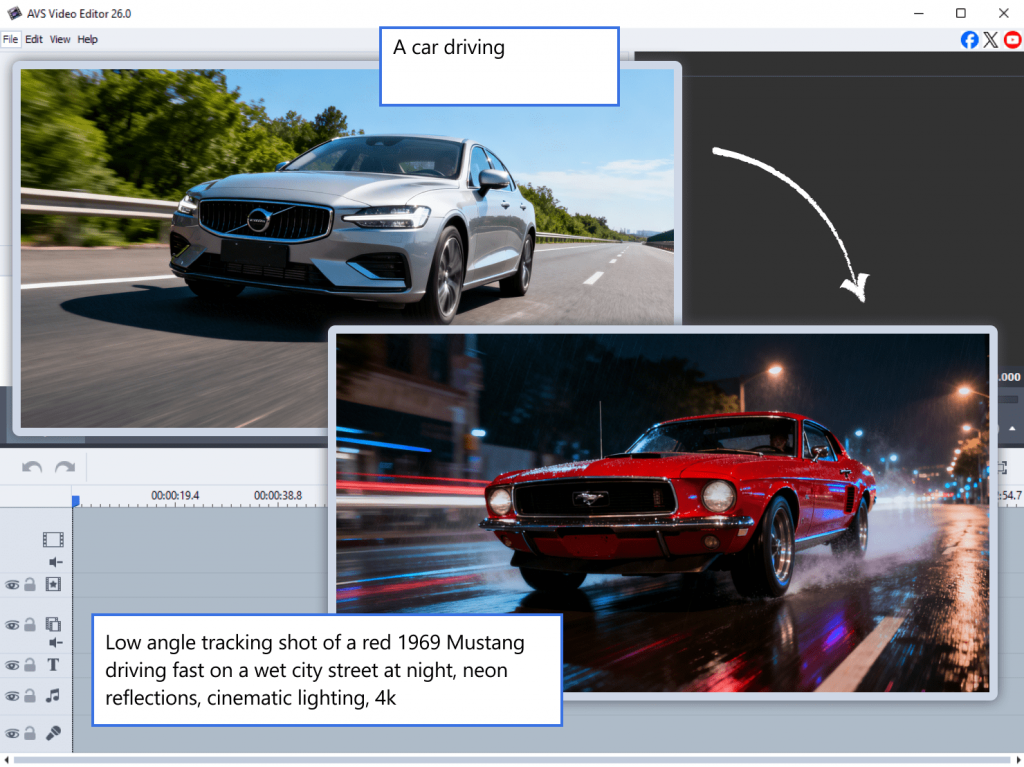
By way of illustration, compare one more pair of samples “A car driving” vs “Low angle tracking shot of a red 1969 Mustang driving fast on a wet city street at night, neon reflections, cinematic lighting, 4K.”
The difference lies in specificity. Writing ai video prompts, it is worth including as many details as possible.
How to write effective prompts for Sora AI video generation
The 6 pillars of an effective AI prompt
To never have to stare at a blank text field again, follow this simple structure. These six principles form the foundation of effective AI suggestions.
Pillar 1: The Subject (Who or What)
Don’t just say “a man.” Be specific. Is he a “cyberpunk detective with a glowing trench coat, aged 50, stubble, tired eyes”? The more visual details you provide about appearance, age, and clothing, the better.
Pillar 2: The Action (The Verb)
Use strong, descriptive verbs because they help create dynamic scenes. Instead of “walks,” try “strides confidently,” “slowly drifts,” or “sprints frantically.”
Pillar 3: The Setting (Environment)
Where does this happen? At what time of the day? Indoors or outdoors? What are the weather conditions? Context determines the content of your video. “On a foggy mountain trail at sunrise”,”a serene bamboo forest at dawn,” or “on a sunlit rooftop garden with scattered tools and blueprints”.
Pillar 4: Cinematography (The Camera)
This is essential for Sora AI video prompt best practices. Tell the AI where to place the camera and use terms such as “Wide shot,” “Extreme close-up,” “Tracking shot from behind,” “Slow push-in”, “Drone view,” or “Overhead shot.”
Pillar 5: Mood and lighting (Atmosphere)
Lighting sets the emotion. Specify “Dark and stormy,” “Soft golden hour glow,” “Harsh fluorescent light,” or “Neon-lit cyberpunk alley.”
Mood turns a basic scene into a story.
Pillar 6: Technical Quality (The Polish)
End your prompt with quality modifiers to ensure a crisp result. Words like “4K, high detail, smooth motion, 60fps, no blur, photorealistic” are the finishing touch.
These modifiers help refine output quality.
Mastering AI prompts for Sora 2 in AVS Video Editor
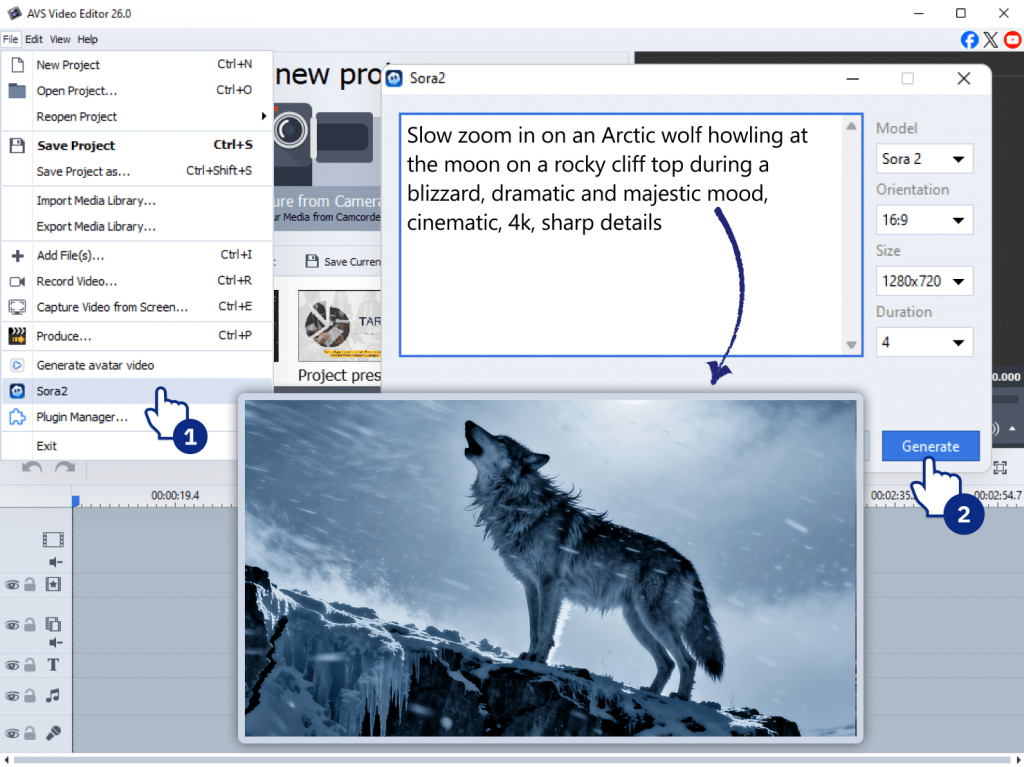
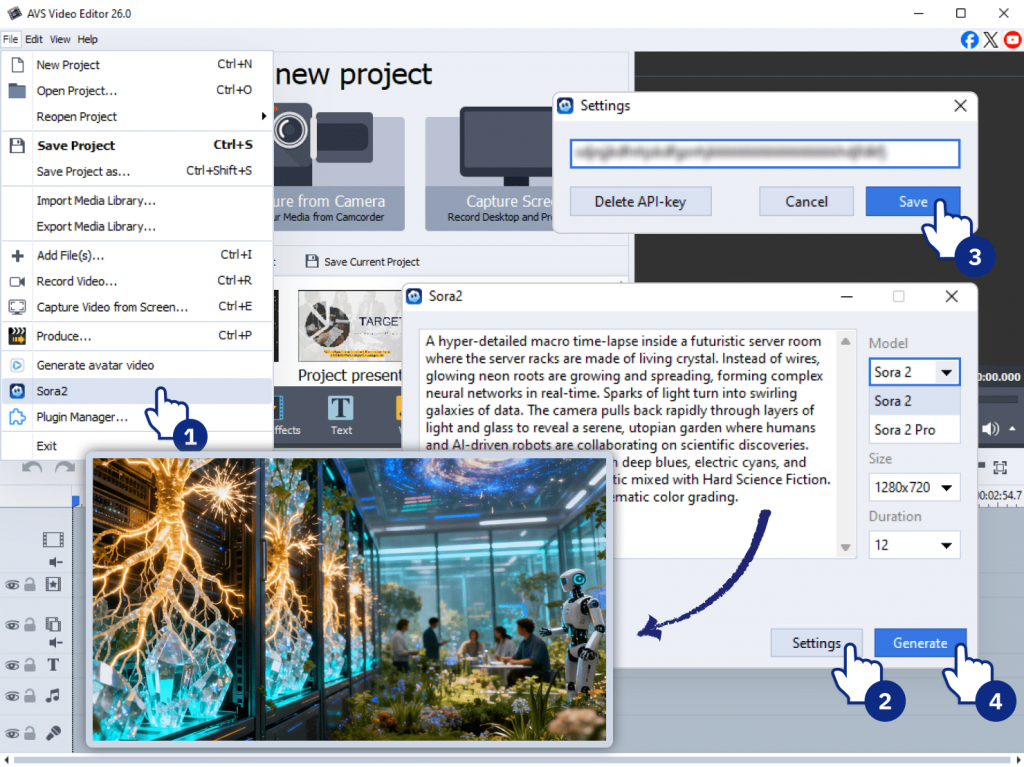
If you want to test your prompts in practice, you can generate clips directly inside AVS Video Editor using Sora 2 video generation plugin. The process is simple: launch the program, open File → Sora 2, and enter your prompt in the opened window.
Once the panel opens, follow this workflow to build a clear and effective prompt:
Start with a clear concept
Write down your core idea in one sentence and keep it simple at first. “A travel vlogger packing for an adventure.”
Add the “Sora-Specific” flair
Sora excels at realistic physics, natural human movement, and fluid motion.Add movement cues such as “Wind moving through hair”, “Water splashing realistically”.
Use the 6 pillars checklist
Run your sentence through the pillars to expand it.
Subject: “Arctic wolf”
Action: “howling at the moon”
Setting: “on a rocky cliff top during a blizzard”
Camera: “Slow zoom in”
Mood: “Dramatic, majestic, cold”
Quality: “Cinematic, 4k, sharp details”
Result: “Slow zoom in on an Arctic wolf howling at the moon on a rocky cliff top during a blizzard, dramatic and majestic mood, cinematic, 4k, sharp details.”
Test and refine
The first result isn’t always perfect. Change one parameter at a time. If the lighting is off, choose “clear night” instead of “snowstorm.” If the camera movement is off, replace “slow zoom” with “static shot.”
AI video prompt examples: from poor to blockbuster
The best way to understand good ai video prompts is to see them in action. The table below transforms half-formed ideas into specific instructions using the 6 pillars.
| Initial prompt (bad result) | Optimized prompt (good result) | Why it works |
| “A car driving” | “Low angle tracking shot of a red 1969 Mustang driving fast on a wet city street at night, neon reflections, cinematic lighting, 4k” | Specifics: It identifies the exact car, the camera angle, the weather, and the lighting style. |
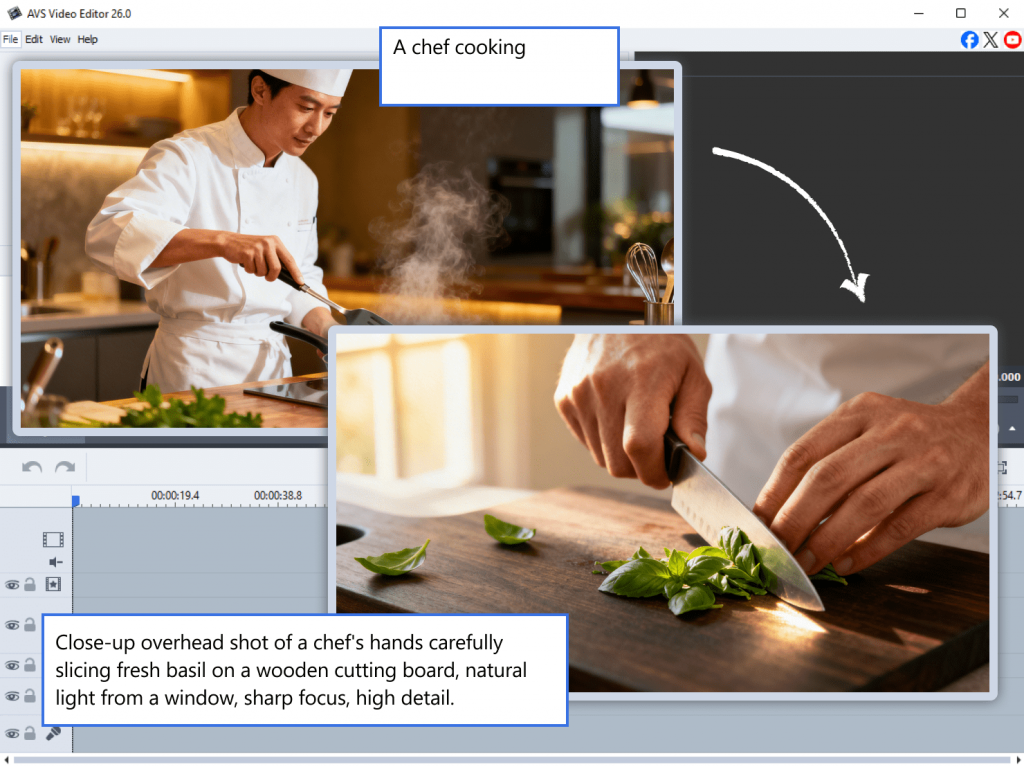
| “A chef cooking” | “Close-up overhead shot of a chef’s hands carefully slicing fresh basil on a wooden cutting board, natural light from a window, sharp focus, high detail.” | Focus: It directs the AI to focus on the hands and the specific action, avoiding a confusing wide shot of a generic kitchen. |
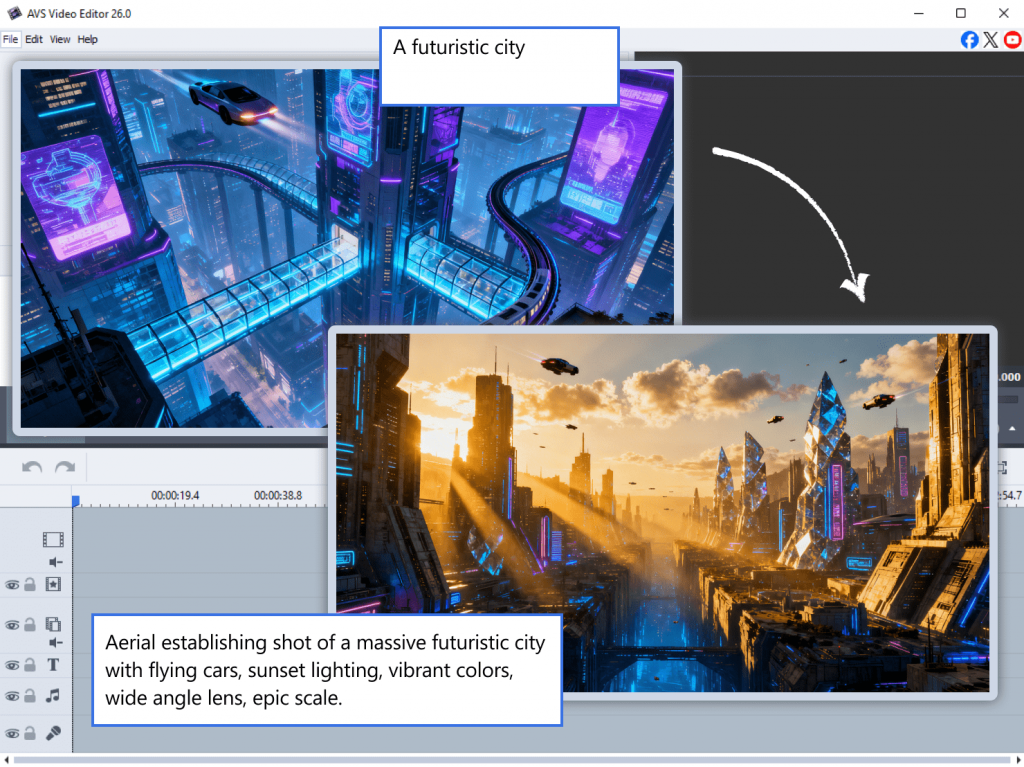
| “A futuristic city” | “Aerial establishing shot of a massive futuristic city with flying cars, sunset lighting, vibrant colors, wide angle lens, epic scale.” | Scope: It defines the type of shot immediately, telling the AI it needs scale and a sweeping view, not a ground-level alley. |
The more clearly you describe the result, the better the AI performs.
AI video generator tips to instantly improve your results
Even with a good structure, these pro tips will help you refine your prompts for the best possible output.
1. Lead with motion
AI models often pay special attention to the beginning of the prompt. Start with the action verb or camera movement for emphasis. (e.g., “Tracking shot of…”).
2. Prioritize the first frame
Describe the opening shot in vivid detail. The first frame sets the tone and style for the entire generation.
3. Use style modifiers
Add words such as “cinematic,” “documentary style,” “anime, or “photorealistic” which act as powerful filters to completely change the aesthetic.
4. Control the speed
Motion speed changes emotional impact. That’s why it is recommended using the following phrases in the prompts: “slow motion,” “hyper-lapse,” “time-lapse,” or “fast-paced action sequence” .
5. Learn from communities
Explore online communities and analyze ai prompt examples to understand what works best. Seeing what drives good results for others is the fastest way to build your own effective prompts.
The best AI video prompts for viral YouTube content
If you are looking for an AI prompt for creating viral videos on YouTube, you need to tailor your descriptions to the platform’s high-energy, high-retention demands.
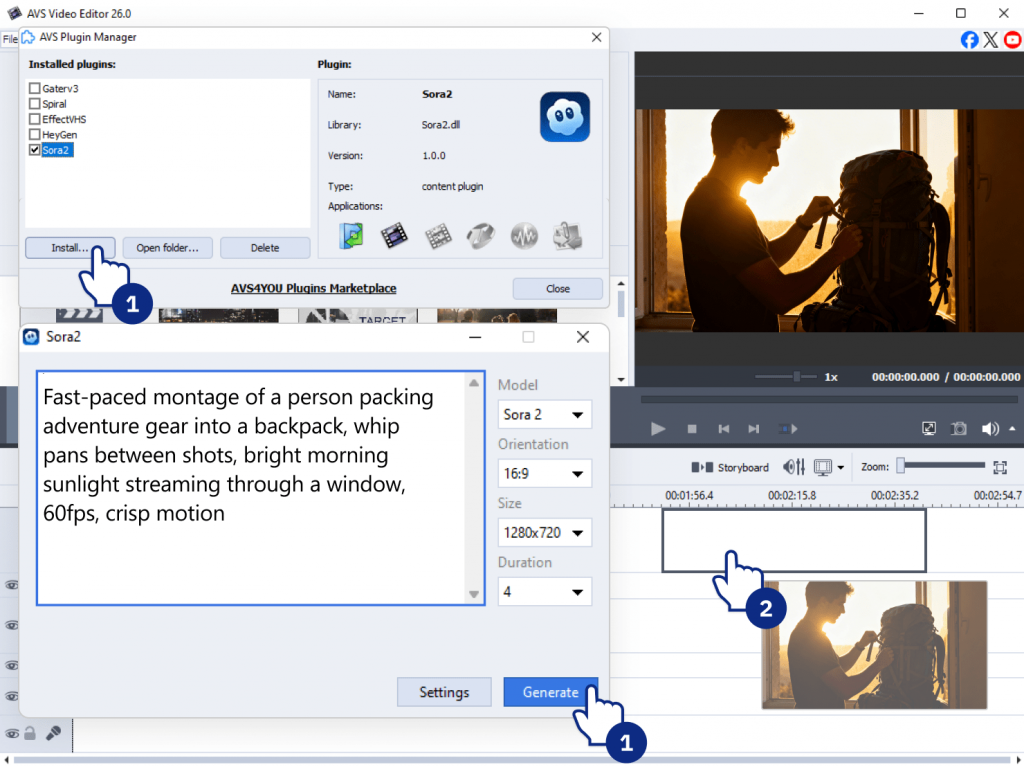
The high-energy hook: “Fast-paced montage of a person packing adventure gear into a backpack, whip pans between shots, bright morning sunlight streaming through a window, 60fps, crisp motion.” It can be used as a YouTube intro.
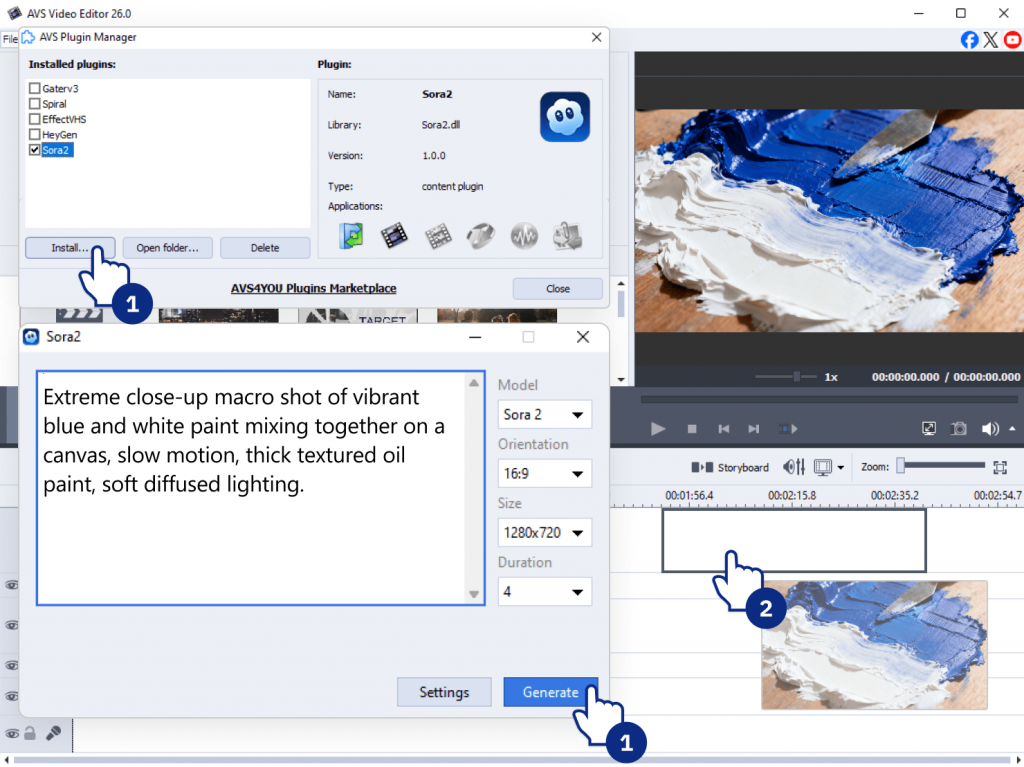
The satisfying tutorial shot: “Extreme close-up macro shot of vibrant blue and white paint mixing together on a canvas, slow motion, thick textured oil paint, soft diffused lighting.” Highly engaging for DIY or art channels.
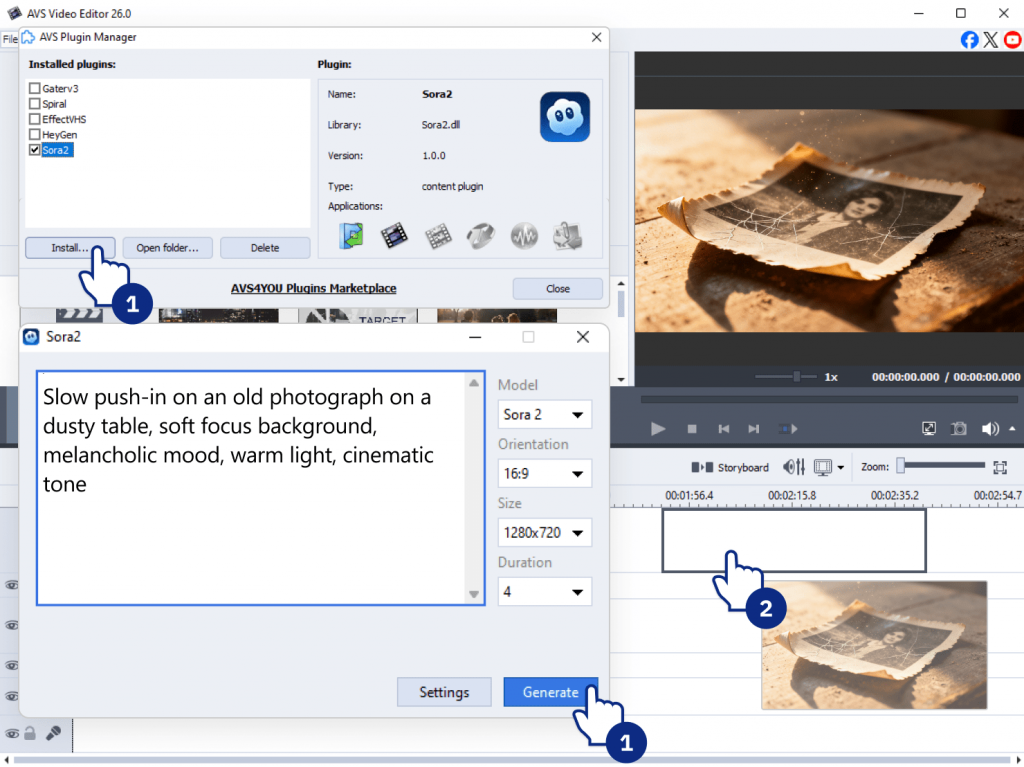
The emotional storytelling shot: “Slow push-in on an old photograph on a dusty table, soft focus background, melancholic mood, warm light, cinematic tone.” It is great for documentaries and narrative content.
These are some examples of best AI video prompts for creators aiming to boost watch time and engagement.
Craft better AI prompts
Writing effective AI prompts is becoming a key skill in modern video creation. The clearer your description, the better the AI understands the scene you are trying to create.
By applying the six core principles of prompt generation and refining your ideas step by step, you can produce more cinematic and engaging results. In AVS Video Editor with its new built-in AI Plugins, it is easy to test prompts, generate clips, and combine them into complete video projects.
The best way to improve is simple. Keep experimenting, refine your prompts, and turn your ideas into video.
Experiment with AI plugins today:
Useful links

Introduction
Creating a video, restoring old footage, or giving your project a fresh, unique look sounds exciting until you open a toolkit full of AI options and realize that you have no idea where to start. With so many features available, it’s easy to feel overwhelmed, and many creators struggle to figure out which AI tool will actually get the job done.
The good news is that AVS4YOU Multimedia Suite already offers several AI plugins, each designed for a particular stage of content creation. They allow you to generate new video clips, enhance existing media files, and add a distinctive visual style.
This post will help you quickly understand what each AI plugin does and how to choose the right tool for your project.
AVS4YOU AI Plugins at a glance
Before diving deeper, here is a quick overview of the main AI plugins available in AVS4YOU and what they are best used for.
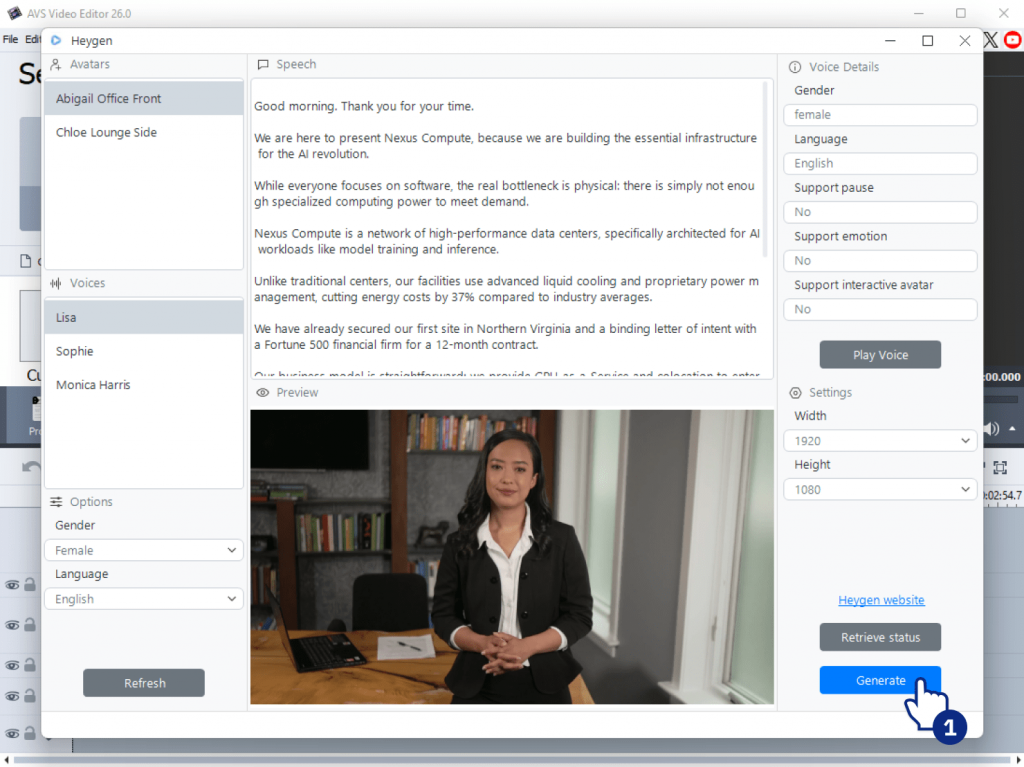
Sora 2 Video Generator produces short video clips from text prompts. Instead of filming footage, you simply describe the scene you want to create. The AI then generates a video based on your description. It is worth using for quick visual content, background footage, or creative experiments.
HeyGen AI Video Generator allows you to make avatar-based videos. It can generate a virtual presenter who delivers your script. It is a convenient solution for tutorials, social media updates, training materials, or marketing messages.
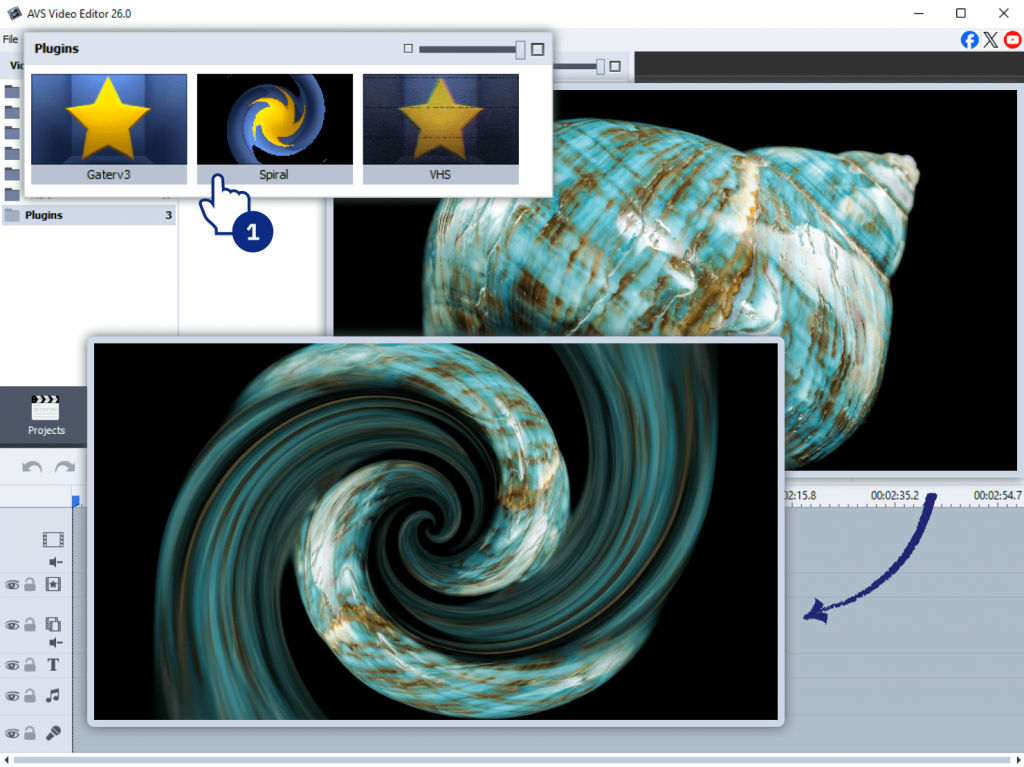
Effect Restoration Gaterv3 improves old, blurry, or damaged images and video frames. It can sharpen details, reduce noise, and restore clarity. This plugin is especially handy when working with archival material, scanned photos, or low-quality footage.
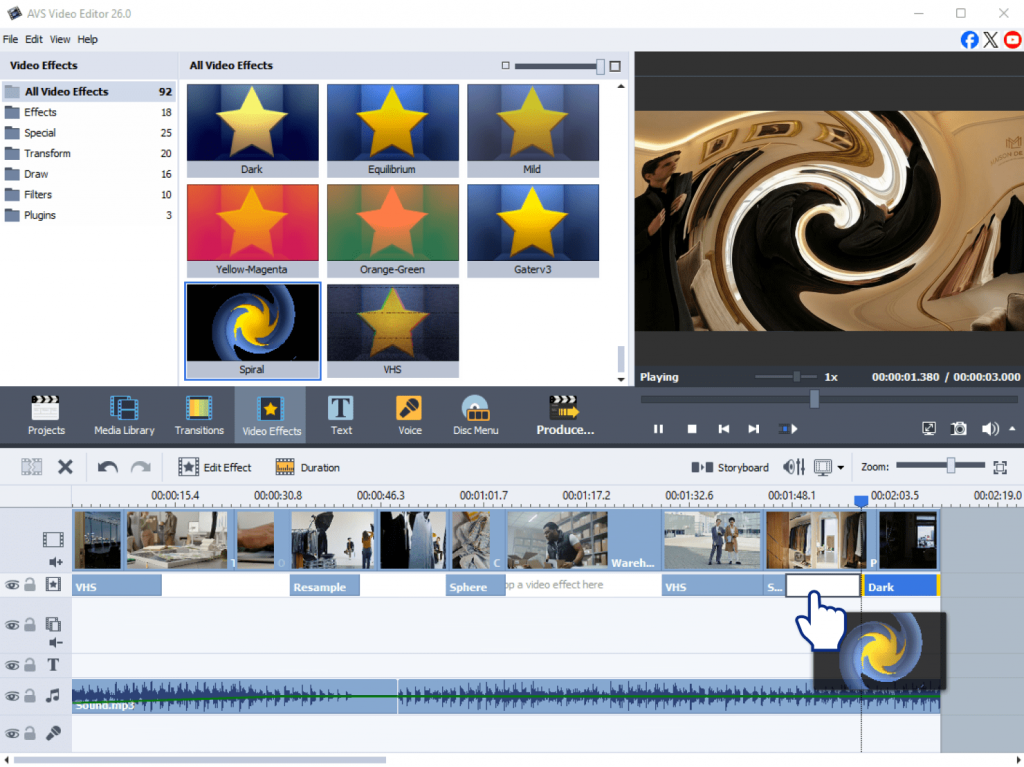
AI-based effects include VHS and Spiral.
VHS Effect adds a retro analog style to your footage. It simulates classic VHS artifacts such as color distortion, scan lines, and tape noise. Creators often use this effect to convey a nostalgic feel or give modern clips a vintage look.
Spiral Effect transforms your video or image by twisting it into a dynamic, swirling motion. This effect draws the viewer’s eye and adds a sense of energy, movement, and visual excitement. It’s widely used for transitions, abstract sequences, or creative projects, making videos more compelling and eye-catching.
How to use AVS4YOU AI Plugins effectively
AI plugins work best when applied at the right stage of the editing process. Using them correctly in your workflow helps improve video quality and save time.
Where AI Plugins fit in your editing workflow
Different AI tools serve different stages of creative work.
Content creation stage
If you don’t have footage yet and have a clear idea of the necessary scene in your mind, you can generate it using the Sora 2 or the HeyGen AI Video Generators. These plugins produce clips or presentation videos from simple text prompts or scripts.
Improvement stage
Sometimes your images or video files may look blurry, faded, or even damaged. In these cases, Effect Restoration Gaterv3 comes to the rescue. It can sharpen blurred frames, restore old photos, and improve footage recorded in low resolution, giving your media a fresh, clear look.
Styling stage
After making some basic edits, give a special flair to your video. For example, the VHS plugin adds a retro atmosphere or character to simple footage, while the Spiral effect creates a twisting, swirling motion. Because of this, your visuals become more dynamic and attention-grabbing.
By combining plugins at different stages, you can turn raw material into a polished final video much faster.
Common editing challenges AI plugins can solve
AI tools are especially helpful when filmmakers face common editing problems.
No footage available
From time to time you may need visuals but don’t have the time or resources to film them. In this case, text-to-video tools such as Sora 2 and HeyGen let you generate clips instantly.
Blurry or damaged media
Old photos, scanned images, or low-quality recordings often appear unusable. Effect Restoration Gaterv3plugin helps improve clarity and recover details.
Footage looks too plain
Even well-shot footage can feel visually flat. Applying creative effects such as the VHS style will add mood and personality to your video.
Mistakes to avoid using AI Plugins
AI tools are powerful, but beginners occasionally misuse them. Avoiding a few common mistakes will improve your results.
Applying AI effects too early
If you apply stylized effects before finishing your main edits, you may need to redo them later. It’s often better to add creative effects at the final stage.
Applying too many AI effects
Using several AI filters on the same clip is likely to produce unnatural results. Always preview the outcome after each change.
Writing vague prompts for text-to-video tools
Short prompts like “a city scene” often result in generic material. More descriptive prompts usually lead to better videos.
Overusing stylization effects
VHS and other effects have a strong visual impact. If applied to an entire video, they may distract viewers from your message. They are most effective when placed in transitions or specific flashback scenes. By avoiding overuse, you ensure these effects enhance the story rather than overshadow it.
Thanks to these AI capabilities, typical editing obstacles become easy tasks to complete.
Choosing the right AI plugin for your task
The easiest way to select the right tool is to focus on your goal.
If you want to generate new video content, choose text-to-video the Sora 2 Video Generator or avatar-based HeyGen AI Video Generator.
For improving the quality of existing images or footage, the Effect Restoration Gaterv3 plugin is the best starting point.
While enhancing visual style, you should apply AI-driven creative effects such as VHS or Spiral Effects which will transform the look of your footage.
You can also combine these plugins. For example, you might restore an old family clip using AI image restoration and then add a VHS effect to give it a nostalgic atmosphere.
Experimenting with different combinations usually leads to the most interesting creations
Craft your video faster with AVS4YOU AI
There’s no single “right” way to use AI in your edits. While each AVS4YOU plugin works best at certain stages, you can experiment and use them however you like. Mix and match tools to see what works for your project, combining AI power with your usual editing workflow
With AI plugins editing becomes faster and more enjoyable. While they handle the technical work, you may focus on your creativity. Think of them as smart assistants that help bring your ideas to life, not as a replacement for your own vision.
Explore the AI plugins in AVS Video Editor and discover new ways to create videos more easily and efficiently.
Useful links

The rise of AI video generation
AI is transforming the way we create content. What once required advanced editing skills, expensive equipment, and hours of manual work can now begin with a simple prompt. Usually, an AI video generator analyzes a description and automatically creates visuals to match the request. As a result, text is transformed into a ready-to-edit video clip in minutes.
The latest version of AVS Video Editor offers new capabilities. With built-in AI tools and a user-friendly interface, it works as an AI video maker and editing studio in one.
In this post, you’ll learn how to create video with AI plugins inside AVS Video Editor, from writing your first prompt to exporting your final project.
Create your AI video from a text
AI Video Features
AVS Video Editor combines AI-powered generation with traditional editing in one workspace. You don’t need to switch between programs or rely on third-party services.
Key features include:
- Multiple video durations (e.g., 4s, 8s, 12s depending on the selected settings)
- Vertical (9:16) and horizontal (16:9) formats for social media or YouTube
- Preview before export to refine your results
- Integrated timeline editing
- Built-in filters, transitions, and audio effects
Unlike standalone online tools, AVS Video Editor combines video creation and further enhancement within the same interface. It is very convenient for all users regardless of their editing skills.
If you haven’t installed the AI plugins yet, follow the setup instructions in the blog guide. Alternatively, you can download them from the AVS4YOU Plugins Marketplace.
How to turn text to AI video
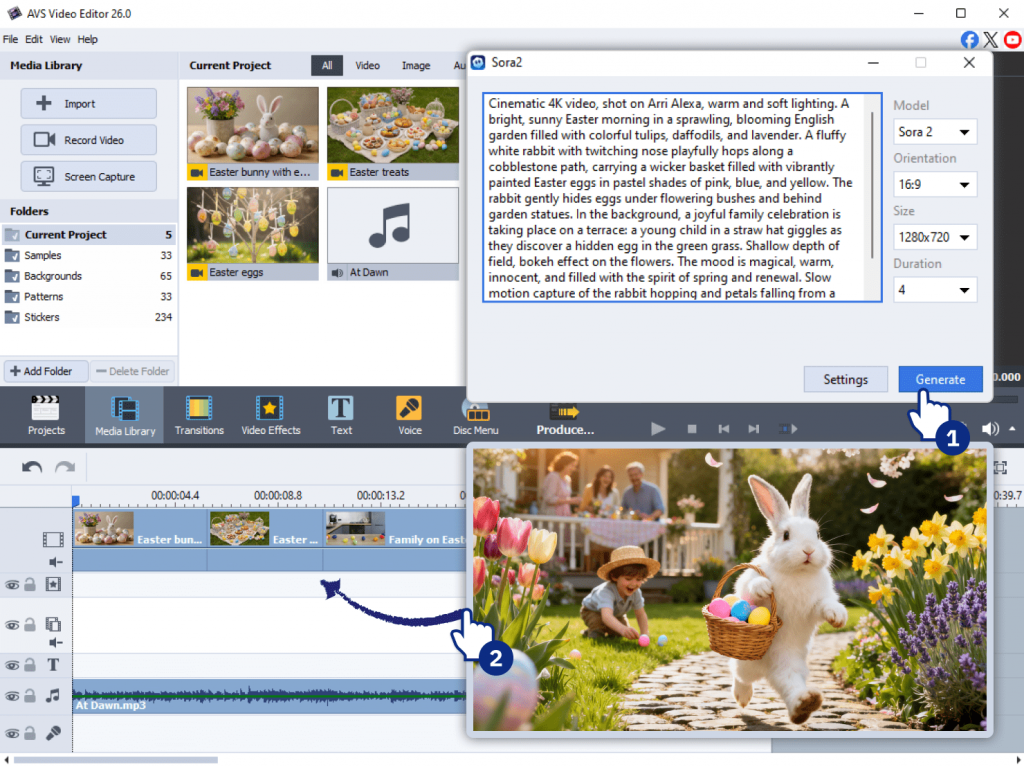
Let’s create a video using the Sora 2 plugin.
1. Define video settings
First of all, launch AVS Video Editor, click File in the left-hand upper corner and choose Sora 2 from the dropdown menu. In the opened window select duration (for example: 4, 8, or 12 seconds), aspect ratio, and set resolution (e.g., 1920×1080 for Full HD). Use 16:9 for YouTube or presentations, 9:16 for Reels, Shorts, or TikTok.
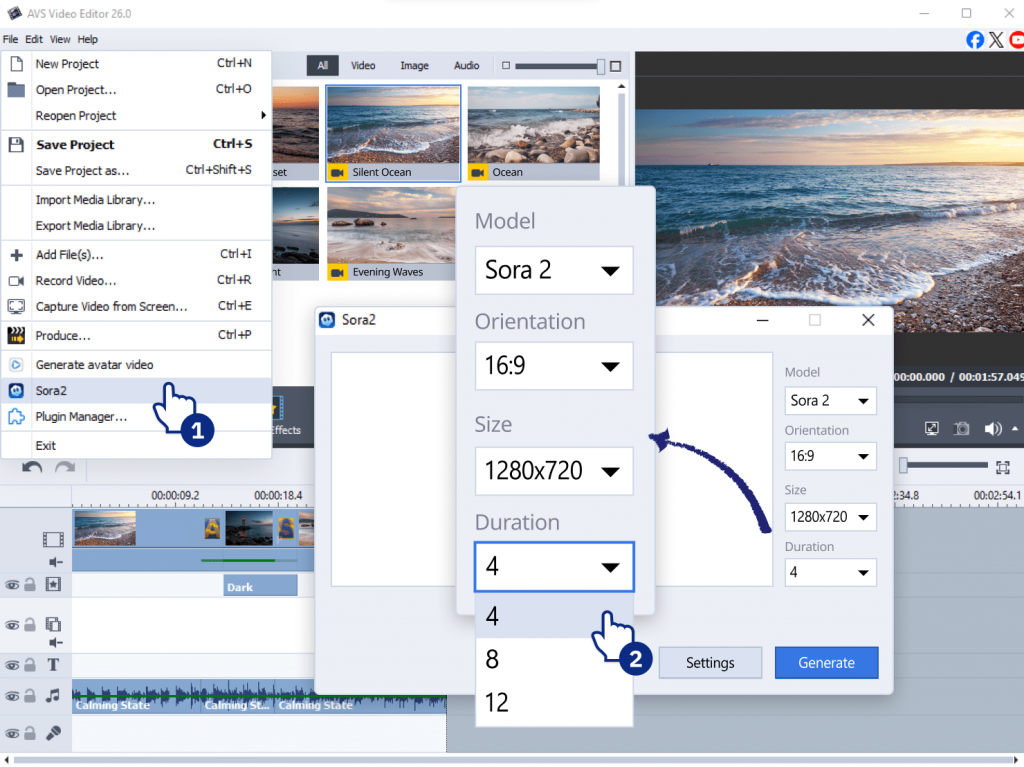
This ensures your AI-generated clip matches your final platform requirements.
2. Write a prompt
To create AI video from text, you have to type a description of the video you want to produce. For example: “Cinematic sunset over a calm ocean, golden light, slow camera movement.”
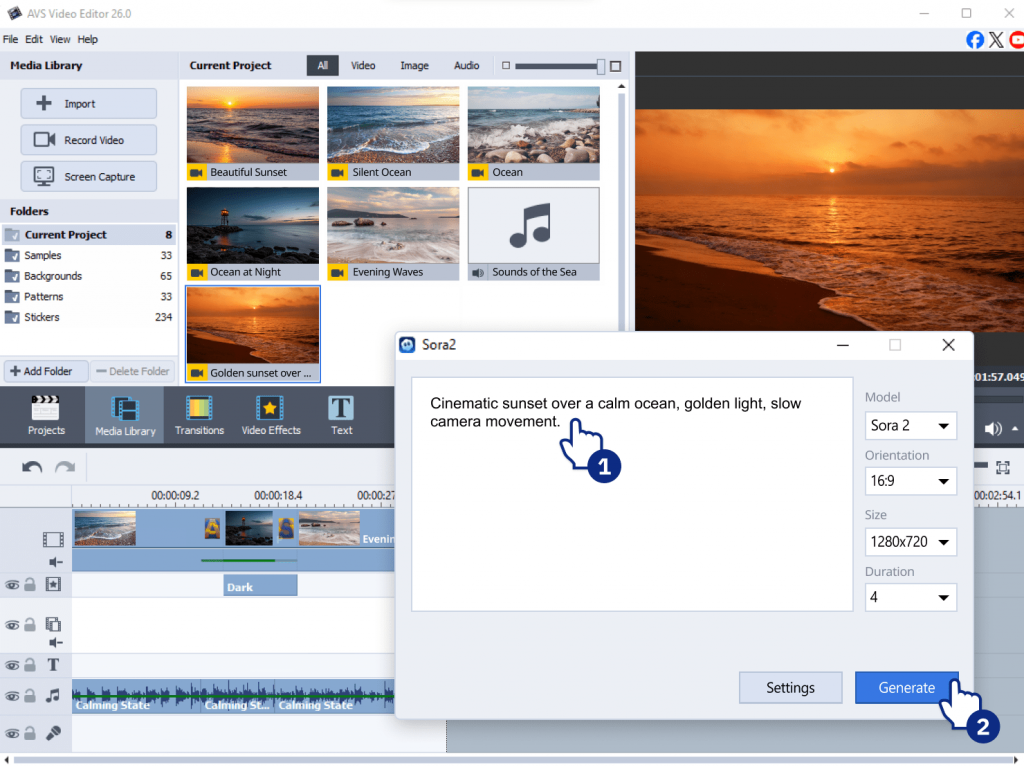
Once generated, the clip appears directly in your media library and can be dragged onto the timeline.
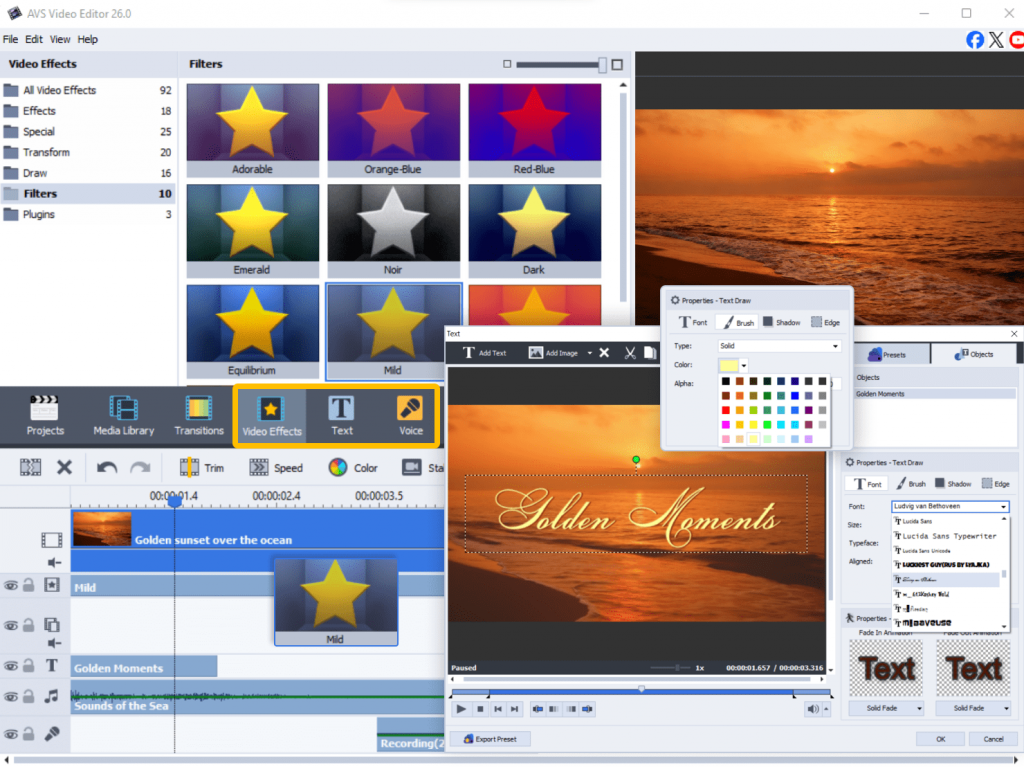
3. Customize AI-generated content
When the video is generated with the AI plugin, you can refine it using built-in tools. Apply color filters and effects, insert background music, record or add voiceover, insert text overlays or captions.
4. Preview and export
Before exporting, use the preview window to check visual consistency, timing, audio levels, transitions. After that click Produce selecting MP4 as an output format because it fits many platforms.
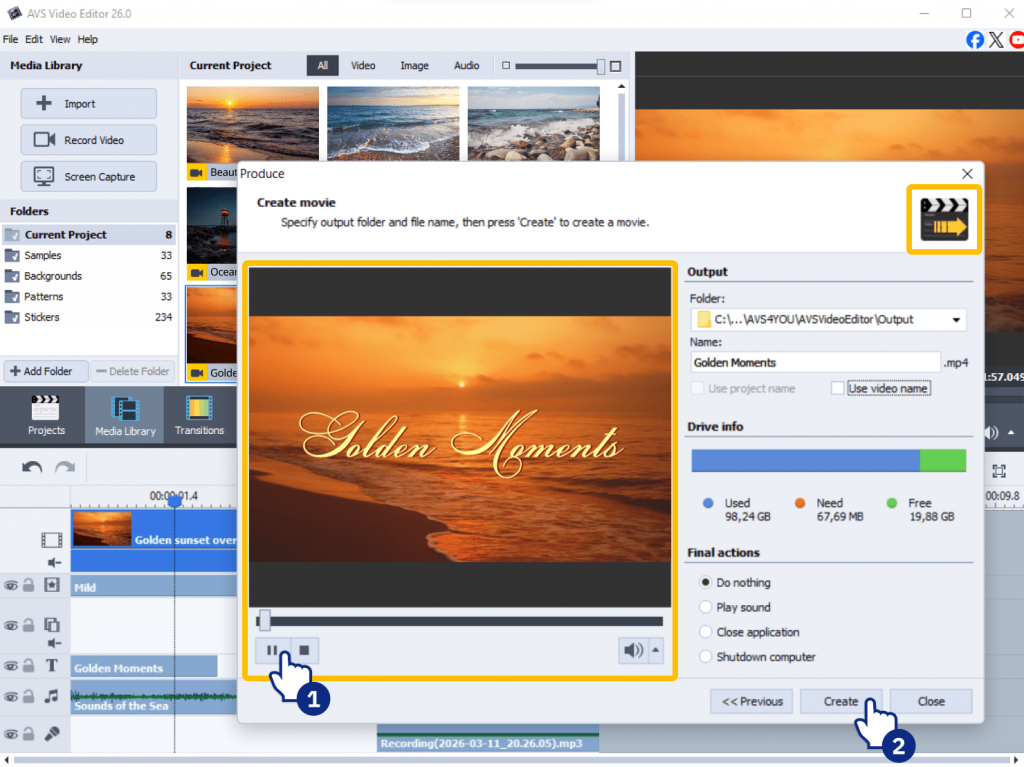
Finally, your AI-generated project is ready to share.
Tips for writing prompts
Even the best AI video maker can fail to perform tasks if the prompt is not up to the mark. To get better results, follow these best practices:
- be specific
Instead of typing “A beautiful landscape.”, describe your idea in detail, for example,
“A wide cinematic shot of snowy mountains at sunrise, soft pink sky, slow camera pan.”
- keep sentences short
AI responds better to clear, direct instructions.
- describe scene, mood, and action
- avoid vague phrases
As a rule, adjectives such as “nice,” “cool,” or “interesting” don’t give clear direction because everybody has a different perception of things. Try to be specific as much as possible.
Here are a few ideas to help you create AI videos from text:
- “Modern office workspace, bright natural light, person typing on laptop, smooth camera zoom.”
- “Futuristic city at night, neon lights, flying cars, cinematic atmosphere.”
- “Minimal white background, rotating 3D product, soft studio lighting.”
Conclusion: Start creating AI videos today
Thanks to AI plugins implemented in AVS4YOU software, you can create short clips for a wide range of purposes faster and with less effort. The possibilities are endless, from a vertical video for social media to a product teaser and animated presentation visuals. The best results often come from mixing AI clips with manual edits such as adding branded intros, custom transitions, inserting logos and animated titles. This hybrid approach turns AVS Video Editor into a full AI filmmaking tool, not just a video generator. Experiment with different prompts, mix scenes, refine your edits, and share videos.
Useful Links
Getting Started with AI Plugins in AVS4YOU: Installation and Setup Guide

Introduction
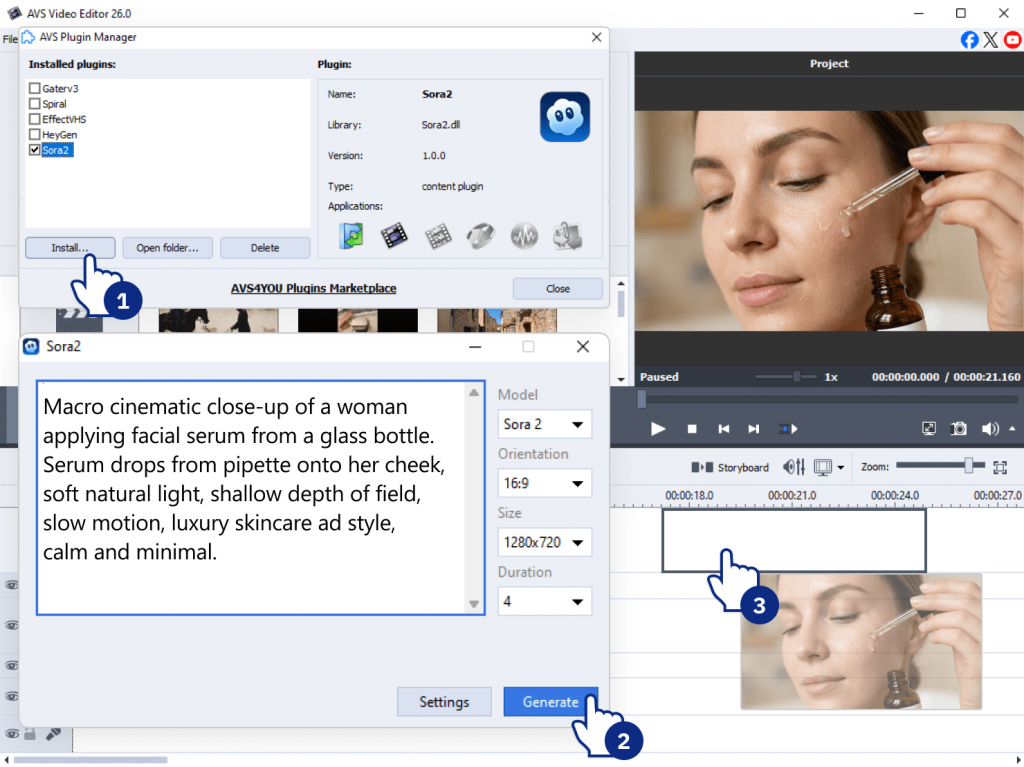
In our digital era, AI is conquering the whole world and penetrating into a wide variety of fields. Unsurprisingly, all modern video suites implement various AI features designed to simplify video editing and creation workflows. In winter release, AVS4YOU team rolled out AI plugins which allow users to generate video and apply advanced effects using artificial intelligence, directly within their favorite AVS applications. In a nutshell, now it is possible to create a short video from a simple text description, apply studio-quality visual effects, or enhance old footage with intelligent restoration.
In this guide you’ll learn how to install AI plugins, activate them with an API key, and start generating content.
Installing AI Plugins in AVS4YOU
Before you start, make sure that you are using the latest versions of your AVS4YOU software. If you have a previous version, please update it at the Download page. To do it, you don’t have to uninstall the software completely, just download a new version from the official website and install it on your PC. What’s more, a stable internet connection is required, not only for the plugin installation, but for smooth AI processing as well.
Please note that AI plugins are available only in AVS Video Editor, AVS Video Converter, and AVS Image Converter.
Step 1: Open one of the AVS programs with AI plugins
Launch the program where you want to use AI features: AVS Video Editor and AVS Video Converter for AI video generation and AI-assisted video enhancements; AVS Image Converter for AI image effects.
Step 2: Navigate to the Plugin Manager
- Go to the Tools or Settings menu.
- Select the Plugin Manager. This is where all supported AI plugins are listed.
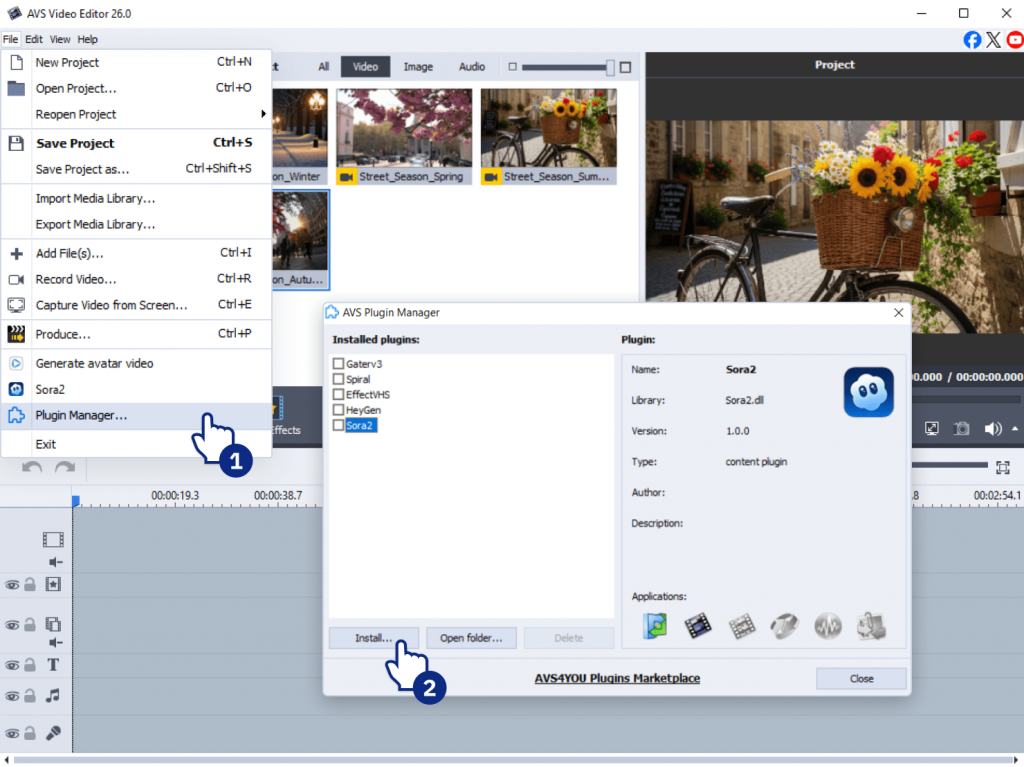
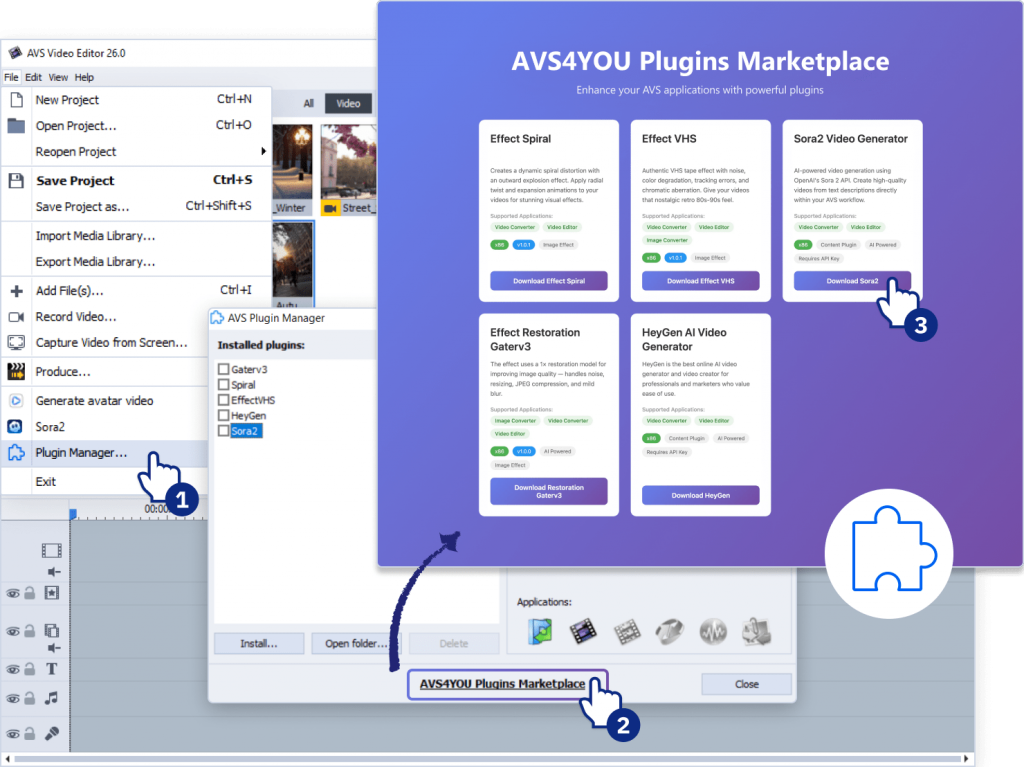
Step 3: Select and install plugins
You can choose to install individual AI plugins or install all available plugins at once at the AVS4YOU Plugin Marketplace. Each plugin includes its description, supported features, and compatible programs. Confirm installation and wait for the process to complete.
Step 4: Activate content generation plugins with an API Key
The plugins are free and open-source, however, Sora 2 and Heygen require an API key from the AI provider. You’ll need to visit the website of each AI service and sign up for an API key. Many services offer free credits to start.
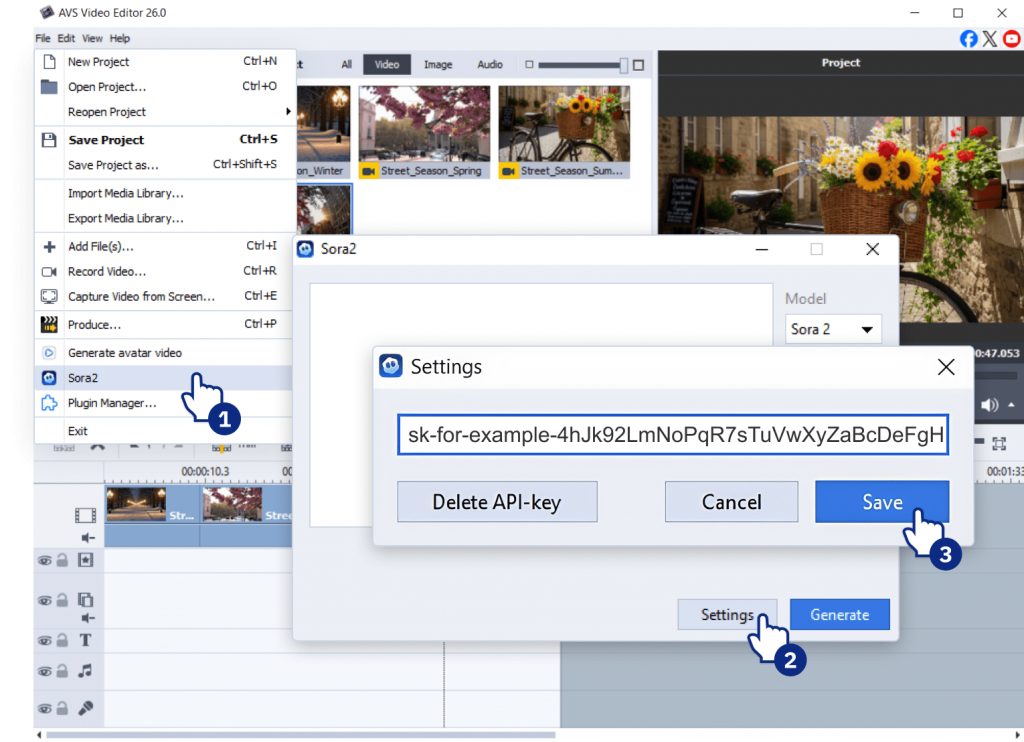
Copy your API key into the corresponding field in the plugin activation window. Once it is activated, you can start using the plugin without restrictions.
Step 5: Test AI Plugins
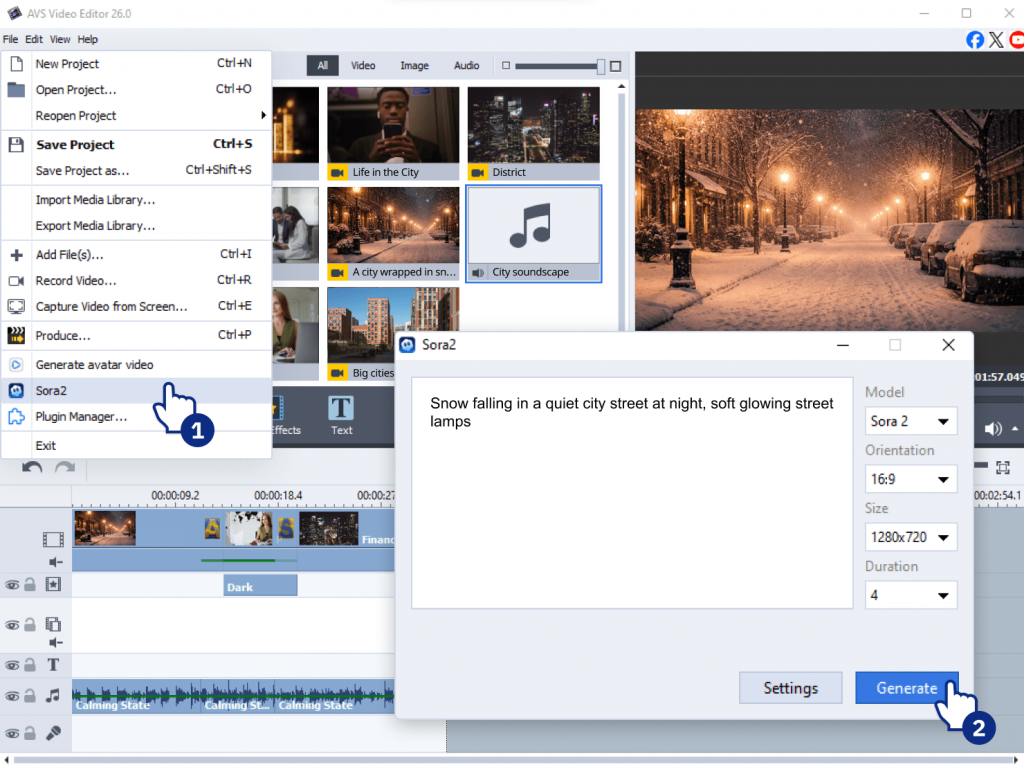
Video plugins
- Write a prompt in the plugin’s text window (for example, “Snow falling in a quiet city street at night, soft glowing street lamps” for Sora 2 plugin).
- Check video settings such as resolution, format, or duration.
- Click Generate to create your first AI video.
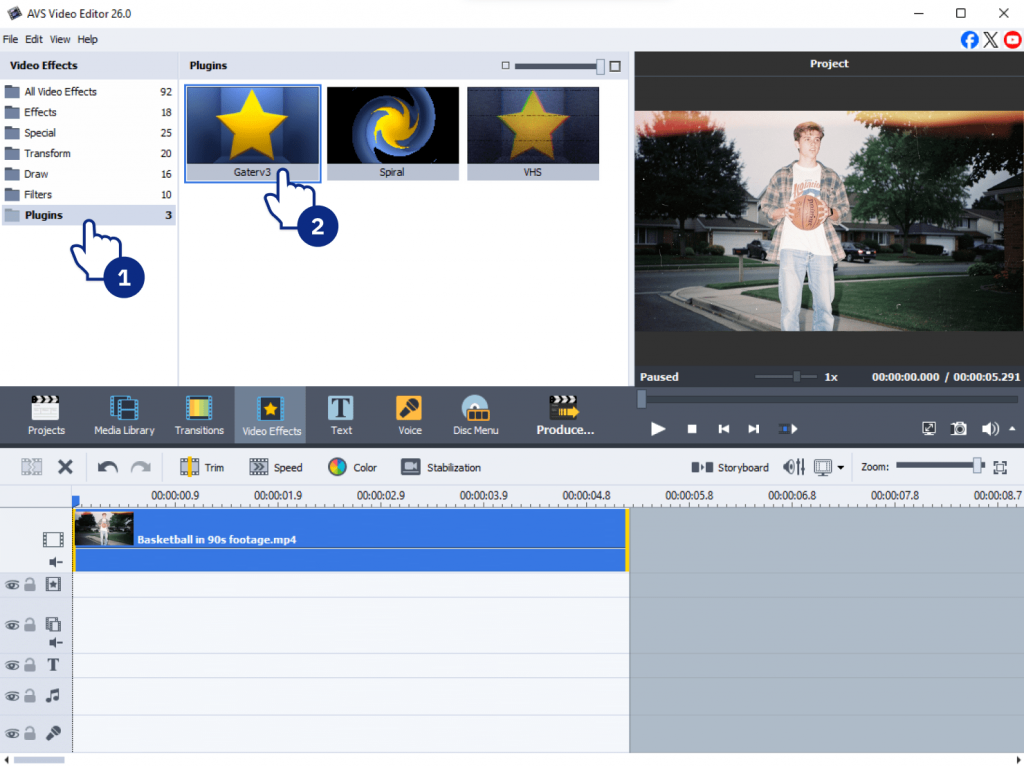
AI-based effects
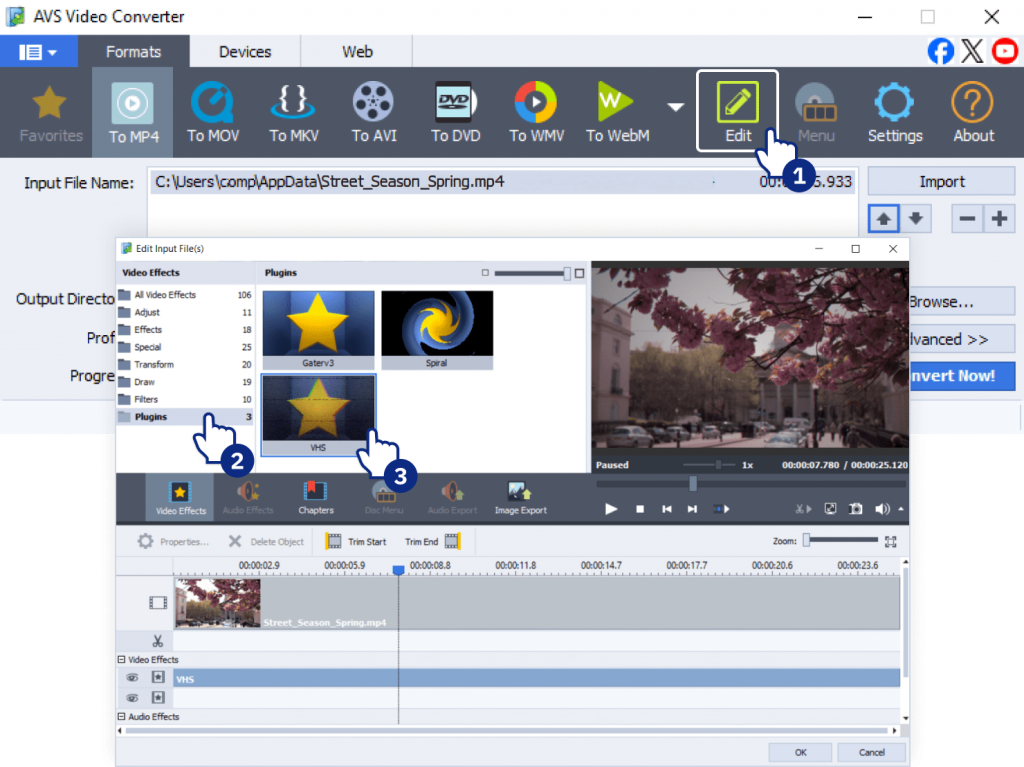
In AVS Video Editor AI image effects are in the Video effects>>Plugins tab. In AVS Video Converter, go to Edit>> Video Effects>>Plugins. AI-based effects are applied in the same way as other effects without any pritfalls.
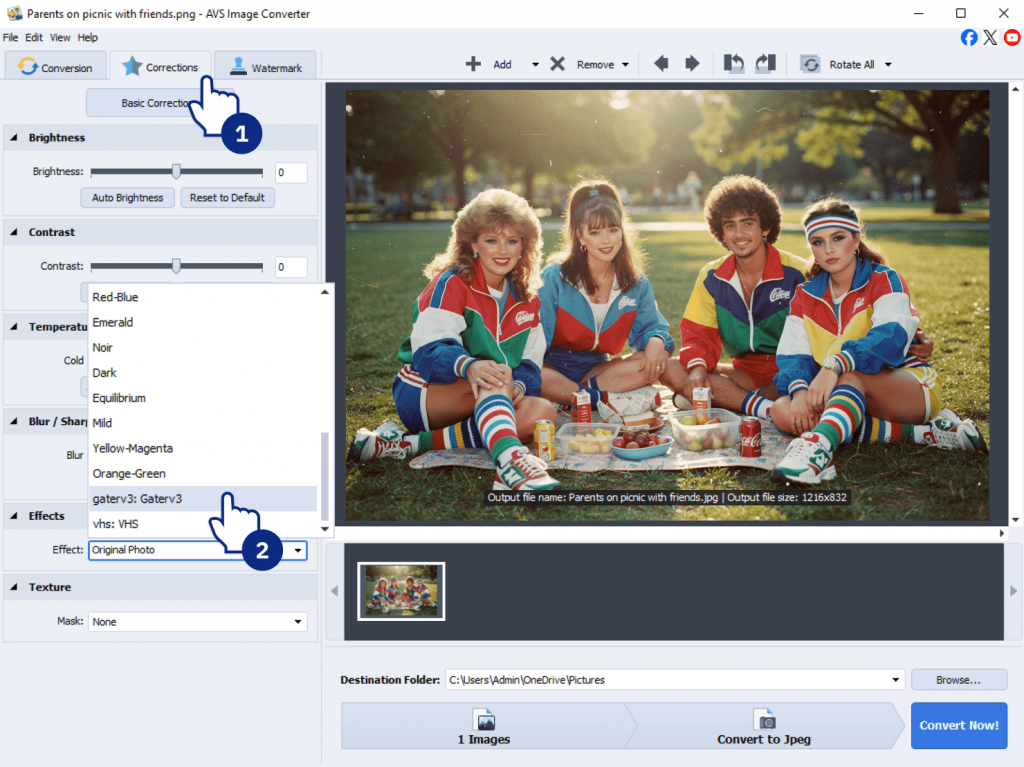
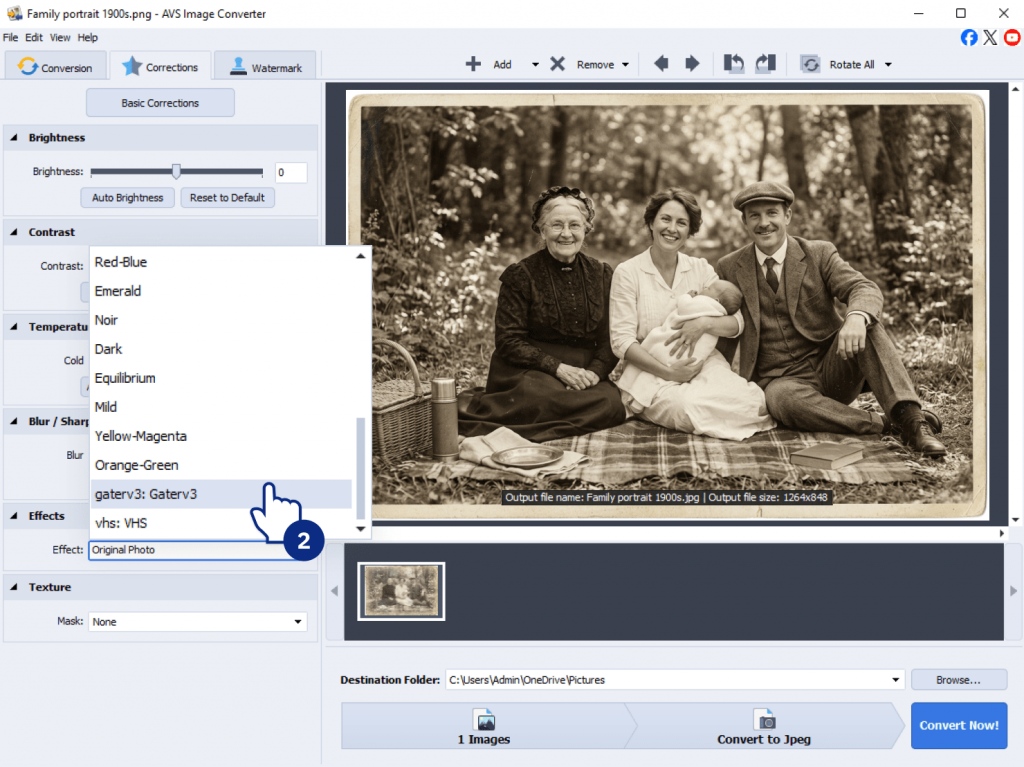
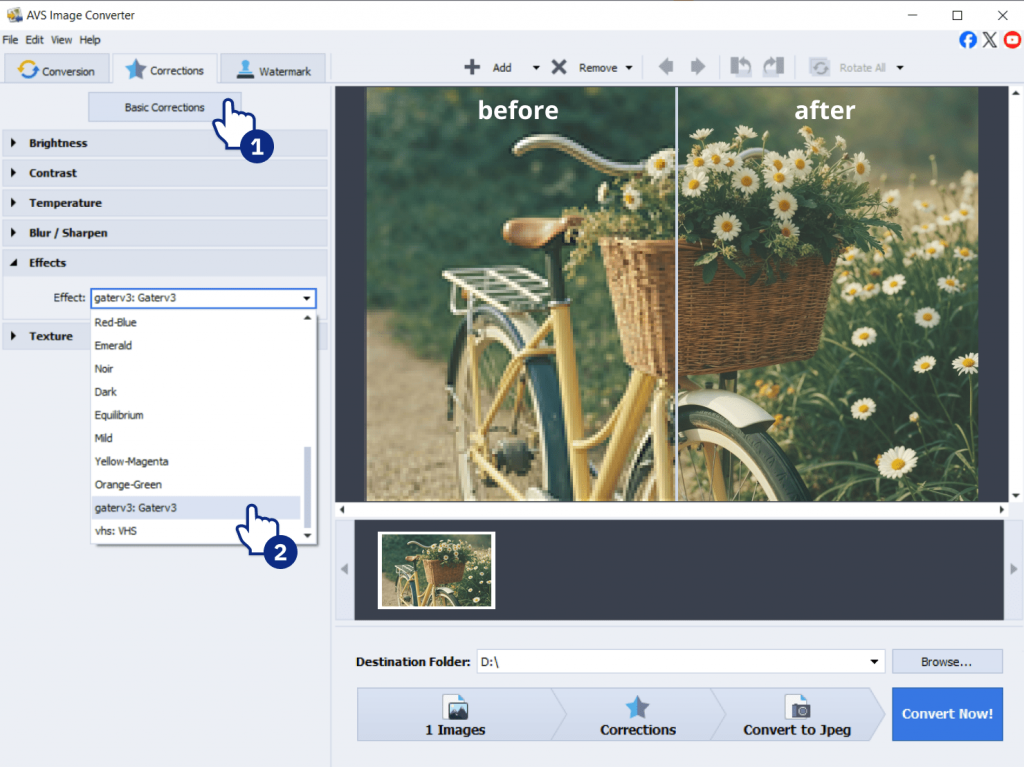
To apply new AI-powered image effects in AVS Image Converter, go to Corrections>>Basic Corrections>>Effects and select the desired effect from the dropdown list. AI effects are located at the bottom.
File locations:
- In AVS Video Editor, AI-generated files are saved in in the following directory c:\Users\[user name]\AppData\Local\avs_plugin_sora2 and displayed in the Current Project section.
- In AVS Video Converter, AI-generated videos appear in the main window automatically—no need to import them manually.
- In AVS Image Converter converted images are saved by default in the folder C:\Users\User_name\Picture, but you can change the destination folder before the conversion.
Common issues and solutions
Even with a smooth setup, you may encounter minor issues. Here’s how to resolve them:
| Issue | Solution |
| Plugin does not appear after installation | Restart the program. Check Plugin Manager to ensure the plugin is installed for that program. |
| Installation stuck or failed | Check your internet connection and make sure it is stable and you have the latest program version. Try reinstalling. |
| Activation failed | Verify your API key is entered correctly and hasn’t expired. |
| Network-related issues | Confirm your firewall or antivirus isn’t blocking access to AI services. |
Note: Each AVS program has access to specific plugins. For example, there are no video plugins in AVS Image Converter. Always check the Plugin Manager for compatibility.
Tips for Beginners
To get the best experience with AI tools for content creation, follow these tips:
- Start with default plugin settings to understand the workflow.
- Use short and clear prompts for more accurate AI results.
- Make small changes to prompts instead of rewriting them completely.
- Watch progress indicators and wait until processing finishes.
- Restart the program if a plugin becomes unresponsive.
- Keep a stable internet connection during AI processing.
- Review plugin settings after updates to ensure consistency.
- Start with lower resolution or shorter video clips to test results faster.
- Always preview AI-generated content before exporting the final file.
Conclusion
The new AI plugins represent a major step forward for the AVS4YOU suite. They can help you generate, restore, and transform your media faster and easier. Now that you are familiar with the AI Plugins, the next step is to try different prompts and resolutions to see what works for you. The best way to learn is by doing!
We encourage you to check our marketplace from time to time because we are constantly expanding the current collection of plugins. Tech-savvy users can create their own plugins to integrate them into AVS4YOU software. Please find the full documentation with examples here.
Can’t find what you’re looking for? Let us know in the comments.
FAQ
1. Are the video plugins AI free to use?
Yes, they are free and open source. However, your AI provider might charge you for using its AI models in AVS4YOU software. To learn more, visit the website of your provider.
2. How do I get an API key for generating AI video?
AVS4YOU doesn’t provide API keys. You should get them from your AI provider. Here are the pages where you can find more information about how to get API keys:
https://docs.heygen.com/docs/quick-start
https://platform.openai.com/api-keys
3. How do AVS4YOU plugins work?
The plugins integrate external AI services directly into your AVS programs. The plugins are installed additionally to the software package and are part of AVS4YOU workflow.
4. Do I need to have an Internet connection to use AI?
Yes, you need a stable Internet connection to generate video using AI video content plugins. But is is not necessary for the use of AI-based image effects.
5. What is an API key, and why is it required for content generation plugins in AVS4YOU?
An API key is a unique code that identifies you to a service such as OpenAI or HeyGen. It’s required for the generator plugins because AVS4YOU software does not perform AI video creation.
When you use the plugin, your request (a text prompt) is sent to the external service’s servers. The API key acts as both your authentication (“this request comes from a valid user”) and your billing identifier, allowing the external service to track your usage and potentially charge you based on your plan with them. The AVS4YOU plugin simply allows to connect AI video generators with AVS programs within their interface.
6. Are there any usage limits for the AI image effects?
No, there are no limits. You can apply AI-based image effects as often as you need.
7. What are the usage limits for Sora2 and Heygen Video Generators?
It depends entirely on your API key plan. AVS4YOU plugins do not impose any usage limits on video generation.