
Decided to launch a series of educational videos for your students online? Start with choosing a suitable video editor and then use these best practices to offer maximum value.
1. Choose the type of your video
Define the nature of your video lessons. Are they tutorials, lectures, or maybe live webinars?
- Tutorials review an object or phenomenon and often require screen capturing.
- Lectures help explain the material to remote students, just as you’d do in a classroom.
- Webinars are live workshops where you can interact with students in real-time.
You may need different software and equipment for producing each type.
2. Put your students’ interests forward
Think about what your target audience is in terms of age, online presence, and content preferences.
Younger students usually prefer to get information from shorter clips (e.g., TikTok or YouTube Shorts), whereas older generations may expect a comprehensive series with a deep dive into details.
The target audience also determines the way and volume of information provided.
3. Use the proper tone of voice
Decide from the very beginning, whether you want to use a formal or a slightly more friendly language in your video lessons. Avoid talking to adults and elementary school kids in the same way — one of these audiences will just not understand you.
Stick to the chosen tone of voice throughout the whole video series.
4. Choose a platform for hosting video lessons
Websites where teachers can upload their online courses are different in reach, audiences, requirements to video specifications and content. Some of them allow sharing clips right away, others have an approval process for each course.
YouTube and Vimeo are general video platforms that encounter billions of views daily. On specialized educational services like Coursera, students can get certified after watching all your video lessons.
5. Write content for your videos
Have the entire text for each video lesson or live webinar ready before making a video. Offhand performance is a bad idea even if you know the material perfectly. Speaking on camera is pretty stressful, and you can forget something anyway.
Make sure the text for each lesson is well-structured and only contains relevant information to the topic. Include multiple examples, especially when talking about complicated things.
Avoid difficult terms when teaching kids and laymen. Using colloquial words is not recommended.
6. Prepare imagery and other creative assets
Visual content is a great fit for your speech, both during live webinars and recorded video lessons. That could be a colorful PowerPoint presentation or just relevant images.
Create a folder on your computer and collect there all images, charts, tables, and music tracks.

7. Check necessary equipment
Conduct an audit to make sure you have everything for recording an educational course. To capture a video, you may need the following:
- Camera
- Tripod
- Lighting
- Additional lenses
To make the sound in a video cleaner, use these devices:
- Microphone
- Pop filter
- Shock mount
If your budget is not super tight, we recommend hiring a professional clip maker — they have all necessary equipment.
8. Look at your background
This step is important for everyone who records a video lesson at home instead of professional studios. Keep the background simple — there should be no distracting elements or personal things.

9. Record a video lesson in one take
Even professional actors perform multiple scenes and producers then choose the best one. This is a perfect approach when you have enough time and budget.
In educational videos, it’s recommended to record your clip in one take. Even if you’re making mistakes or forget something, just go ahead — you’ll cut out unwanted scenes afterwards.
10. Communicate with your viewers
At the beginning of your clip, always make a brief overview of what you’ll cover in this lecture. People don’t want surprises here — they should have a clear idea of what’s going on.
Inform students when you want to show something on the screen. Comment on any graphs and images.
Moves from one topic to another should be possibly smooth. At the end of your clip, give a hint of what will be discussed in the next one.
11. Edit your video & audio
Alright, you have a video lesson footage ready for post-editing. Open AVS Video Editor and consider making these changes:
- Cut out unwanted scenes
- Apply the Fade In / Fade Out effect
- Insert text, pictures, voiceover or background music
- Add new scenes, e.g. intro with the logo of your university
- Apply transitions between scenes
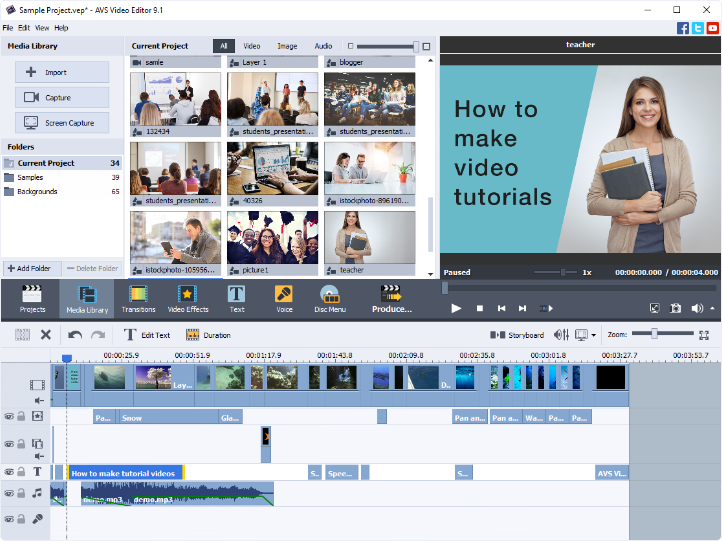
You can make numerous amendments to the video look and feel. Guides for different tools in AVS Video Editor can be found in our blog or knowledge base.
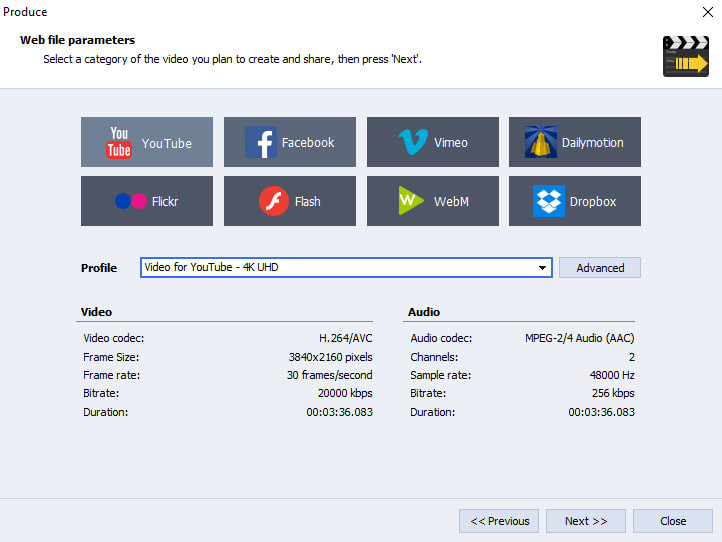
Polished up your video lesson? Save it in the compatible format with suitable parameters. In AVS Video Editor, you can choose a pre-defined standard.
12. Share your video and engage viewers
Depending on the video hosting platform, there will be various ways to interact with the audience. For example, YouTube allows adding timestamps in the description, so that people can jump to the desired part of your video.
On Coursera and similar educational platforms, you can add short quizzes and even ask questions during watching a clip.
The success of an educational video depends on numerous factors. The above-mentioned essential tips are relevant for the most cases.
Plan to record your video course? Get AVS4YOU with a special discount for education!
In the following section, you’ll find some other guides for making engaging videos.
Useful links
How to add a picture to a video
How to overlay a video on a video