Category: AVS

There is no doubt that e-learning is a great way to increase your knowledge and skills in a unique and flexible digital environment with its own strengths and opportunities.
Whether you are attending online classes for the first time or looking for ways to strengthen your current learning habits and approaches, there are some key areas to consider to set yourself up for success and make the most of all that online courses and programmes have to offer.
In this article, we’ll share some tips and strategies to help you succeed in your e-learning and take it to a new level.
Tip 1. Don’t underestimate the importance of e-learning
If you tend to think that online classes require less work and are easier than traditional classes in the classroom, you are wrong. In reality, online courses are designed to be just as rigorous and demanding as traditional courses.
That’s why you need to be prepared for a minimum of several hours of work every day – and that’s a modest estimate. For some online courses, much more time will be required, especially during the final exam weeks and mid-term.
Tip 2. Create a comfortable learning environment
If you don’t want to be nervous about online learning, you need to make make sure you can see and hear your teachers and other students clearly. At the same time, it’s vitally important to feel relaxed and be on firm ground.
If you study from home, you need to make sure that the environment you are in is tidy and well-lit, and the temperature is neither too high nor too low. Nobody and nothing should distract you so that you can concentrate on processing new information.
However, you don’t have to make your new place to study online look like a regular classroom.
Tip 3. Set clear learning objectives
Setting clear learning objectives will help you see the benefits of the learning process and how it will help you develop and improve your skills.
Why am I attending these online lessons? How can I benefit from this knowledge? What qualifications will I get at the end of this course? Do I really need this skill to get my dream job? The answers to all these questions will help you make the most of what you study online.
Once you have established your learning objectives, all other aspects of your learning strategy will automatically fall into place.
Tip 4. Make use of the required hardware and software
Such requirements are usually specified somewhere in the course. You may not be able to complete written assignments, watch educational videos, listen to podcasts or participate in group video and audio calls if you do not have the right technology. Making sure you have the proper Internet connection, anti-spyware software and software programs installed is essential to your online learning success.
Tip 5. Record your online lessons if possible
Some teachers don’t record their online classes, and sometimes you may face technical problems, like incompatible software. That’s why it’s a good idea to find a way to record your online lessons whenever possible.
There are some evident benefits. If you are sick or unable to attend online classes for some other reason, you can watch the video later. Even if you never miss anything, you may want to replay some parts of the video to better understand the topic.
For this purpose, you need special software. For example, using AVS Video Editor you can not only record video files from your PC screen but also add text annotations and apply animation effects while recording. It’s also possible to edit and save video files in all popular formats (MP4, M4V, MOV, MKV, WEBM, AVI, DVD, VOB, MPG, WMV, 3GP, FLV, M2TS, TS, etc.) and adjust them for iOS and Android devices.
Tip 6. Listen to audio podcasts everywhere
Video courses and content work great when you try to learn new information online. However, audio perception is also important, and some people process auditory information even better than image information. That’s why it’s important to get new knowledge via podcasts and audio lessons.
On the Internet, there are plenty of web resources where you can find educational podcasts and listen to them online. At the same time, it’s a good idea to extract audio from videos and listen to it as a podcast while doing the household work or going for a walk.
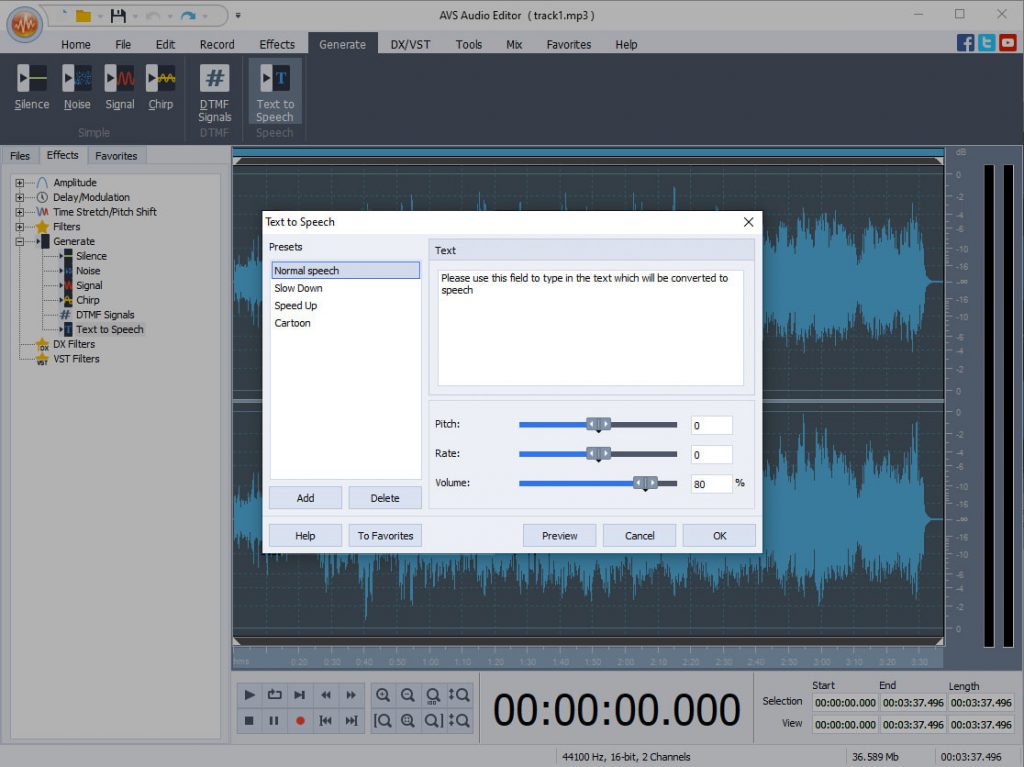
If you need to extract audio from video files, you can try AVS Audio Editor. With this software tool, you are allowed to extract and edit audio from your video files and even record audio data from various inputs. For example, you can record the voice of your teacher during an online lesson and listen to it later to better understand the topic. Importantly, AVS Audio Editor can turn text into a voice with the Text-to-speech feature so you can create audiobooks from written materials and listen to them everywhere.
Tip 7. Regularly treat yourself to a break
If you study too hard, it may lead to unintended consequences, like a lapse of concentration, chronic fatigue or even depression. Don’t try to learn everything 24/7. Regular breaks will help you ingest information better and remember things much easier.
After studying online for a few hours, take a break for at least 15-20 minutes and do what you like. Go for a short walk, do some push-ups, read a book or listen to your favourite music. When you feel refreshed after the break, get back to your computer and keep grinding away at your studies.
If you prefer to relax with the help of music, we recommend trying AVS Media Player. This powerful multimedia tool makes it possible to listen to audio tracks in different formats (WAV, MP3, ALAC, FLAC, M4A, OGG, AAC, AMR, etc.) and create personal playlists according to your mood. It also allows you to play videos so you can watch your favourite films and video clips.
Conclusion
As you can see, e-learning is made easier with the right approach and dedication. If you are motivated and know what you want to archive, you can easily gain knowledge and acquire new skills via online classes and courses.
Software tools, like AVS4YOU, help you make some things easier when studying online and allow you to make constant progress. Use the benefits of modern technology and become a better learner.
Useful links
How to record voice on Windows 10
How to remove audio from video
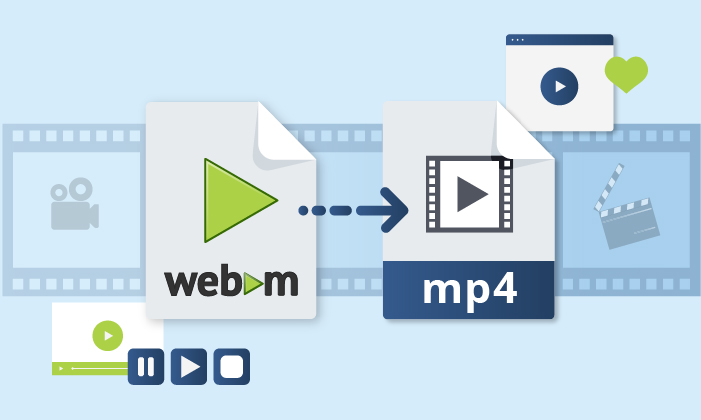
Today the variety of available video formats is so large that most users easily get confused when they need to choose one. At first sight, many formats look similar and have a lot in common but such an impression is always deceptive. In this article we will take a look at two popular formats, WebM and MP4, and learn how to convert WebM files to MP4 using AVS Video Converter.
Comparison of WebM and MP4
WebM is a container format especially created for Internet streaming. This open source video format is developed by Google and based on Matroska media container.
MP4 or MPEG-4 Part 14 is also a container format but more widespread and compatible (than WebM or other formats). It is most commonly used to store video and audio, but it can also be used to store other data such as subtitles and still images. Like WebM, MP4 is suitable for the Internet streaming.
Although both formats are suitable for online streaming, they are different and, consequently, have strong and weak points. Let us take a closer look at each of the two.
WebM | MP4 | |
Supported video codecs | VP8, VP9 and VP1 | MPEG-2 Part 2, MPEG-4 ASP, |
Supported audio codecs | Vorbis and Opus | HE-AAC, MP3, AC-3, |
Streaming support | WebM is especially designed for the Internet streaming | MP4 supports the Internet streaming and can be easily uploaded to websites |
Supported media players and browsers | Only the most common web browsers (Mozilla Firefox, Google Chrome, Opera, Microsoft Internet Explorer, etc.) and a limited number of media players | Almost all the existing media players and web browsers |
Supported devices | Only Android devices | All devices by Apple, Samsung, Sony, Microsoft, etc. |
Strengths |
|
|
Weaknesses |
|
|
To sum it up, both WebM and MP4 have their pros and cons. It would be wrong to say that one is better than the other, but it is clear that each of them meets users’ individual needs. If you focus more on video quality and want you video files to be played on any device and with any media player, MP4 is a better choice.
WebM to MP4 Converter
Using AVS Video Converter, you need to follow several simple steps listed below to convert WebM to MP4:
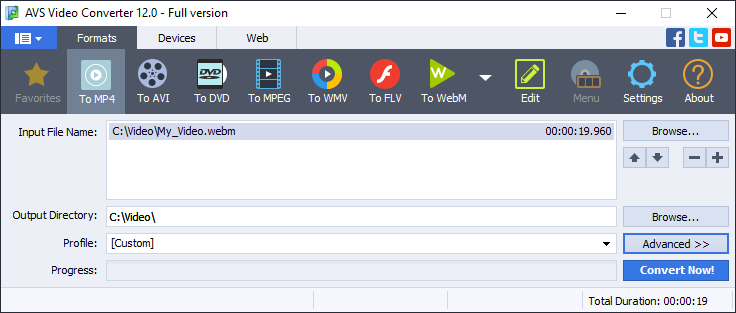
- Choose a file for conversion by clicking the upper Browse button next to the Input File Name field and browse for the required video file in the resulting window.
- Customize the output file name and its location by clicking the lower Browse button next to the Output File Name field.
- Press the To MP4 button at the Formats tab of the main toolbar.
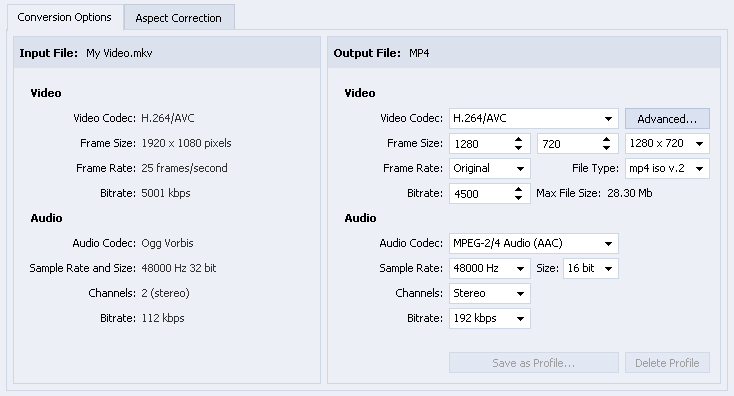
- Select a pre-defined MP4 Profile with suitable output video parameters. Choose the right configurations for your particular devices and purposes.
- Open the Conversion Options window by pressing the Advanced >> button to customize the output video properties and save them as a new profile. Please note that if you are new to video encoding, it is recommended to use pre-defined profiles to get a file with the required parameters.
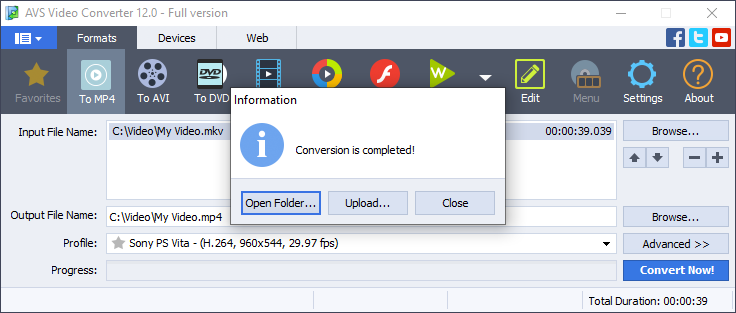
- After setting up all the conversion parameters, click the Convert Now! button to start converting your video file to MP4.
The Open Folder… button helps you easily find the location of the converted file.
By clicking the Upload… button you can transfer the converted video to your gadget or digital storage device.
You can also close the pop-up window by clicking the Close button and continue converting other video files.

As you can see, video converting is really simple with free AVS Video Converter. You can freely convert any video files to different formats. Read this guide to learn how to convert video to WebM. With AVS Video Converter, you can also convert video files to MP4 for your favourite devices. Try it out now!
We hope this guide was useful to you. If you have any questions, please use the comments section below.
The latest version of AVS4YOU is already available with dozens of enhancements and new features for AVS Video Editor and AVS Video ReMaker. Read this article to get familiar with them.

The update has brought significant changes into AVS Screen Capture.
Just to remind: This utility allows you to record any actions on the desktop for making a detailed presentation or video tutorial. To launch it, click Capture Screen at the Start Project menu of AVS Video Editor. More information here>>>
Better quality of screen recording
We decided to use MOV format for the output video quality as WMV did not fulfill our requirements. You can also choose between two presets: MOV with standard or reduced video/sound quality depending on your expectations and PC performance.
From now on MOV is a preferred format for capturing your screen activity (FLV and AVI are also available). The utility automatically sets process priority as ‘above normal’ and Stereo Mix as the audio source by default. Recommended settings may be changed any time you want. Check this instruction to learn how to customize screen capturing configurations.
We have improved AVS Screen Capture stability when it is launched separately from VideoEditor/VideoRemaker. Renewed recording initialization now spares resources consumed by your PC.
Besides, minimum and maximum dimensions of a recording area were enlarged, so that video codecs work at peak capacity and you have more space for arrows to move the area.
New sticker packs for AVS Video Editor
Want to make a memorable video footage of the last Easter celebration? Create a stunning video using new stickers for any event – we added 54 thematic PNG stickers (New Year, Valentine’s Day, Wedding, Party, Birthday, Easter). Try it yourself in AVS Video Editor!
Performance and stability optimization
AVS4YOU developer team cares about stable functioning to guarantee smooth and user-friendly video editing experience. That way, installation and launching become easier and faster in every update. The new version has more intuitive appearance of a project list in the main window, i.e. correction of its initial altitude on Windows Vista/7/8/8.1/10. Plus AVS Video Editor got easy safe mode launching, updated Media Library, restriction for inserting unwanted media files into Stickers and Backgrounds folders.
Try all new features yourself and enjoy improved performance!
Share your thoughts about the release and let us know what else can be improved in the comment section below. Your feedback is highly appreciated!

The famous quote says that one eyewitness is better than ten hearsays. Nevertheless, many users need to convert their videos into audio formats like MP3. AVS4YOU professional multimedia tools export audio from video in MP3 quickly without any effort.
There are many reasons to take the sound out from a video, but these below are the most common.
- Save songs from music videos. Suppose you watch a video of a concert and you like a live version of some song more than one recorded in a studio. Or just have a music video and want to make a song out of it to save it to your player, smartphone, tablet, etc. Plus you can make an individual ringtone or burn a full concert on to a CD and play it when driving your car.
- Create podcasts. Some podcasts are initially video records and need further conversion into MP3. It is relevant for radio stations focusing on humor shows, particularly stand-up performances.
- Transcribe speech easier. While transcribing what characters say in a video, typists have to go back every ten seconds if they don’t keep up with the pace of speech (which is incredibly difficult). Having an audio file you can do this work much easier: just use Speech-to-text technology and edit the output text.
Summing it up, video to MP3 conversion is a demanded and useful function not only for laymen, but also for experts in many fields. The best way to convert video to MP3 is to use a converter like AVS Audio Converter or AVS Video Converter.
About MP3
MP3 is a popular and convenient coding format for storing and compressing audio. It is widely adopted and has a fair sound quality. Still, as any format MP3 has its weak and strong points.
+ MP3 files are normally smaller in size, compared to WAV or FLAC. And sound quality remains similar to uncompressed audio.
+ MP3 is compatible with most of players and media services.
+ MP3 gives you an opportunity to modify bit rate, file size and level of audio quality.
– MP3 is lossy compression, which reduces its maximum quality.
– Compression may cause scratches and noises the initial recording doesn’t contain.
– It has a strong competitor AAC that offers better sound quality at the same bit rate.
To conclude, MP3 is a perfect balance of good sound quality, acceptable file size and compatibility.
Video to MP3 Converter
Install AVS Audio Converter and follow several simple steps listed below to export audio from video in MP3.
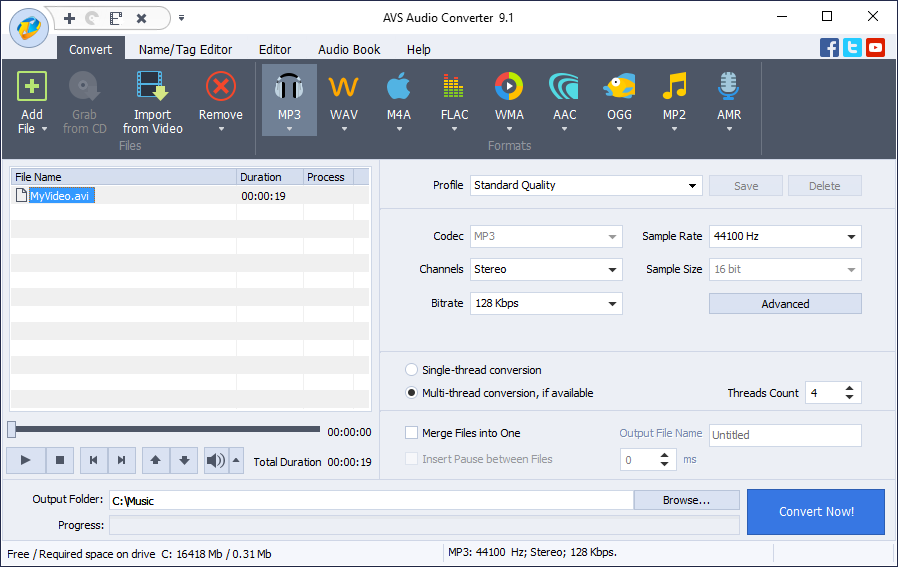
- Choose a video to convert by clicking Import from Video on the main toolbar.
- A format for conversion is by default MP3. If it is not the case, click MP3 on the main toolbar.
- Choose one of pre-defined profiles depending on the required quality of the output file or modify its properties yourself.
- You can convert multiple videos and even merge them into one file by selecting the appropriate checkbox in the settings.
- Customize the location of the output file by clicking Browse…, if needed.
- If you want to choose more precise properties of an audio file (Coding method, filtering frequency), click Advanced >>. Please note that if you are new to video encoding, it is recommended to use pre-defined profiles to get a file of expected parameters.
- Click Convert Now.
When conversion is completed the following window pops up:
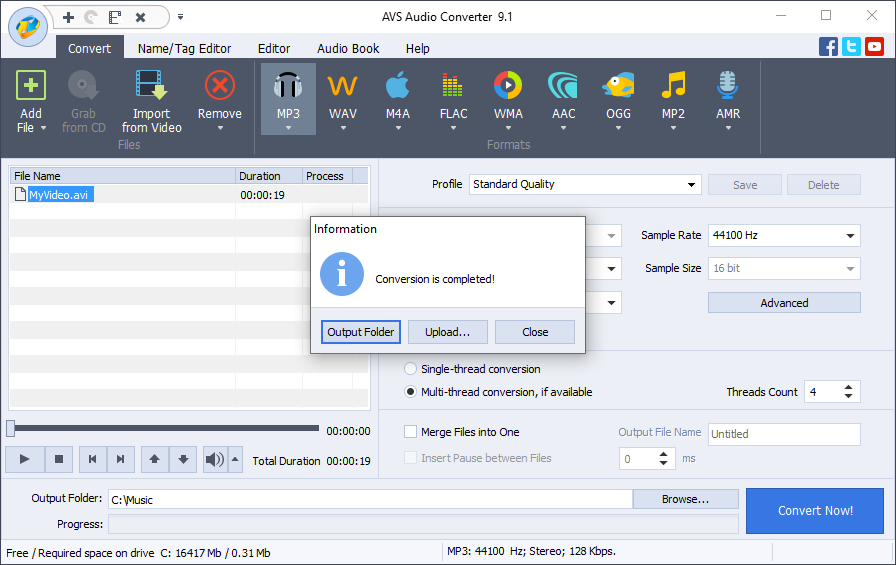
The Output Folder… button helps you find the location of a converted file easily.
The Upload… button transfers the converted audio to your gadget or digital storage devices.
You can also just close the pop-up by clicking Close and continue conversion of other videos.
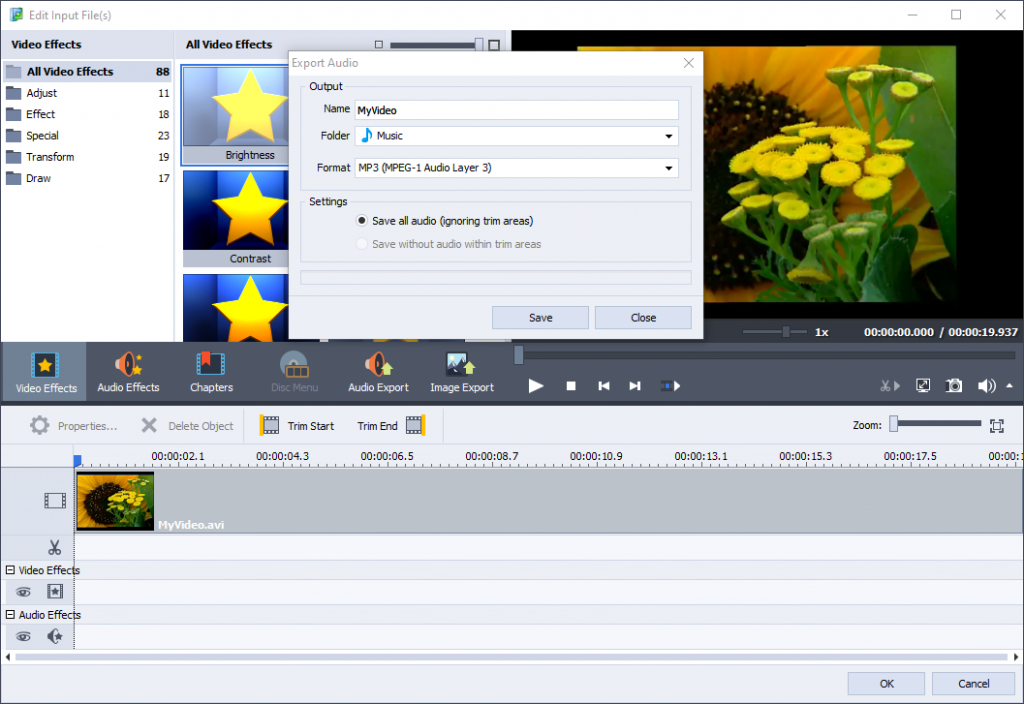
Another way to export audio from video in MP3 is to use AVS Video Converter.
- Choose a file to convert by clicking the upper Browse button.
- Customize output file name and its location with the lower Browse button.
- Click Edit at the Formats tab of the main toolbar. Note that editing features are only available in full version of AVS Video Converter.
- Choose Audio Export on the toolbar and save your file. It will contain AVS4YOU logo unless you own a full version.
Which audio format do you prefer and what makes you convert videos to audios? Tell us in the comments section below!
Love is … telling Your Story. In fact, there are so many ways to make a love declaration or just to show how loving and caring you are about someone very special. Tell your romantic story with AVS4YOU software making a warm, touching greeting card or a charming video. A new collection of stickers in AVS Video Editor will be of great help.
Here, at Online Media Technologies Ltd., we respect and support those who are already our existing customers, those who are weighing all pros and cons before making a purchase and those who are just testing the applications or using free programs. AVS4YOU team sends all love to everyone on this special occasion.
Take advantage of St. Valentine’s offer and save 20% on AVS4YOU Unlimited Subscription.
Redeem this coupon code* – AVSLove20
Happy St. Valentine! Wishing a fantastic day to our favourite Valentines. Take care and stay tuned 🙂 🙂 🙂
*The offer ends on the 18th of February 2020.
What is a free video converter?
Under free video converters we usually understand non-commercial software that allows to change a file format into another one. Some of them have a rich set of features and include tools for video editing, taking screenshots, burning video onto a disc, creating menus for DVDs, etc. But what do we basically expect a free video converter to have?
- All conversion features free;
- Fast conversion of as many modern formats as possible;
- Possibility to choose and modify the properties of the output video.
Most common paid functions
Generally speaking, the limitations given by quasi free video converters fall into two major groups – restrictions on features and advertisement. Let us take a closer look at each of the two.
Advertisement. Promotion of a full version is common for all software that actually has it. It is disappointing for users expecting a free converter that would save their time and money. But annoying ads suggesting you install third-party software are much worse – no one guarantees they are malware free and the links they contain will not collect your PC data.
Restrictions on features. Some converters set limitations on advanced tools that you probably don’t really need everyday, some of them let you work with just a couple of file extensions, and there are also programs that deny any unpaid access at all. Whatever these chargeable features are, they are not free. Let us see what features are most commonly restricted by popular converters that are considered free.
- Watermark is mostly a transparent image with a logo of software you use to convert video. It is normally set in the center of the output video. So you don’t pay for a license, but still you involuntary promote the product that way. Watermark will be removed if you buy a license key.
- Acceleration is available in some converters after purchasing a full version. This can speed up conversion and make it up to 30 times faster! Of course, users working with dozens of videos have to choose between time and money.
- DVD conversion is another feature that is often unavailable for home use. Meanwhile, users still need it today, since hard discs are not so widely used and more prone to data losses than flash drives.
- Limitations on the format and size of the output video are probably the most common and annoying. All settings are available free, but choose a file of more than 100 MB or some exotic extension – and you’ll need a full version.
- Locked encode settings are another example of features disabled in free versions. They are probably not so important for those who are new to video encoding and don’t need to change the default audio and video configurations. And still it is chargeable.
Free AVS Video Converter
Taking into consideration all features of truly free converters listed above, AVS Video Converter meets them perfectly. Let us check it in a table below:
Free AVS Video Converter
| All formats unlocked | Yes |
| No limitations on the file size | Yes |
| DVD conversion | Yes |
| Unrestricted speed of conversion | Yes |
| Watermark* | No |
| Variable settings of the output file | Yes |
| Advertisement | No |
*Watermark is set if you edit video before converting it.
To sum it up, all converting features are free in AVS Video Converter. Click the button below to enjoy this user-friendly video encoder.
Let us know what you use a video converter for and what features are the most important for you. Drop us a line in the comment section below!
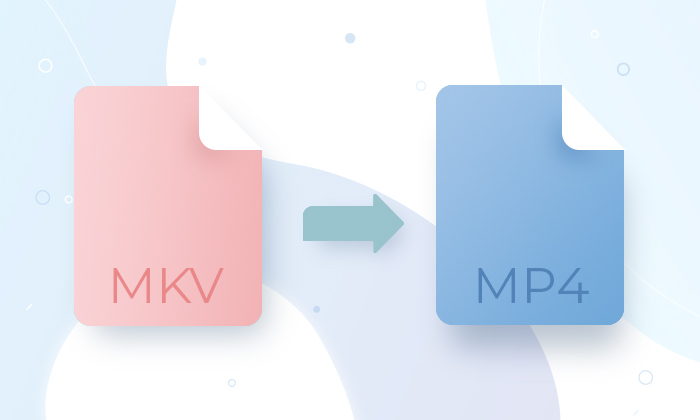
Users often get confused when they download a free video, but their player can’t open it. It happens mostly because some file extensions like MKV are incompatible with many media players and web services. Free AVS Video Converter solves the problem easily converting your MKV files into more popular formats like MP4 without losing quality.
MKV and MP4 in comparison
MKV and MP4 are high-quality container formats and hold videos, audios, images and subtitles. They are both suitable for online streaming. Still, they are different and, hence, have strong and weak points when it comes to some particular purposes. Let us take a closer look at each of the two.
| MKV (Matroska Video) | MP4 (MPEG-4) | |
| Video codec |
Almost All |
MPEG-2 Part 2, MPEG-4 ASP, |
| Audio codec |
Almost All | HE-AAC, MP3, AC-3, Apple Lossless, ALS, SLS, Vorbis, etc. |
| Subtitle format |
Almost All | Support MPEG-4 Timed Text |
| Resolution | Up to 1080P | Up to 4K/8K |
| Compatibility | MKV players or editors, some TVs. Supported by Windows with a special codec. |
Almost all devices, including modern smartphones. Supported by all operating systems. |
| Variable Frame/Bitrate |
Yes | Yes |
To sum it up, the two compared formats have their pros and cons. It would be wrong to say that one is better than the other, but it is clear that each of them meets users’ individual needs.
MKV is a feature-rich format that can hold an unlimited number of content types. It has a perfect resolution and a free license, supports almost all video and audio coding formats. However, MKV is really bulky as compared to other formats. Besides, you need a special software compatible with Matroska to play it.
MP4 is one of the most universal multimedia formats today. It is supported by all kinds of media players, devices, operating systems and video platforms. MP4 is a good choice if you need a video of smaller size to open it on a mobile device or some web service.
MKV to MP4 Converter
Follow several simple steps listed below to convert MKV into MP4 with AVS Video Converter.
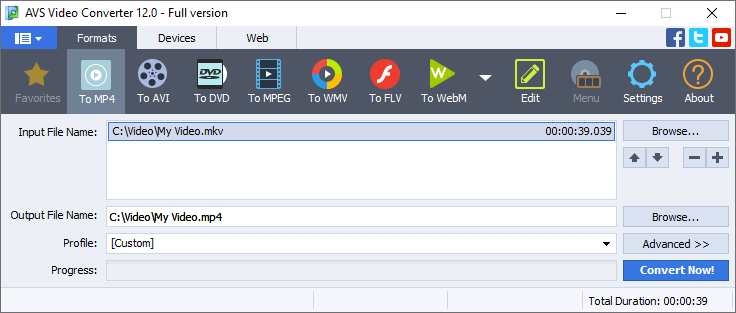
- Choose a file to convert by clicking the upper Browse button.
- Customize output file name and its location by clicking the lower Browse button.
- Press To MP4 at the Formats tab of the main toolbar.
- Select a pre-defined MP4 Profile with suitable output video parameters. Choose between numerous configurations for particular devices and purposes.
- Open Conversion Options by pressing Advanced >> to customize the output video properties yourself and save it as a new profile. Please note that if you are new to video encoding, it is recommended to use pre-defined profiles to get a file of expected parameters.
6. Click Convert now.
When conversion is completed the following window pops up:
The Open Folder… button helps you find the location of the converted file easily.
The Upload… button transfers the converted video to your gadget or digital storage devices.
You can also just close the pop-up by clicking Close and continue conversion of other videos.
Jump in the world of video encoding with the free version of AVS Video Converter.
We hope this guide was useful to you. If you have any questions, please use the comment section below.
Dear users,
Thank you for choosing AVS4YOU, your inspiration, loyalty and trust, which motivates us to make our programs more user-friendly and your editing experience more enjoyable. Is AVS4YOU special offer in your Christmas wish list? Take a look at what AVS-Santa has got for you:
First, festive atmosphere may come to your home even before the New Year’s Eve! So make magic happen with a $ 29.00 gift card on AVS4YOU Unlimited Subscription until December 31.
Second, write a review of AVS Video Editor on Capterra.com and receive a gift certificate of your choice worth up to $20: Amazon, Visa, iTunes or Starbucks. Please submit your name and a relevant e-mail at info@avs4you.com until December 27 to confirm your participation.
Third, Christmas is about family. Get a free license key for AVS Video ReMaker 1 Year Subscription and share it with someone special.
May joy and love fill your hearts and homes these wonderful days. Stay tuned not to miss amazing upcoming updates and new exclusive offers!
Merry Christmas and Happy New Year!

A video file format refers to the type of file format for storing digital video data on a computer system, disk or other digital media. Every film and video clip is stored in a certain format and can be converted into another one with AVS Video Converter for free!
Formats universal for common PC media players
AMV
It’s probably the most familiar video project associated with PC. It indicates as Windows Media Video file. One of the advantages of these files is a small file size (it’s useful mostly in cases when you try to share it with your friend via the Internet). On the other hand, low size is a result of high video compression which leads to quality losses. Unfortunately, if you want to save your video in HD (or FullHD) quality, you should choose another format. For example, MOV.
MOV
It is a container developed by Apple for QuickTime. It can contain several audio and video tracks, subtitles, animation, and horizon-to-horizon images. It’s mostly common among Mac users (nevertheless, it’s compatible with both Macintosh and Windows platforms). MOV file is distinguished by an extremely high visual quality, which certainly, affects its’ size: it’s formidable! In some cases, the size of a 10-minute video can achieve 2 GB! Thanks to high image quality, MOV file often is used for storing FullHD films and videos.
AVI (Audio-Video Interleaved )
AVI is a standard video format for Windows machines, developed by Microsoft. AVI works as a container holding audio and video created and compressed using several codecs (DivX, XviD, H.264 etc.). AVI files use less compression and take more space than many other video files. They also can be created without compression which leads to the significant file size increase. AVI format is supported by all Windows-based devices as well as many Android-based devices, game consoles and can be played on almost all personal computers.
MKV
MKV (Matroska) is a video container much like MOV and AVI. Can incorporate audio, video, and subtitles into a single file even if those elements were encoded with usage of different codecs (for example, you can have an MKV video file with H.264 video file and AAC or MP3 audio). MKV is not an industry standard, therefore not all media players support it – even though support has grown rapidly. You can use an MKV compatible media player or download the appropriate codecs for the media player to playback such video.
Best formats for Internet sharing
FLV
FLV (Flash Video) is the file, that uses Adobe Flash Player to transmit media files over the Intentet (99% of all Internet users have Flash Adobe player installed in the browser, which made this format the most common online viewing platform in a very short time). It’s used on video sharing and news networks (Youtube, Vimeo, Google Video, etc). The current version of the FLV format also supports H.264 codec, which offers a significantly better quality/bitrate ratio. Thanks to it, Flash files can contain high definition quality videos with an ACC sound. The FLV file can be played by almost all popular and open-source media players (VLC, Media Player Classic, Winamp (WinOS) QuickTime (MacOS)).
SWF
SWF (Shokwave Flash or Small Web Format) – a video format, which can contain video and vector-based animations and sound. It’s designed for efficient delivery over the web. It can be played in Adobe Flash Player, VLC Media Player, Media Player Classic Home Cinema, etc.
WEBM
WebM is a media file format designed for the web basing on MKV container structure. The main advantage of these files is that they have support for the most popular web browsers (Google Chrome, Firefox, Opera) since the format is sometimes used on HTML5 websites for video streaming. The integration of WebM video on the website occurs without long delays and errors in the process. High data compression and video quality rates make this format one of the most successful and popular video formats of the new generation.
Formats common among device users
MP4
MP4 file format is also known as MPEG-4 Part 14 or MPEG-4 AVC (Advanced Video Coding). MP4 is basically a container that holds audio and video files that are digitally encoded. It’s also used for video streaming over the Internet and becomes a universal standard for sharing videos on the Internet. Thanks to nearly lossless compression algorithm, MP4 videos are famous for its’ higher quality than most other formats.
M4V
M4V format (also known as iTunes video file) was developed by Apple and is very similar to the MP4 format as they are both based on MPEG-4 video container format. Unlike MP4, M4V can be played only in certain media players: like QuickTime Player, iTunes, RealPlayer, Media Player Classic Home Cinema.
3GP
3GP is a multimedia file saved in an audio and video container format developed by the 3rd Generation Partnership Project (3GPP). Stores video and audio streams that are transmitted between 3G mobile phones and over the Internet. 3GP files are commonly used by 3G mobile phones that support video capture, but may also be played on 2G or 4G phones. On the PC you can open it with a variety of programs (such as Microsoft Moves&TV, QuickTime player, VLC media player and other)
Disc formats
I’m planning to write a post about Disc formats a bit later, so now I’ll give you a brief explanation of these.
VOB
VOB (Versioned Object Base) – files that contain the video, audio and subtitles information on the DVD disc (at the same time IFO (information) files contain the navigation and configuration files, BUP file is a backup for the IFO file – standard DVD disc structure).
M2TS
M2TS is the container format commonly used for high definition video on Blu-Ray Disc and AVCHD. M2TS can provide you with a better viewing experience than other common HD formats. These files can be opened with Windows Media Player, VLC Player, Splash and probably some other popular media player applications as well.
BDAV/BDMV
BDAV/BDMV – Blu-Ray Disc format. Generally, when video content is recorded on BD-R or BD-RE media using a Blu-Ray Disc recorder, the content is recorded in BDAV format (Blu-Ray Audio-Video). On the contrary, BDMV files contain data about the contents of a Blu-Ray disc (video file title, location directory) and include index.bdmv, MovieObject.bdmv and sound.bdmv (these files don’t hold the actual multimedia files themselves).
Convert all the video formats above with Free AVS Video Converter and share it with your friends!
That’s all with common video file formats for today. Soon I will write a similar post describing the most common audio formats!).
What’s your preferred format for each purpose? Please share your experience in the comments below.
You are likely to have the boxes of home video VHS tapes that might contain different events of your life, exclusive musical gigs filmed or some other incredible things you witnessed years ago. It’s time to breathe new life to them and bring them up to date.
What you need to do
Step 1: Download and install AVS Video Editor
Step 2: Connect VHS recorder/player to the computer
You need to use a video capture device as a go-between:
- If you use an external video capture board supplied with RCA and S-Video jacks, the best way to link the devices is to connect the VHS recorder/player S-Video output with the video capture board S-Video input using the corresponding cable so to relay a video signal. To relay an audio signal use an RCA cable, connecting your VHS recorder/player RCA output with the video capture device RCA input but employing white and red jacks only. And then use a USB cable to connect the external video capture board to the computer USB port.
- If you have a DV-camera and your computer system is supplied with an IEEE 1394 port then connect your VHS recorder/player to the DV camera just in the same way as it has been described above and then connect the DV camera IEEE 1394 port marked as DV In-Out with the computer IEEE 1394 port using the corresponding cable.
Attention! Actions relating to connecting devices should be done when they are off.
For all the details concerning the possible ways of connecting devices, please, refer either to the User Manuals bundled with them or manufacturer support team.
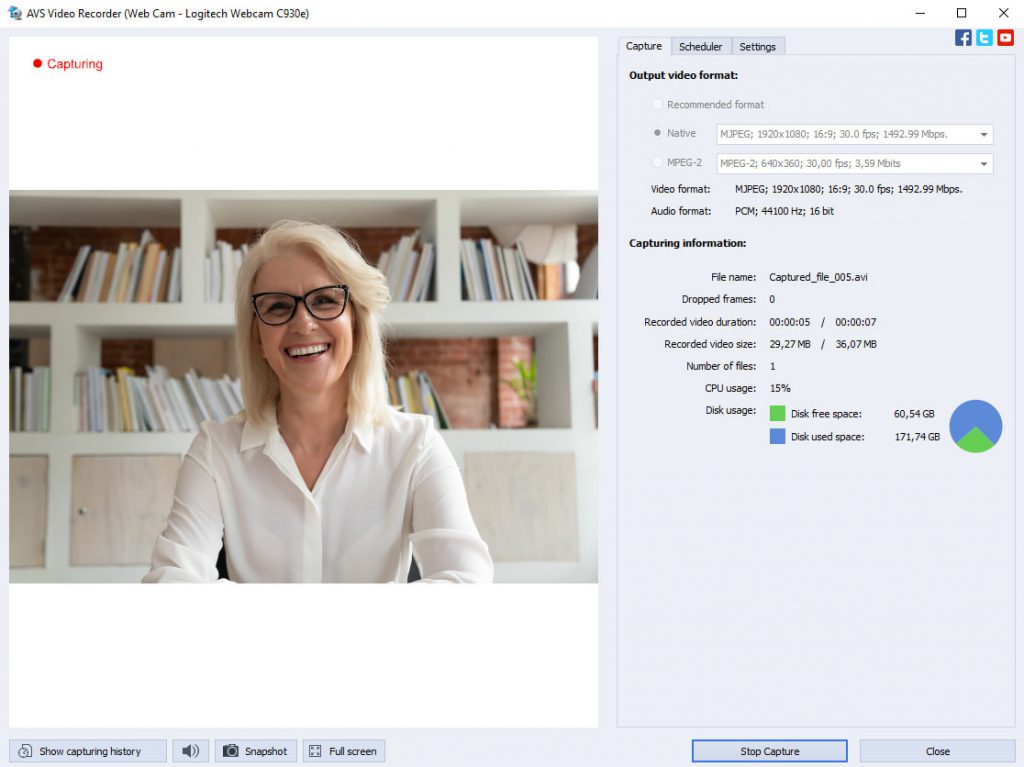
Step 3: Launch AVS Video Recorder and select video format
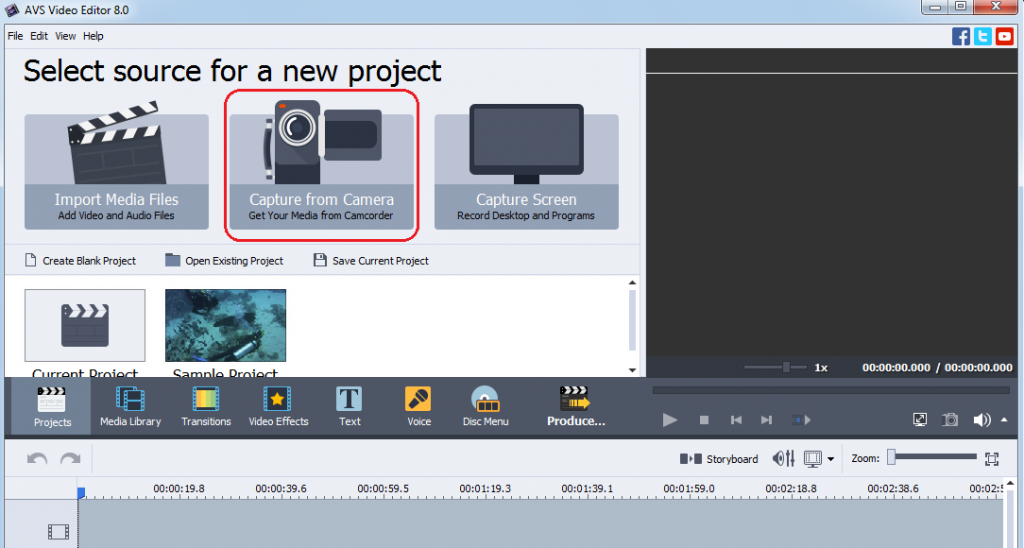
Make sure you work with the Capture tab. By default output video format is set to Recommended (MPEG-2), since your final goal is to have your video in DVD format, that suits fine although there is no reason why you should not select Native or MPEG-2 (with some other presets):

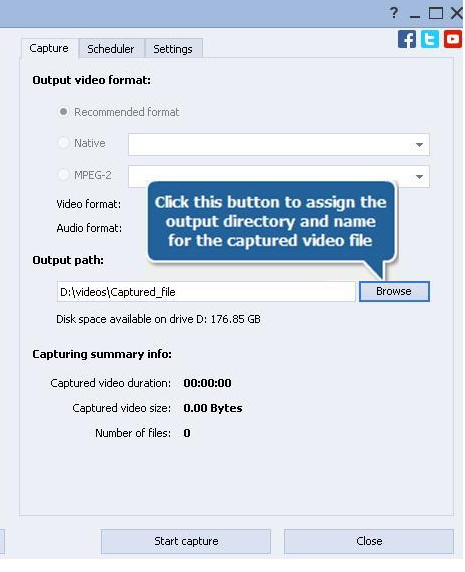
Step 4: Assign an output folder
Now define where the captured video should be saved to. Click from the Output path section:
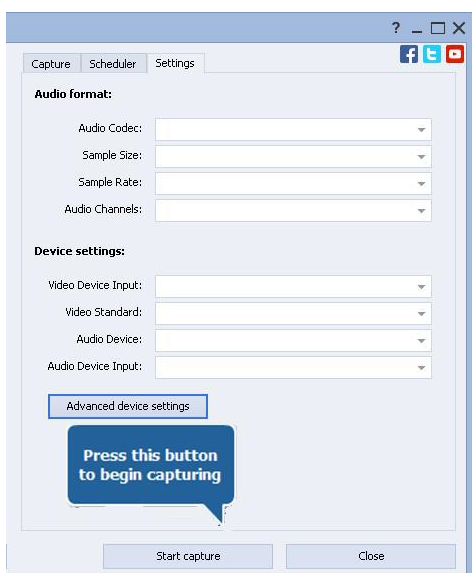
Step 5: Define video device input
Switch to the Settings tab. Drop down the Video Device Input control and choose either the Composite option in case your VHS player is connected to the capture device using an RCA input or the S-Video option if you preferred an S-Video jack:

Step 6: Start Capture
Note: before starting capture switch your VHS recorder/player on and check whether a VHS cassette is inserted into its compartment. If you use a DV camera as a capture device then:
- Switch the DV camera on.
- Make sure its cassette compartment does not contain a cassette.
- Enable the DV camera AV to DV feature (refer to User manual for details) and then switch it to playback mode.
Press the Start capture button of AVS Video Recorder and begin the VHS recorder/player tape playback. You can stop capture by pressing the Stop Capture button which will replace the Start Capture button immediately after clicking it:
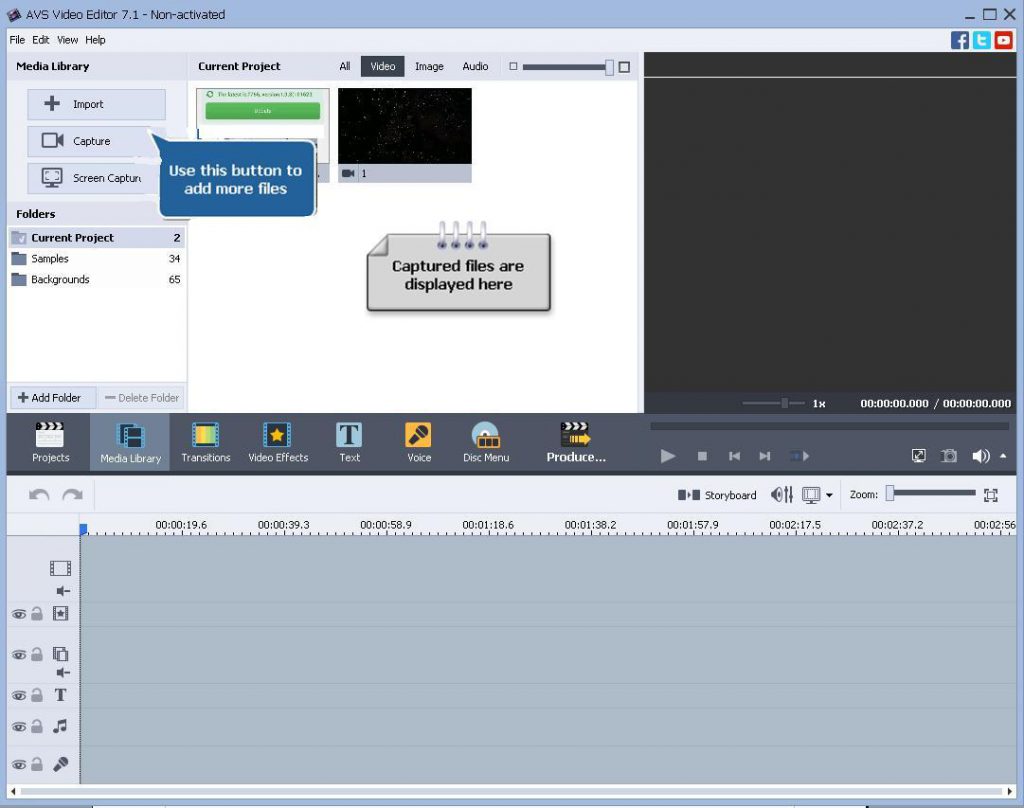
Step 7: Edit the created video and produce DVD or other video file
When you finish capturing video, press the Exit button in AVS Video Recorder bottom right corner to return to AVS Video Editor. You will find your captured video in the Video category of the Media Library:
Have any questions about using AVS Video Converter? Don’t hesitate to ask them in the comments below this post.