Category: Без рубрики
What is noise removal software?
Even small, unnoticed sounds during recording can affect sound quality and ruin your audio making it sound unprofessional. For podcasters, streamers, and audiophiles, noise removal software is essential. It eliminates unwanted sounds, delivering cleaner, more polished audio. Often, there isn’t a dedicated noise removal tool; instead, many audio editors include built-in features to reduce background noise with just a few clicks.
Although these apps promise quick and easy cleanup, choosing the right one can be challenging. The ideal software should combine:
- High-quality output: delivering crisp, professional sound.
- Ease of use: offering an intuitive interface for smooth editing.
- Affordability: reasonably priced without compromising key features.
- Gentle learning curve: accessible for beginners yet powerful for experienced users.
At the same time, it should offer advanced capabilities for diverse audio tasks and creative flexibility.
Let’s explore the pros, cons, and key differences to help you make the right decision.
Top free noise removal tools
Free tools can be surprisingly powerful, especially for beginners or anyone who only needs them occasionally for specific projects. Here are some of the most popular options to remove noise from audio, either online or on your desktop.
1. Audacity
Audacity is a free, open-source audio editing and noise removal software. It is popular among novices and enthusiasts, and supports multi-track editing and a wide range of audio effects.
Pros:
- Completely free
- Cross-platform (Win/Mac/Linux)
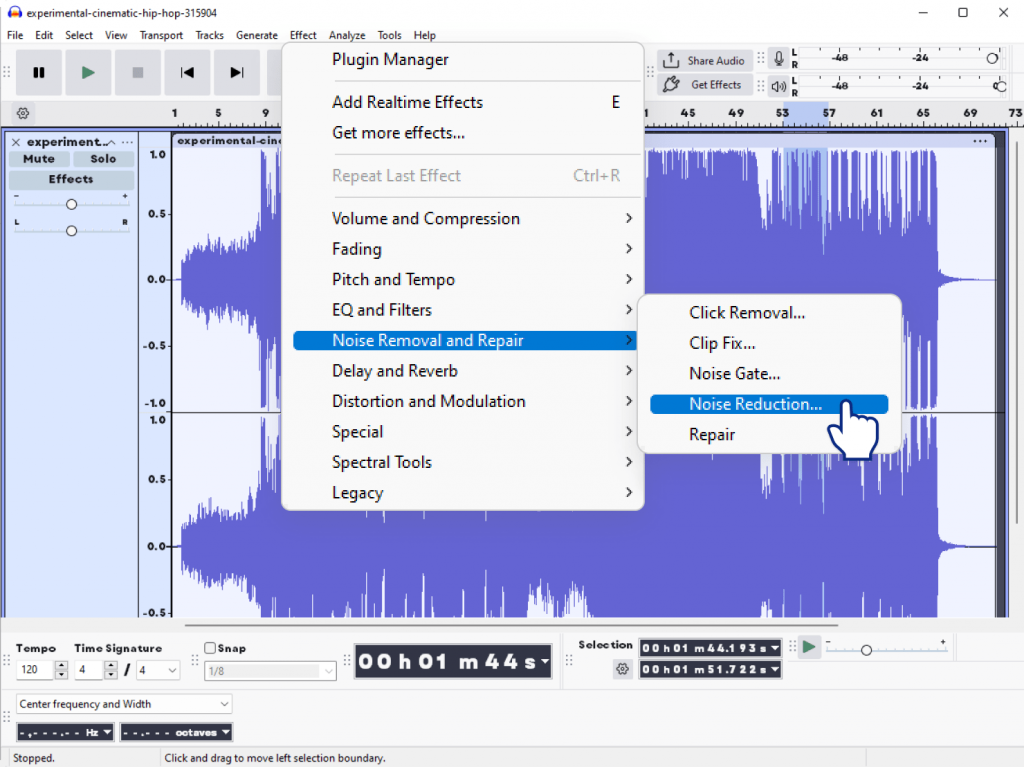
- Built-in noise reduction effect
- Supports VST & AU plugins
- No watermarks
Cons:
- Outdated interface
- Steeper learning curve
- Limited real-time preview
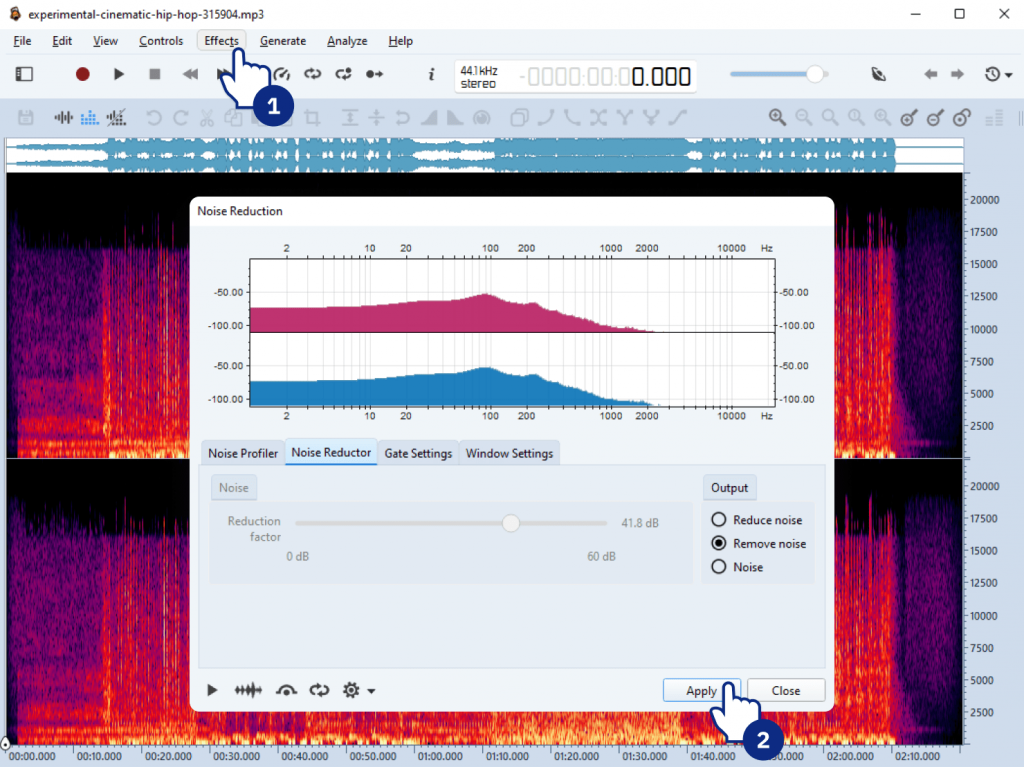
2. Ocenaudio
Ocenaudio is a fast, intuitive, and cross-platform audio editor designed for both newbies and professionals. With real-time previews, powerful editing tools, and support for VST plugins, it makes audio cleanup, applying effects, and precise editing quick and effortless.
Pros:
- Modern, user-friendly interface
- Real-time preview of effects
- Lightweight
Cons:
- Fewer advanced effects
- Occasional stability issues
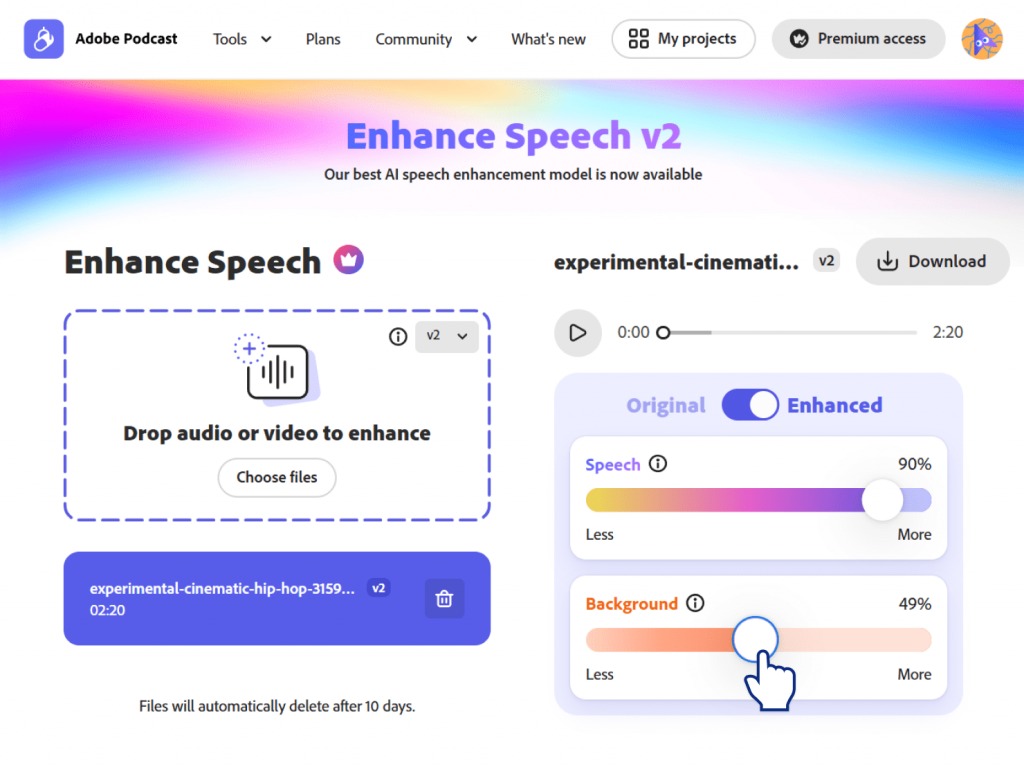
3. Adobe Podcast Enhancer (Free beta)
Adobe Podcast Enhancer is a web-based AI tool created to instantly enhance podcast recordings. Powered by Adobe’s AI, it improves voice clarity, reduces background noise, and balances levels automatically. No software install is required.
Pros:
- AI-powered, impressive automatic cleanup
- No installation required
Cons:
- Requires Adobe account
- Beta version: occasional errors
- Limited manual control
Please check the main differences including noise removal features between these audio editors in the table below:
| Tool | Ease of Use | Features | Output Quality | Noise Removal Features | Limitations |
| Audacity | Moderate | Medium | Good | Manual noise reduction effect; adjustable parameters | Older interface, manual setup |
| Ocenaudio | Easy | Basic | Good | Real-time preview of noise reduction; limited controls | Few advanced options |
| Adobe Podcast | Very easy | Low (auto only) | Very good (for voice) | AI-based automatic cleanup; no manual control | Limited control, beta version |
Best paid noise reduction software
Paid audio software is packed with plenty of advanced features thanks to which they deliver higher quality and better support. Therefore, they are perfect for regular or professional use.
1. AVS Audio Editor
AVS Audio Editor is an easy-to-use yet powerful audio editing and noise removal software. It offers noise reduction presets, manual cleanup tools, batch processing, and plenty of advanced editing features.
- Noise reduction presets + manual control
- Batch processing
- Edit, trim, mix audio easily
- One-time payment (Unlimited subscription)
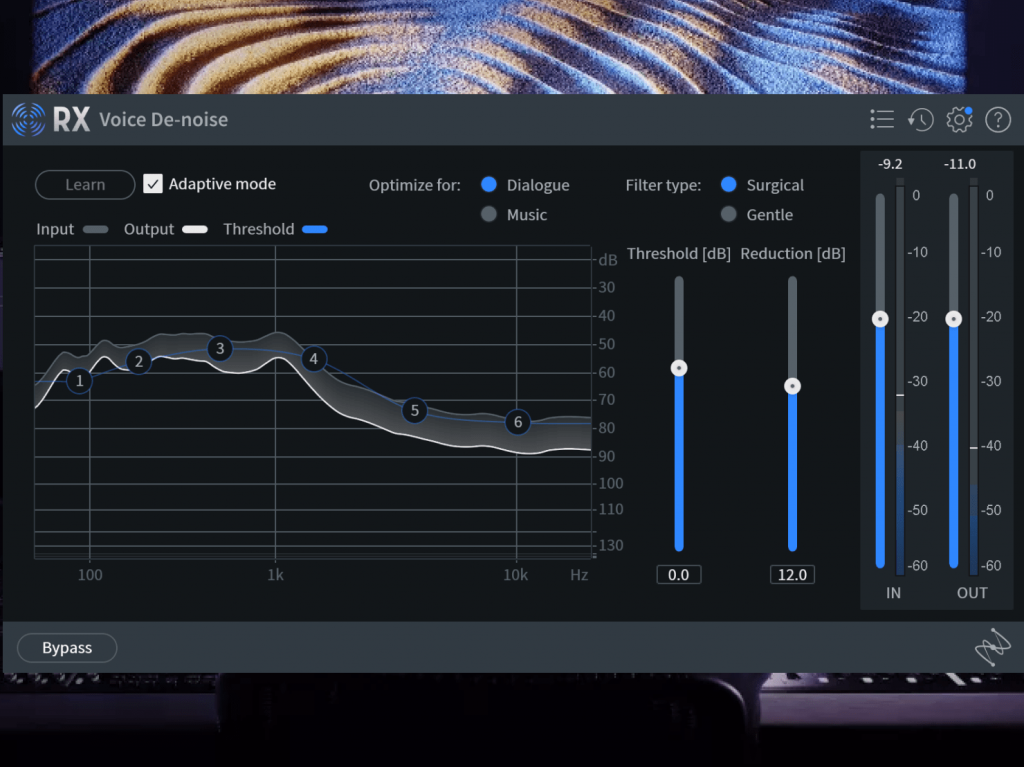
2. iZotope RX
iZotope RX is a professional-grade audio restoration and noise reduction suite. It offers advanced tools such as spectral editing, AI-powered denoising, and precise repair features to clean even the most challenging recordings.
- AI-powered denoising
- Spectral editing
- Advanced tools for music and videos
- Premium cost, but unmatched quality
3. Adobe Audition
Adobe Audition is a professional audio workstation for recording, mixing, and restoring
audio, and is part of the Adobe Creative Cloud suite. It offers multi-track editing, advanced noise reduction tools, and seamless integration with other Adobe apps.
It is widely used by podcasters, video editors, and audio professionals.
- Multi-track editing
- Real-time noise reduction
- Seamless integration with other Adobe apps
- Subscription required

| Tool | AI Features | Batch Processing | Price Model | Best For |
| AVS Audio Editor | No | Yes | Subscription or one-time payment, affordable | YouTubers, podcasters, small studios |
| iZotope RX | Yes | Yes | One-time, high cost | Audio professionals, studios |
| Adobe Audition | Some | Yes | Subscription | Editors using Creative Cloud |
Free vs. paid audio denoisers: Key differences
We have compared free and paid audio editing software based on key criteria for effective noise removal.
Please see the results in the table below:
| Feature | Free Tools | Paid Tools |
| Noise removal quality | Good, basic | High, professional-grade |
| AI cleanup | Rare or basic | Often advanced, customizable |
| Batch processing | Rare | Common |
| Real-time preview | Limited or none | Usually available |
| Control over parameters | Basic sliders or presets | Detailed, multi-band, spectral controls |
| Adaptive noise profiling | Rare | Often included |
| Integration with workflow | Limited | Better integration with video, DAWs, etc. |
| Processing speed | Moderate, depends on tool | Often faster and optimized |
| Export options | Basic formats | All key audio formats & bitrates |
| Support and updates | Community only | Dedicated support & frequent updates |
| Ads & upsells | Sometimes | Usually ad-free |
| Learning curve | Can be steep | Often smoother UI and guides |
| Long-term value | Free, but limited features | Costly upfront, but higher quality and efficiency |
Free tools are perfect for quick fixes or small-scale projects. Compared to freeware, paid tools excel when you need consistent quality, advanced control, and efficiency.
How to choose the right audio denoiser
Selecting the ideal noise reduction software depends on your specific needs, budget, and technical expertise. Here are the key factors to consider before making your choice:
- Budget
Decide whether you’re ready to invest in paid software or prefer to start with a free option. Free audio apps can handle basic cleanup, but paid tools often produce higher audio quality, advanced features, and are updated regularly. - Skill level
If you’re new to audio editing, look for an app with intuitive controls, presets, and helpful guides. Advanced users might benefit from tools offering detailed parameter adjustments, multi-band noise reduction, or spectral editing. - Use case
For YouTubers & content creators
Prioritize batch processing, fast rendering, and automatic background noise removal.
For musicians & producers
Seek spectral editing, detailed EQ controls, and compatibility with DAWs.
For podcasters & voice actors
Use AI to clean up voices, remove clicks, and preview changes in real time
How to remove noise from audio in AVS Audio Editor
If you need an affordable yet feature-rich solution, AVS Audio Editor strikes a good balance offering:
- Batch processing for handling multiple files efficiently
- Essential noise reduction tools without overwhelming complexity
- User-friendly interface suitable for beginners and intermediate editors
Here’s a quick, practical guide on how to clean up background hiss, hum, or static using Noise Removal and Noise Gate, the built-in filters in AVS Audio Editor :
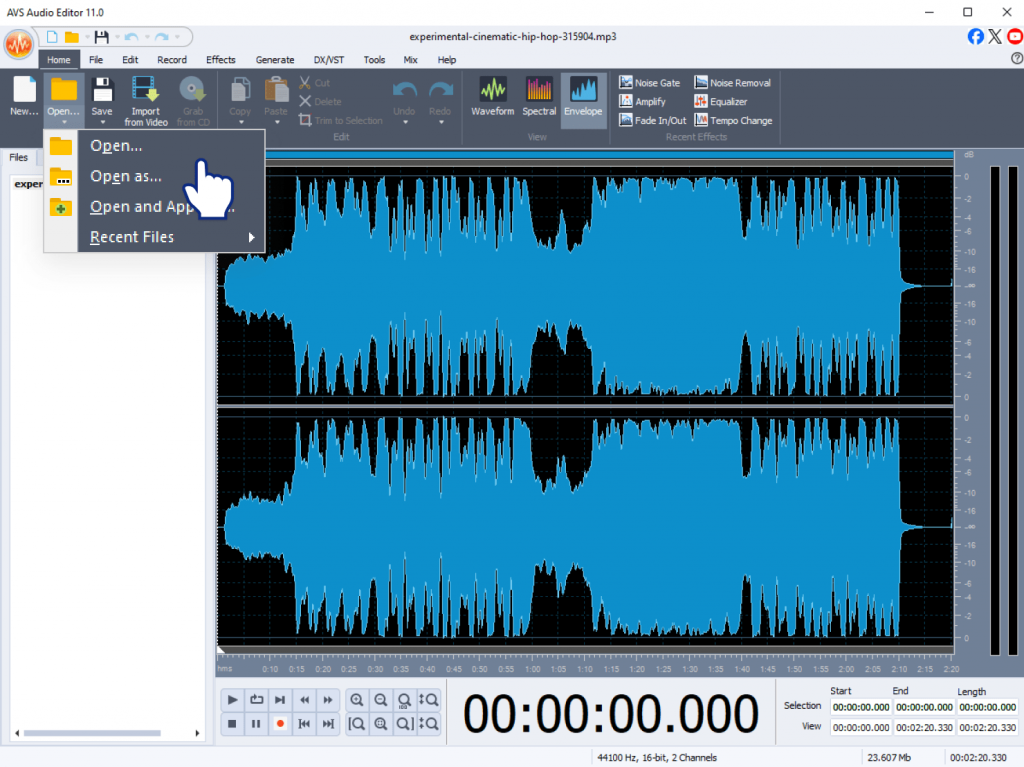
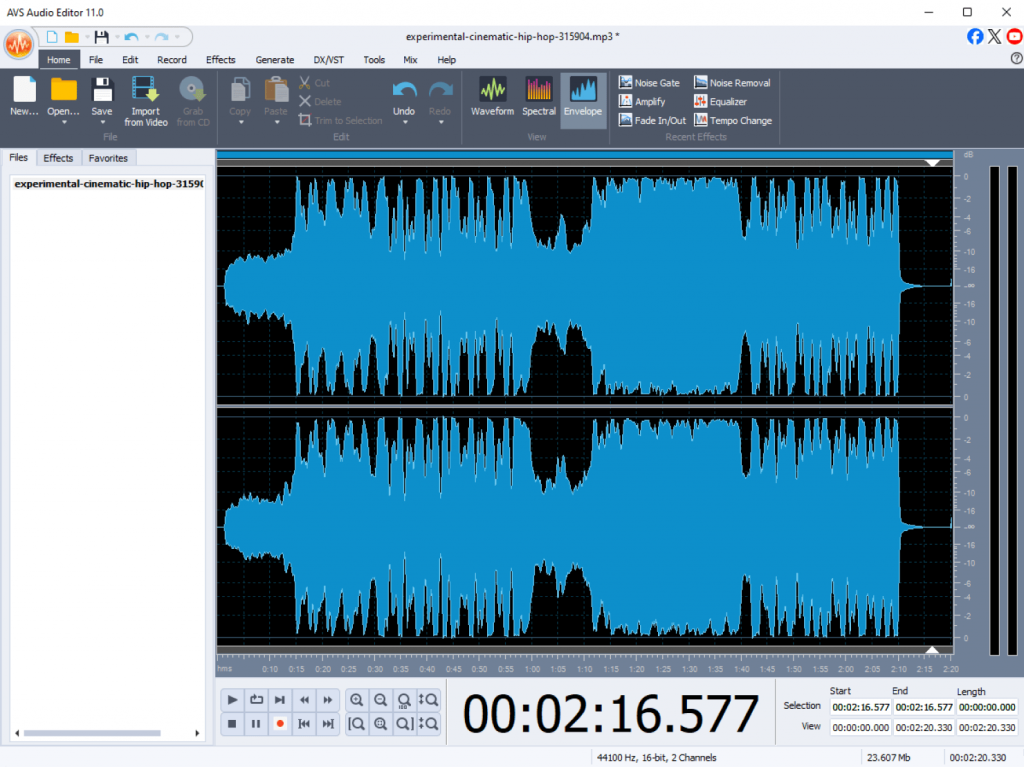
Step 1: Open your file
Launch AVS Audio Editor and open the audio file you want to polish.
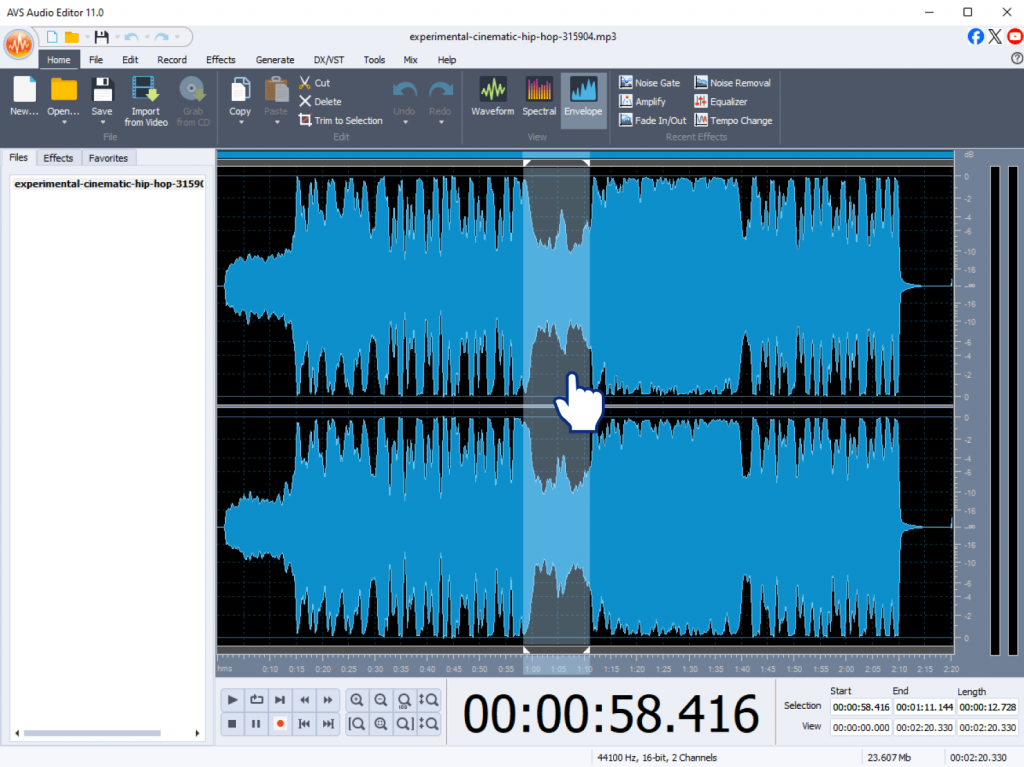
Step 2. Select the noisy part
If the noise is mostly in certain sections, highlight those parts with your mouse. To process the entire track, you can skip this step.
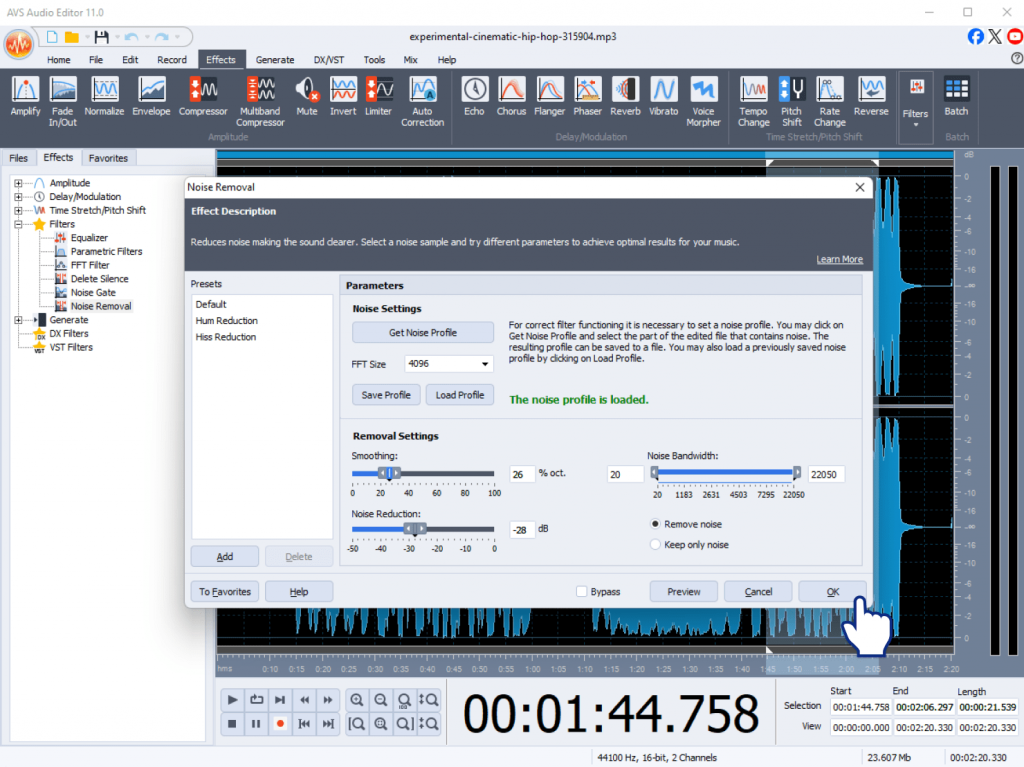
Step 3. Use Noise Removal
- Go to the Effects menu and choose Noise Removal.
- In the Noise Removal window, click Get Noise Profile and select a short fragment that contains only background noise.
- Adjust settings if needed to balance noise reduction with audio quality.
- Click Apply.

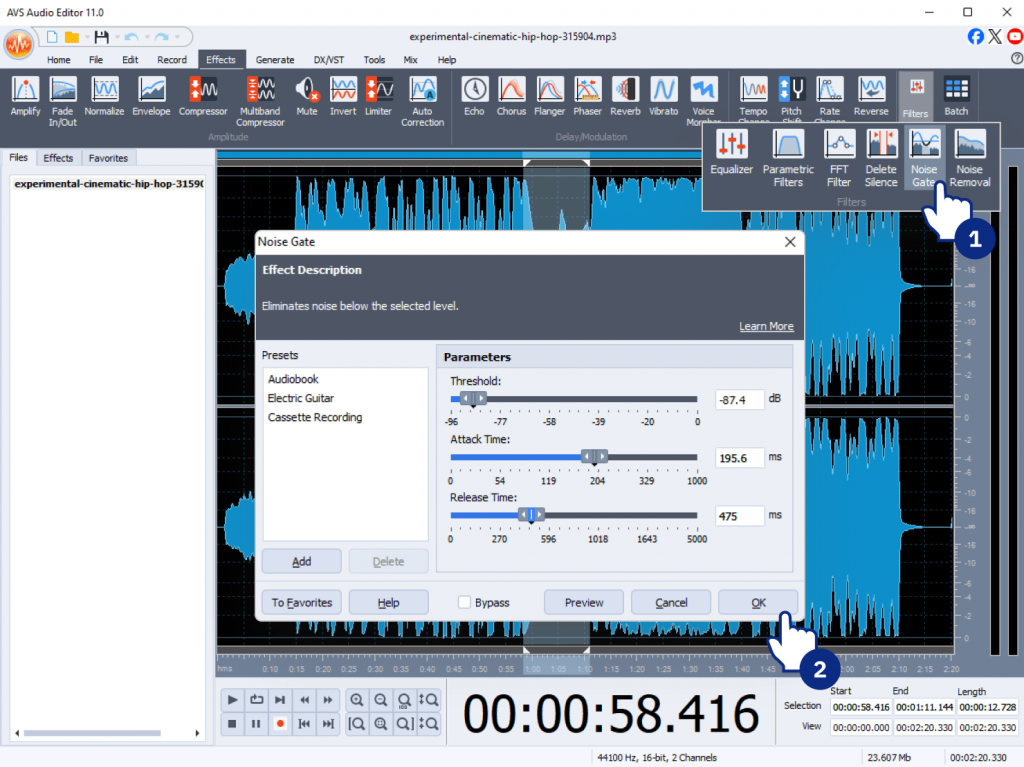
Step 4: Use Noise Gate (optional)
For additional cleanup, go to Effects and select Noise Gate.
- Set the Threshold: the level below which audio will be muted.
- Adjust Attack and Release to make the gating sound natural.
- Click Apply.
For a detailed explanation, please check our post dedicated to audio cleanup.
Step 5. Preview and refine your audio. Play back the edited audio. If some noise remains or the result sounds too harsh, undo the changes and try different settings.
Download AVS Audio Editor to discover it is good value for money.
Still unsure? Explore free trials or freemium versions to test which tool fits your workflow best!
Conclusion
Noise removal software is essential to achieve crystal-clear sound in any type of audio recording. Free audio editors such as Audacity and Ocenaudio handle basic tasks well though they may lack advanced features and be tricky for novices to work with. In contrast, paid tools, for example, iZotope RX and Adobe Audition, stand out for pro-level results but can be a challenge and expensive for those who are on a tight budget. If you want something powerful yet affordable, AVS Audio Editor is worth trying.
Useful links

We’re excited to announce the latest summer release of AVS4YOU Multimedia Suite! This update delivers significant behind-the-scenes improvements to format compatibility, automation features, and overall reliability across several AVS4YOU programs.
What’s new in this update?
Improved format and codec support
Thanks to updated ActiveX components, all AVS4YOU programs now offer broader support for audio, video, and image formats. While the list of supported formats and codecs hasn’t changed, the software manages video files hassle-free, especially those with unique encoding or non-standard parameters.This includes:
- Improved support for MKV and WebM videos, particularly screen recordings made via Chrome browser extensions. These files now open reliably without errors, making editing and conversion much easier.
- Better handling of non-standard media files, improving both playback and conversion stability.
- Slight improvements in conversion quality, especially for complex or high-compression video sources.
Smarter command-line mode with improved autonomy
Command-line users will appreciate expanded capabilities:
- The new “hide app” mode allows to complete different operations in silent background.
- Enhanced error handling means that the software can better address issues when opening or converting media files. As a result, there are fewer interruptions which is necessary for automated batch conversion workflows.
- New sample scripts help you get started quickly with automation setups.
Refined format support and bug fixes
We’ve resolved several format-specific bugs that, while rarely encountered, could interfere with niche workflows:
- MIDI and RealMedia files now open and convert smoothly in AVS Audio Converter, AVS Audio Editor, and AVS Media Player.
- Conversion to MPG with the MPEG-1 codec now works correctly (previously caused an error).
- Conversion to AVI with the MPEG-2 codec is also functional again, although it may produce aspect ratio issues when converting anamorphic MPEG-2 input to AVI (non-square to square pixels).
Ready to try it out?
Update now to enjoy these enhancements and make the most of your AVS4YOU software!
Not a subscriber yet? Don’t miss our summer offer!
Save 25% on AVS4YOU Multimedia Suite until August 15, 2025! Use the code Summer25 when ordering online.
Thank you for choosing AVS4YOU. More enhancements are on the way!

In today’s content-driven world, using of a green screen editor is a must if you want your video production to stand out. The key process is known as chroma keying. This is where you separate a specific color, usually a bright green, from your footage, then replace it with a digital background, CGI, or any other custom graphics you have planned out.
This process is not limited to large studios. Nowadays, everyone can make use of chroma keying to improve their visuals (such as content creators, teachers, Twitch streamers, or video enthusiasts). The key is to understand how chroma key algorithms work and then apply that knowledge with the right green screen software.
Nowadays, real-time keying for live streams is a feat; it is CPU-intensive, but achievable with today’s hardware. If you are working in post-production, you get more control. The choice of software may depend on your workplace.
With all the top tools available, AVS Video Editor is a practical choice. It offers an intuitive UI, fits within a manageable budget, and its chroma key tools are robust for entry-level editors. Whether you are an amateur or a prosumer, it covers the basics with fewer hassles.
Top green software compared
With the availability of a variety of green screen editors, it is necessary to find the right tool based on your requirements, funds, and skill level.
The following comparison covers four popular options, taking into account different workflows from user-friendly editors to advanced post-production suites.
AVS Video Editor
This is best for beginners, content creators, and home users.
Why it stands out
- AVS Video Editor offers a simple solution for chroma key editing. You get efficient one-click background removal, so extra steps won’t slow you down.
- The real-time preview streamlines your workflow. This means letting you see adjustments as they happen so you can quickly spot and fix any issues.
- With intuitive controls, there is no need to search through confusing menus.
- The program offers flexibility for complex projects by supporting various file formats and layered video timelines. Moreover, as part of the AVS4YOU suite, it comes at a reasonable cost, making it a practical choice for users seeking results without a large investment.

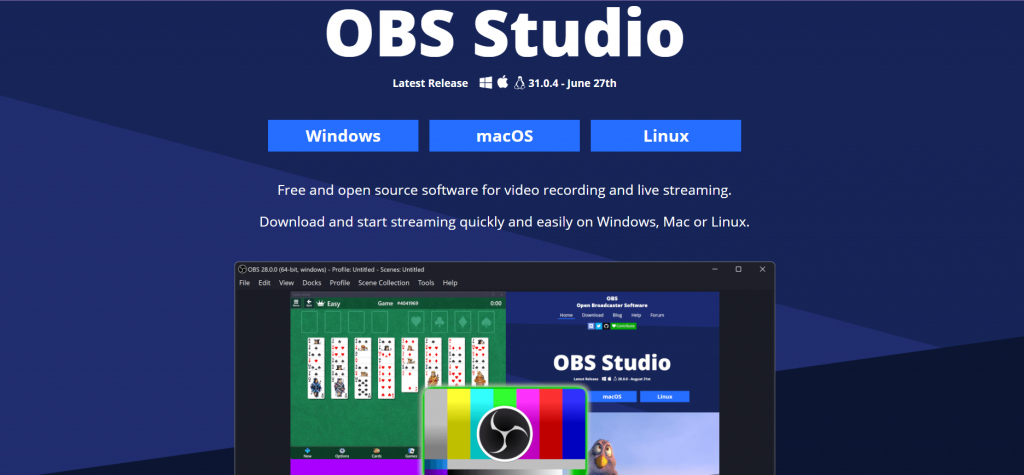
OBS Studio
This is best suited for live streamers, gamers, and online presenters.
Why it stands out
- OBS Studio offers robust real-time green screen support, ideal for live streaming on platforms like YouTube or Twitch.
- A key advantage is that it is open-source and free to use.
- Setting up a chroma key filter is simple. You apply it to your webcam input, and you are good to go.
But OBS is not designed for post-production editing. It is mainly beneficial for live visuals and real-time overlays, rather than editing footage after recording.
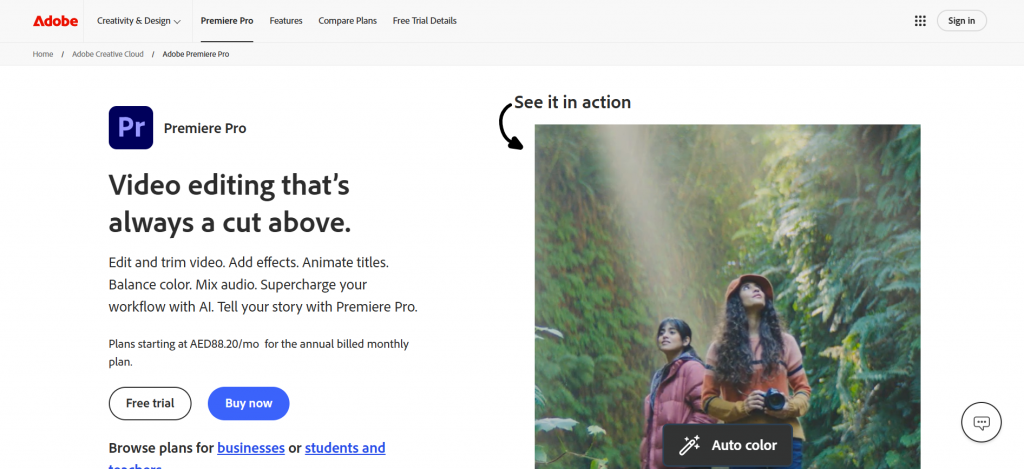
Adobe Premiere Pro
This is a fine software tool for professional video editors.
Why it stands out
- The Premiere Pro includes some of the advanced chroma key capabilities, such as Ultra Key, precise masking, and layered effects.
- This software is the best choice if your workflow demands precise green screen work.
It is a good option for studio-grade results. However, it is not a ready-for-use software. Learning the toolkit requires time, and the cost of the subscription is high.
DaVinci Resolve
This software is ideal for movie makers, colorists, and advanced hobbyists.
Why it stands out
- DaVinci Resolve works with a node-based compositing workflow. It means that you create effects or make adjustments by connecting nodes, making the process highly flexible.
- It provides support for various keyers, extensive color grading, and detailed refinement tools.
Even though its free version feels wholesome, it is designed for users who are already skilled in video editing. Amateurs may find it a bit overpriced and challenging due to its steep learning curve, but it is best for editors who want control and power.

Quick-reference comparison table
| Software | Price | Best For |
| AVS Video Editor | $$ (One-time fee) | Beginners & prosumers |
| OBS Studio | Free | Streaming, live green screen |
| Adobe Premiere Pro | $$$ (Monthly sub) | Advanced editing professionals |
| DaVinci Resolve | Free / $$ | Color grading & post FX |
Pro techniques for flawless Chroma Key
Reaching a clean chroma key is not only about the software you use, but also about the post-production workflow. You require the correct green screen setup, thoughtful lighting, and a camera that works wonders. If you start your work carelessly, you are primarily setting yourself up for a post-production headache. Once you have recorded the video, you have to clean up the edges, fix color spills if any, and refine the matte. The software may help, but it is only as good as what you feed it.
Pre-production tips
Green vs. blue screens
- Green screens dominate the industry because of their high brightness and strong compatibility with digital sensors.
- Blue screens excel when the subject is dressed in green or when the recording conditions are on the darker side.
Tip: Ensure the subject does not wear clothing that matches the background.
Chroma Key lighting
- Ensure that the screen has consistent lighting. Avoid any wrinkles or shadowy areas.
- Add back-lighting or a hair light from behind the subject to create separation from the screen and reduce the unwanted green spill (color reflection).
Post-production techniques
Spill suppression
- Use the right tools to desaturate the green spill or make corrections to hue or saturation settings around the subject’s edges for a distinct separation.
- In AVS Video Editor, you can use edge smoothing and color tuning to correct unwanted color fringing.
Edge refinement
- Try the approach of feathering or matte cleanup to lighten the edges and discard rigid outlines for a more natural composite.
- If automated tools do not give the expected results, cover the problematic areas manually (around hair or complex details)
Using multiple keyers
- For elements that seem challenging (such as smoke, hair, or transparent objects), apply multiple chroma key passes by combining them as needed to refine the result.
- Advanced editors like DaVinci Resolve support node-based keying, which allows layered effects and more controlled compositing.
How to use green screen for creative projects
The technology of chroma key is no longer limited to high-end productions. With user-friendly tools like AVS Video Editor or Capcut green screen, available on mobile devices, any user can benefit from these effects.
Some use cases include:
- Virtual Zoom backgrounds
This adds a professional environment to your project rather than your actual surroundings.
- Using OBS to stream overlays
A polished broadcast is guaranteed when you use the OBS green screen over gameplay or presentations.
- CGI & effects
You can refine the narrative content by combining visual elements like explosions, weather, or snowfall overlays.
- Social media content
Design effective short-form videos, reaction content, or trending green screen memes for platforms like YouTube and TikTok.
In simple words, the barrier to entry for chroma key work is lower than ever. If you’ve got a device, you’ve got the tools.
Getting started with Chroma Key editing
If you are seeking to enhance your video projects—whether for streaming, YouTube, or personal footage—understanding how to use a green screen is a real game changer.
The AVS Video Editor stands out for striking a balance between user-friendly design and robust technical capabilities. It does not burden you with a complex interface. Despite its simplicity, the chroma key features are easy to operate and still deliver advanced capabilities for expert-level editing tasks.
Also, it is budget-friendly, so you don’t need a big investment to get started.
Curious to try it firsthand?
Download the AVS Video Editor free trial and start applying chroma key effects into your editing process. It’s an easy way to see how this feature fits into your workflow.
Useful links

Swapping video backgrounds used to be something only high-budget productions could achieve. Today, it is possible for anyone with a laptop, smartphone, or web browser to create professional-looking videos. Modern tools have made background removal more accessible than ever, making it easy to create YouTube content, join virtual meetings, or experiment just for fun.
At the core of this process is chroma keying, more commonly known as green screen editing. By filming yourself in front of a bright green or blue backdrop, you can use editing software to replace that background with virtually anything, from tropical beaches to your company’s logo. And now, with the rise of AI-powered tools, you can remove backgrounds even without a green screen. In this article, we will explore both approaches and recommend the best tools available for desktop, web, and mobile editing.
What is Chroma Keying?
Chroma keying is a visual effects process that removes a specific color, typically green or blue, from video footage, making those areas transparent so you can insert any background you like. The process works by isolating the chosen color range (the “chroma”) and replacing it with a new image or video.
Why Green?
Green is the industry standard because it offers maximum contrast with human skin tones and is efficiently captured by digital cameras, resulting in cleaner, more accurate keys. Blue screens are sometimes used, especially if the subject contains green elements or if you’re working with film, but green remains the preferred choice for most digital workflows due to its brightness and lower noise profile.
AI-powered background removal is a newer approach that uses machine learning to automatically detect and separate subjects from any background, regardless of color. This method is fast and requires no special setup, making it ideal for creators who need flexibility. However, traditional chroma keying still offers the highest level of control and quality, especially for professional project.
How to use a green screen: traditional Chroma Key workflow
Getting clean results starts way before you open any editing software. A lousy green screen setup will give you headaches later, no matter how fancy your software is.
- Lighting: Use soft, diffuse lights to illuminate the green screen evenly. Set up your lights to minimize shadows and hotspots. Place your subject several feet in front of the screen to reduce color spill and ensure separation.
- Camera Settings: Shoot at the highest possible resolution for finer detail. Use a low ISO to minimize noise, and set your white balance to match your lighting. Proper exposure is crucial – overexposed or underexposed screens are harder to key cleanly.
Post-production tips to remove green screen background
Once your footage is captured, the chroma key effect is applied in post-production:
- Apply Chroma Key effect: Most video editors include a chroma key or “green screen” effect. Select the green color using an eyedropper or color picker tool.
- Adjust settings: Fine-tune tolerance (the range of green to remove), edge softness (to smooth cutout lines), and spill suppression (to reduce green tint on your subject).
- Common issues & solutions:
- Uneven Green Screen: Adjust lighting or use multiple color samples in software.
- Fuzzy Edges: Increase resolution or refine edge settings.
- Color Spill: Add rim lighting or use spill suppression tools.
A careful setup and attention to detail in post-production are key to achieving a professional, seamless result.
How to remove backgrounds on different platforms
Desktop Tools for Background Removal
Using AVS Video Editor to remove backgrounds
AVS Video Editor makes chroma keying surprisingly straightforward, even if you’ve never touched video editing software before.
Step 1: Import and Arrange Footage
Start by adding your background video or image to the Main Video line on the timeline. Then drag your green screen footage to the Video Overlay line, positioning it above the background layer.

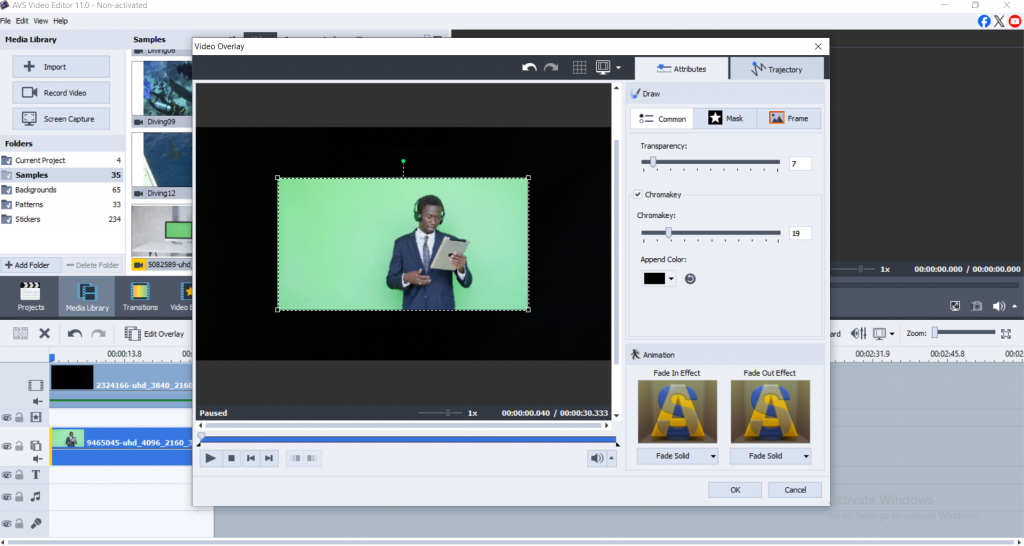
Step 2: Apply Chromakey Effect
Select the green screen clip on the Video Overlay line and click the Edit Overlay button. In the overlay properties window, check the Chromakey box to activate the effect. Adjust the Chromakey slider to increase the effect strength for better green removal.
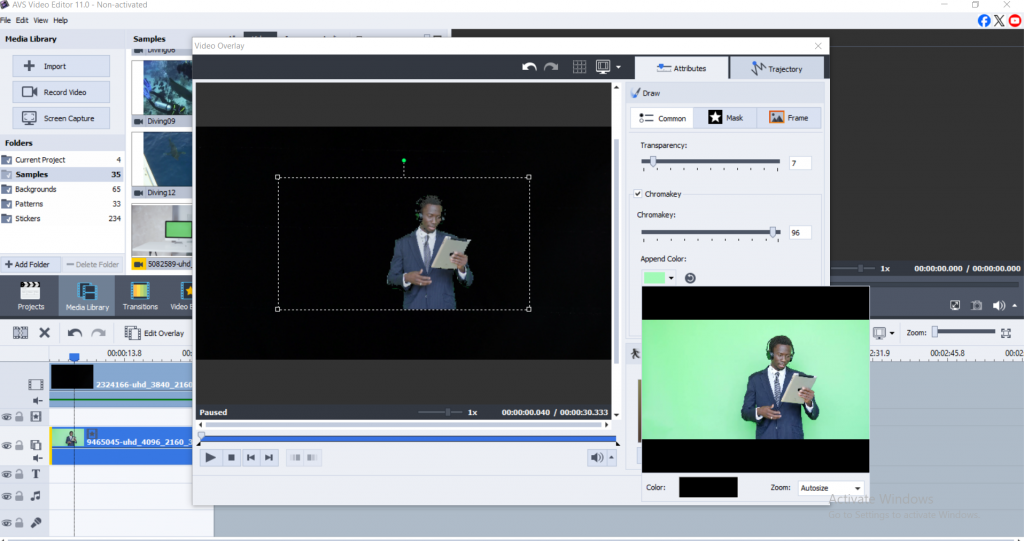
Step 3: Fine-tune Color Selection
Use the Append Color option to select specific green tones for removal. Click the color field and use the color picker to sample different areas of your green screen for more precise keying. The zoom feature helps you select colors with greater accuracy.
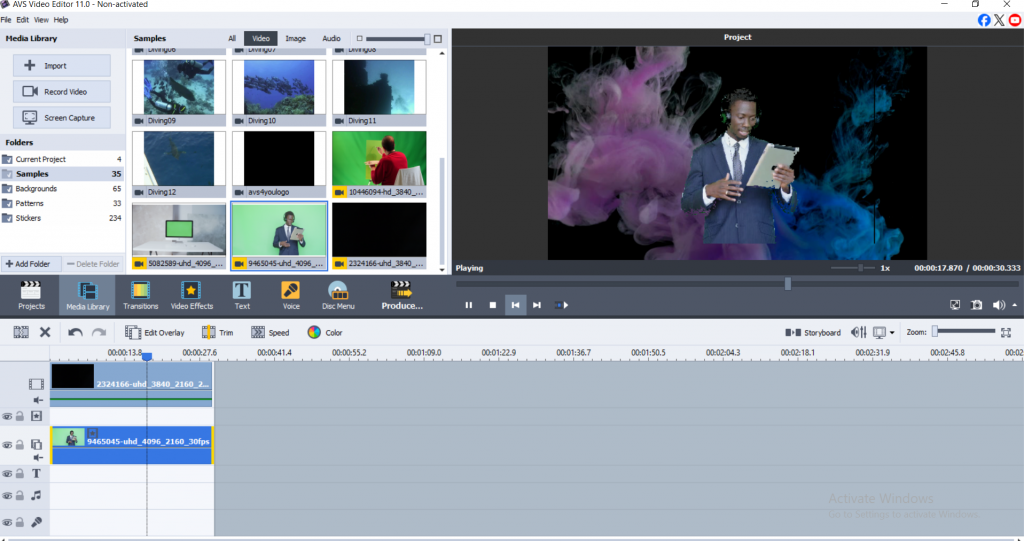
Step 4: Preview and Export
Preview your results using the playback button in the overlay window. Once satisfied with the keying quality, click OK to apply changes and export your video in your preferred format.
More Ways to Remove Backgrounds on Desktop
DaVinci Resolve gives you Hollywood-level tools without the Hollywood price tag (it’s free). The learning curve is steeper, but the Qualifier and 3D Keyer tools can handle complex scenes that would trip up simpler software.
Adobe Premiere Pro remains the industry standard. The Ultra Key effect produces excellent results, and if you’re already paying for Creative Cloud, it’s a no-brainer.
Green screen remover tools online
Sometimes you just need to get something done fast without installing anything new. Online editors have becomesurprisingly capable, though they’ll never match desktop software for complex projects.
Kapwing handles both traditional chroma keying and AI removal. Upload your footage, select your green screen color (or let the AI figure it out), then download your finished video. The interface is clean and beginner-friendly, plus you can collaborate with team members in real-time.
Canva keeps things simple with basic background removal for images and short videos. Perfect for social media posts where you need something quick and don’t care about pixel-perfect edges.
The trade-offs are obvious: limited features, file size restrictions, and you’re dependent on your internet connection. But for quick projects or when you’re away from your main computer, online tools get the job done.
Mobile Chroma Key: iOS & Android Solutions
Your phone is probably powerful enough to handle chroma keying now, which would’ve sounded crazy just a few years ago.
KineMaster brings desktop-level chroma key tools to mobile. The interface takes some getting used to on a small screen, but the results are solid. You can fine-tune your key, adjust edge feathering, and layer multiple backgrounds.
Adobe Premiere Rush syncs with desktop Premiere projects if you’re bouncing between devices. The AI-assisted background removal works well for simple scenes, though it struggles with complex lighting or detailed edges.
LumaFX focuses specifically on advanced keying and effects. If you’re serious about mobile video production, it’s worth the learning curve.
AI background removal
How AI removes background
These AI models have been trained on millions of images, learning to recognize the difference between people and backgrounds. They analyze each frame, identifying edges, depth cues, and visual patterns to separate subjects automatically. The newer models can even handle tricky stuff like hair blowing in the wind or semi-transparent objects.
When AI beats traditional methods
No green screen setup required, you can shoot anywhere, anytime. It’s faster for simple scenes and perfect when you’re working with existing footage that wasn’t shot for keying. Plus, you don’t need to worry about color spill or uneven lighting.
Where traditional chromakey still wins
Complex scenes with lots of detail, professional productions where quality matters most, and situations where you need frame-perfect control. AI is great, but it’s still making educated guesses about what should stay and what should go.
AI tools worth trying
NVIDIA Broadcast has become the gold standard for real-time background replacement during streaming or video calls. Unscreen.com handles pre-recorded videos with impressive accuracy. Remove.bg started with still images but now tackles video too.
Which background removal is best for you?
- Use chroma key green screen workflows when you require precise, professional results and have control over your shooting environment. This method is ideal for commercial videos, streaming, and projects where edge quality is critical.
- Opt for AI background removal when speed and convenience are paramount, or when shooting in uncontrolled environments without access to a green screen. AI tools are perfect for social media content, remote work, and quick edits where ultimate precision is less important.
- Consider your audience’s expectations as well, while AI removal continues improving, discerning viewers may still notice the difference in professional applications where perfect edge quality is crucial.
Conclusion
Chroma key green screen technology and AI background removal each offer unique advantages for video creators. For those seeking professional-grade results with full control, AVS Video Editor stands out as a reliable and user-friendly choice for desktop editing. Meanwhile, AI-powered tools and mobile apps provide flexibility and speed for creators on the move.
Ready to elevate your video projects?
Download AVS Video Editor and experience seamless background replacement with industry-leading chroma key tools. Explore our blog for more expert tips and tutorials on video editing and green screen techniques.
Useful links
10 common video effects every video editor must have
Enhance your video storytelling with special effects for mood creation

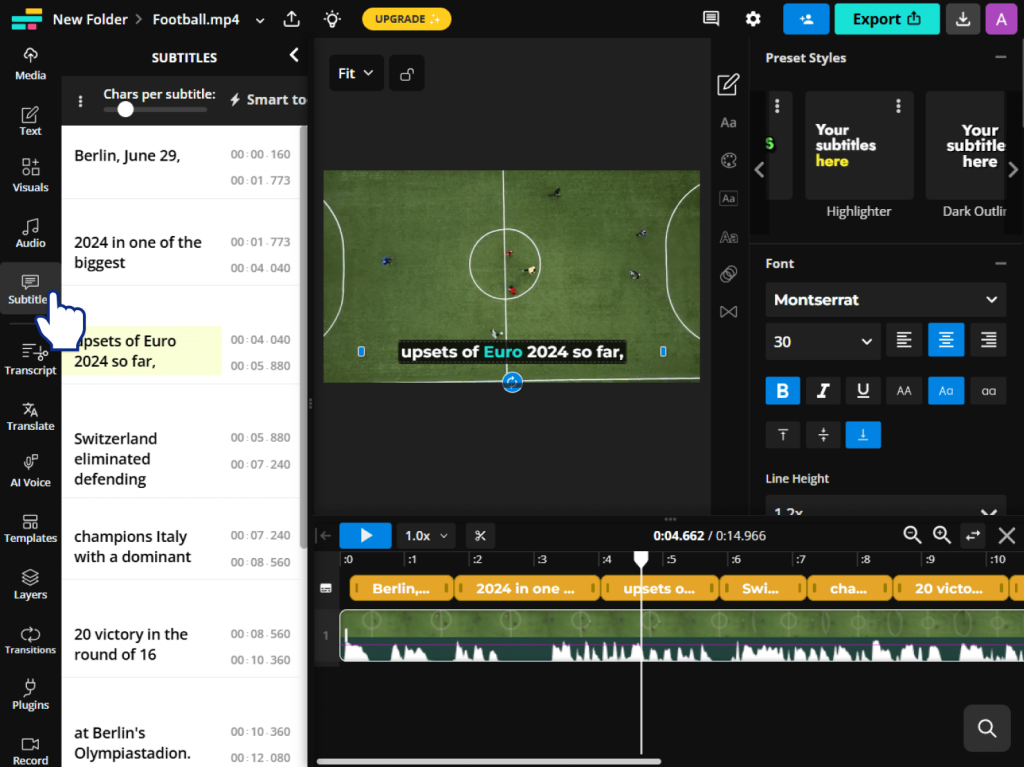
Subtitles are more than just a convenience. They make content available for those who have problems with hearing. Captions allow people to watch videos in environments where it is obligatory to keep silence, such as an office or a crowded train. What’s more, subtitles can help boost video’s SEO, attracting diverse audiences and increasing watch times, and help international viewers better understand the content.
With a growing demand on YouTube, e-learning platforms, and social media, knowing how to add subtitles to a video is now a must-have skill for content creators. In this guide, we’ll explore the best free tools, online services, and AI-powered options to add subtitles on Windows and Mac. Additionally, you will get essential tips how to get the job done smoothly.
Add subtitles on your desktop (Windows & Mac)
There are plenty of free tools for working with subtitles on Windows and Mac. The main advantages of the listed apps below are greater control over data, faster performance with large files, and access to more advanced editing features regardless of the internet connection.
Here are a few popular options to consider:
AVS4YOU – video subtitles tools
AVS Video Converter, designed exclusively for Windows, stands out for its high-speed processing. It allows to convert MKV, MP4, AVI and other video formats with embedded subtitles, ensuring that the existing captions remain synced after conversion.

Since there is no option for adding new external subtitle files (like .srt or .ass) within the program, we recommend using AVS Video Editor for this purpose. It supports adding captions with various fonts, styles, animation, shadows, and more. Read our full post dedicated to text overlays in AVS Video Editor
Best for: Converting videos without losing embedded subtitles and adding customized captions.

HandBrake – subtitle embedding converter
HandBrake, a popular open-source video converter, lets you import external subtitles (.srt) or burn them into the video. It’s great for embedding subtitles during file conversion but it doesn’t allow to edit subtitles.
Best for: Embedding subtitles while converting videos.

VLC Media Player for subtitle playback
VLC allows to open and playback files with embedded subtitles without altering the original video file. This is useful for viewing subtitles in different languages or testing timing and formatting on the fly. Being a free media player, it lacks the ability to edit, embed or permanently save subtitles into videos.
Best for: Quick playback and subtitle previewing.

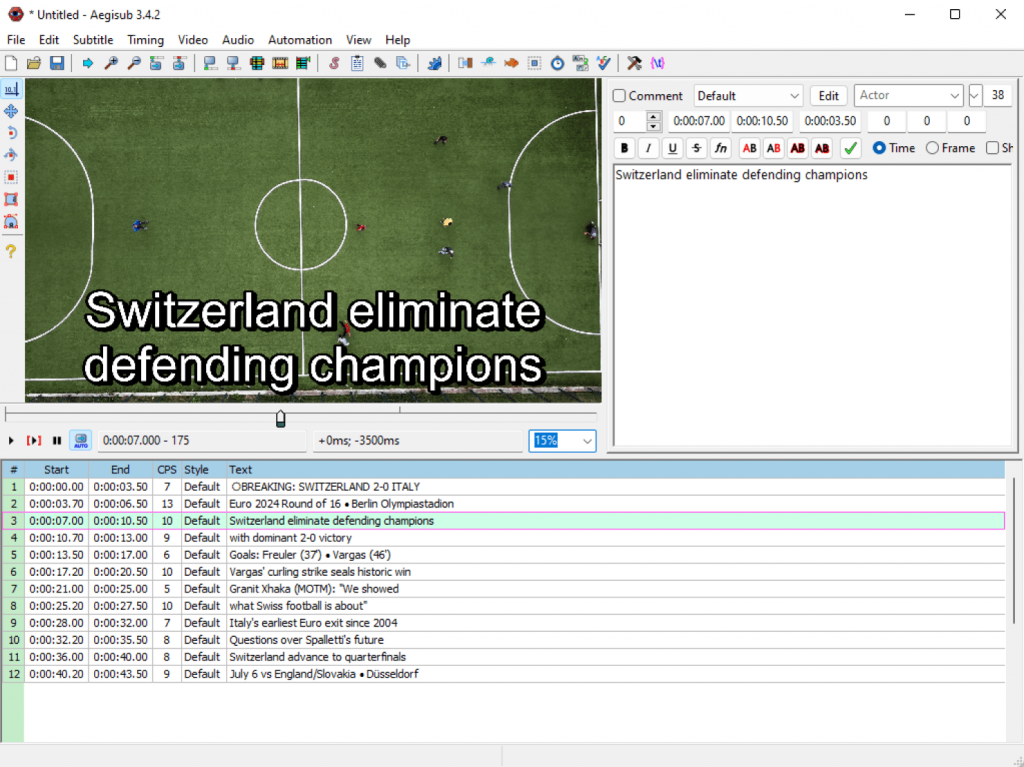
- Aegisub – advanced subtitle editor (H3)
Aegisub is a powerful subtitle editor available for both Windows and macOS. It offers precise frame-by-frame timing, advanced style customization (fonts, colors, positioning), and multilanguage support. However, the program lacks built-in video encoding or burning tools; therefore, external software is required to embed subtitles into video files.
Best for: Advanced subtitle editing and styling.
Add subtitles online
Online tools are convenient for quick edits or creating content for platforms like Instagram, TikTok, or YouTube Shorts. We recommend using Kapwing, VEED.io, Canva.com all of which offer drag-and-drop interfaces. You can upload a video, auto-generate subtitles, make edits, and burn the subtitles directly into your clip.
Pros:
- No software installation
- Fast and beginner-friendly
- Great for short-form content
Cons:
- File size limits
- Watermarks in free versions
- Privacy concerns with sensitive content
Kapwing – online subtitle generator
Kapwing is an easy-to-use online video editor with a built-in subtitle tool. It lets users auto-generate subtitles, style them visually, and burn them into your video.
Best for: Content creators who want stylish, branded captions fast.
VEED.io – subtitle and translation editor
VEED.io is a browser-based video editor designed for social media and team collaboration. It offers powerful subtitle tools with translation options and branded styling.
Best for: Marketers, agencies, businesses crafting polished videos, educators, translators, and anyone who just needs captions quickly.

Canva – video captioning and design tool
Canva is an online design and video editing platform with a user-friendly interface. It can automatically generate captions for video files with spoken audio, however, subtitle translation is a paid feature. Users can add, style, and time text with precision, customize fonts, colors, and animations to match their branding. If you insert captions manually, you can voice them with AI.
Best for: Content creators, educators, and teams creating polished, captioned videos for social media and presentations.
All three solutions make adding subtitles a breeze, so pick the one that fits your workflow!

AI subtitle generators and translators
Want to automate the process? AI tools can help you generate and translate subtitles quickly.
AI subtitle generator tools such as Whisper (by OpenAI), Otter.ai, Happy Scribe use speech recognition to create subtitle files from your audio/video. Some tools also offer subtitle translation into multiple languages allowing you to reach international viewers.
Pros:
- High-speed transcription
- Automatic time-coding
- Language translation available
Cons:
- Accuracy can vary, especially with background noise or accents
- Some tools require paid plans
- Privacy concerns with uploading private files
Whisper (by OpenAI) – best free and open-source transcriber
Whisper is an open-source speech recognition system that automatically transcribes audio and video with high accuracy. It supports multiple languages and works well even with background noise.
Best for: tech savvy users looking for a free, powerful solution.

Otter.ai for creating real-time subtitles
Otter.ai is a popular transcription tool that creates real-time subtitles and summaries from meetings, lectures, and videos. It’s user-friendly and integrates with Zoom and Google Meet.
Best for: professionals and educators needing fast, shareable transcripts.

Happy Scribe – multilingual subtitles generator
Happy Scribe offers AI-powered transcription and subtitle generation in over 120 languages. It includes editing tools and the ability to export in various subtitle formats.
Best for: content creators and translators working with multilingual video content.
For those who value speed and don’t mind doing a quick review, AI subtitle tools can dramatically speed up the workflow.

Tips for working with subtitles
Before you start adding subtitles, keep these technical points in mind:
- Format compatibility
Common subtitle formats include .srt, .vtt, .ass, each with different features and levels of styling.
- Burned-in vs. soft subtitles
Burned-in subtitles are part of the video and can’t be turned off, whereas soft subtitles are separate and can be toggled.
- Timing and formatting
Make sure the subtitles appear at the right time and are broken into lines that are easy to read.
For simple editing, a basic subtitle converter or text editor may be enough. For more complex projects, you may need a full-featured subtitle suite.
Conclusion
Adding subtitles is an essential step to make your videos more accessible, reach global audiences, or just boost viewer retention. Use free tools like HandBrake or Aegisub for hands-on control, try online editors for quick fixes, or go with AI subtitle generators for speed and automation.
And if you’re converting videos and want to preserve embedded subtitles, AVS Video Converter is a reliable option to include in your workflow.
Adding subtitles has never been easier. Choose the method that fits your needs and start creating more engaging video content today.
Useful links

Ever noticed how you continuously make adjustments to the volume levels of the podcast you are listening to or the videos that you watch?
Fluctuating audio levels are not just a minor flaw- they can cause a severe impact on user experience and drive listeners away.
This is precisely why audio normalization matters. It is a process of maintaining volume levels to ensure your music sounds in tune from the start to finish.
What does normalization do and why is it important?
Audio normalization is important because it helps maintain constant volume levels across audio tracks. For instance, if you revised a podcast or mixed music, you understand the distraction it may cause when one audio sharply increases while the other lessens. Normalizing audio is not a choice but a key process for producing audio professionally, whether it is for your YouTube content, a voice-over, or a complete music project.
In this article, we will discuss the fundamentals of audio normalization, explain its benefits, and highlight how to normalize audio using AVS Audio Editor and similar tools.
What Is Audio Normalization?
Normalizing audio is when you make adjustments to the overall volume to reach a certain target level. This is important when your recording consists of high sounds and silent sections that upset the overall balance.
While normalization and compression are used to control volume, they vary in some ways:
- Normalization makes a uniform adjustment to an audio track based on the highest peak or the overall sound.
- Compression minimizes the volume of loud sounds and amplifies silent ones within an active range, which changes the dynamic character of the audio.
Types of Audio Normalization
Peak Normalization
This regulates the volume so that the highest sound reaches a defined level (e.g., -1 dB). This is best for ensuring clarity without distortion or clipping or helping to prevent distortion or clipping.
Loudness Normalization
This adjusts the midpoint loudness to tone with a standard like LUFS (Loudness Units Full Scale), perfect for podcasts or broadcasts, where perceived loudness matters more.
Why Normalize Audio?
Audio normalization is essential for:
- Consistent volume across recordings
Normalizing audio ensures the same volume across all files, fit for interviews, multi-track songs, or video content.
- Refined listening experience
Your audience would not need to adjust volumes repeatedly. It ensures convenient playback on headphones, speakers in cars, and smart devices.
- Meeting platform standards
Platforms like YouTube, Spotify, and Apple Podcasts have sound standards (around -14 LUFS). Maintaining your audio level helps meet these requirements and prevents auto-leveling features from interfering with your sound quality.
How to Normalize Audio with AVS Audio Editor
AVS Audio Editor offers an intuitive and user-friendly interface for beginners and hobbyists who consider quick and accurate ways to normalize audio.
Launch AVS Audio Editor
Download and install from the official AVS Audio Editor page.

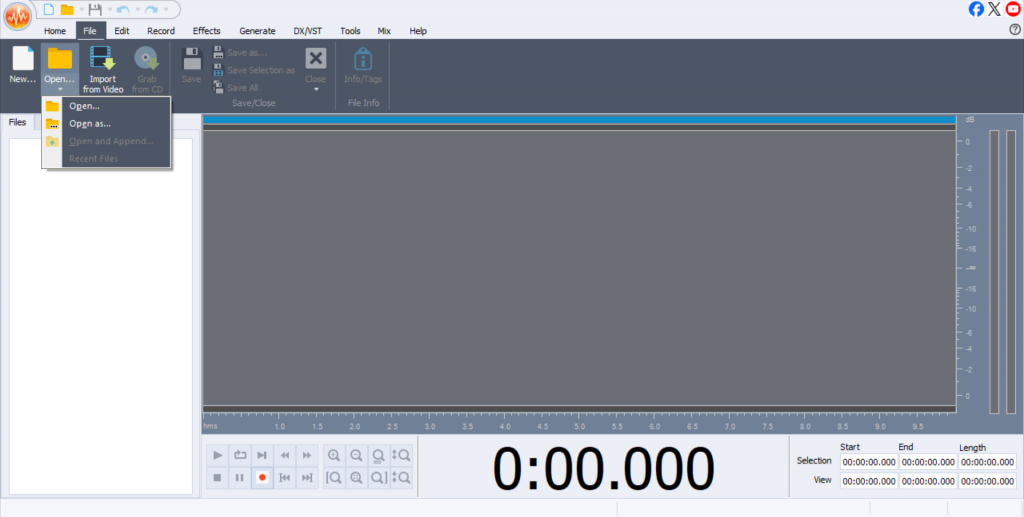
Import Audio File
Click on File > Open and select your audio track.
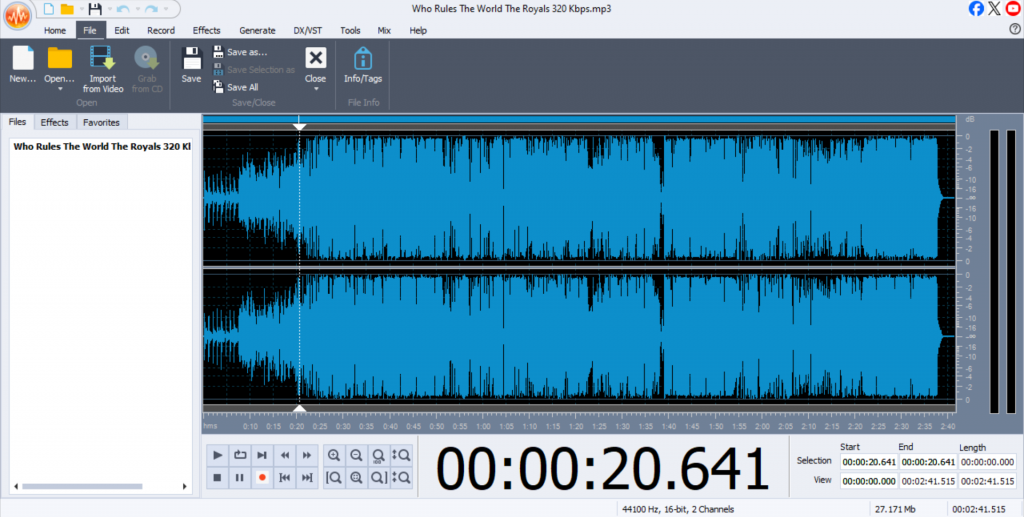
Select full audio or a segment
Use the selection tool to highlight the complete track or a part of it.
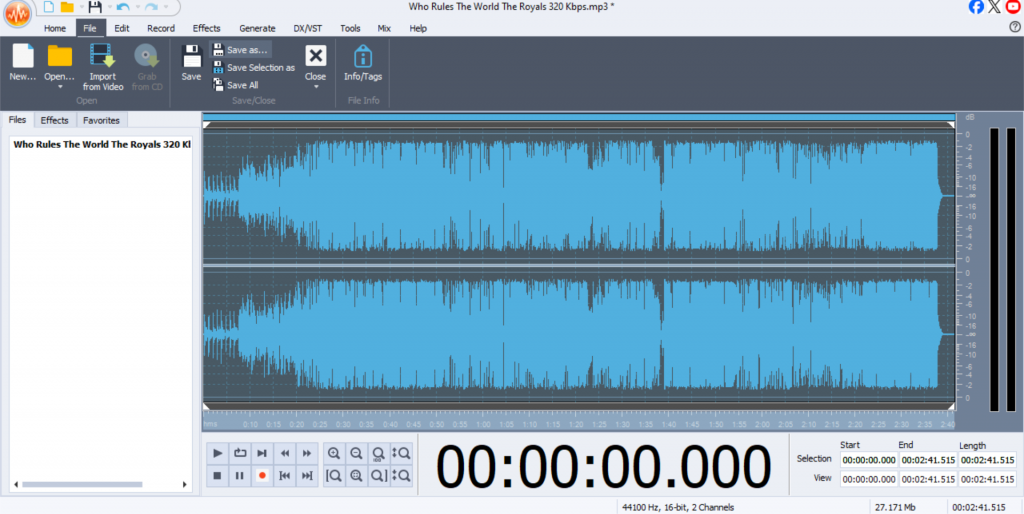
Normalize effects
Go to Effects in the top menu and select Normalize.

Choose the parameters
Select your required normalization level (e.g., -1 dB for peak or -14 LUFS for loudness normalization).

Preview and Apply
Select Preview to hear the set changes, then click OK to apply the changes.

Save your file
Export your final normalized file through File > Save As.
Key features of AVS Audio Editor
- Selection-based editing
AVS Audio Editor lets you choose parts of the audio track to normalize. This feature is handy if you want to make changes to the level of volume in some parts of the track without impacting the complete file.
- Real-time preview
Before you apply any final modifications to your track, use the preview function to observe the effects of normalization in real-time. This approach allows you to assess necessary changes right away so you can tune in the needful settings without relying on trial-and-error adjustments.
- Batch processing for several files
If you want to normalize a batch of audio at one go, AVS Audio Editor allows batch processing. This will let you apply consistent volume settings to various tracks quickly and efficiently. It suits podcasts, music albums, or video series.
Audio Normalizers for Windows, Mac, Online, and Mobile Devices
There are a few options or additional tools to consider if you are looking for top audio normalization tools across platforms:
Audacity (Windows, Mac, Linux)
This is an open-source and free-to-use audio editor that upholds peak and intense normalization.
Pros: Free-for-all with robust features.
Cons: Interface may be overwhelming for newcomers.
Adobe Audition (Windows, Mac)
This is a professional-grade audio editing software with advanced normalization and compression tools.
Pros: Wide industry-standard, multi-track support.
Cons: Expensive, membership fee.
Normalize Audio Online Tools
Web-based tools like AudioAlter and Bear Audio Tool let users normalize audio online without any software installation.
Pros: Appropriate for quick tasks, does not require download.
Cons: Offers limited features and file size restrictions.
Mobile Apps
Apps like WaveEditor for Android and Hokusai Audio Editor for iOS include basic normalization features for on-the-go editing.
Pros: Real-time editing.
Cons: Limited control, unsuitable for professional use.
Tips for Better Normalized Sound
There are some basic tips you can follow to make your audio normalization process neat and smooth:
- Normalize after editing
Carry out trimming, noise reduction, and EQ first, then normalize to avoid re-processing.
- Avoid clipping and distortion
Perform normalization to safe levels (e.g., -1 dB peak or -14 LUFS) to prevent digital distortion.
- Test across devices
Make sure you listen to your normalized file on speakers, headphones, and mobile devices to ensure stability.
- Batch normalize
Use batch tools (like in AVS Audio Editor) for even volume across multiple recordings.
Enhance your audio with the right tools
Audio normalization is important for anyone who is working with sound. If simply explained, this process ensures consistent audio levels across all your files. Once this happens, listeners do not reach out constantly to change the volume levels to compensate for tracks that are too high or extremely low. Normalization is about conveying a balanced and professional listening experience.
Mastering normalization means your recordings maintain a professional quality with a balanced sound, with no surprise peaks or drop-offs. It is one of those workflow steps that saves time and spares you from the load of post-production headaches. Once you get it right, your audio will always meet the industry standards.
AVS Audio Editor ensures the process is simple for beginners and intermediate users. With a neat interface, clear preview options, and batch tools, this editor is one of the best audio normalization software solutions for daily use.
Try our AVS Audio Editor for free and begin normalizing your audio like a pro today!
Related links
5 essential audio editing tips to improve your videos

In most cases, audio recordings need post-editing and cleanup to sound clear and professional. There are several reasonssuch as background noise, uneven volume, or a muffled voice. If you’re planning to use your audio for playback or to voice a video, especially on a public platform, audio processing is essential.
Let’s walk you through a quick and effective way to clean up audio, with a focus on enhancing speech. Even if your goal goes beyond voice recordings, this method will help improve the overall sound quality of any file. For the best results, use reliable headphones while editing because speakers may mask issues like low-end rumble or subtle noise.
1. Record or Import Audio
Record your voice using an audio editor, or import an existing file. For testing, you can read a short poem with expression. When you’re done recording, leave about 10 seconds of clean background sound (no clicks or movement). This will be useful later for noise filtering.

2. Noise Removal
Noise in audio recordings such as a subtle hiss, a persistent hum, or random clicks affects the clarity of your music, podcast, or voiceover.
Noise comes in different forms:
Constant noise is easier to remove because it’s consistent. You might hear this as the steady hum of an air conditioner or the buzz of electrical equipment.
Irregular noise is trickier to eliminate since it’s sporadic and often overlaps with the main audio. This type of noise includes keyboard taps, door slams, or mic bumps.
The best-case scenario is having a short section where only the noise is present, for example, a silent pause before someone starts speaking. This makes it much easier for your audio editing program to identify and remove unwanted sounds.
How Noise Removal Works
Most noise reduction tools follow the same basic process:
Create the noise profile
You select a sample of “pure” noise (no speech or music) so the software knows what to target.

Apply the reduction:
The editor then scans the entire track and removes frequencies that match the noise profile.

Fine-tune the settings
Too much noise reduction can make voices sound robotic or introduce weird artifacts, so moderation is key.

A good starting point is a light reduction (6–12 dB) and then adjust it from here. If the noise is still noticeable, a second gentle pass is better than one aggressive one.
3. Equalizer
The Equalizer helps you shape the tonal balance of your voice. You can manually adjust frequency bands by moving sliders up to brighten or down to dull the sound. If you’re unsure, try built-in presets if there are any. After making changes, use the Preview button to check the result. A well-equalized voice sounds fuller and more natural.

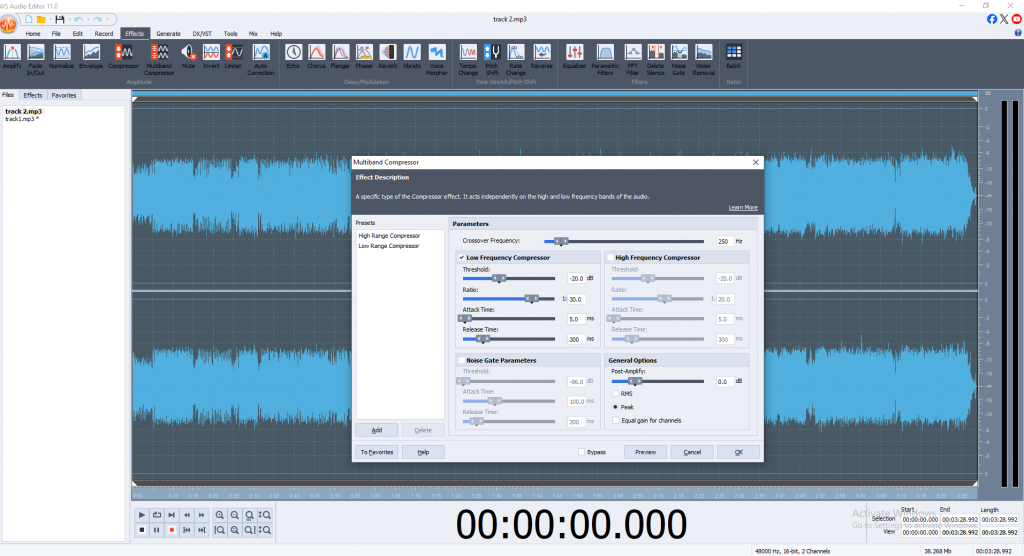
4. Compressor
The Compressor reduces the dynamic range of your audio, making quiet parts louder and loud parts quieter. Usually, it works together with the Noise Gate to keep your volume consistent and background noise under control.
Key settings include:
- Threshold
It is the level (in dB) above which compression starts. A lower threshold increases compression. Set it based on the quietest part of your recording.
- Ratio
Ratio shows how much the sound is reduced once it passes the threshold. For speech, a ratio between 2:1 and 4:1is usually ideal.
- Attack
Attack determines how fast the compressor responds. Use 10–40 ms to keep vocals natural.
- Release
Release is the opposite of attack. It controls how long the compressor continues to apply gain reduction after the sound falls below the threshold. A setting around 100–150 ms works well for speech.
Be careful not to over-compress your audio, otherwise it can sound flat and lifeless. Aim to preserve the natural dynamics and character of the voice.

5. Limiter
To avoid distortion and control sudden volume peaks, apply a Limiter. It caps the highest volume levels while keeping the rest of the audio intact.
Recommended settings:
- Threshold set to -3 dB prevents clipping.
- Post-Amplify restores overall volume after limiting.
- Equal Gain for Channels keeps stereo balance even.

6. Reverb (Optional)
Adding a subtle Reverb effect can make your voice sound more natural and full, especially in dry or overly clean recordings. Use it sparingly to add space and depth without making the voice sound distant or echoey.

7. Normalize
Normalization brings your audio to a consistent overall volume without changing its dynamics. It raises quieter parts to match louder ones, ensuring balanced output. You’ll find it under Amplitude Effects. By default, it’s set to 0 dB, but using -1 dB or -0.5 dB is safer to avoid clipping. Apply normalization at the end of your editing process, once everything else is done.

Final steps
Once you’ve finished fine-tuning your audio, it’s time to save your work. Export your recording(s) in popular formats such as MP3, WAV, FLAC, and others, depending on your needs. Before saving, always check your final result to make sure everything sounds just right. This helps catch any over-processing or unwanted changes early.
Recommended audio editors for polishing audio
Here are three great options for polishing your audio, ranging from free to premium:
Audacity (free)
Perfect for beginners, with essential noise removal, EQ, and compression tools.

AVS Audio Editor (paid)
A user-friendly Windows editor with noise reduction, voice enhancement, and batch processing.
Adobe Audition (paid)
Professional software with spectral editing and advanced restoration features.
Whether you need a free starter tool or a professional-grade editor, there’s an option here for every need and budget.

Final thoughts on audio cleanup
Cleaning up audio requires both technical skill and a careful ear. The key is to remove distractions like noise and uneven volume while keeping the recording natural and dynamic. Always listen critically, test your edits on different speakers or headphones, and fix issues when possible, for example, improving mic placement or recording in a quieter space. With the steps described above, you can turn a raw voice recording into polished, professional-sounding audio even if you have no editing experience.
Give AVS Audio Editor a try and start cleaning up your recordings with ease.
Useful links

Are you struggling to play or share video files in the M4V format? In fact, many users encounter compatibility issues with M4V files, especially on non-Apple devices. Fortunately, there’s a simple solution that can make your life easier. It isM4V to MP4 video conversion. In this post we’ll focus on the difference between M4V and MP4 formats, explain key benefits of changing M4V files into MP4 and offer you simple tools to seamlessly convert your videos.
What are M4V and MP4 files?
M4V and MP4 are both video container formats that store video, audio, and other metadata. However, they have different purposes and key distinctions.
- M4V
This format was developed by Apple and is typically used for iTunes videos, TV shows, and movies. Many M4V files are protected by DRM (Digital Rights Management), which restricts playback to authorized Apple devices.
- MP4
Known as a universal standard, MP4 files are compatible with virtually all devices, operating systems, and media players. It’s widely supported for streaming, editing, and sharing videos online.
Key differences between M4V and MP4
| Feature | M4V | MP4 |
| Compatibility | Primarily for Apple devices | Works on nearly all devices |
| DRM Protection | Often DRM-protected | DRM-free |
| Usage | Mainly for iTunes and macOS | Perfect for sharing, editing, and streaming |
Why convert M4V to MP4?
Converting M4V files to MP4 offers a range of benefits, particularly for multi-platform usability. Here are some reasons to change the format:
1. Universal compatibility
MP4 files can be played on Android devices, Windows PCs, smart TVs, tablets, gaming consoles, and more.
2. Free from DRM restrictions
MP4 removes playback restrictions (from non-protected M4V files), making it easy to play videos anywhere.
3. File size optimization
MP4’s advanced compression reduces file size by up to 30% without noticeable quality loss, saving your storage space.
4. Editing & sharing
It is easier to edit and share MP4 files on social platforms like YouTube and Instagram.
How to convert M4V to MP4
There are several methods you can use to perform this conversion. Below, we’ll show you how to do it using AVS Video Converter and also share a few alternative methods for specific needs.
Step-by-step guide for converting M4V to MP4 in AVS Video Converter
What you’ll need
- Your M4V video file(s)
- AVS Video Converter installed on your computer
Steps
1. Install AVS Video Converter
Go to the official AVS4YOU website and download the program. Follow the installation instructions to set it up on your PC.

2. Import your video files
- Open the program and click “Add File”.
- Select the M4V video(s) you want to convert.
- AVS Video Converter supports batch processing, so you can work on multiple files at once.

3. Choose MP4 as the output format
- From the format menu, select MP4.
- Choose between MP4 presets optimized for specific devices (e.g., smartphones, TVs, or social platforms).

4. Adjust advanced settings (Optional)
For higher-quality results, tweak these settings under “Advanced Options”:
- Codec: Use H.264 for the best balance of quality and file size.
- Resolution: Match the source resolution for HD (1080p) or 4K content, or downscale to save space.
- Bitrate: Opt for 8-12 Mbps for HD videos and 15-25 Mbps for 4K.
- Frame Rate: Maintain the original frame rate (typically 24fps or 30fps).
- Enable hardware acceleration for faster processing if your device supports it.

5. Convert your files
- Select the output folder where you’d like to save the converted files.
- Click the “Convert Now” button, and the program will start the process.

6. Check the output
Once the conversion is complete, find the output files in the destination folder. You can play your MP4 videos on any device or upload them to your favorite platform.

Alternative tools for M4V to MP4 conversion
If you’re looking for additional options, here are some alternatives to AVS Video Converter:
1. Online Converters
Quick and convenient for small file sizes, online tools like CloudConvert and Zamzar can handle basic conversions. However, they may have file size limitations and require a stable internet connection.
2. VLC Media Player
VLC isn’t just for playback; it can also convert M4V to MP4. However, it lacks advanced customization options and doesn’t support batch processing.
3. FFmpeg
FFmpeg gives users a lot of control over video conversions and delivers excellent results, but it can be tricky for beginners since it requires some technical knowledge.
Tips for maintaining video quality during conversion
- Match source settings
Use the same resolution and bitrate as the original file to keep video quality. - Enable hardware acceleration
Devices with hardware acceleration, like GPU support, can process conversions faster and more efficiently. - Avoid overcompression
Don’t drastically lower the bitrate, as this can make your video look pixelated.
Addressing common concerns
1. Can I convert DRM-protected M4V files?
DRM-protected files need to be authorized through iTunes or require specialized tools for decryption. Always ensure you’re converting files you own and have the right to use.
2. Will subtitles be removed during conversion?
If you convert video files with embedded subtitles, AVS Video Converter will keep them after conversion but it does not allow you to add new files with subtitles during the conversion process.
3. How do I check the output quality?
Use tools like MediaInfo to compare technical properties (bitrate, resolution, codecs) before and after conversion.
Best M4V to MP4 converter
Changing M4V files to MP4 makes your videos easier to play, share, and manage. With AVS Video Converter, the conversion process is simple, fast, and hassle-free. Batch processing and customizable settings ensure high-quality results every time you switch between video formats.
Now that you have the right tools and understanding, it’s easy to refresh and reorganize your video library. We recommend you using MP4 format for seamless playback, editing, and sharing across devices.
Download AVS Video Converter today and make the most of your video collection.
Have questions or tips about video file conversion? Share them in the comments below!
Useful links

Whether you’re renovating your audio collection, creating playlists to share with friends, or working on complex audio editing projects, the ability to manage and edit your files is essential. By transforming your audio from a rigid CD format to the universally compatible MP3, you can open, share, and store your tracks the way you like. To put it simple, music lovers greatly benefit from changing their CDA files into more popular audio formats.
But before we dive into the CDA to MP3 conversion in detail, lets explore the difference between these formats.
CDA vs. MP3
CDA, short for Compact Disc Audio, isn’t an audio file format as commonly understood. When you put a music CD into your computer, the CDA files you see act as shortcuts pointing to audio tracks on the disc. While this format is perfect for CDs, it is useless when you want to play or edit those tracks on digital devices since CDA files don’t store the actual audio data.
In comparison with CDA, MP3 is a compressed file format designed for digital use. On the one hand, it maintains a high level of audio quality. On the other, it significantly reduces file size. Naturally, MP3 suits better for everyday music use. You can store thousands of MP3 tracks on your devices, share them effortlessly, and even customize their metadata for better organization. These qualities make MP3 essential for anyone looking to keep their music widely compatible and portable.
AVS Audio Converter: CDA to MP3 converter
When it comes to transforming CDA files, there are plenty of audio converters available. AVS4YOU Multimedia Suite includes AVS Audio Converter, one of the best free audio converters. Here’s why music enthusiasts love it:
- User-friendly interface
You don’t need to be a tech savvy to use this converter. Its clean, intuitive interface ensures that even beginners can convert files in no time. - Batch conversion
AVS Audio Converter processes multiple files at once quickly, so you can focus on your music instead of waiting on progress bars. - High quality
It is well known that conversion can affect sound quality making sound less clear or quieter. With AVS Audio Converter, you can be sure that your MP3 files will keep the quality of the original recordings or even sound better thanks to advanced fine-tuning tools.
How to convert CDA to MP3 using AVS Audio Converter
Here is a step-by step guide to walk you through CDA to MP3 conversion in AVS Audio Converter.
1. Install AVS Audio Converter
First, download and install AVS Audio Converter. Once installed, launch the program.

2. Add CDA files
Insert your audio CD into your computer. Open AVS Audio Converter and click on “Add Files” to import the CDA files from your CD.

3. Select output format
From the Output Format menu, choose MP3. You’ll also see quality options such as bit rate and sample rate. For standard quality, a bit rate of 192-256 kbps works great.

4. Adjust output settings
If needed, customize the metadata (track name, album, artist, etc.) for better file organization.

5. Start conversion
Click the “Convert Now” button. The program will quickly process your files and save them as MP3s in your selected folder.

6. Enjoy your music
Once the conversion is complete, transfer your MP3 files to your preferred device or playlist and play them anywhere.

Tips for better audio quality
- Choose a higher bit rate for greater clarity
Audio files with higher bit rates like 320 kbps take up more space, but they deliver sharper sound for experienced listeners. This can be ideal for tracks with rich instrumentation. - Avoid over-compression
Converting already compressed formats (like MP3 to MP3) multiple times can reduce quality. Try to start with the most original source files when possible. - Check volume normalization
If some tracks sound too quiet or loud, AVS Audio Converter allows you to adjust the volume during conversion for a better listening experience.
Pitfalls to avoid
- Watch Your Storage
MP3 files are quite compact, but they can add up when converting full albums. Keep an eye on your hard drive’s space.
- Don’t interrupt the process
Stopping the conversion mid-way can result in incomplete or corrupted files. It’s best to avoid interrupting the process altogether.
Everyday benefits of CDA to MP3 conversion
Music lovers can transform their experience in countless ways by converting CDA to MP3. Here are some real-life scenarios where this comes in handy:
- Easy sharing
Want to send your band’s demo tracks to friends or collaborators? MP3 files are universally compatible, making sharing stress-free. - Building a portable music library
Convert your old CD collection into MP3 files and store them on a USB stick, phone, or cloud service for on-the-go access. - Editing audio tracks
If you create remixes or mash-ups, MP3 files work smoothly with most audio editing software, letting your creativity flow.
Make the most of your music with AVS4YOU
Converting CDA to MP3 is useful in many cases from digitizing an old CD collection to sharing playlists with friends, or transferring audio files to a hard drive or portable device, and more. Free audio converters make these tasks easy, saving your time and ensuring high-quality results.
If you’re ready to get started, check out AVS Audio Converter and see how simple it is to convert CDA to MP3. Why wait? Give it a try and explore the full set of powerful features and customizable settings today.
Useful links

In video editing, it’s often the subtle touches that transform ordinary footage into compelling stories. Video effects play a crucial role in bringing emotion, intention, and clarity to all your projects. From vlogs and tutorials to commercials and short films, knowing how to apply the right effects can keep your audience engaged and elevate your video to a whole new level.
AVS Video Editor is a good option for beginners and intermediate editors. Knowing which video effects and transitions are appropriate for each case is very important. In this article we will present you 10 video effects that every editor must know. They help you bring your ideas to life and make your videos shine.
1. Video transition effects
Transitions assist in the smooth movement between two scenes or clips, mostly using fades to black, dissolves, or wipes.
When applied correctly, they provide smooth transitions and support the storytelling by preventing abrupt or distracting cuts.
These are widely used in vlogs, short films, travel diaries, and video essays to enhance narrative flow and emotional continuity.
Tips for usage:
- Apply crossfades for slow-moving and emotional scenes or time lapse scenes.
- Limit the use of flashy wipes unless stylistically necessary.
2. Chroma key in video editing
With this effect, you are able to replace the green or blue background with a custom image or video.
This can be beneficial for developing professional chef backdrops, generating special effects, and transporting subjects into new virtual environments for a more dynamic and immersive visual experience.
Often used in YouTube tutorials, staging interviews, news-style backdrops, and creative storytelling scene that require a virtual location.
Tips for usage:
- Make sure the lightning is even when shooting to avoid shadows and inconsistencies.
- Use the Chroma Key tool in AVS Video Editor to fine-tune color tolerance and smoothing.
3. Slow motion for a dramatic impact
Slow motion stretches out time, allowing the viewer to experience motion or emotion more deeply.
This effect brings attention to key moments, enhances dramatic sequences, and allows viewers to absorb intricate details that might otherwise be missed in real time.
It’s often used in sports highlights, emotional wedding scenes, or slow product reveals in promotional content.
Tips for usage:
- Shoot at higher frame rates for smoother slow-motion playback.
- Combine with background music to amplify impact.
4. Speed up (time-lapse) effects
The opposite of slow motion, time-lapse condenses time by increasing video playback speed.
This is a great way to give a summary to long scenes, create visual interest, and to emphasize the theme of time passing in a stylized manner.
You’ll frequently see it present in travel vlogs, cooking tutorials, or behind-the-scenes setup sequences.
Tips for usage:
- Stabilize footage to avoid a jittery effect.
- Use it as a storytelling tool for transitions or montages.
5. Stylish text effects
Overlaying text elements such as titles, captions, and credits makes your message clearer and easier to understand.
When used effectively, text elements can provide additional context, support your brand, enhance your narrative clarity, and increase audience appeal and accessibility.
These are commonly found in YouTube intros, explainer videos, educational content, and interview graphics.
Tips for usage:
- Choose legible fonts and place text over solid backgrounds or blur overlays.
- Use title animations to grab attention without overwhelming the frame.
6. Color correction
Adjust brightness, contrast, saturation, and white balance to match or enhance footage colors.
This helps maintain visual consistency across scenes, enhances the emotional tone, and creates a more professional, cohesive look.
You’ll often use it in travel videos, cinematic shorts, beauty content, or any brand-focused production.
Tips for usage:
- Use color grading presets in AVS4YOU to speed up your workflow.
- Match the color palette to your project’s theme or brand identity.
7. Picture-in-picture (PiP) overlay
This effect allows you to add a smaller video on top of the main screen video, which is great for tutorials or reaction-based content. PiP will allow you present an alternative view or perspective simultaneously, maintaining engagement by providing live commentary or additional visual context.
Commonly used in gameplay videos, how-to tutorials, unboxings, or reaction-style content.
Tips for usage:
- Keep the overlay small and position it in non-distracting corners.
- Use border and shadow settings to distinguish PiP elements.
8. Focus & depth with Blur
Blur effects can be applied to an entire image or a screen segment to soften visuals, often for focus or censorship purposes.
This effect guides the viewer’s focus, suggests depth of field, and can also hide sensitive elements that might disrupt the viewing experience.
You’ll often see this in tutorial videos hiding private data, beauty vlogs simulating bokeh, or transitions with motion blur.
Tips for usage:
- Use directional blur for motion or Gaussian blur for background defocus.
- Combine with keyframing for dynamic blur transitions.
9. 3D Effects: depth and motion
Add dimensional depth or movement to text and visual elements using 3D transformations.
These effects create a dynamic, professional look that captures attention and gives your visuals a sense of space and realism when used thoughtfully.
They’re great for animated titles in tech videos, infographic visuals, or bold branding intros.
Tips for usage:
- Avoid overusing 3D effects to maintain clarity and avoid distractions.
- Apply shadows and light sources for a richer effect.
10. Sound effects for clearer audio
Audio editing effects correct or enhance sound in a variety of ways, like fading in/out or removing extraneous background noise.
Clear, well-balanced audio improves the viewing experience significantly, reinforces the emotional tone of the content and helps ensure that the message you want to deliver is not hindered by distractions.
These are most useful in vlogs, voiceovers, interviews, and cinematic scenes requiring immersive audio.
Tips for usage:
- Use fade-in/out for smooth audio transitions.
- Apply noise reduction sparingly to avoid distortion.
Conclusion
By mastering the basic video editing effects, every content creator and video editor can improve their presence and productivity. Every tool, from overlays to transitions, contributes to creating a polished and engaging video.
Enhancing your projects has never been easier with the help of this powerful video editor. Its user-friendly interface and step-by-step guides make customizing video effects a breeze.
Want to boost your skills? Get AVS Video Editor now and begin to apply effects right away!
For additional guidance, check out our official tutorials and learn how to make stunning videos in minutes.
Useful links
Timelapse with a twist: adding zoom effects to highlight key moments
Blur it out! How to blur a video and protect sensitive information