Category: news-post

You are likely to have the boxes of home video VHS tapes that might contain different events of your life, exclusive musical gigs filmed or some other incredible things you witnessed years ago. It’s time to breathe new life to them and bring them up to date.
What you need to do
Step 1: Download and install AVS Video Editor
Step 2: Connect VHS recorder/player to the computer
You need to use a video capture device as a go-between:
- If you use an external video capture board supplied with RCA and S-Video jacks, the best way to link the devices is to connect the VHS recorder/player S-Video output with the video capture board S-Video input using the corresponding cable so to relay a video signal. To relay an audio signal use an RCA cable, connecting your VHS recorder/player RCA output with the video capture device RCA input but employing white and red jacks only. And then use a USB cable to connect the external video capture board to the computer USB port.
- If you have a DV-camera and your computer system is supplied with an IEEE 1394 port then connect your VHS recorder/player to the DV camera just in the same way as it has been described above and then connect the DV camera IEEE 1394 port marked as DV In-Out with the computer IEEE 1394 port using the corresponding cable.
Attention! Actions relating to connecting devices should be done when they are off.
For all the details concerning the possible ways of connecting devices, please, refer either to the User Manuals bundled with them or manufacturer support team.
Step 3: Launch AVS Video Recorder and select video format
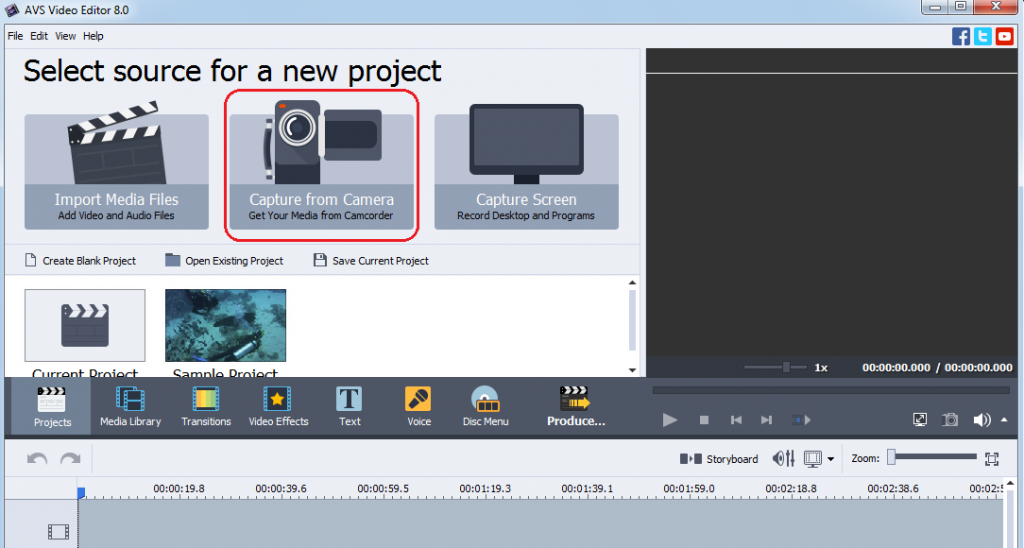
Make sure you work with the Capture tab. By default output video format is set to Recommended (MPEG-2), since your final goal is to have your video in DVD format, that suits fine although there is no reason why you should not select Native or MPEG-2 (with some other presets):

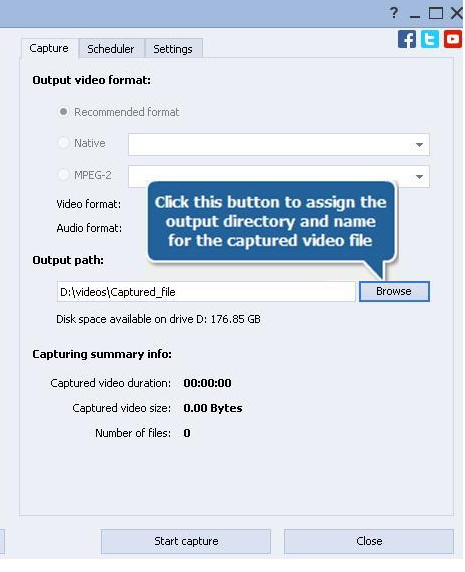
Step 4: Assign an output folder
Now define where the captured video should be saved to. Click from the Output path section:
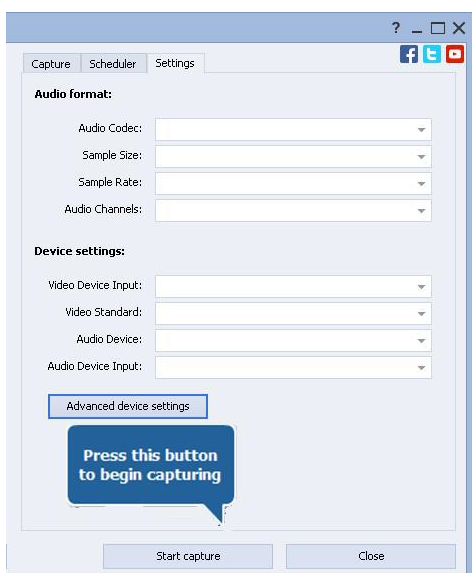
Step 5: Define video device input
Switch to the Settings tab. Drop down the Video Device Input control and choose either the Composite option in case your VHS player is connected to the capture device using an RCA input or the S-Video option if you preferred an S-Video jack:

Step 6: Start Capture
Note: before starting capture switch your VHS recorder/player on and check whether a VHS cassette is inserted into its compartment. If you use a DV camera as a capture device then:
- Switch the DV camera on.
- Make sure its cassette compartment does not contain a cassette.
- Enable the DV camera AV to DV feature (refer to User manual for details) and then switch it to playback mode.
Press the Start capture button of AVS Video Recorder and begin the VHS recorder/player tape playback. You can stop capture by pressing the Stop Capture button which will replace the Start Capture button immediately after clicking it:
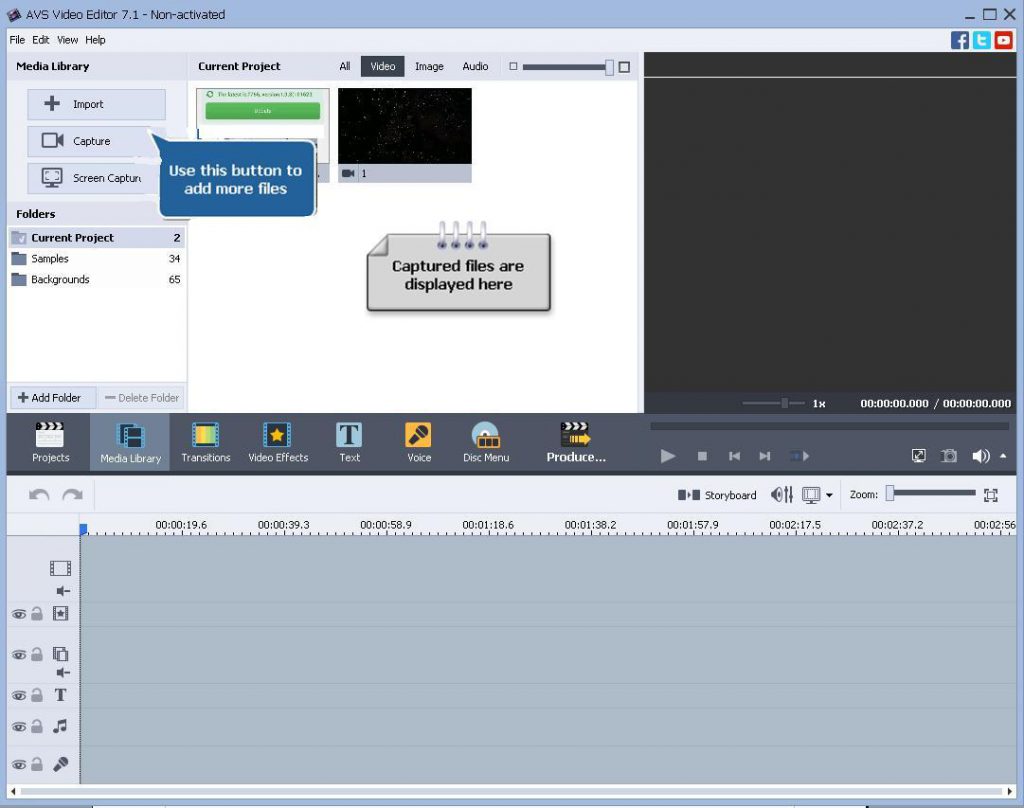
Step 7: Edit the created video and produce DVD or other video file
When you finish capturing video, press the Exit button in AVS Video Recorder bottom right corner to return to AVS Video Editor. You will find your captured video in the Video category of the Media Library:
Have any questions about using AVS Video Converter? Don’t hesitate to ask them in the comments below this post.

We are often being asked on how to increase the output video quality. So, please use the below tips if your output video file quality does not satisfy you in any way.
First of all I’d like to mention, that AVS4YOU software cannot increase the quality of the input file. In other words, if you have 480×320 frame video recorded on your phone and convert it to HD profile, the quality of that converted video will not be equal to HD video recorded on HD video camera.
Advanced settings of the input and the output
So, if you use AVS Video Converter and AVS Video Editor and wish to get the best possible output video quality, you’ll need to check the advanced settings of your input and output video files.
AVS Video Converter
What you have to do is set the output file settings so, that they match those of the input file. Click the Advanced button after selecting format for output video and set original frame size, bitrate and frame rate.
AVS Video Editor
If you use AVS Video Editor, you’ll need to check the input file settings in media library first.
Then select those settings in Advanced settings when producing your project.
Slideshow Video
It is also important to use Video for Slideshow preset (MP4, AVI and M2TS formats), if you use AVS Video Editor to create video from photos or image files.
AVS Video Editor preview quality
In the end, I’d like to mention the preview quality in AVS Video Editor. Actually, by default AVS Video Editor creates cache for HD files after importing them, and playback the cached file on the preview, so the editing process may be more convenient. So, preview quality does not influence anyhow the output video quality.
It is possible to change the quality of the video preview both on the timeline and on media library by clicking on the Edit button on the top toolbar – choose Settings – General tab – Preview section: choose “High (Slowest)” in “Quality” drop down box to get the best available quality for the timeline video playback. Please note that processing/editing speed will be lower. If you check the option “Use original format in media library” – you will get the best available quality for the preview from media library.
Experiencing any problems with AVS software? Or maybe you have a question? Drop us a comment below!

A number of significant technological developments have occurred in the past few years that have enabled the digital playback and display of feature films at a level of 2K and 4K resolution.
4K resolution, also called 4K, refers to a horizontal resolution on the order of 4,000 pixels and vertical resolution on the order of 2,000 pixels (e.g. 3840 x 2160 or 3840 x 2400). 2K – horizontal resolution of approximately 2,000 pixels and higher (e.g. 2560 x 1440, 2560 x 1600 or 2560 x 2048).
These technology developments include the introduction of high-resolution film scanners and 4K digital television, high-speed data networking, storage, and 4K computer monitors.
By 2015, 4K television market share had increased greatly. By 2025, more than half of U.S. households are expected to have a 4K-capable TV (2160p) (Mark Hoelzel from “Business Insider”).

Many AVS4YOU users now use 4K and 2K monitors. In this case interface of AVS4YOU software applications may become too small and inconvenient to use. Our developers have created a special patch to make AVS4YOU programs interface comfortable for 2K and 4K monitors.
How to install
The patch will replace the usual versions of AVS4YOU software with the applications with scalable GUI. After downloading the patch, save it to your PC folder and launch it.
- AVS non-DPI-aware patch will be started – press Next, then the Install button. You can choose to install a scalable version of AVS Screen Capture too, but it is not recommended as the borders of the screen being captured may not coincide in a scalable version.
- Press the Finish button to end installation.
That’s all you have to do to use the software on 2K or 4K monitors.
Please note that after installing updates of the software, you will need to install non-DPI-aware versions anew.
If you have any questions, please drop us a line in the comment section below.

I often receive requests on which program to use to fulfill different tasks. Now I’d like to show you the difference between 2 programs – AVS Video Converter and AVS Video Editor.
Both AVS Video Editor and AVS Video Converter can be used to convert all key video file formats (including ready presets for different devices) and edit videos: delete the unnecessary parts from the video, add text and objects, apply audio and video effects, create DVD menus.
MORE
Whether you are a professional or only starting your video editing practice, there’s a certain set of tools that are just essential in the process of creating a mastered video piece. Below, we prepared a list of seven core tools available in AVS Video Editor and explained how to use them.
MORE
A number of significant technology developments have occurred in the past few years that have enabled the digital playback and display of feature films at a level of 2K and 4K resolution.
Differences between video resolutions
4K resolution, also called 4K, refers to a horizontal resolution on the order of 4,000 pixels and vertical resolution on the order of 2,000 pixels (e.g. 3840 x 2160 or 3840 x 2400). 2K – horizontal resolution of approximately 2,000 pixels and higher (e.g. 2560 x 1440, 2560 x 1600 or 2560 x 2048).
These technology developments include the introduction of: high-resolution film scanners and 4K digital television, high-speed data networking, storage, and 4K computer monitors.
Mark Hoelzel from “Business Insider”:
By 2015, 4K television market share had increased greatly. By 2025, more than half of U.S. households are expected to have a 4K-capable TV (2160p)
Processing various resolutions in AVS software
AVS Video Converter and AVS Video Editor can be used to process 2K and 4K videos:
2560×1440 (QHD – 2K) and 3840×2160 (Ultra HD 4K) frame size can be selected in MPEG, MKV, FLV, MOV, MP4, F4V file formats.
What you need to do is just select the file format for the output video, press the Advanced button, choose H.264 codec in the list of codecs, then select the frame size you need and enjoy the highest video quality!
Download the latest versions of AVS software to get the most of the editing experience.
Have questions? Don’t hesitate to leave your comments below.