Category: Без рубрики

Introduction
Do you still have boxes of old VHS tapes with priceless memories including family holidays, childhood birthdays, or wedding footage? Although VHS was popular and frequently used, nowadays this format has become obsolete. VHS tapes degrade, lose quality, and most players do not support their playback. Converting VHS to DVD or digital formats such as MP4 is the best way to preserve and relive these moments.
In this blog post, we’ll list the best VHS to DVD converter software available today, both free and paid. You’ll learn the essential features to look for, see detailed overviews of top tools, and find a step-by-step guide for converting VHS to DVD using AVS Video Editor.
Reasons for converting VHS to DVD or digital formats
VHS digitization isn’t just about convenience, it’s about preservation.
- Protect fragile memories
Tapes deteriorate with time, exposure, and repeated playback.
- Easy playback and sharing
DVDs and MP4 files play on laptops, TVs, and smartphones.
- Future-proofing
Digital files ensure your memories remain safe for future generations.
Without digitizing, you risk losing irreplaceable family history forever.
VHS to DVD software: Must-have features
We recommend focusing on the following features when choosing which software to use for VHS conversion:
- Ease of use
A simple, beginner-friendly interface saves time and helps complete tasks effortlessly. - Video capture support
Seamless work with capture devices delivers real-time recording without dropped frames or synchronization problems. - Editing tools
Trimming, stabilization, and color correction help transform VHS cassettes into polished videos. Even small adjustments, for instance, cutting out blank sections or enhancing brightness, make old recordings much more enjoyable to watch. - Output formats
Wide format support, including DVD, MP4, AVI, and more, guarantees that you will easily play or share your digitized videos across different devices, from DVD players to smartphones and smart TVs. Having multiple options also future-proofs your collection. - Speed and reliability
Reliable software processes files fast and also reduces the risk of crashes or corrupted files, which is especially important when working with brittle VHS recordings you can’t easily redo. - Updates and support
Regular updates keep the software compatible with the latest devices and operating systems, while customer support provides help if you run into technical issues. This is particularly valuable for beginners who may need guidance during the process.
Best free VHS to DVD converter software
Free software is a great starting point for tech-savvy users on a budget. Here are three top options.
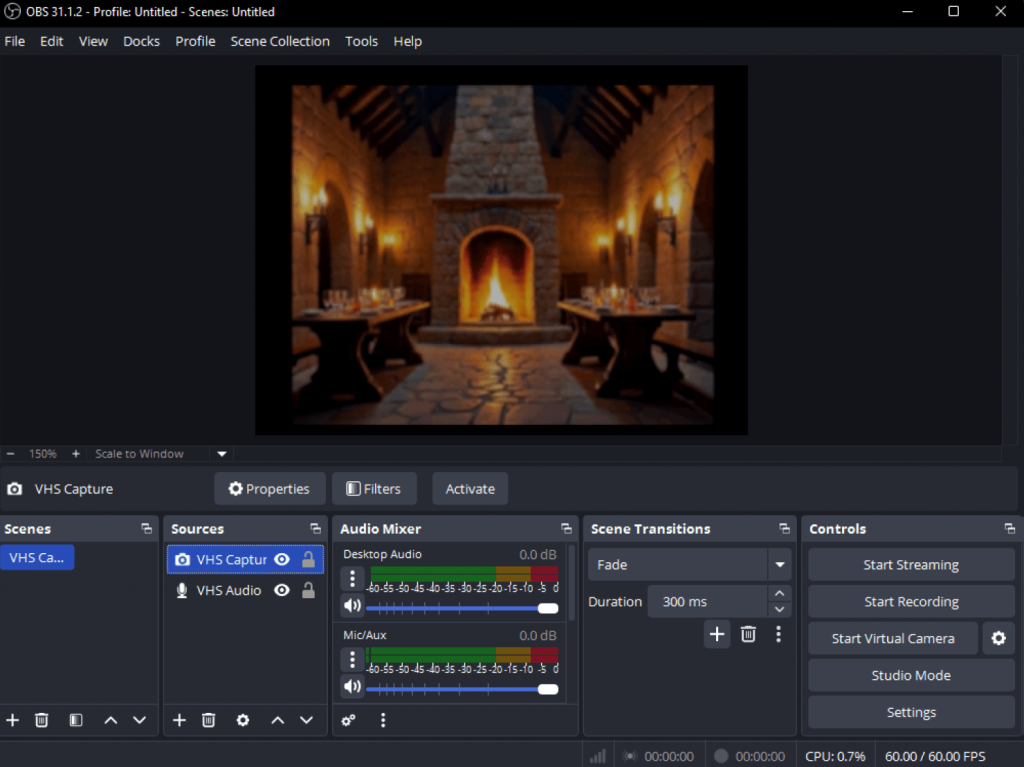
1. OBS Studio
OBS Studio is a free, open-source tool mainly used for live streaming and screen recording, but it also supports VHS capture. It’s highly customizable, allowing to adjust settings for bitrate, resolution and select output format before or during recording.
- Pros: Completely free, powerful capture options, active community.
- Cons: Steep learning curve, limited editing functions.
- Best for: Tech enthusiasts who want to customize their video capture experience.
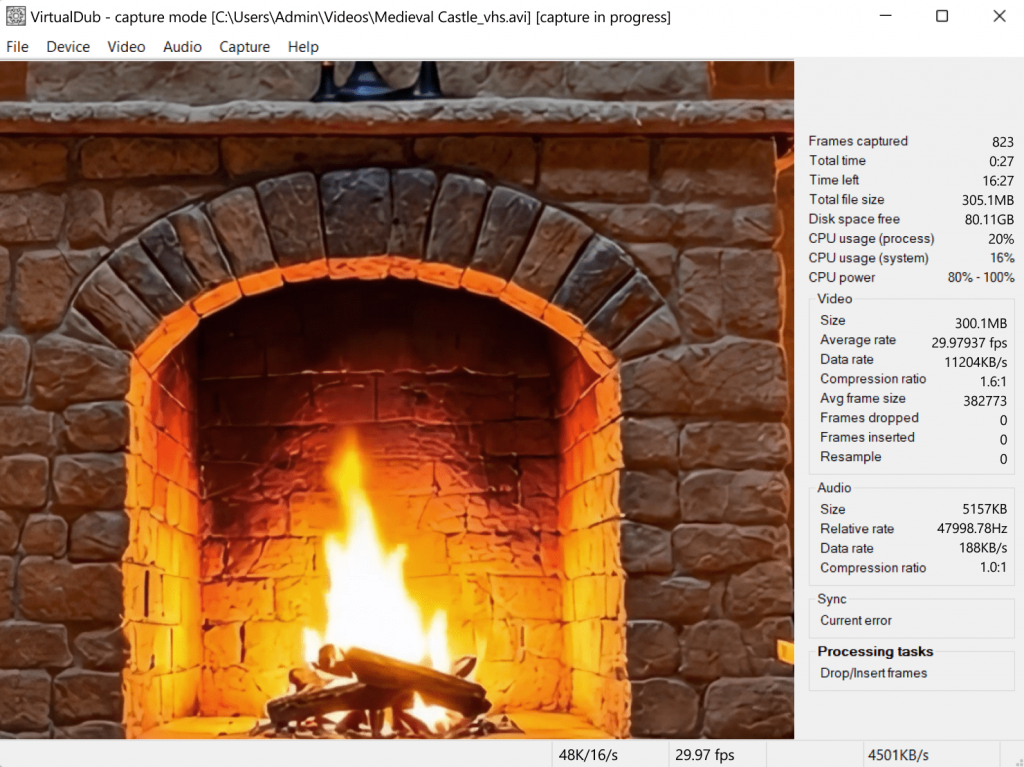
2. VirtualDub
VirtualDub, a classic, lightweight capture utility, is designed for linear video processing and capture. It’s excellent for applying filters and compressing video files without a complicated interface.
- Pros: Free, fast, reliable for simple captures.
- Cons: No longer updated, outdated design, limited modern format support.
- Best for: Users comfortable with older software who only need straightforward VHS transfers.
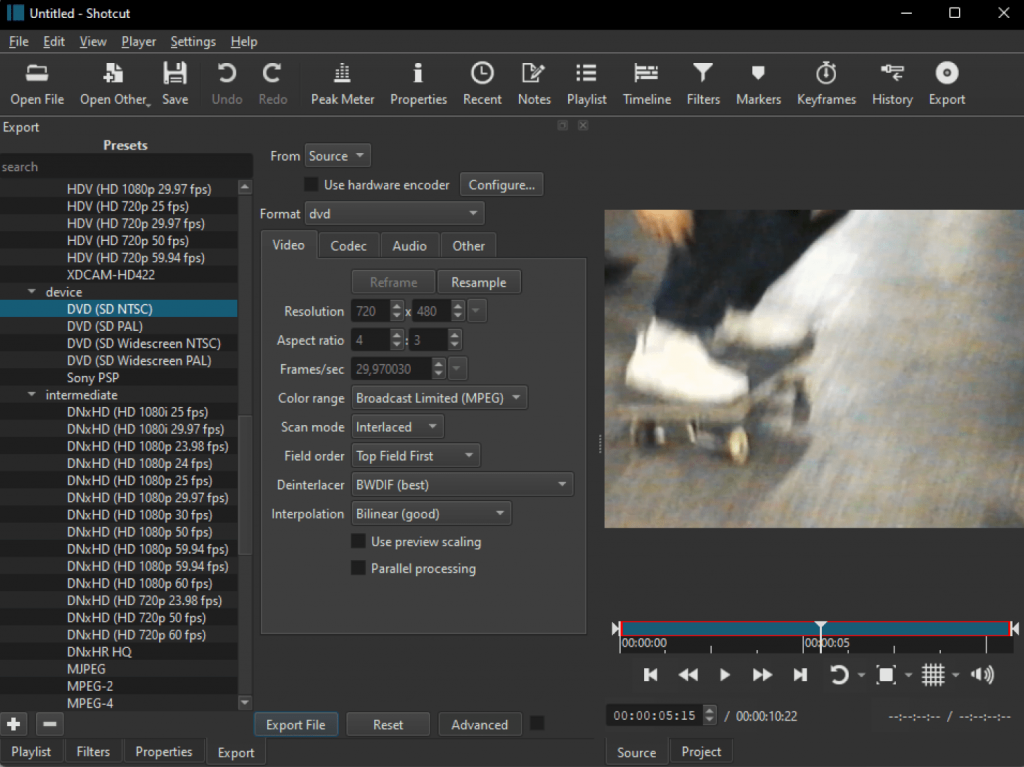
3. Shotcut
Shotcut is a full-featured, open-source video editor that supports a wide array of formats. It includes video capture functionality and a comprehensive set of polishing tools.
- Pros: Rich editing features, supports many formats, no watermark.
- Cons: Learning curve for complete beginners. The capture process is less guided than in dedicated VHS conversion software.
- Best for: Users who want a balance of free VHS capture and robust editing capabilities.
Best Paid VHS to DVD Converter Software
Paid software typically offers a more streamlined, beginner-friendly experience with dedicated support and advanced features.
1. AVS Video Editor
AVS Video Editor is an all-in-one video editor that simplifies digital transfer of home video tapes. It lets you connect your VHS player via a capture device, record video directly, edit footage, and export to DVD or MP4 or other formats.
- Pros: Intuitive capture wizard; comprehensive editing toolkit; direct export to DVD and MP4; ability to create DVD menus.
- Cons: Requires a license (affordable compared to premium alternatives).
- Best for: Beginners and families who want reliable results without profound technical skills.

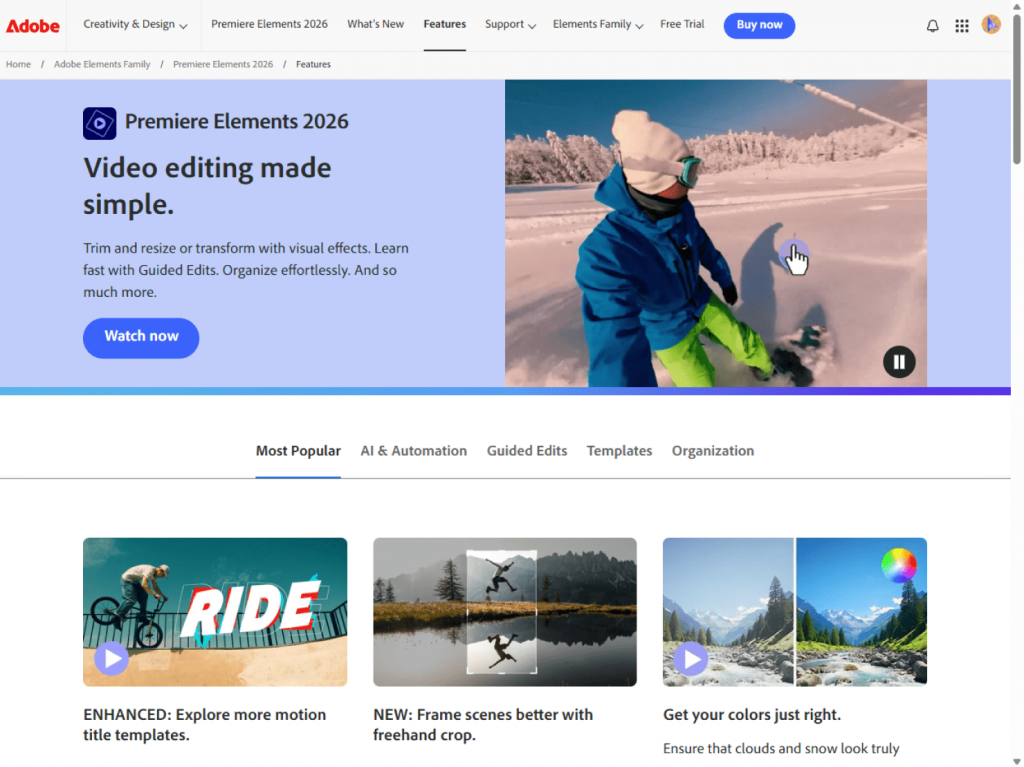
2. Adobe Premiere Elements
Adobe Premiere Elements is a simplified version of Premiere Pro, designed for home users. It doesn’t directly capture VHS but works well if you’ve already digitized footage with a capture device. It offers step-by-step editing instructions, automatic tools, and sophisticated effects.
- Pros: Intuitive interface, advanced yet accessible editing features.
- Cons: Expensive compared to simpler options, requires separate capture software/hardware.
- Best for: Users who need professionally restore and enhance old VHS footage.
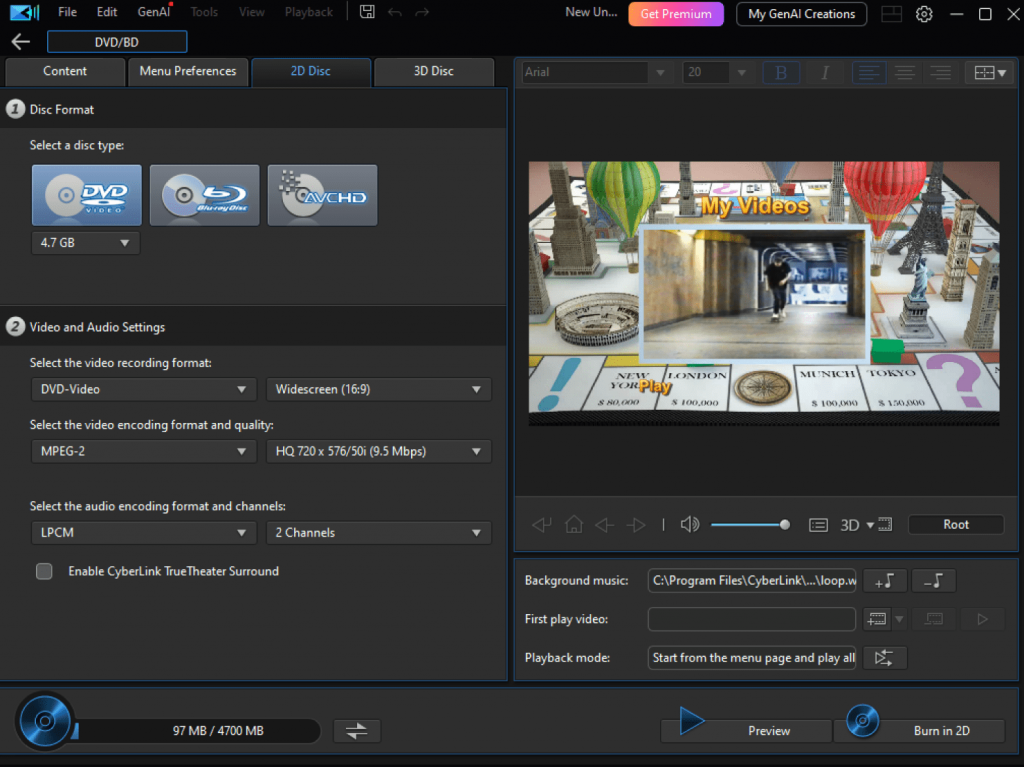
3. CyberLink PowerDirector
CyberLink PowerDirector is a powerful consumer-level editor with advanced effects, templates, and fast rendering. It works with video capture devices for VHS digitization and offers excellent timeline editing tools.
- Pros: Feature-rich, fast processing, user-friendly.
- Cons: Pricier than AVS4YOU, requires decent hardware.
- Best for: Users who want creative capabilities and high-quality output.
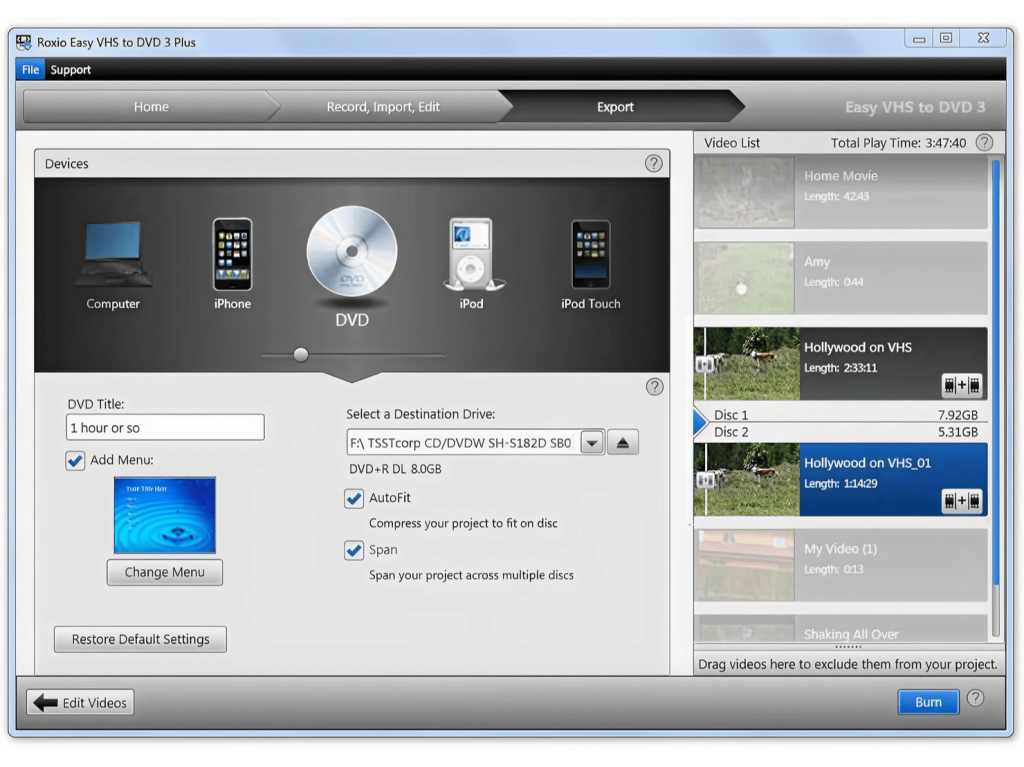
4. Roxio Easy VHS to DVD
Roxio provides a complete package comprising capture hardware plus software. It is one of the easiest ways to convert VHS to DVD. The workflow is streamlined: just plug in, capture, and burn to DVD.
- Pros: Hardware included, very beginner-friendly.
- Cons: Limited editing options, Windows-only.
- Best for: Users looking for a plug-and-play VHS-to-DVD kit.
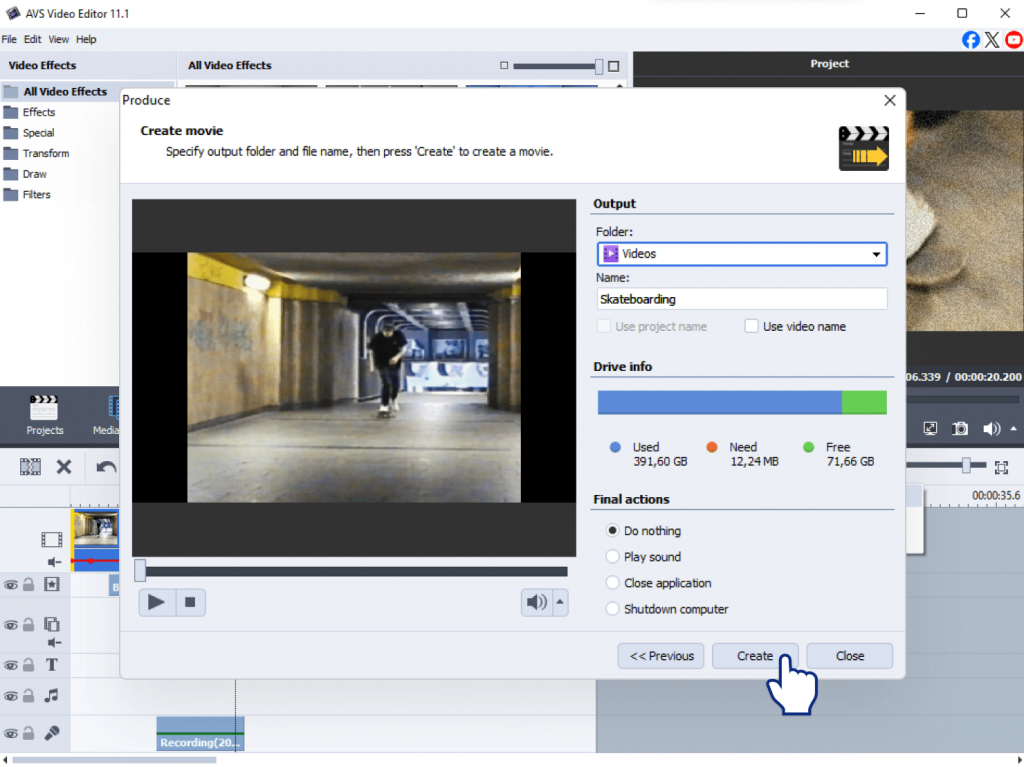
How to convert VHS to DVD with AVS Video Editor
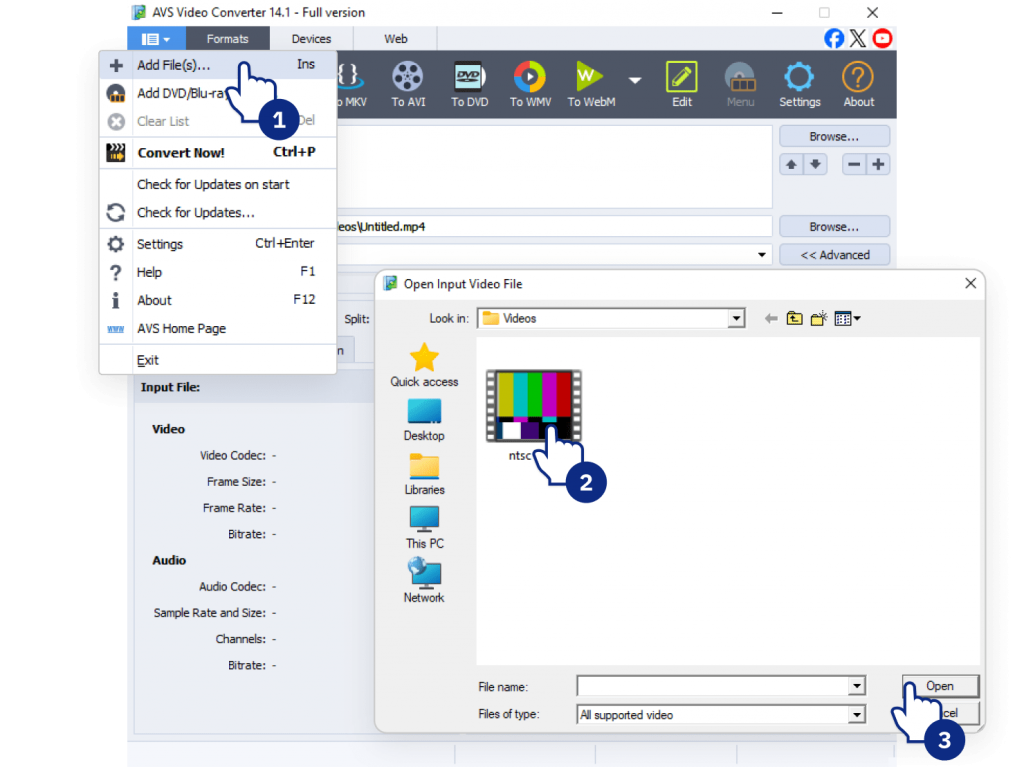
Follow this step-by-step guide to learn how to transfer VHS tapes to DVD using AVS Video Editor:
1. Connect VHS player to your computer using a capture device (USB video capture card).
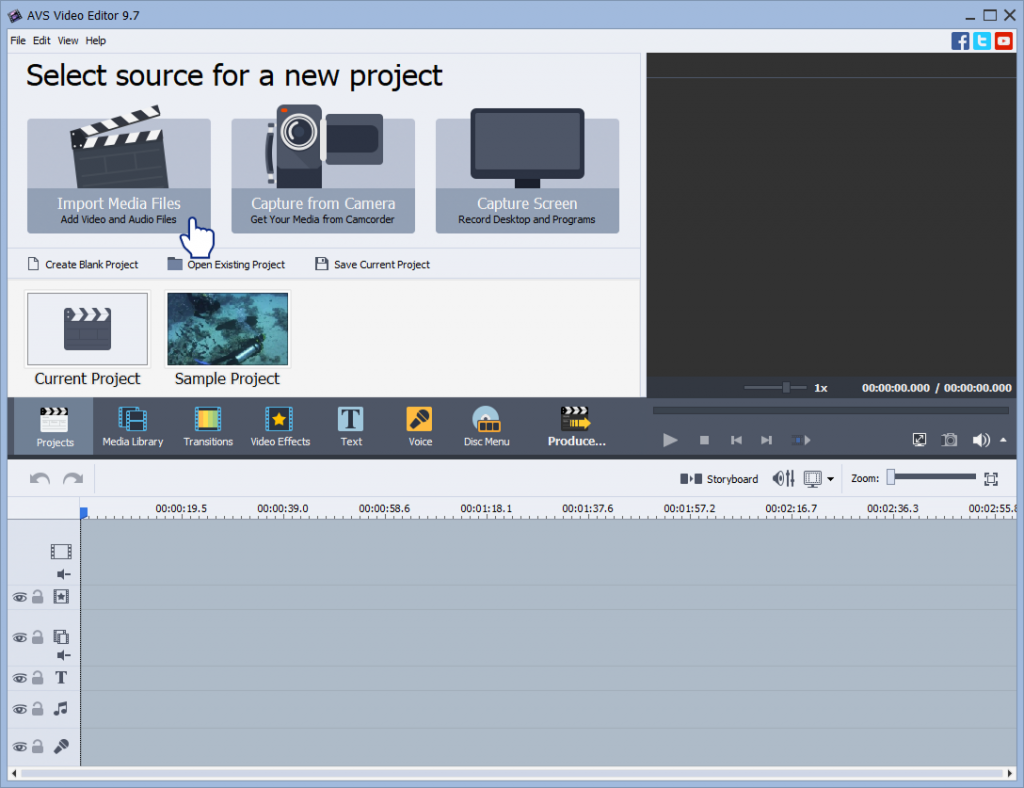
2. Open AVS Video Editor and select “Capture Video.”
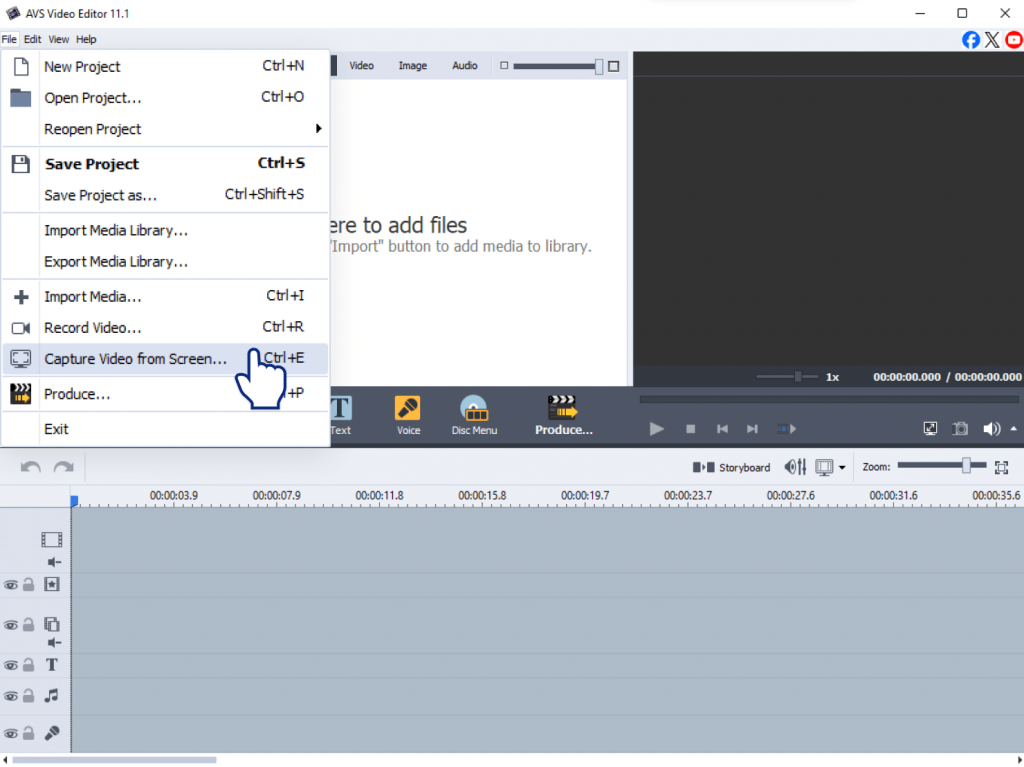
3. Choose your input source (the connected VHS player) and press “Start Capture.”
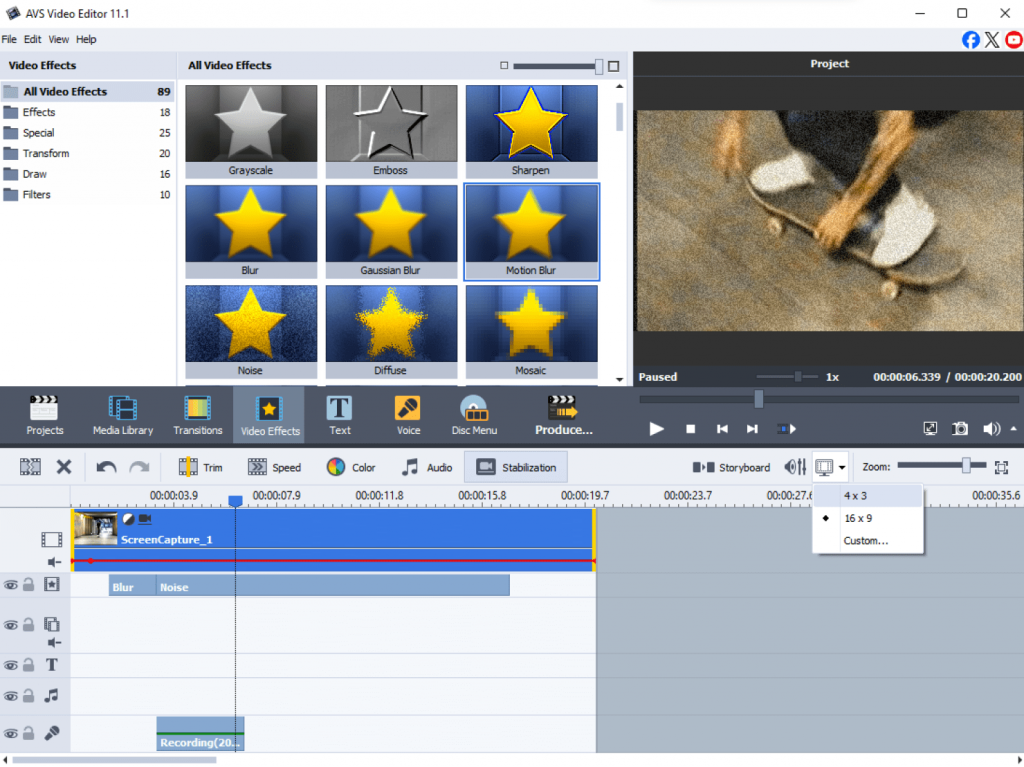
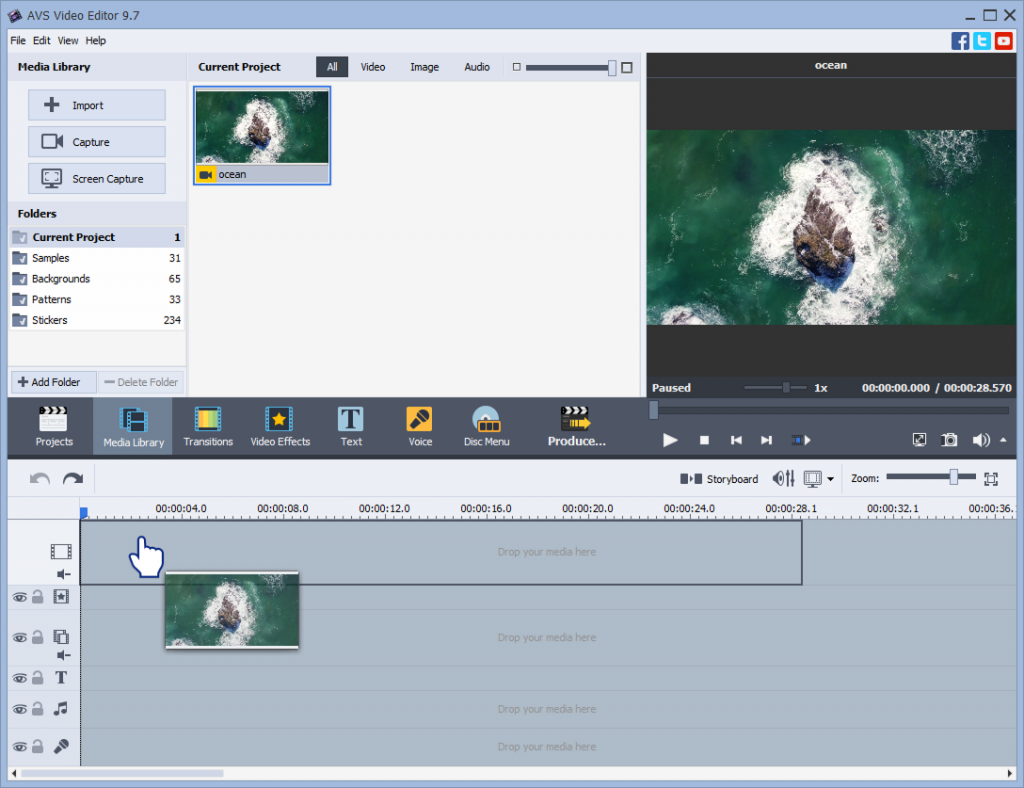
4. Preview and edit your footage – trim unwanted parts, adjust colors, stabilize shaky frames.
5. Export your video by selecting “Create DVD” or “Save to MP4/AVI.”
6. Burn to DVD directly within AVS Video Editor.
As you can see, it is really easy as 1,2,3 to preserve your old video tapes.
Tips for the best results
Digitizing your VHS tapes is a straightforward process, and a little preparation will do no harm. To ensure you capture your memories flawlessly and create digital files that will last, we recommend following these best practices:
- Clean your VHS tapes with a rewinder/cleaner before capturing.
- Use a high-quality capture device to avoid freezing or skipping.
- Choose the right format: MP4 for sharing online, or DVD for a physical disc to play in a DVD player.
- Always test with a short clip to fine-tune quality settings.
- Store backups on both physical drives and cloud storage.
Free vs Paid: Which should you choose?
Once you’re prepared, the next step is selecting the right software. Here’s a simple breakdown of your options to help you decide:
Free Tools (e.g., OBS Studio, Shotcut) are great for budget-conscious users who don’t mind technical setups. They work well for basic tasks but often lack advanced features and dedicated support.
Paid Tools save time with easier workflows, stable performance, and customer assistance. This category includes two types:
- User-Friendly & dedicated: programs such as AVS Video Editor, Roxio Easy VHS to DVD, or CyberLink PowerDirector with step-by-step wizards that simplify capturing VHS cassettes.
- Advanced editing: for those who want more powerful features and extra fine-tuning capabilities. For example, Adobe Premiere Elements offers professional-level tools.
For most families, the convenience and reliability of a paid tool justify the investment.
Final thoughts: Preserve your VHS memories today
Over time VHS tapes deteriorate losing their quality and color, they are no longer supported by players. Digitizing VHS ensures that your family history is protected, shareable, and easy to enjoy on today’s devices.Conversion is the key that unlocks the content, allowing you to remix and share it with everyone. No matter what program you pick for converting VHS to DVD, the most important step is to start.
Give a second life to your old tapes with AVS Video Editor, a reliable and beginner-friendly video editor. It offers an intuitive way to capture, trim, and save your videos. You can even burn polished DVDs with menusand present them as a valuable gift to your family members.
Ready to begin? Download AVS Video Editor today and turn fragile VHS tapes into timeless treasures you can enjoy for a long time.
Useful links
Introduction
When working with sound, terms like audio joiner, audio merger, and audio combiner often come up. At first glance, they may seem interchangeable, but in audio editing each has a unique purpose. Understanding the differences can save time and help you achieve the best results for your project.
Choosing the right method depends on the task at hand. Joining audio parts into one file, merging multiple tracks, or creating a seamless playlist all require different techniques. The wrong approach can lead to messy audio that’s harder to edit later.
In this post, we’ll explain what each process involves, explore their pros and cons, and highlight the best situations to use them.
What Is audio joining?
Definition
Audio joining refers to combining multiple audio files one after another into a single track. Instead of blending sounds, you are simply creating a continuous file.
Example
It is similar to a playlist where Song A is followed by Song B, and then Song C, all saved as one file.
Pros
- Keeps audio segments intact without altering sound quality.
- Easy to perform, even for beginners.
- Creates seamless playback for multiple files.
Cons
- No blending between tracks (sudden transitions).
- Limited flexibility for editing later.
Best use cases
- Audiobooks where chapters are joined into one file.
- Podcasts with different segments combined together.
- Music mixes where songs are simply put one after another.
What Is Audio Merging?
Definition
Audio merging means layering multiple tracks so that their sounds blend together. Unlike joining, where one file starts only after the other ends, merging allows them to play at the same time.
Example
It’s like mixing a voice recording with background music, so both are heard simultaneously.
Pros
- Creates rich, layered sound.
- Perfect for music production and podcasts.
- Useful for adding effects and soundtracks.
Cons
- Harder to separate tracks once merged.
- Requires advanced editing skills.
Best use cases
- Mixing music and voice together
- Combining instruments in a music track.
- Creating overlaid audio effects for videos.
What Is Audio Combining?
Definition
Audio combining lets you put several audio files into one project without changing them, keeping each on its own track. This is the basis of multi-track editing. Unlike merging, files remain separate within the combined file.
Example
Imagine placing multiple interviews in one timeline but preserving each as a standalone segment.
Pros
- Provides full editing flexibility.
- Keeps multiple tracks well-organized.
- Allows easy rearranging and adjustments later.
Cons
- Can result in larger project files
- Requires an audio editor to manage effectively.
Best use cases
- Long podcasts with guest speakers.
- Video editing projects with multiple audio sources.
- Music production, mixing, and mastering.
- Any complex project that needs control over individual elements.
Comparison Table: Join vs. Merge vs. Combine Audio
| Feature | Joining | Merging | Combining |
| Output format | One continuous file | Single audio file | One project with separate tracks |
| File size | Smaller | Medium (depends on effects) | Larger (multiple editable tracks) |
| Editing flexibility | Low | Low after merging | High |
| Sound blending | No | Yes | No (files stay separate) |
| Common scenarios | Audiobooks, playlists | Music mixes, podcasts with music | Multi-track editing, video projects |
Choosing the right method for your project
The choice between using an audio joiner, an audio merger, or an audio combiner depends on your project:
- Join audio files to play them one after another without overlap.
- Merge audio to blend multiple tracks into one.
- Combine audio files to keep them separate for further editing.
As you can see, all these three audio editing tools are handy and compliment one another. No wonder that modern audio editors come fully packed with all essential features, allowing users to merge, join, and combine audio files with ease. It doesn’t matter whether you choose a freeware tool like Audacity, a more professional solution like Ocenaudio or Adobe Audition, or an online service such as Clideo or Kapwing—most audio editing apps support all three functions. However, factors like budget, data security, ease of use, and your preferred platform should also be considered when choosing the best solution.
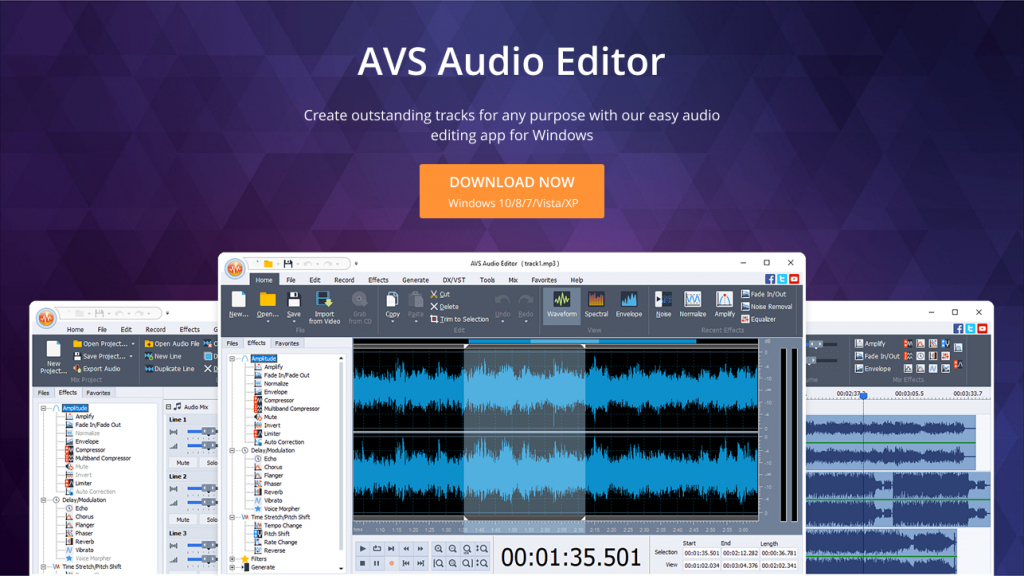
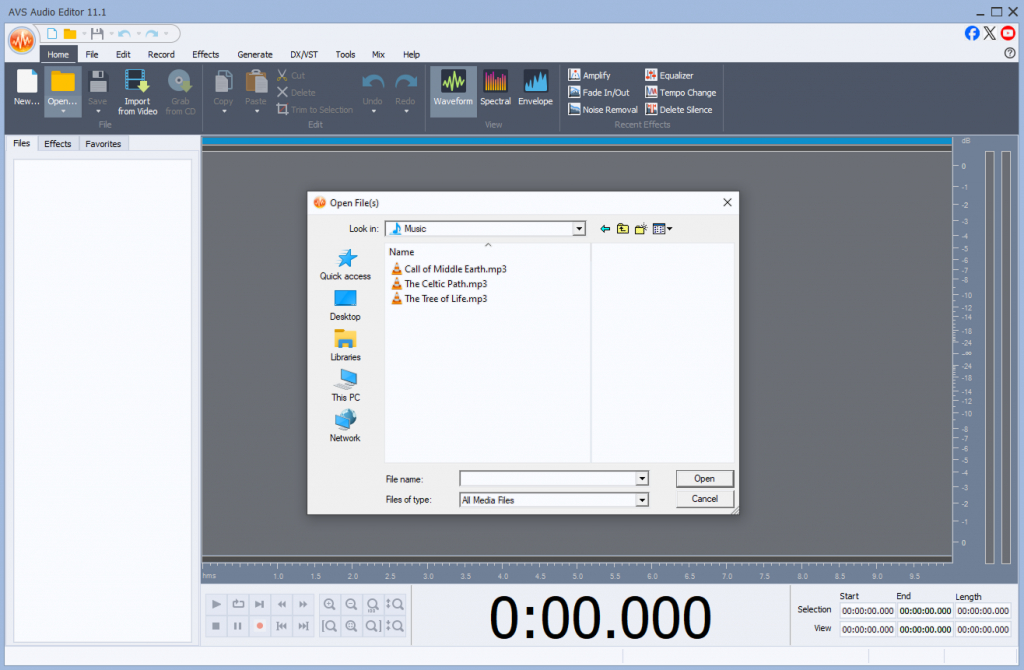
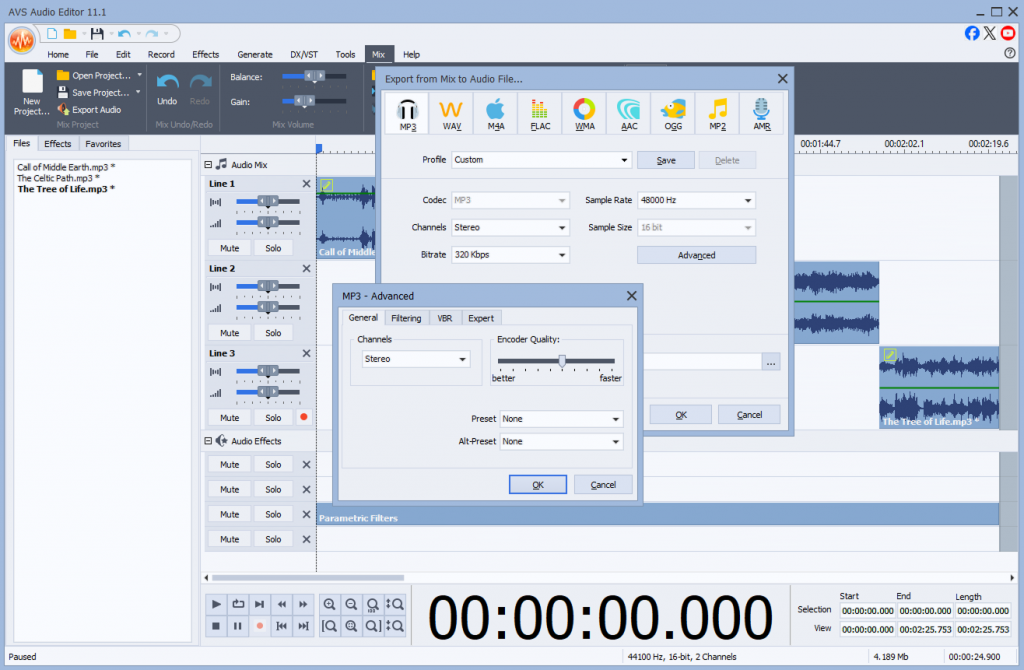
AVS Audio Editor – the best audio joiner, merger and combiner for Windows
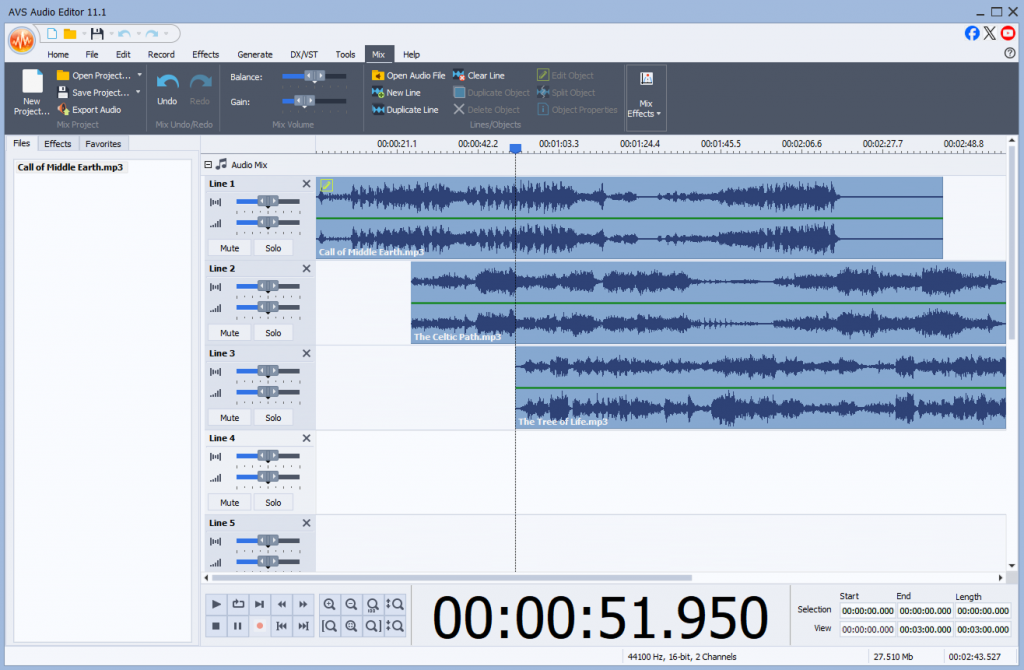
AVS Audio Editor is a powerful audio editing software for Windows, allowing uses to cut, join, merge and combine audio files with ease, even for beginners. To perform all three functions, it is necessary to create a new project in the program. For joining audio, just arrange one track after another on the timeline, and save the output audio in the desired format. You can find useful information which audio format suits best for different tasks here. To merge files together, overlap tracks in a your project so that they play at the same time.

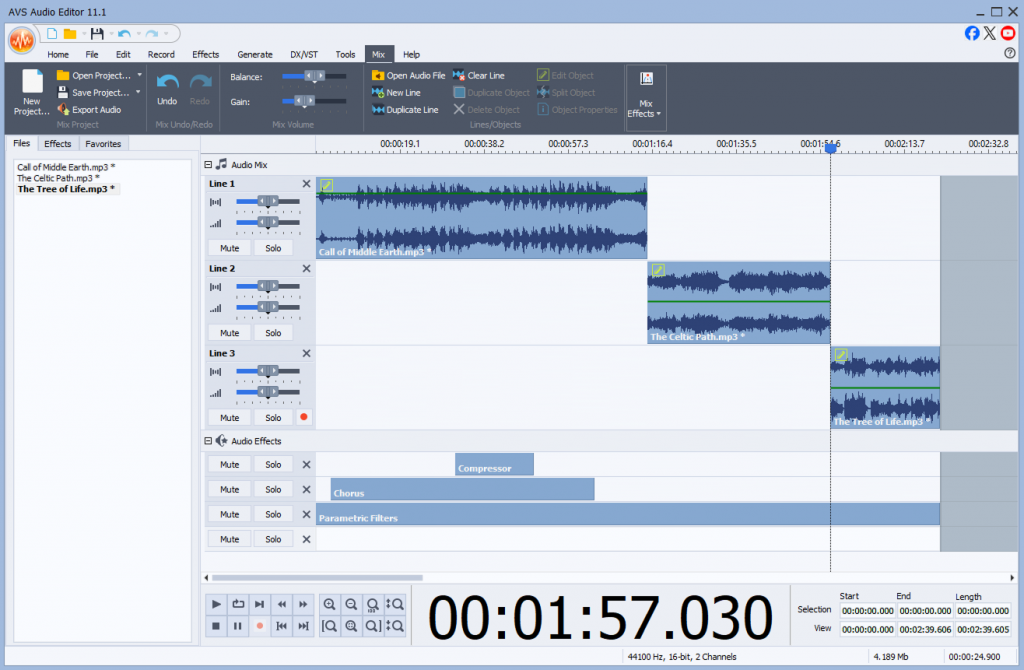
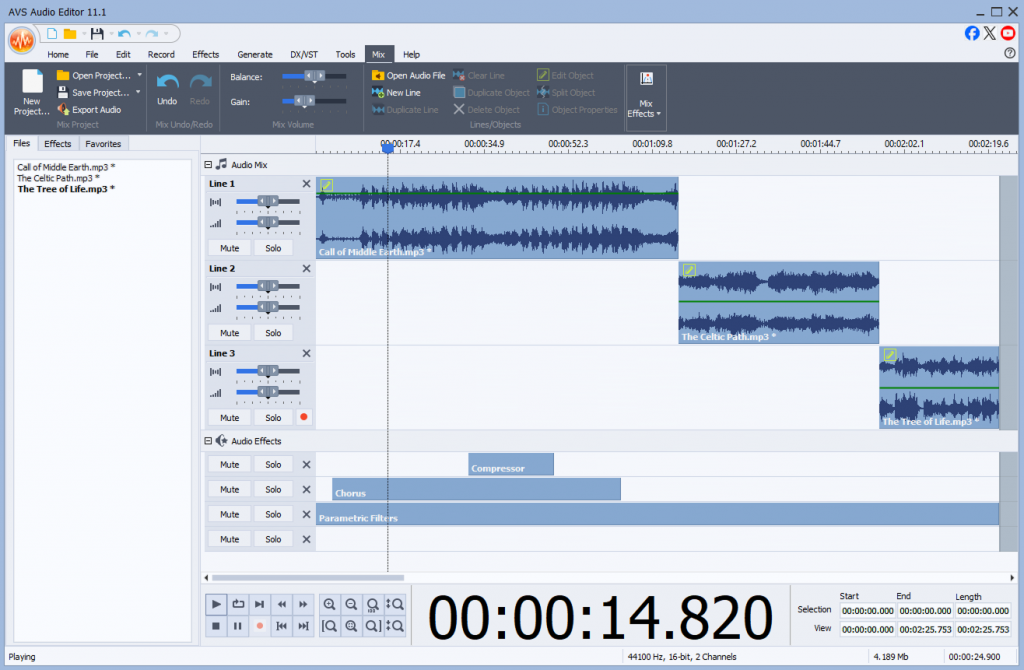
Combining and joining audio feel like the same process in AVS Audio Editor with the only difference. While joining, you put tracks one after another in a project and export it as one file. When combining audio, you collect tracks in one project and they stay separate until you decide whether to join or merge.
Along with joining, merging, and combining, the software covers everything from basic cutting and trimming to advanced tools within an intuitive interface. You can record audio, enhance the quality of your audio recordings, remove noise and apply special effects to make your sound crystal clear without a steep learning curve.
Ready to try it out? Read our step-by-step guide: The Best Way to Join, Merge & Combine Audio (Pros & Cons).
Download AVS Audio Editor today and experience how easy it is to edit audio files for any project, from the simplest to the most complex!
Useful Links
Introduction
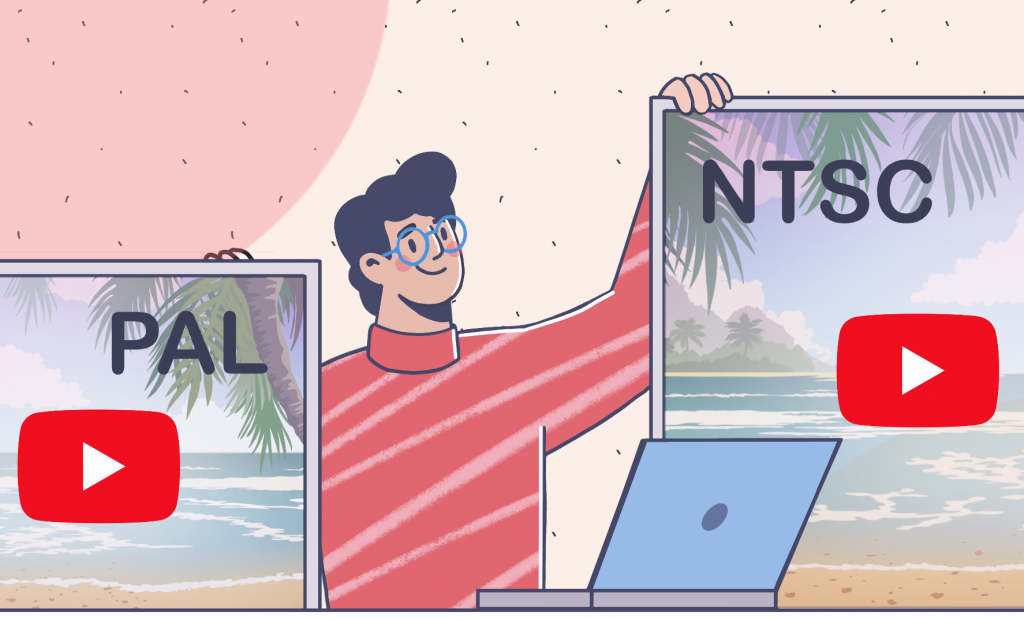
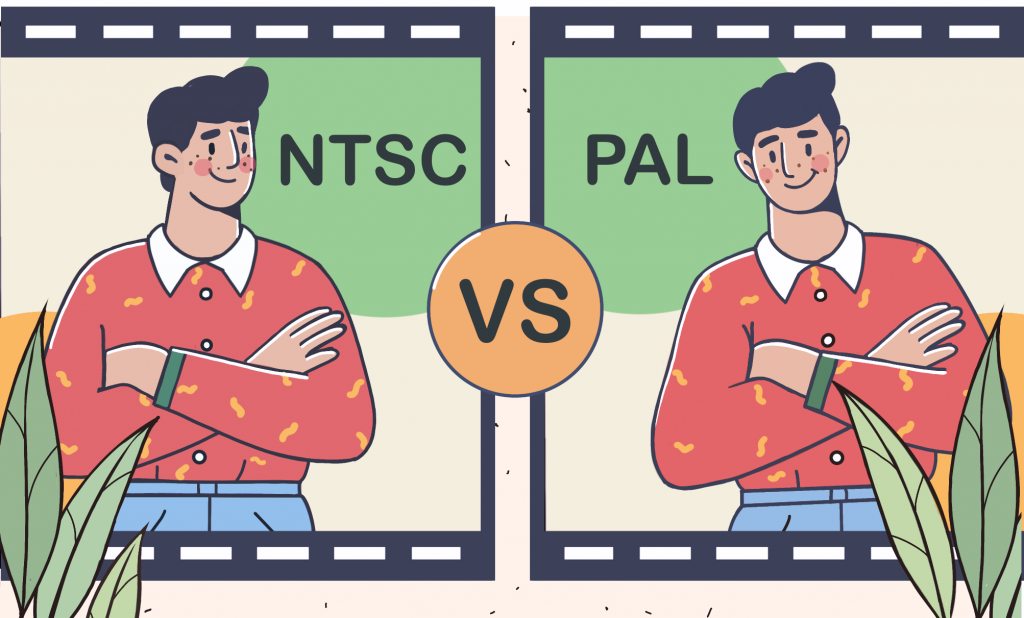
If you’re editing video for an international audience, converting old home movies, or simply trying to figure out the best export settings, you’ve likely come across the terms NTSC and PAL.
Originally designed as analog television broadcast standards, their legacy still shapes today’s digital video, affecting frame rates, compatibility, and playback quality on different platforms. In this post, we’ll analyze the key differences between NTSC and PAL and explain which one you should use for YouTube, DVDs, and streaming services today.
NTSC vs PAL: From TV standards to YouTube and DVDs
Before diving into today’s platforms’ specifications, let’s quickly review what sets NTSC and PAL apart.
NTSC (National Television System Committee)
Frame rate: 29.97 fps (often rounded to 30 fps)
Resolution: 720 × 480 (DVD standard)
Used mainly in North America, Japan, South Korea
PAL (Phase Alternating Line)
Frame rate: 25 fps
Resolution: 720 × 576 (DVD standard)
Common in Europe, Australia, and parts of Asia
Being aware of these frame rate distinctions lets you tackle NTSC/PAL issues on YouTube and DVD formats with confidence.
NTSC and PAL for YouTube
YouTube is flexible when it comes to video standards, supporting multiple frame rates and resolutions. Itsservers automatically process uploaded videos into various streaming formats. Here, the question is not about which standard suits best, as both are acceptable, but what the best frame rate is for uploading YouTube content.
- Supported frame rates: 24, 25, 30, 48, 50, 60 fps
- For cinematic content: 24fps (or 23.976fps) is the industry standard and a safe choice.
- For standard video: 30fps (or 29.97) is common and provides a slightly smoother look than 24fps.
- For high-motion content (sports, gaming): 60fps is the best format for YouTube as it delivers incredibly seamless motion.
- If your source is 25fps (PAL): you can absolutely upload it to YouTube without additional manipulations. However, it is better to save it at 25 or 30fps if this video is blended with 30fps footage.
Key points:
- Keep the native frame rate of your footage, it was shot in. If the video is intended to be viewed globally, 30fps or 24fps are universally excellent options.
- Mixing PAL and NTSC clips in one project can cause shaky playback or mismatched timing.
- By converting footage to YouTube’s recommended formats, you can avoid problems when watching the video.
- With AVS Video Converter, you can quickly adjust frame rates and resolutions before uploading.
In short, if you’re exporting NTSC PAL YouTube videos or fresh 60 fps content, what matters most is to keep the same settings throughout the entire video project..
NTSC and PAL for DVDs
Unlike YouTube, DVDs are region-sensitive and closely tied to NTSC and PAL standards. The format you choose determines where your DVD can be played.
- PAL vs NTSC DVD considerations:
NTSC DVDs are standard in Region 1 (US, Canada).
PAL DVDs dominate Region 2 (Europe, Middle East) and Region 4 (Australia, New Zealand).
A PAL DVD may not play properly on an NTSC-only player, and vice versa.
If you’re authoring DVDs for global distribution, always consider:
- Target audience location
- Player compatibility
- Need for PAL/NTSC conversion
Most modern DVD players and game consoles are “multi-standard” and can play both formats, but many older players cannot. If you are creating a DVD for distribution, you must encode it in the standard of your target region to ensure maximum compatibility.
NTSC and PAL for streaming platforms
Streaming services (Netflix, Amazon Prime, etc.) handle frame rate conversions automatically. Still, the difference between NTSC and PAL matters in specific scenarios:
- Archival content: Old PAL or NTSC tapes must be digitized before uploading.
- Live streaming: Encoders work better with steady frame rates.
- Quality retention: Unnecessary frame rate changes (e.g., 25 fps → 30 fps) can cause motion distortions.
For NTSC PAL streaming, use the original format during upload. Most platforms re-encode video but keeping the native standard helps minimize quality loss.
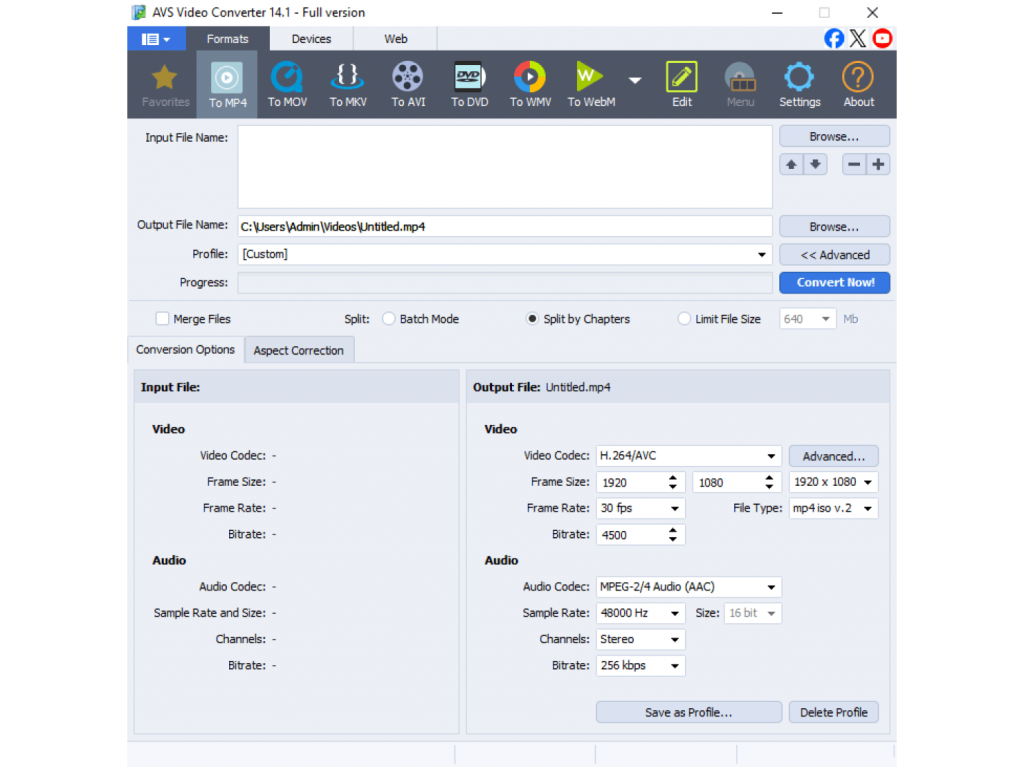
How to convert NTSC and PAL in AVS Video Converter
If you’re working across different platforms, you have to switch between PAL and NTSC. With AVS Video Converter, the process is simple:
1. Import your video into AVS Video Converter.
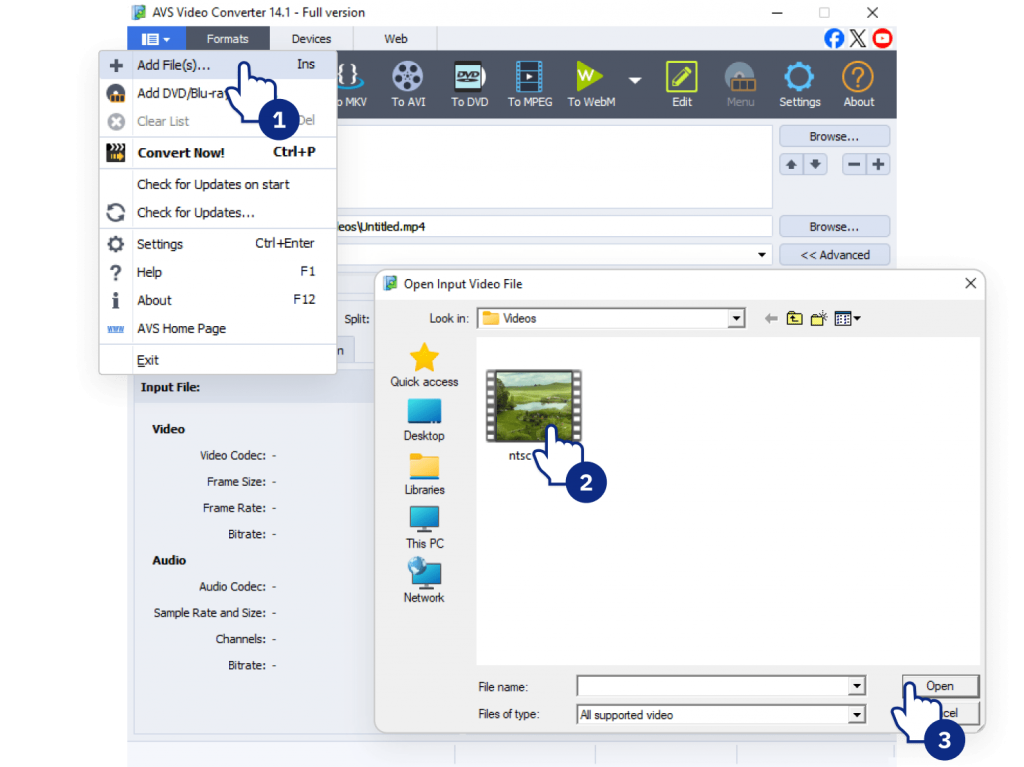
2. Choose the output format (e.g., MP4 for YouTube, MPEG-2 for DVDs).
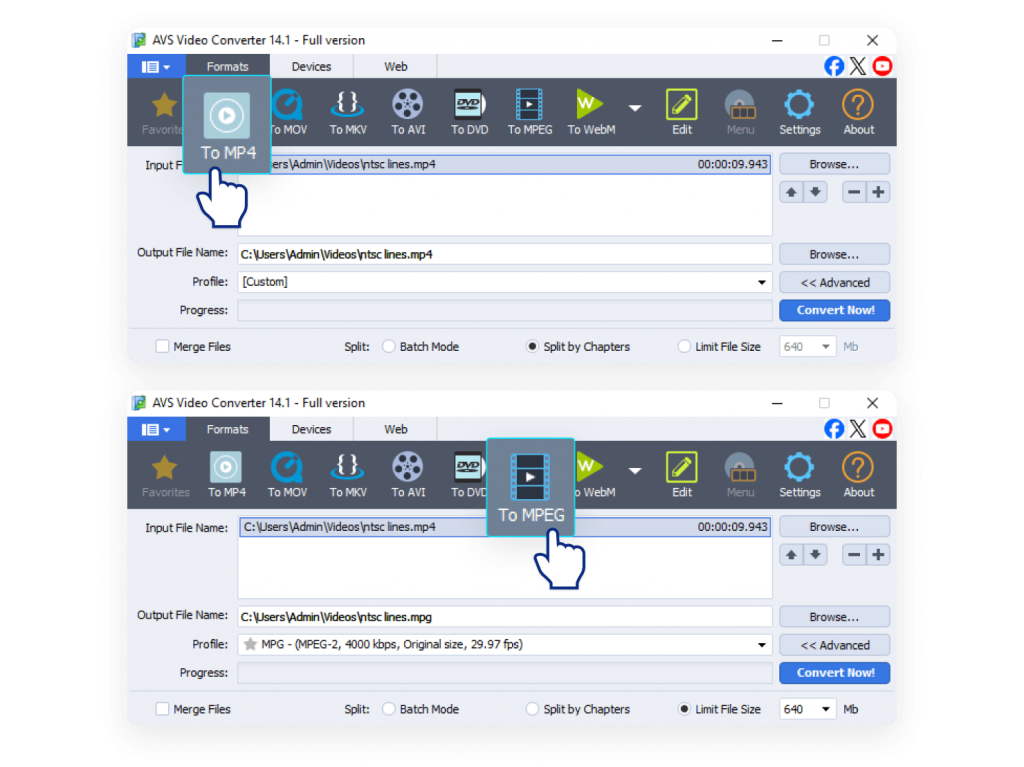
3. Adjust frame rate
YouTube: Match native fps: 30/60 for NTSC, 25/50 for PAL.
DVD: Select NTSC (29.97 fps, 720×480) or PAL (25 fps, 720×576).
Streaming: Select original fps for best results.
4. Export and save your optimized file.
Pro tip: Changing frame rates can make videos look a bit less natural, but AVS Video Converter uses filters to maintain best quality possible.
Other reliable video converters that support PAL↔NTSC conversion include HandBrake (free, open-source), Wondershare UniConverter, Any Video Converter, and Movavi Video Converter. These tools offer flexible settings and wide format support, but for Windows users, AVS Video Converter remains the best option.
Recommendations and Best Practices
- For YouTube
Maintain the frame rate your footage was shot in. Convert only if combining NTSC and PAL sources.
- For DVDs
Always match your target playback region: NTSC for North America, PAL for Europe.
- For Streaming
Upload at the native frame rate to minimize re-encoding issues.
- For legacy footage
If you’re digitizing old tapes, capture them in their native standard first. You can always convert the digital file later for a specific project. Use conversion tools to update content for modern platforms.
Adopting these guidelines will help you sidestep compatibility issues and preserve your videos’ professional quality.
Wrapping up, which is better, NTSC or PAL?
Despite being analog relics, NTSC and PAL still influence frame rates and regional DVD compatibility.For YouTube and streaming, frame rate choice is more about creative intent than broadcast standards. For DVDs, the standard is still crucial for hardware compatibility.
- YouTube: Both work, but keep your native footage’s frame rate.
- DVDs: Match the format to your audience’s region.
- Streaming platforms: handle both, but preserving the original format provides smoother playback.
The key is to understand where your video comes from, how it was recorded, and where/ on what platform you plan to share it. Converting PAL to NTSC for a DVD or optimizing your frame rate for YouTube is easy when you have the right tool.
Download AVS Video Converter to convert and optimize your videos for any platform.
Try AVS Video Editor for editing and creating polished, professional-looking video projects.
Useful links
Introduction
There’s nothing more disappointing than capturing a perfect moment on video, only to discover it’s playing sideways or upside down. This is a frequent headache for creators recording video on a phone, an action cam, or a webcam. Before you consider that moment lost, know that the solution is easier than you think. Modern tools make it simple to rotate your video, restoring it to a professional, shareable format, ensuring smooth playback on any screen.
In this article, we’ll explore the root causes of flipped footage, provide step-by-step fixes for every skill level, and share key prevention strategies to keep your future videos right-side up.
Why is my video upside down? Common causes
First of all, let’s explore why this happens. When video files appear flipped, the problem is usually dogged by how the recording device captured the footage or how the playback software reads it. Here are some typical reasons why filmed video ends up upside down:
- Orientation metadata issues
Most smartphones and cameras save an orientation tag that tells media players how to display the video. If a player or platform ignores this tag, the clip may appear rotated or completely flipped. - Enabled rotation lock
To avoid upside-down videos on your phone, always disable rotation lock before you hit record. When this setting is active, it locks the camera’s orientation, which can cause your footage to play back upside down. - Unusual camera mounts
Action cams strapped to helmets, bikes, drones, or even mounted on tripods at unusual angles may record footage in the wrong orientation depending on the position of the lens. - Software or OS bugs
Occasionally, glitches in the camera app, or even the operating system can lead to incorrect orientation data being saved with the video file. - Import or editing software issues
Sometimes, there are no problems with the video itself, but a video editor, converter, or player misreads the orientation settings, causing the clip to look flipped. - Cross-platform playback differences
A video that looks correct on your phone may be displayed upside down on a computer or when uploaded to certain platforms, due to differences in how devices read orientation tags.
Understanding the cause makes it easier to choose the right fix: either rotate the video in an editor, adjust device settings, or convert the file for correct playback.
How to fix upside-down videos
1. Temporary fixes in video players
If you just need to watch your video in the correct orientation without making permanent changes, several media players offer quick rotation tools:
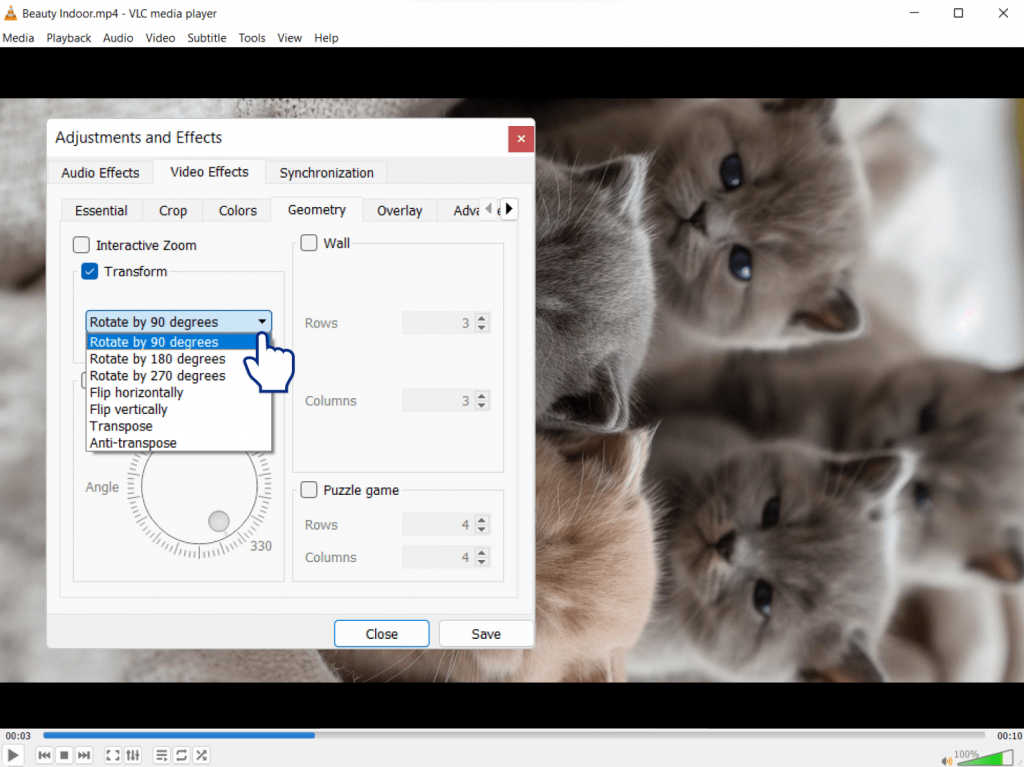
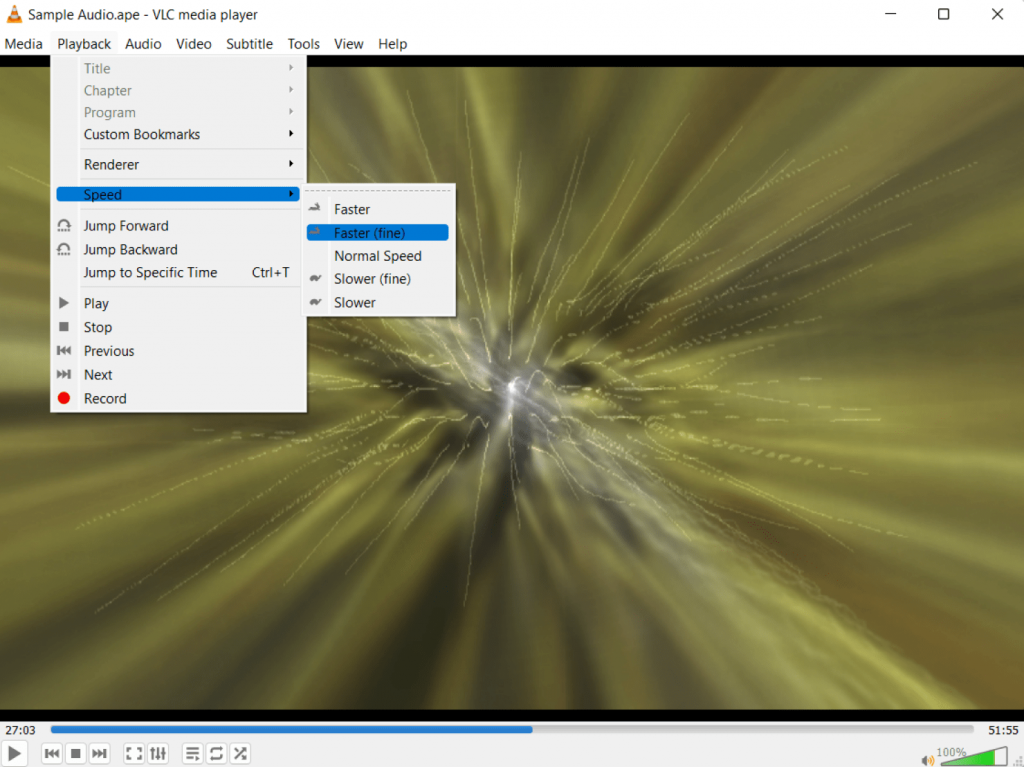
- VLC Media Player (Windows/Mac/Linux) – A versatile, free player that lets you rotate or flip during playback using the “Rotate” or “Transform” features. The video displays correctly as you watch, but the file remains unmodified.
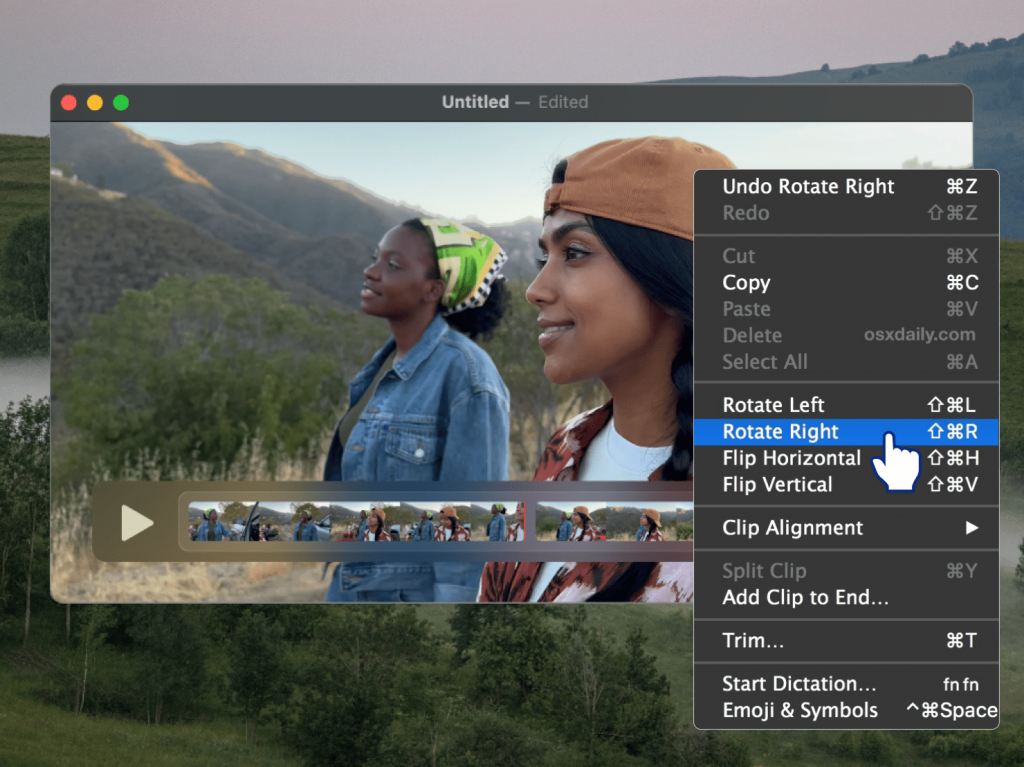
- QuickTime (Mac) – Apple’s built-in player includes simple rotation controls so you can adjust orientation while the video plays.
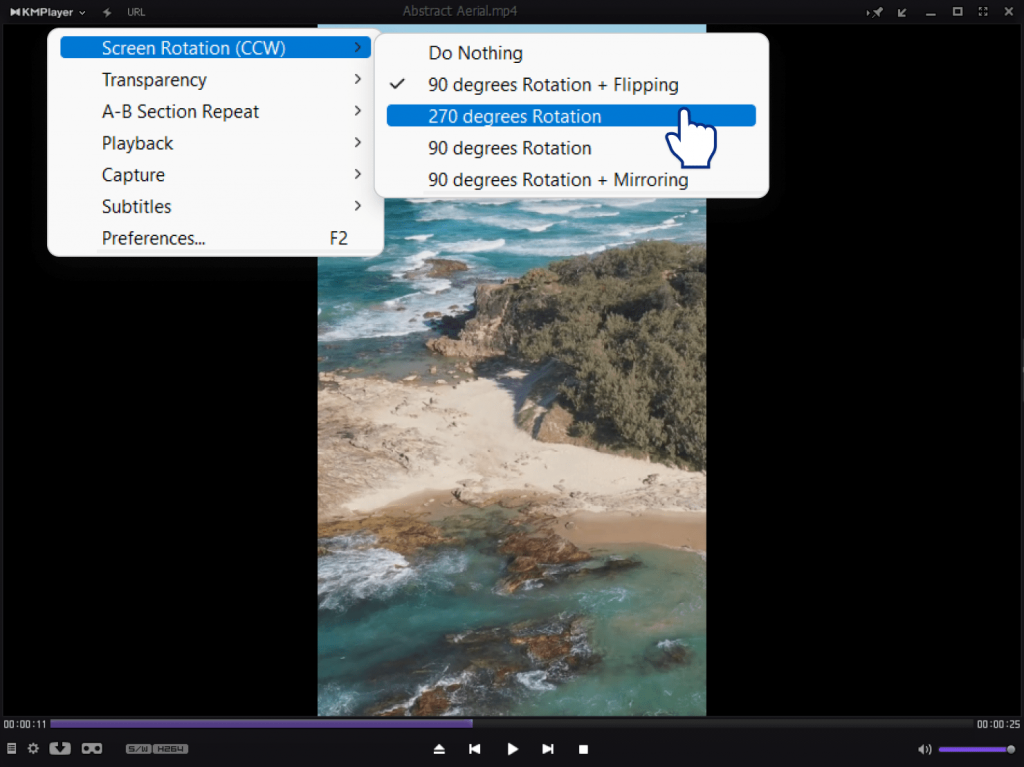
- KMPlayer or PotPlayer (Windows) – Popular alternatives that provide on-the-fly rotation and flipping options during playback.
These fixes are convenient, but temporary. The orientation resets once you close the file. To make the change fixed, you’ll need metadata adjustment tools or video editing software.
2. Permanent fixes with video editing software
The most reliable method for permanently saving your video in the right orientation is to use a dedicated video editor. We recommend these options based on your operating system and skill level:
- AVS Video Editor (Windows) is the ideal choice. It’s designed for beginners, making rotating or flipping clips a quick and straightforward process with virtually no learning curve.
- iMovie (Mac): The fastest and most accessible option for Apple users. This pre-installed app provides an intuitive way to correct orientation for casual projects and instant corrections.
- Adobe Premiere Pro (Windows/Mac): A professional-grade editor for sophisticated projects that require precise adjustments and a comprehensive editing toolkit beyond just rotation.
Explore our step-by-step guides to learn how to use each of these tools to correct your video’s orientation perfectly, without any loss in quality.
3. Online video rotators
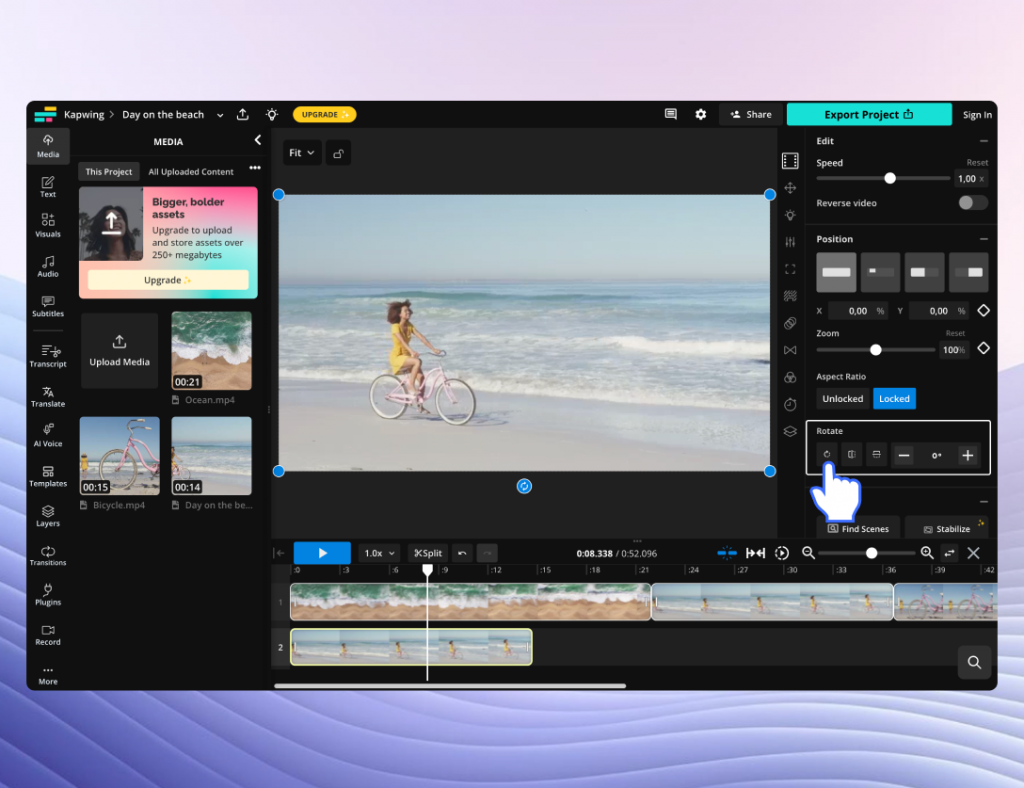
Online video editors, for example Kapwing, Clideo, and Clipchamp allow you to rotate uploaded video files directly in your browser. These tools are convenient for rapid fixes and don’t require any technical skills. Preview the changes instantly and export the corrected files within a few minutes.
Pros: They are fast, easy to use, and accessible from any device with an internet connection, best for occasional or small-scale video edits.
Cons: Most online editors have file size limits, thus, they don’t support high-resolution videos. Furthermore, uploading and downloading large files is significantly slower than working with local files. Additionally, it is not recommended to upload sensitve content online for privacy or security concerns.
4. Metadata correction tools
For a faster fix that keeps original video quality, you can change a simple setting in the video’s information tag instead of processing the whole file again. For example, free FFmpeg can do this instantly with just one command, telling players how to rotate the video. However, this method requires using a command prompt, which can be tricky if you’re not experienced with advanced computer tools.
How to prevent upside-down videos
A few simple habits during recording will save you from the tedious and annoying work of fixing mistakes later. Have a look at the list below:
Enable auto-rotate on your phone before recording. Most smartphones automatically detect orientation changes and set the correct rotation flag, reducing the chances of upside-down footage.
Hold your device steady using a landscape or portrait mode for a moment before pressing record. This helps the camera accurately register the orientation and prevents sudden rotation errors during capture.
Test mounts on action cameras. After attaching the camera to any mount, physically look at the camera from the front and side to check that it’s filming in the right direction.
In addition, record a short 10-second clip. Play it back immediately to confirm the orientation is perfect.
The best way to save editing time is to fix orientation problems while you’re still filming. A quick check lets you adjust the camera immediately. Make the mentioned tips a regular habit, and you’ll be sure your videos look right straight out of the camera, with very little fixing needed afterwards.
Fix video orientationonce, watch it right every time
The bottom line is that upside-down videos happen to everyone, but they don’t have to ruin your project. Now you understand the simple reasons why it happens, be it a camera setting, a mount, or a simple filming mistake. More importantly, you know how to solve it.
Thankfully, if you need a permanent fix with video editing software, a metadata adjustment, or just a simple rotation during playback, you can choose the right method for you. You’re all set to confidently correct any orientation issue, finish your video project, and finally share it with the world!
Download AVS Video Editor today and make sure your videos always play the right way up.
Useful links
What do a classic Hollywood DVD, a vintage European commercial, and your parents’ wedding tape have in common? They are all relics of a format war that began long before HD was even a dream. They’re locked in either NTSC or PAL standards, and getting them out requires a key – conversion. So why do these analog holdovers still cause digital problems? And how can you solve them? Let’s take a closer look at these TV standards.
From NTSC to PAL: The evolution of TV standards
Before global streaming, the world watched TV on two different systems. The competition for analog dominance was between two standards:
- NTSC (National Television System Committee)
Developed in the United States in the 1940s, NTSC ran at roughly 30 frames per second (29.97 fps) with 525 lines of resolution. It became the standard across North America, Japan, and parts of South America, and was often jokingly called “Never The Same Color” due to its fading color quality.
- PAL (Phase Alternating Line)
Introduced in the 1960s in Europe, PAL improved color stability by changing color signals line by line. It used 25 fps and 625 lines, making it sharper but less smooth in motion compared to NTSC.
Over time, countries adopted one or the other standard based on electrical frequency (60 Hz in NTSC regions, 50 Hz in PAL regions). Although analog TV gave way to digital, these systems shaped video production and remain relevant in older media.
Technical differences between PAL and NTSC
At first glance, both standards deliver moving pictures with sound. But the PAL vs NTSC debate boils down to three key differences:
Frame Rate
- NTSC: ~29.97 fps (60 Hz electricity standard).
- PAL: 25 fps (50 Hz electricity standard).
- Result: NTSC appears smoother, while PAL has a slightly slower, more cinematic look.
Resolution
- NTSC: 480i (525 lines, interlaced).
- PAL: 576i (625 lines, interlaced).
- Result: PAL offers higher vertical resolution, giving a sharper image.
Color Encoding
- NTSC: More prone to color shifts and flicker over time.
- PAL: Designed to correct phase errors, producing more stable colours.
NTSC vs PAL: Quick Comparison
| Feature | NTSC | PAL |
| Frame Rate | ~29.97 fps (rounded to 30 fps) | 25 fps |
| Resolution (SD) | 480i (525 lines, interlaced) | 576i (625 lines, interlaced) |
| Color Encoding | More prone to color shifts and flicker | Phase Alternating Line corrects errors |
| Power Frequency | 60 Hz (North America, Japan) | 50 Hz (Europe, Asia, parts of Africa) |
| Image Quality | Smoother motion, lower sharpness | Higher sharpness, slightly less smooth |
| Regional Adoption | USA, Canada, Japan, parts of South America | Europe, Australia, most of Asia, Africa |
NTSC and PAL in today’s video production
In the age of global digital delivery and resolutions that far exceed broadcast standards of the 20th century, the technical specifications of NTSC and PAL might seem obsolete. However, these analog standards remain highly relevant in today’s video production. Why do these legacy formats still matter when we now have HD, 4K, and streaming platforms?
The importance of NTSC and PAL formats is rooted in three critical areas of modern filmmaking.
- Archival footage
Vast libraries of valuable content, from vintage commercials and home movies on VHS to classic documentaries on DVD, were encoded in these formats. To access, restore, or repurpose this footage for modern use, one must first match its original NTSC or PAL specifications to ensure accurate frame rates, resolution, and color decoding.
- Global content distribution
Despite digital standards, the world is still divided by its historical broadcast regions. A physical disc or digital file intended for audiences in North America (NTSC standard) may have compatibility issues, and, therefore, will not play correctly on systems designed for Europe or Asia (PAL standard).
- Modern editorial workflows
Contemporary editors frequently blend new HD/4K footage with archival SD material. Importing a clip with a mismatched frame rate (e.g., 29.97fps NTSC into a 25fps PAL timeline) causes severe technical issues, for example,choppy playback, unsynchronized audio, and distorted motion rendering.
This is why understanding and performing proper NTSC/PAL conversion remains an essential skill, particularly for projects involving international collaboration or the digitization of old recordings.
NTSC to PAL conversion software
Don’t worry if PAL to NTSC conversion seems rather complicated. You don’t need to be an expert, because today’s software is designed to make converting videos simple and fast. Usually it is packed with ready-made presets, so that there is no need to adjust technical parameters.
Here are a few software options:
- AVS Video Converter – A feature-rich video converter that easily switches between PAL and NTSC. Supports batch conversion and multiple formats, perfect for any multimedia project.
- HandBrake – A free, open-source software for video transcoding.

- FFmpeg – A powerful command-line tool for advanced users.
- VLC Media Player – Primarily a player, but with some basic conversion options.
With a reliable PAL to NTSC converter, you can ensure your videos play properly on any device or platform, regardless of region.
How to convert from NTSC to PAL in AVS Video Converter
Need to make your video compatible with European systems? Converting from NTSC to PAL delivers seamless playback on PAL TVs and devices. AVS Video Converter makes this technical process easy. Here’s how to do it:
1. Download and Install
First, download and install AVS Video Converter from the official AVS4YOU website.

2. Add your NTSC video
Launch the program and click the “Add Video” button (or drag and drop your file) to import your NTSC video into the application.
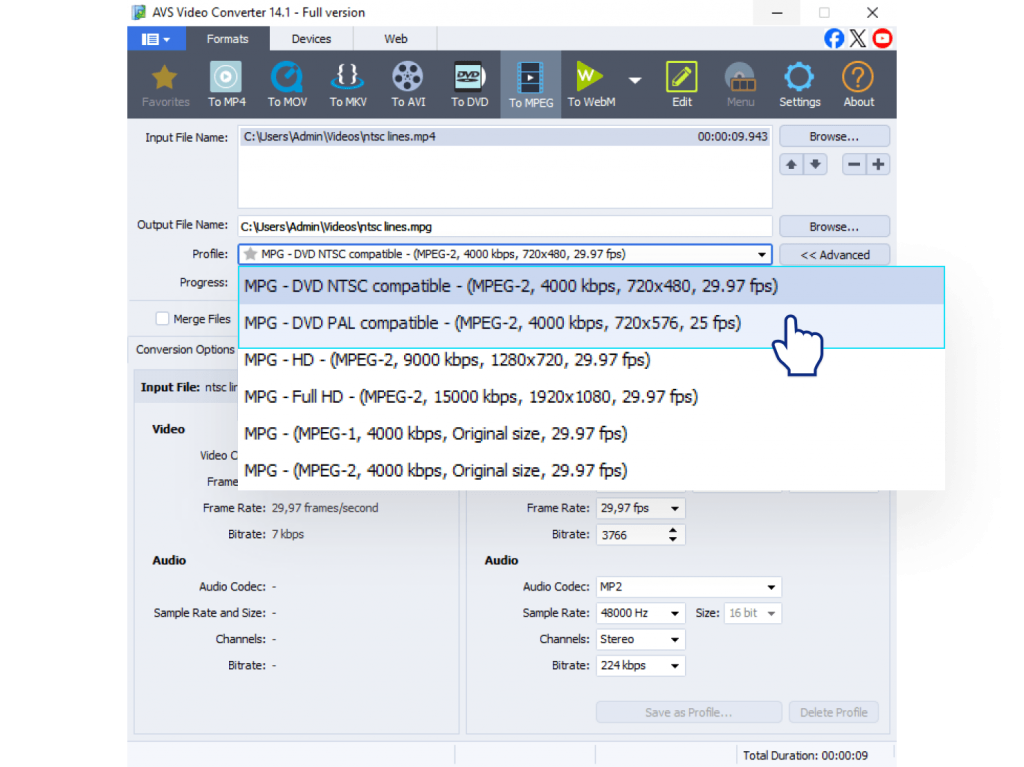
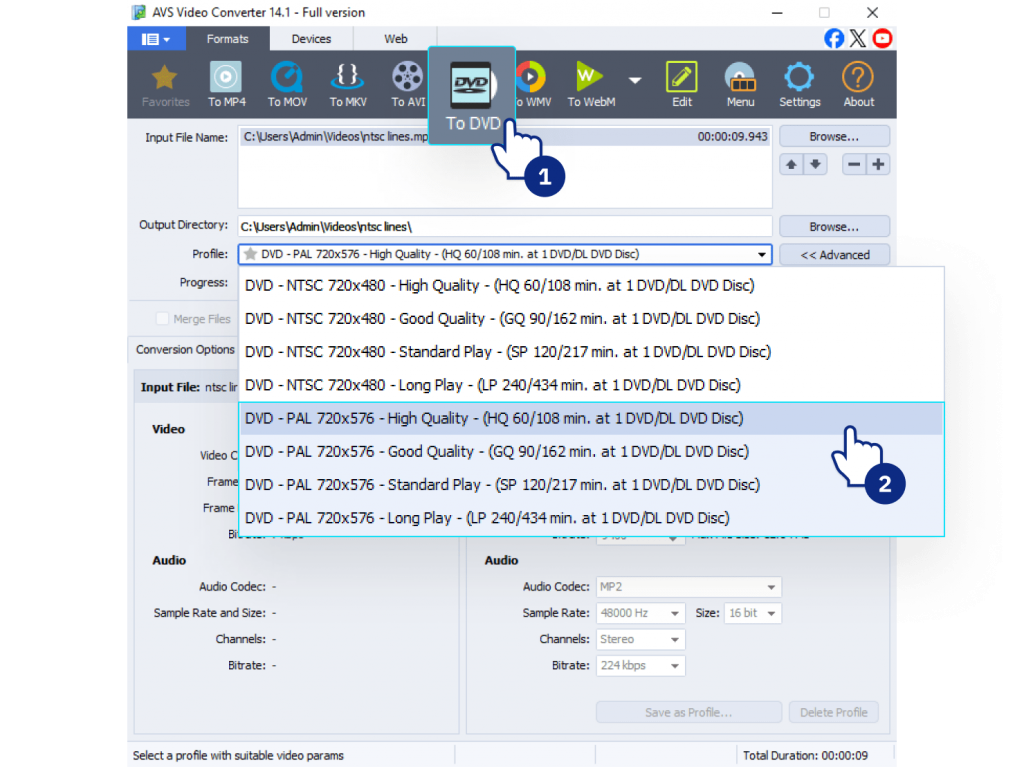
3. Adjust settings
Choose DVD as a desired output format and select one of the PAL presets (e.g., “DVD PAL”, “DVD PAL MPEG2,” etc.) from the dropdown list. This ready-made preset automatically configures the correct frame rate (25 fps), resolution, and aspect ratio for you.
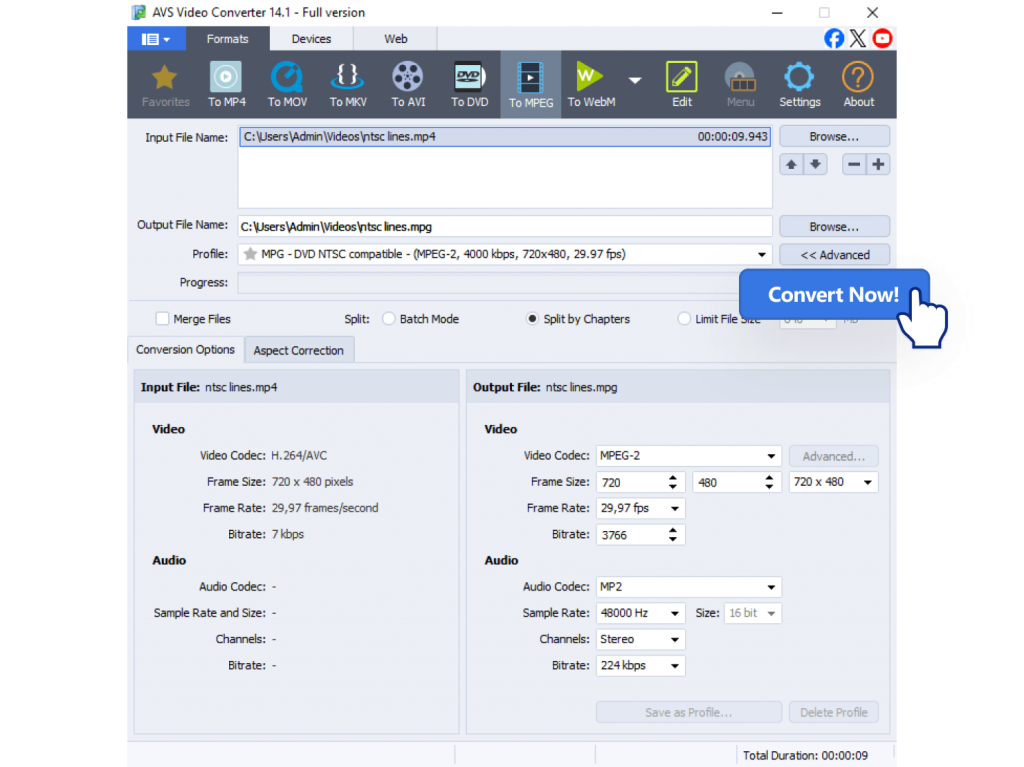
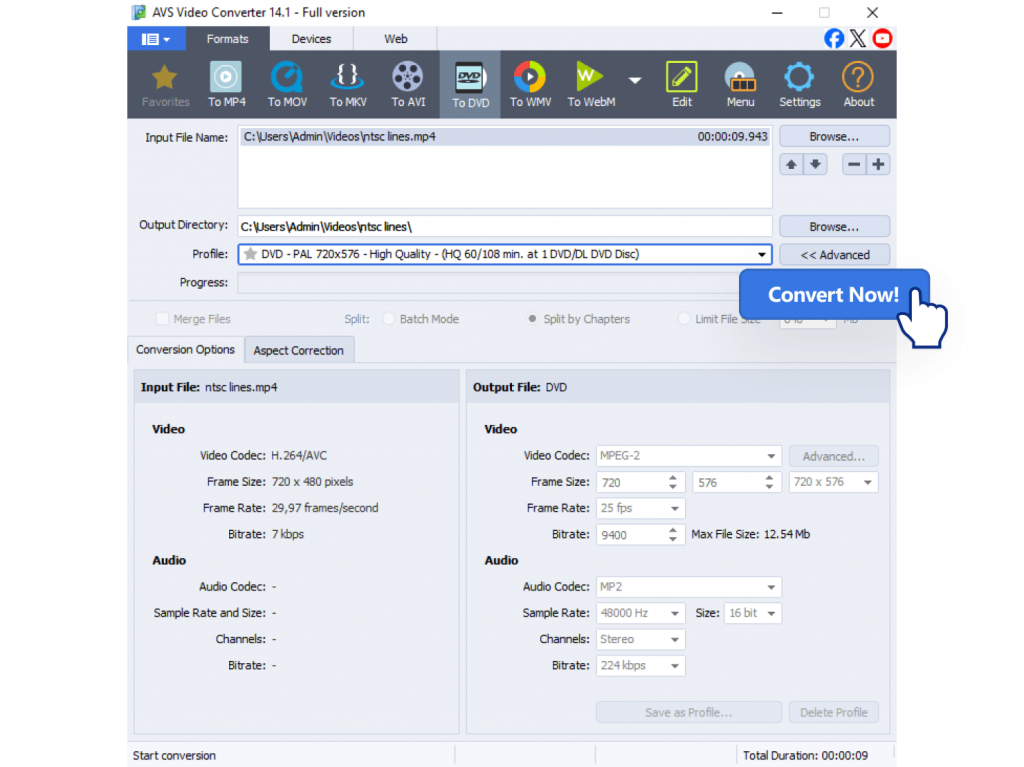
4. Convert video
Choose an output folder for your converted file and click “Convert Now!” button. AVS Video Converter will automatically handle the change in frame rate (from 29.97 fps to 25 fps) and resolution.
And you’re done! Your new video will be converted to the PAL standard, ready for use on any compatible device or for distribution in PAL regions.
NTSC vs PAL: Best practices for video creators
If you’re working with international audiences or digitizing archival footage, keep these tips in mind:
- Choose the right format
Match your target region’s system (PAL for Europe, NTSC for North America).
- Test playback
Check your video on the devices or players your audience will use.
- Future-proof your content
When possible, use modern HD or 4K formats, but respect legacy standards for older archives.
The bottom line: PAL/NTSC conversion made simple
Although digital technology has mostly replaced analog television, the difference between NTSC and PAL continues to affect video editing, playback, and international distribution. It is crucial for digitizing VHS tapes, converting DVDs, or sharing content worldwide. Ignoring PAL/NTSC legacy can lead to playback issues, unsynchronized audio, and rejected content in professional workflows.
The solution is simple: let conversion software do the work. All modern video converters, including AVS Video Converter, can handle complex tasks such as converting 29.97 fps to 25 fps and adjusting resolution automatically. This allows you to focus on creative editing and storytelling rather than getting bogged down by analog-era specifications.
Ultimately, you can’t fully understand video history or fix problems with vintage footage without understanding NTSC and PAL. By mastering their differences, you achieve flawless playback for every project on any device, anywhere in the world.
Download and use AVS Video Converter to easily convert PAL to NTSC and vice versa.
Useful links

Introduction
In today’s digital world, audio is everywhere. Creators often need to join audio files, merge audio tracks, or combine audio files into one project for podcasts and online courses, social media content and professional music production. Maybe you’ve recorded a podcast interview in several parts, saved a music mix across multiple clips, or want to put together lecture recordings for easier listening. No matter the reason, the challenge remains the same. How to transform multiple files into a single track without losing quality or wasting time?
There are plenty of methods, from free online tools to professional audio editing software. Each comes with its own benefits and drawbacks. In this article, we’ll explore the most common approaches, assess their pros and cons, and recommend some tools you can try right away.
Popular methods to merge audio
When looking for how to combine audio files or how to merge audio tracks, you’ll find four main categories of tools. Let’s look at each in detail.
Online Audio Joiners
When you just need a quick fix, online audio joiners are the easiest option.
Recommended Tools:
- Clideo Audio Joiner – A versatile online platform with support for multiple formats and quick results.
- 123Apps Online Audio Joiner – An easy-to-use web-based editor with fade effects for smooth transitions.
- Audio Joiner by Kapwing – A flexible web app that allows you to trim and reorder clips before exporting.
How it works: Upload your audio clips, arrange them on the site’s timeline, and export one combined file.Thanks to their intuitive drag-and-drop feature, these tools are exceptionally beginner-friendly.
Pros:
- Quick and simple: No need to install software.
- Accessible: Work on Windows, macOS, or even Chromebooks.
- Beginner-friendly: Interfaces are usually very straightforward.
- Free versions available: Many online joiners are free of charge.
Cons:
- File size restrictions: Many platforms limit the size or number of files.
- Quality concerns: Audio may be compressed during processing.
- Privacy risks: Uploading recordings to third-party servers isn’t reliable for sensitive material.
- Internet-dependent: Performance depends heavily on the connection speed.
Best for: Casual users who need to join small MP3 files quickly without advanced editing.
Free ways to combine audio files on Windows and Mac
Creators working with sensitive material or large audio tracks will find more security and better performance with offline, open-source alternatives.
Recommended Tools:
- Windows Voice Recorder + Audacity – Windows users can record clips with Voice Recorder, then refine them in Audacity.
- GarageBand (macOS) – Free for Mac, with a clean interface for arranging audio and exporting projects.
- Audacity (Windows/macOS/Linux) – A free open-source audio editor that works on all platforms for editing and exporting audio.
How it works: Open your audio files, arrange them on the timeline, trim or adjust them as needed, apply effects if you like, and export the finished project in MP3, WAV, or another format. Desktop tools such as Voice Recorder or GarageBand work well for quick, simple edits, while Audacity lets you create more sophisticated projects with polished results.
Pros:
- Free to use: No extra cost for simple edits.
- No internet needed: Work completely offline.
- Accessible: Built-in tools are available to everyone.
Cons:
- Limited features: Native OS tools don’t offer fades, volume balancing, or mixing.
- Less precise: Editing is not as accurate as in professional software.
- Learning curve: Some free apps can be overwhelmingly complex for beginners.
Best for: Users who want a no-cost solution for occasional, basic file joining.
Join audio like a pro with professional editing software
For podcasters, musicians, and creators who prioritize sound quality and flexibility, professional audio editing software is the most powerful solution.
Recommended Tools:
- AVS Audio Editor (Windows) – A powerful audio editor with robust features for high-quality audio production.
- Adobe Audition (Windows/macOS) – A premium choice with advanced effects and noise reduction.
- Reaper (Windows/macOS/Linux) – An affordable professional-level editor with strong customization.
How it works: Import your audio files into the editor, arrange them on the timeline, use trimming and effects as needed, and export them as a single file. These programs offer advanced editing tools and professional-grade results.
Pros:
- High-quality output: No compression or loss of sound quality.
- Full editing control: Trim, cut, fade in/out, balance volume, and more.
- Wide format support: Work with MP3, WAV, FLAC, AAC, and many others.
- Professional features: Add effects, remove noise, and mix multiple tracks.
- Reliability: Process long recordings and large files smoothly.
Cons:
- Require installation: You need to download and install such programs.
- Learning curve: More tools mean more features to understand.
Best for: Podcasters, musicians, teachers, and marketers who want to create high-quality recordings with uncompromised flexibility.
Mobile apps
For people who work on the go, mobile apps provide a handy way to combine audio files directly on a smartphone.
Recommended Tools:
- WavePad (iOS/Android) – A robust yet lightweight mobile editor for comprehensive audio editing and joining on the go.
- Lexis Audio Editor (Android) – An efficient utility for performing simple trims, fades, and efficient file joining.
- GarageBand (iOS) – A versatile studio offering multi-track editing right on your iPhone or iPad.
How it works: Import recordings from your phone or cloud storage, place them on the app’s timeline, apply basic trims or fades if needed, and finally export a single, unified file.
Pros:
- Portable: Edit anywhere, anytime.
- Convenient for quick edits: Great for trimming clips or joining short recordings.
- Offline use: Many apps don’t need an internet connection.
Cons:
- Limited editing options: Mobile apps can’t match desktop software.
- Screen size limitations: Precise editing is harder on smaller displays.
- File compatibility issues: Some apps don’t support all audio formats.
Best for: Quick fixes and casual use when you don’t have access to a computer.
Comparison: Which method is the best for joining audio?
| Method | Best Tools to Try | Pros | Cons | Best For |
| Online Audio Joiners | Clideo, 123Apps, Kapwing | Quick, no installation, beginner-friendly | File size limits, internet required, privacy concerns | Casual users who need to join MP3 files fast |
| Built-In Tools / Free Software | Windows Voice Recorder, GarageBand, Audacity | Free, offline, accessible | Limited features, less precise, steep learning curve for some | Beginners who want a no-cost solution with basic edits |
| Professional Software | AVS Audio Editor, Adobe Audition, Reaper | High-quality, precise control, wide format support, advanced effects | Requires installation, takes time to learn | Podcasters, musicians, teachers, marketers who need flexibility & pro results |
| Mobile Apps | WavePad, Lexis Audio Editor, GarageBand (iOS) | Portable, convenient for quick edits, offline options | Limited editing, small screens, format issues | Quick edits on the go, social media content creators |
Step-by-step guide: How to join audio in AVS Audio Editor
AVS Audio Editor meets all needs of Windows users seeking an ideal blend of user-friendliness, high-quality output, and adaptable editing. Follow these simple steps below to learn how to join your audio files quickly.
1. Download & install
Get AVS Audio Editor from the official website and install it on your PC.
2. Open the program
Launch it and create a new project.
3. Import your audio files
Add all the files you want to combine.
4. Arrange the files in order
Drag and drop the clips onto the timeline.
5. Make edits if needed
Trim silence, apply fades, balance volume, or add effects.
6. Preview your project
Listen before saving to check everything.
7. Export the final track
Save as MP3, WAV, or another preferred format without losing quality.
In just a few minutes, you’ll have a polished, professional-sounding file ready for publishing, sharing, or further editing.
Why AVS Audio Editor stands out
Here’s how AVS Audio Editor compares against free tools, online services, and mobile apps:
| Feature | Online Tools | Free Software | Mobile Apps | AVS Audio Editor |
| Ease of Use | Very simple, drag-and-drop | Varies (Audacity has a learning curve) | Easy but limited | Beginner-friendly with pro features |
| Audio Quality | May compress files | Good, but not always pro-level | Basic | High-quality, no loss |
| File Size Limitations | Often restricted | None | Sometimes limited | None |
| Editing Features | Minimal (just joining) | Basic to moderate | Limited | Advanced (trimming, fades, effects, noise removal) |
| Privacy & Security | Files uploaded to servers | Local editing | Local, but limited formats | 100% local editing, secure |
| Best For | One-time casual use | Beginners with patience | Quick mobile fixes | Podcasters, musicians, teachers, marketers |
Best practices to join, merge, and combine audio files
Choosing the best method to join audio files is crucial for achieving professional results. The right tool combines ease of use, output quality, and a range of advanced features to fit your specific project’s needs. Here’s a quick breakdown of the available options:
- Online Joiners: Good for small, quick tasks but lack features and privacy.
- Built-in OS Apps:Basic and convenient, but too limited for quality work.
- Mobile Apps:Great for edits on the go but can’t handle large projects.
- Professional Software:Powerful and flexible, but often complex and expensive.
For most creators, the ideal solution is a dedicated desktop editor that strikes a perfect balance—powerful enough for professional work yet intuitive enough for beginners. For Windows users, one of the best solutions is AVS Audio Editor.
AVS Audio Editor is more than just a joiner. It’s a comprehensive audio editing software designed to handle the entire audio editing workflow with precision and ease. It delivers lossless quality, robust editing tools, and an intuitive interface. Being a trusted choice for podcasters, musicians, educators, and content creators, this audio editor bridges the gap between simplistic free tools and overwhelmingly complex professional suites.
Download AVS Audio Editor today and take control of your audio projects without sacrificing quality.
Useful Links
Introduction
Sometimes a video plays upside down or sideways because it was recorded in the wrong orientation. This can happen if the camera wasn’t held straight during filming, or if you deliberately want to add a creative rotationeffect. The good news is that you can rotate video files easily on any platform, using a variety of methods, from quick online tools and built-in phone features to powerful desktop software. It is a basic technique included in most current video editing programs. Rotation is widely used to fix a clip shot in portrait mode, correct vintage footage, or add a unique visual style.
This comprehensive guide will walk you through the best techniques for every device and need, covering options for Windows, Mac, iPhone, Android, online tools, and even professional editing software.
How video rotation works
Rotating a video means changing its orientation. You can turn a video:
- 90° clockwise or counterclockwise
- 180° upside down
- 270° (three-quarter turn)
- Flip horizontally or vertically
When you rotate, the change can be permanent (saved into the video file) or temporary (applies only during playback). Rotation is supported for MP4, AVI, MOV, MKV, and other video formats. Some older players may not handle rotation metadata properly, so the rotated video should be saved to keep the necessary changes.
Rotate video on PC (Windows)
If you’re a Windows user, there are several reliable programs for video rotation, from a user-friendly editor to a free open-source alternative:
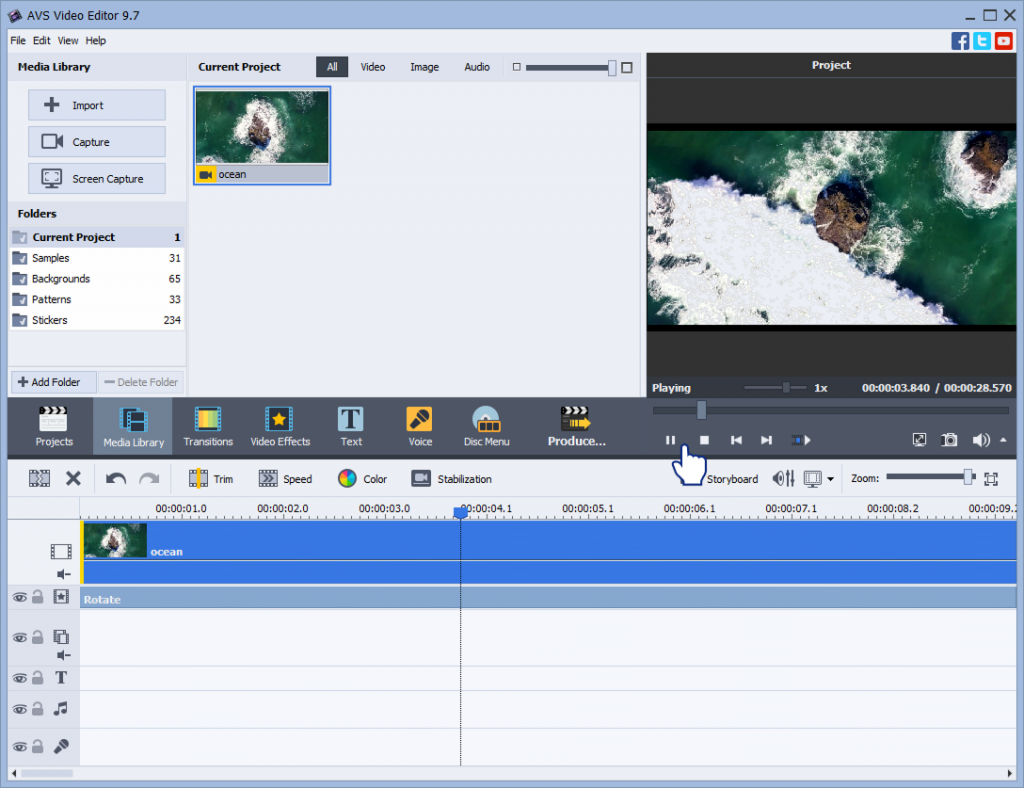
1. AVS Video Editor (Recommended)
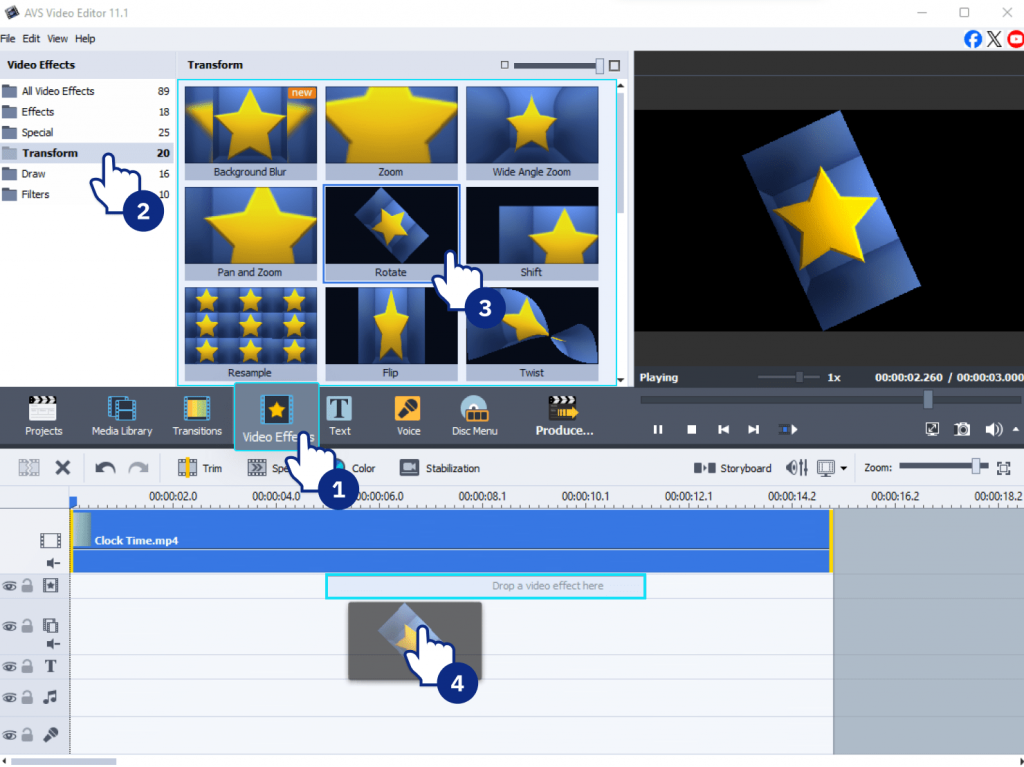
AVS Video Editor is a powerful yet beginner-friendly tool to rotate videos permanently. It supports MP4, AVI, MOV, and all key video formats. Here’s how to do it:
Step 1. Open your video in AVS Video Editor.
Step 2. Drag it to the timeline.
Step 3. Go to Effects >> Transform and select “Rotate“. Right click the button >> Edit effect and change the rotation angle (90°, 180°, 270°) until your video is oriented correctly. Alternatively, you may use Flip options.
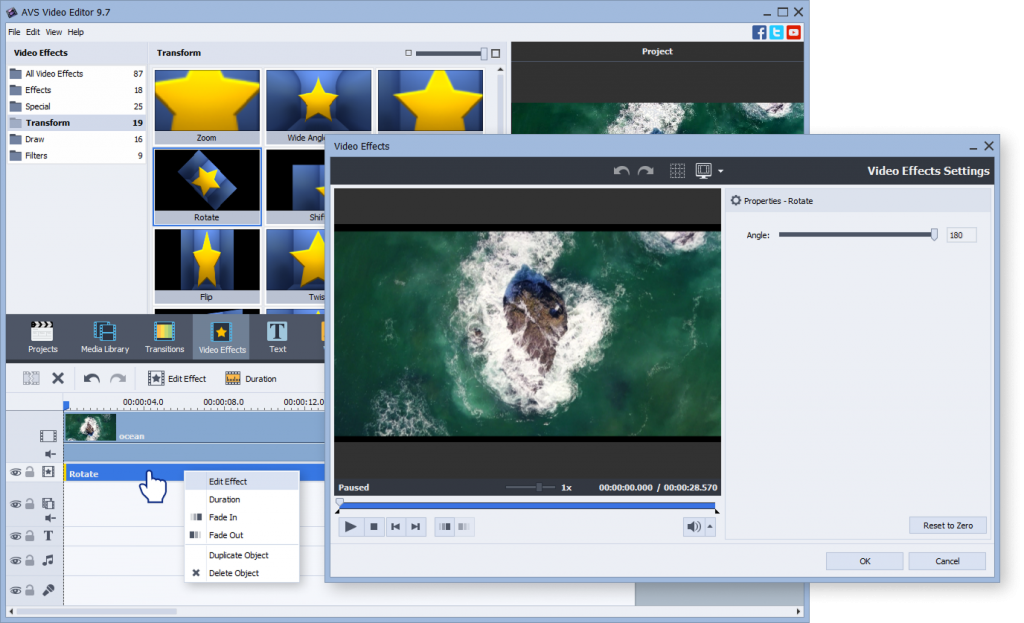
Step 4. Play a preview to check the result. When you’re happy, click “Produce”and save your newly rotated video in the preferred format.
AVS Video Editor’s functionality is not limited to video rotation, it also allows to trim, crop, add text overlays and a wide range of effects. It’s the best choice if you want more than just a basic video rotator for PC.
2. VLC Media Player
VLC is primarily a free media player, but it can perform a temporary rotation for quick fixes. Please, bear in mind that this method doesn’t permanently save the rotated video.
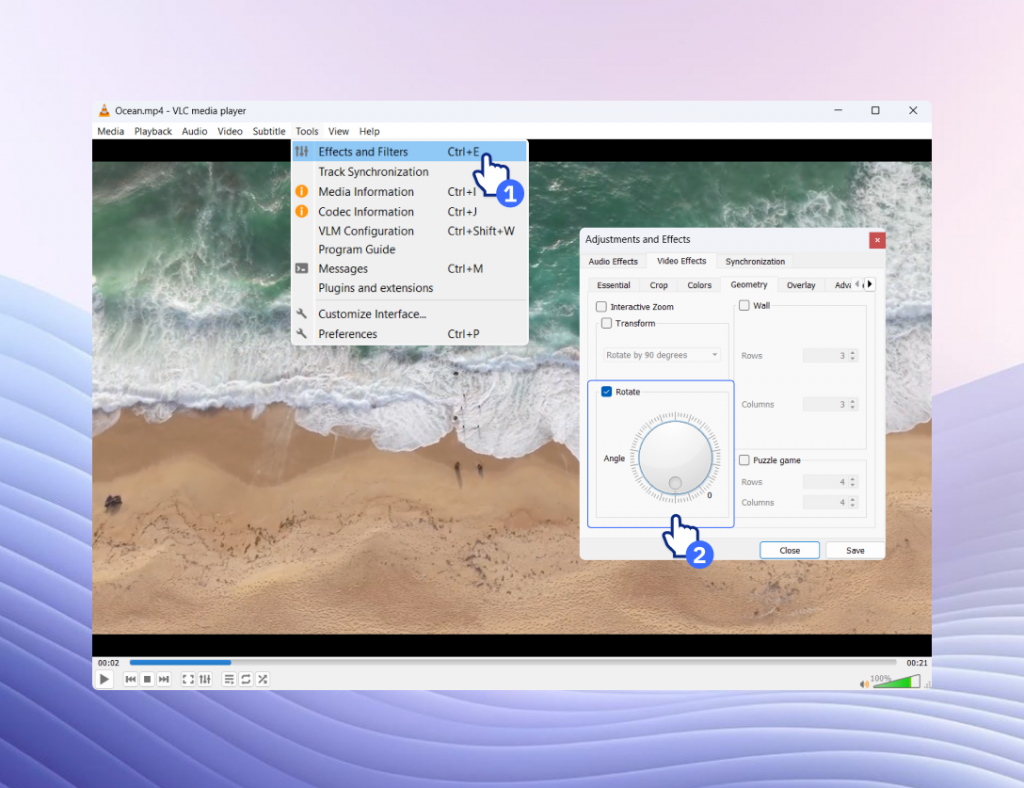
- Go to Tools > Effects and Filters > Video Effects > Geometry.
- Enable Transform, then choose rotation angle from the dropdown menu.
The rotation is only for this playback session. To save it, you need to use VLC’s “Convert / Save” feature with advanced settings, which is less intuitive than using a dedicated editor.
3. Shotcut (Free)
Shotcut is an open-source editor, ideal for those who need robust features.Simply import your video, apply the Rotate and Scale filter, and export the file. It’s a bit more advanced than VLC, but fully free.

Rotate video on Mac
Mac users can rely on built-in or third-party tools:
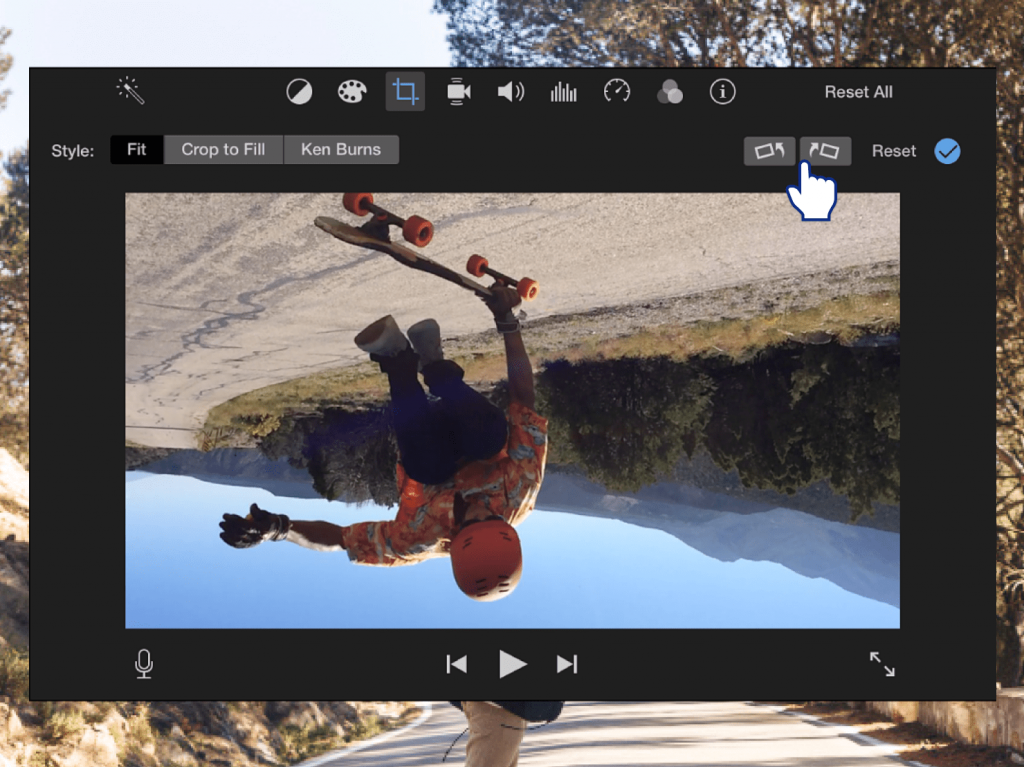
iMovie
iMovie provides a straightforward way to correct your video’s orientation.
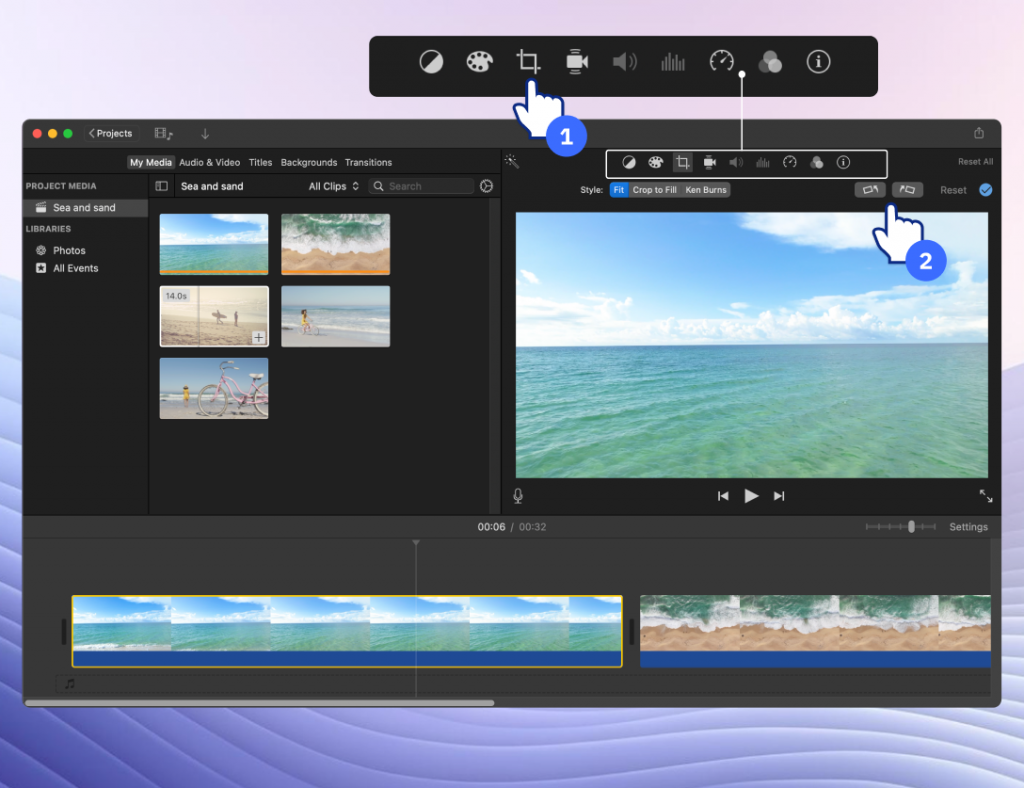
Learn how to rotate the video in iMovie:
- Import your video into the program.
- Drag it to the timeline.
- Click the Crop icon, then rotate left/right.
- Export the rotated video.
Other Mac options include QuickTime Player, suitable for basic rotation, or more advanced editors like Final Cut Pro. If you just need a quick rotation, iMovie is usually enough.
Rotate Video on iPhone & Android
Fixing a video directly on your mobile device is often the fastest solution.
On iPhone
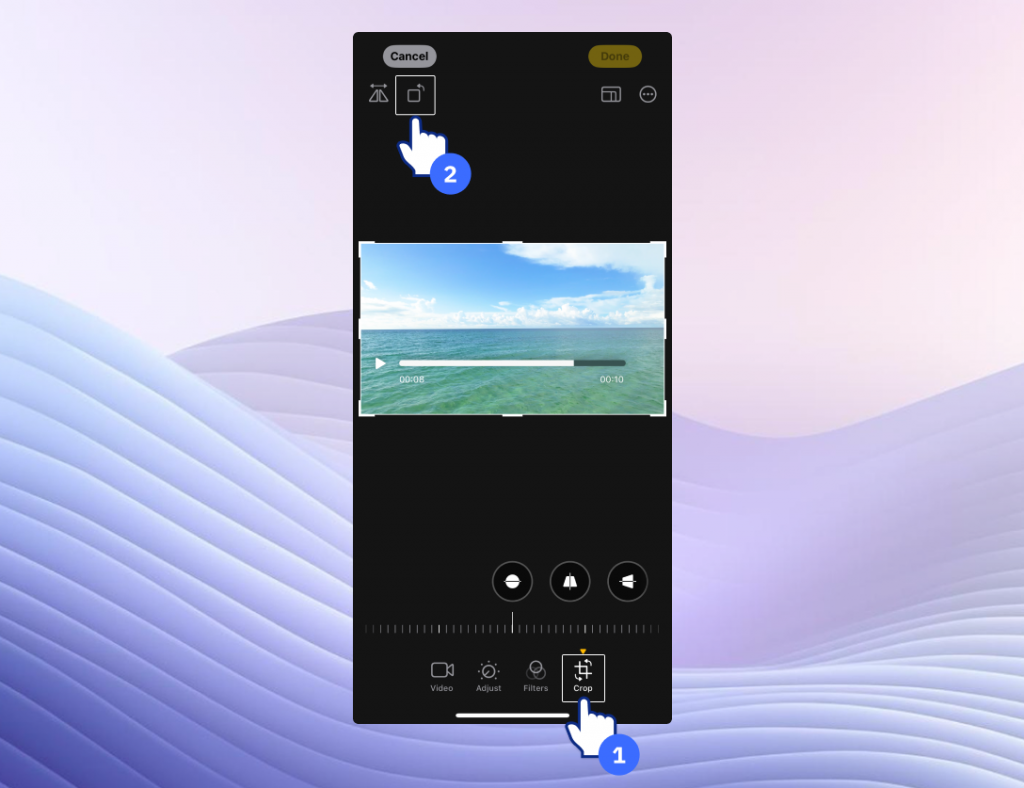
The native Photos app is the easiest way to rotate video on iPhone:
- Open your video in Photos.
- Tap Edit > Crop & Rotate.
- Tap the Rotate button until the orientation looks correct.
- Save.
On Android
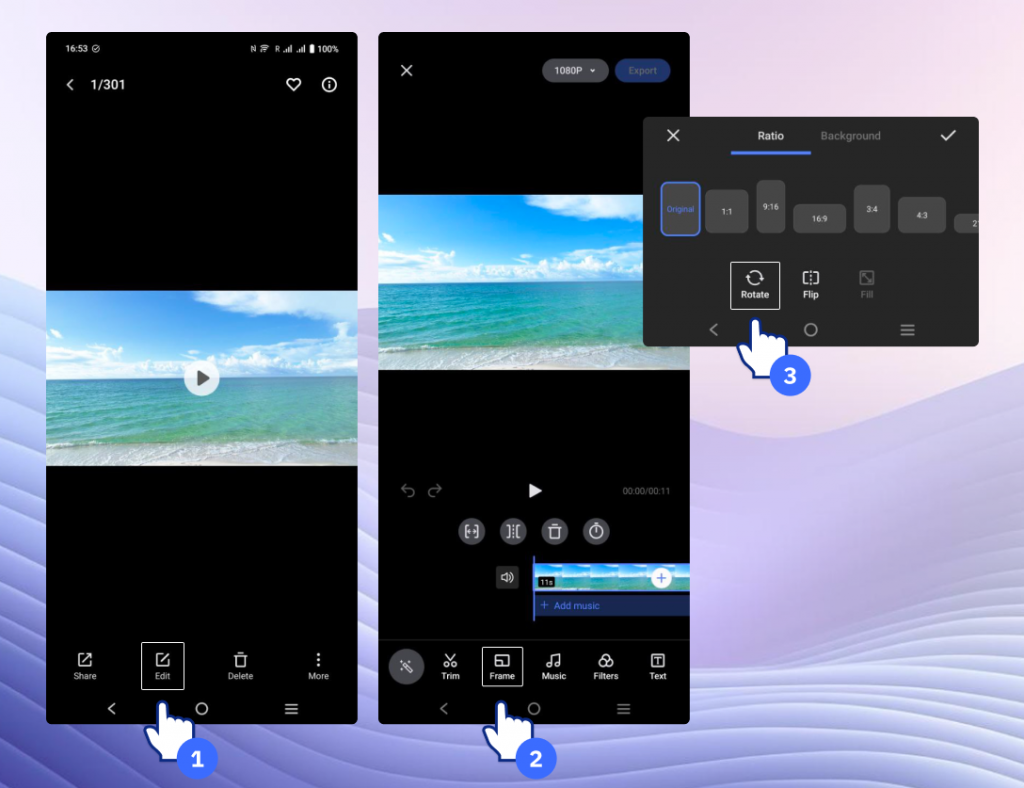
Most Android phones allow rotation directly in the gallery or Google Photos:
- Open the video.
- Tap Edit > Crop/Rotate.
- Adjust orientation and save.
Both methods are free and quick, perfect for casual use.
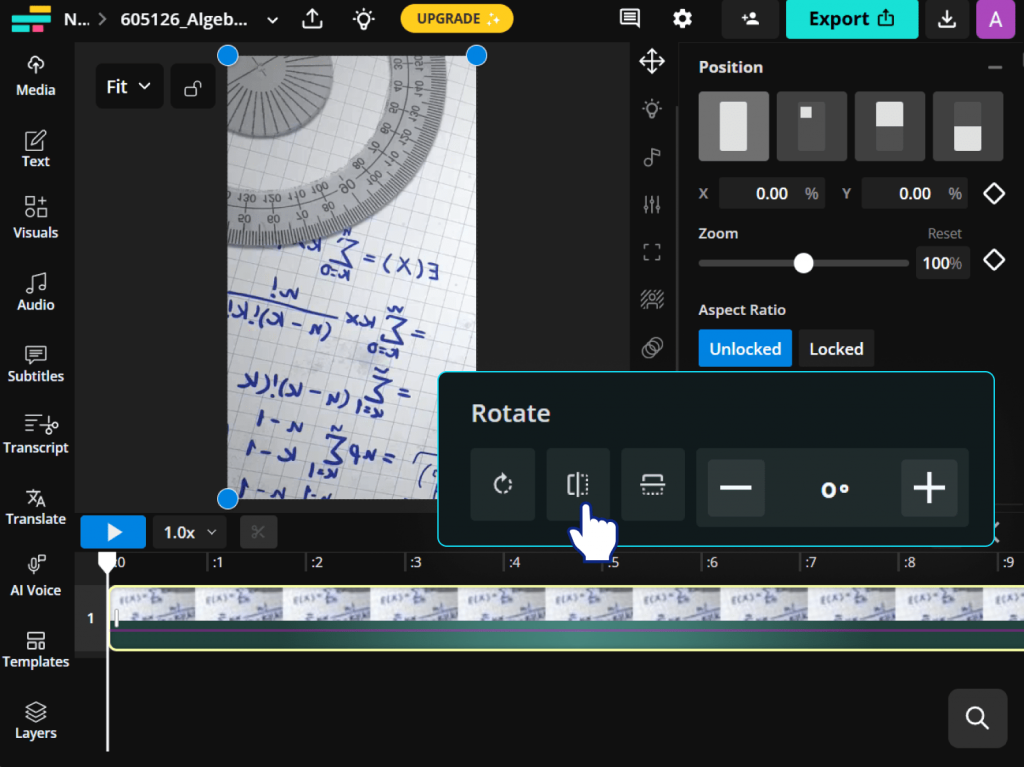
Rotate video online
If you don’t want to download and install software on your computer, you can rotate video online using web-based tools. You may consider using one of these 3 popular online video rotators:
- Clideo – Free and simple, supports MP4, MOV, AVI.
- Kapwing – Easy to use, with additional editing features.
- Online Video Cutter – Lightweight online rotator.
These sites usually offer free video rotation services but may have:
- File size limits
- Watermarks on free exports
- Privacy concerns (avoid uploading sensitive videos)
They’re ideal for quick fixes on the go when you’re away from your main editing suite.
Rotate video using professional tools
Professional editors and command-line utilities offer maximum flexibility to advanced users. These tools not only let you rotate a video but also fine-tune angles, add animated motion, and apply rotation as part of a larger editing workflow.
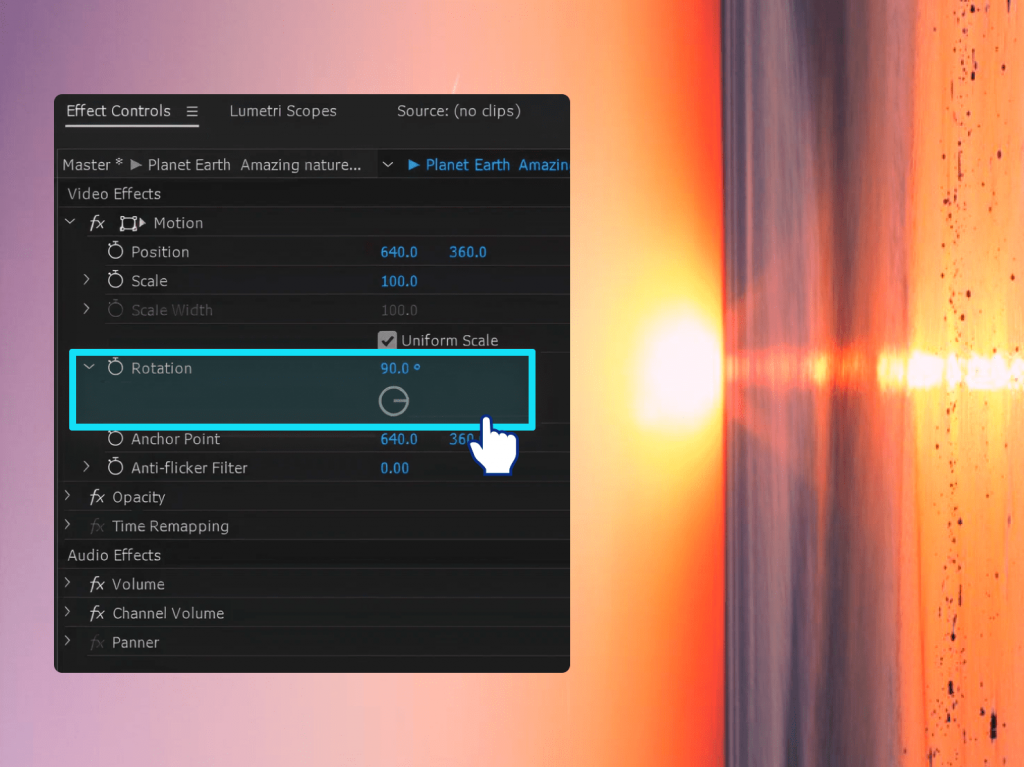
Adobe Premiere Pro
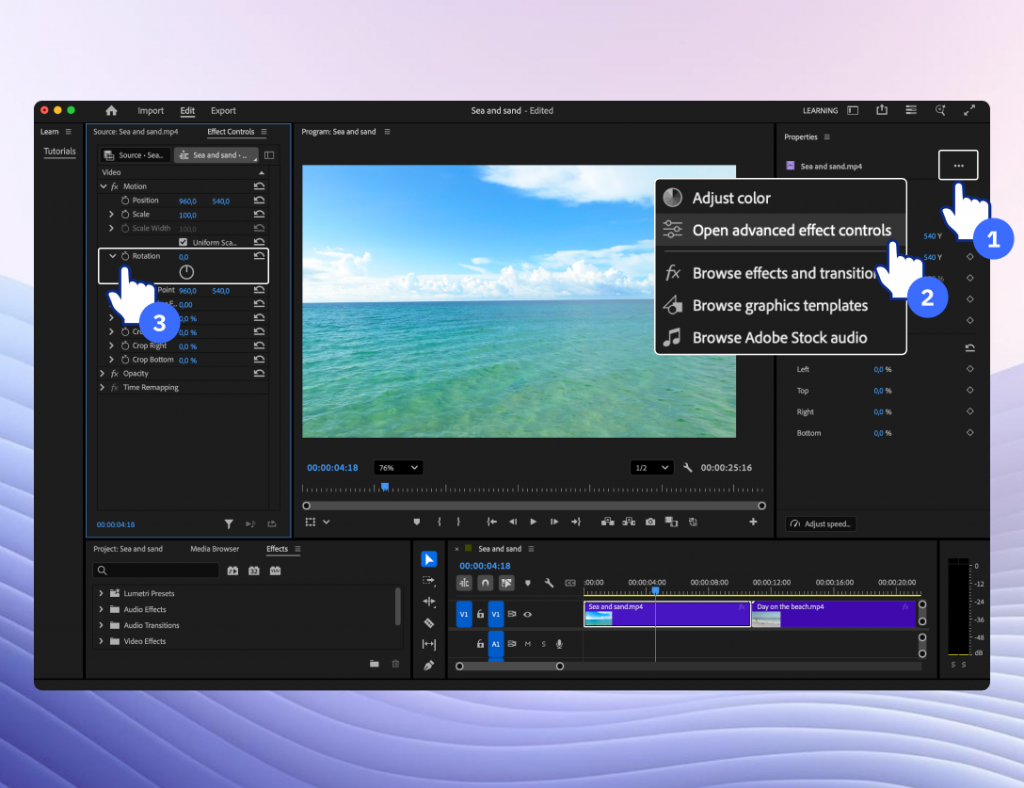
If you’re working with professional editing software, Adobe Premiere Pro gives you full control over video rotation. Here’s how to do it:
- Import your video into the timeline.
- Select the clip and open Effect Controls.
- Under Motion > Rotation, set the angle.
- Export.
Premiere Pro offers precise adjustments and keyframe-based rotation for creative effects.
FFmpeg
For users comfortable with the command line, FFmpeg is a powerful tool for video editing. With FFmpeg, you can rotate a video with just one command:
ffmpeg -i input.mp4 -vf “transpose=1” output.mp4
In this example, transpose=1 rotates the video 90° clockwise. Other values let you flip or rotate in different directions. Once you run the command, FFmpeg saves the new file with the corrected orientation.
How to rotate YouTube videos
If you uploaded a video in the wrong orientation, you might wonder how to rotate YouTube video. Unfortunately, YouTube removed its built-in rotation tool. Instead, you can:
- rotate the video before uploading using one of the methods above.
- re-upload the corrected version.
YouTube Studio only allows trimming and cropping, no rotation is available. Always check orientation before publishing.
The best ways to rotate a video: A quick recap
Video rotation fixes awkward orientations or adds creative effects. You can do it on Windows, Mac, iPhone, Android, or online. The best method for you depends on your device, the required output quality, and how often you need to perform this task.
For quick, one-time fixes, your phone’s native editor or a free online tool may be enough. Advanced users are more likely to choose professional software like Premiere Pro offering granular control. However, for Windows users seeking a perfect balance of power and simplicity, AVS Video Editor is an excellent choice. It’s a versatile, full-featured video editor that doesn’t just rotate videos but also lets you to crop, trim, enhance, and create stunning projects with ease.
Try AVS Video Editor today to rotate, crop, trim, and polish your videos effortlessly.
Useful Links

A new academic year brings fresh opportunities, ambitious goals, and plenty of challenges for both students and teachers. With the right digital tools, you can save valuable time, boost creativity, and transform everyday tasks into something enjoyable, from preparing assignments, delivering presentations to making study materials more engaging. That’s where AVS4YOU comes in.
Why AVS4YOU Is Perfect for Students and Teachers
AVS4YOU offers an all-in-one multimedia software suite designed to make studying and teaching more effective and a lot more fun.
For Students: smarter study tools
- Create polished video projects
From video essays to group presentations, AVS Video Editor makes it simple to edit, cut, and enhance your work. Turn school projects into professional-looking videos with polished transitions, effects, and titles.
Collaborate effortlessly on video assignments using easy trimming, splitting, and editing tools—no advanced skills required. Add subtitles for inclusivity or music for greater impact.
- Record lessons and tutorials
Capture lectures, study group discussions, or record personal notes with AVS Audio Recorder. Then, refine your recordings using AVS Audio Editor: remove background noise, adjust volume, and enhance clarity for perfect playback.
With AVS Screen Recorder, you can also record online lectures or create your own custom study guides to revisit anytime.
- Organize study materials
Convert videos, audio, eBooks into the right formats for easy sharing and compatibility across devices. Edit notes and manage files efficiently with AVS4YOU’s versatile tools.
For Teachers:Next-level classroom engagement
- Prepare engaging learning materials
Bring lessons to life with multimedia presentations that include videos, voiceovers, and animations. Overlay text, highlight key points, and adjust playback speed for better comprehension.
- Record and share lessons
Record crystal-clear lectures with built-in audio recorder ensuring that your online lessons, feedback, or podcasts sound professional. Remove echoes, hums, or distractions with AVS Audio Editor’s noise reduction tools.
Build a library of reusable digital resources for students to access anytime.
- Simplify file handling
Convert educational content into formats that can be easily viewed on any platform.
All-in-One Multimedia Suite
Instead of juggling multiple apps, AVS4YOU provides a complete set of tools in one subscription: video and audio editing, screen recording, file conversion, and more. It’s affordable, easy to use, and designed to handle both everyday tasks and more advanced projects.
Back-to-School Special
To celebrate the new school year, we’re offering 30% Off the AVS4YOU Unlimited Subscription. Unlock access to all AVS4YOU software and make your academic journey smoother, smarter, and more creative.
Start the year right—grab your 30% discount today!
Happy learning and teaching!

If your device can’t play an APE file, don’t worry. In fact, many users experience compatibility issues with less popular audio formats like APE, especially since most media players and smartphones don’t support them by default. But the good news is that opening, playing, and converting APE files is simpler than you might think.
In this post, you’ll learn what an APE file is, how to open and convert it to MP3 using reliable tools on Windows, Mac, and mobile devices. Using handy tips below you will be able to manage APE audio files with ease.
Let’s dive in!
What is an APE file?
An APE file is a compressed audio format created using Monkey’s Audio, a lossless compression codec developed in the early 2000s. Unlike lossy formats such as MP3, APE keeps all the original audio data, offering high-quality sound. It is perfect for CDs backups, studio recordings, and long-term audio archiving.
The key advantage of APE files is their lossless nature, ensuring studio-grade reproduction of CDs or studio recordings. However, their main drawback is limited compatibility. Many media players, smartphones, and streaming devices do not support APE files. On top of it, due to the large file size, APE format is not suitable for everyday use.
APE files are commonly used by audio enthusiasts who want lossless playback but they often need to be converted to more compatible formats. Here are some examples:
- MP3 – for smaller file size and broader compatibility
- WAV – for editing or professional use
- FLAC – another lossless format with wider support than APE
Pros of APE files:
- Excellent audio quality (lossless)
- Smaller file size compared to WAV
- Metadata support
Cons:
- Limited playback support on modern devices
- Larger file size than MP3 or AAC
- Slower encoding/decoding
- Not ideal for streaming
How to open APE files on Windows, Mac, and mobile
Top Windows apps to open APE files
You have several options for opening APE files on a Windows PC:
1. Foobar2000 for native APE support
A highly customizable and compact audio player for Windows. It supports APE files and offers advanced features for audio playback such as tagging and conversion.

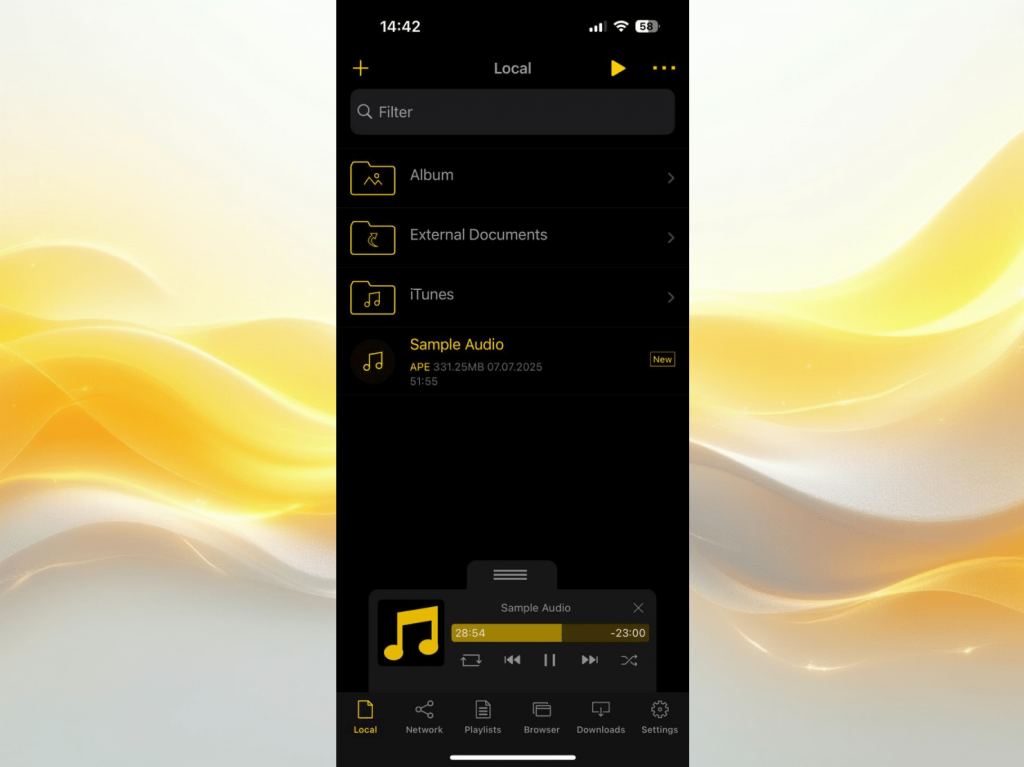
2. AVS Media Player – simple APE playback
A free and easy-to-use multimedia player developed by AVS4YOU. It plays APE files out of the box with no extra setup and supports various video and audio formats.

3. Using VLC Media Player for APE files
A popular open-source media player known for supporting a wide range of formats. APE playback may require additional codecs or configuration adjustments depending on the version.

APE file playback on macOS
MacOS doesn’t natively support APE files. However, you can use third-party apps.
1. Vox Music Player for APE audio on Mac
Vox is an intuitive music player for macOS with high-fidelity playback, including lossless formats like APE, FLAC, and WAV. It is a good choice for users who prefer pure digital sound.
2. XLD (X Lossless Decoder) for APE conversion and playback
XLD (X Lossless Decoder) is a handy Mac app for anyone dealing with APE files. It does not only open them but also lets you convert these files into more common formats: MP3, FLAC, or Apple Lossless.
Best APE-compatible apps for mobile devices
APE support is limited on mobile, but a few apps can help:
1. APE playback on Android
- AIMP is a lightweight, high-quality music player for Android that handles a robust set of formats, including APE.
- Foobar2000 for Android works with APE files and features advanced playback controls.
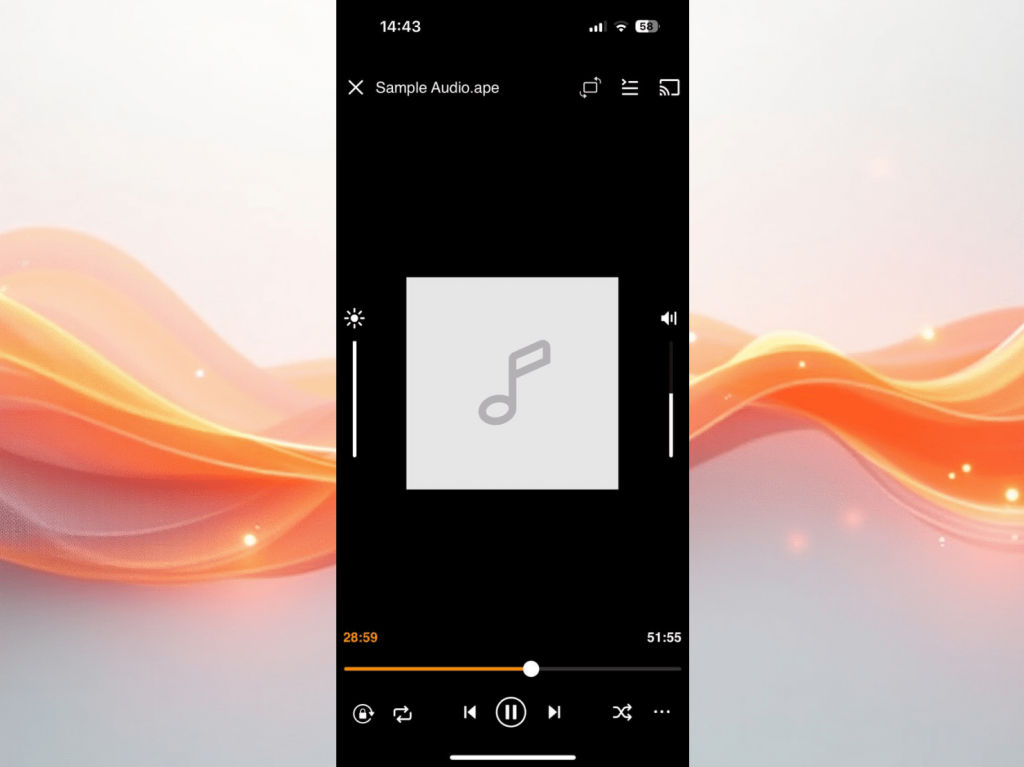
2. APE file support on iOS
- nPlayer supports various media formats, including APE, and offers smooth playback with subtitle and streaming options.
- VLC for mobile is a flexible app capable of playing APE files, but the playback quality might depend on the file’s encoding.
In general, converting APE to a more common, widely used format such as MP3 is the most reliable way to ensure playback on any device.
Best free APE to MP3 Converters
If you’re looking to convert your APE files to MP3 or other more compatible audio formats, several reliable tools are available across Windows, macOS, and mobile devices. Find the top options for each platform.
Free APE to MP3 converters for Windows
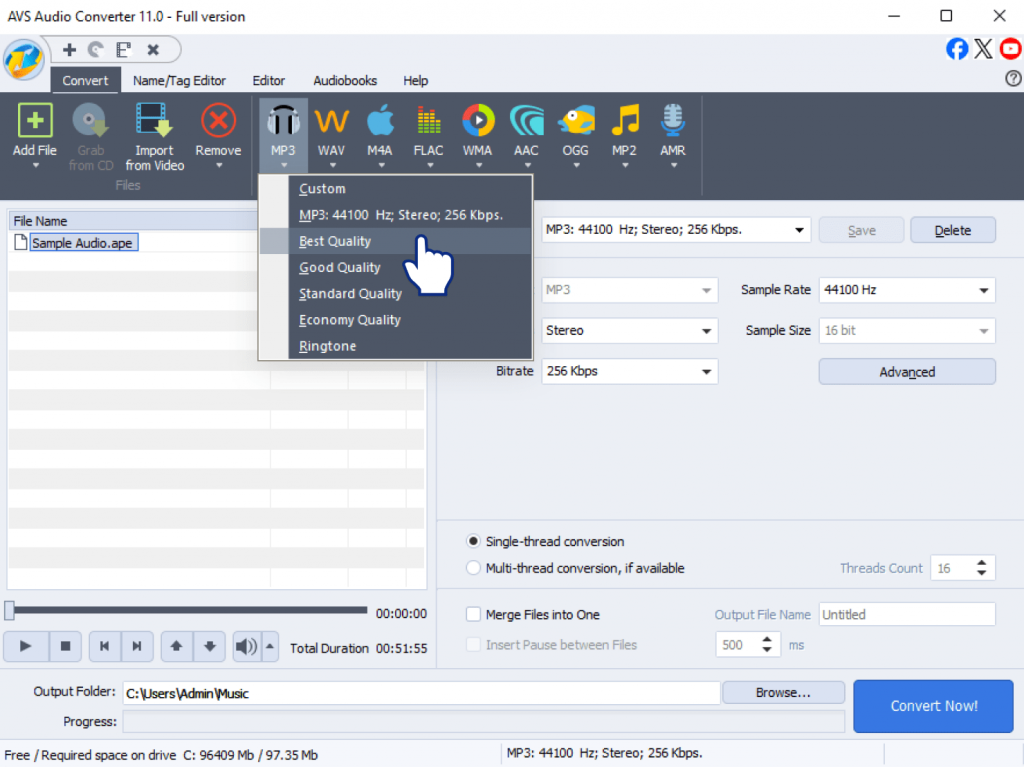
1. AVS Audio Converter
AVS Audio Converter is a comprehensive and user-friendly tool that supports all key audio formats, including APE, MP3, WAV, FLAC, OGG, and M4A. It features a clean interface, fast processing, and flexible output settings such as bitrate, sample rate, and channels. Users with large music libraries can benefit from batch conversion. It’s the best choice for those who value both performance and simplicity.
2. Fre:ac
Fre:ac is a free and open-source converter with a support of many popular audio formats. Althought the interface may not be very intuitive for beginners, it’s a powerful tool once set up. It includes advanced codec settings and offers command-line use for automation, making it a great option for tech-savvy users.

APE audio conversion software for Mac
1. XLD (X Lossless Decoder)
XLD is a reliable application for macOS users who need to decode or convert lossless audio formats. It opens and converts APE, FLAC, ALAC, MP3, and others. With its focus on keeping original audio quality, XLD is perfect for users who want to achieve pure sound in output files and have the ability to adjust file parameters.
2. MediaHuman Audio Converter
MediaHuman Audio Converter features a clean, modern interface that makes converting audio files quick and simple. It is compatible with a wide range of audio formats including APE, MP3, AAC, OGG, and FLAC. MediaHuman Audio Converter features drag-and-drop importing, seamless iTunes integration, and automatic file organization. It’s a great choice for casual users and music lovers looking for a hassle-free conversion tool on macOS.
APE audio format solutions for mobile devices
1. Audio Converter (Android)
Audio Converter for Android can turn APE into MP3 in a few taps. It works with AAC, WAV, and OGG. This app is free to use, easy to navigate, and suitable for users who need to convert their files quickly on the go. Although it doesn’t include advanced editing features, it deals with everyday essential tasks efficiently.
2. The Audio Converter (iOS)
This iOS app supports a broad range of audio formats, including APE, MP3, M4A, and WAV. Before considering to try it out, bear in mind that this tool is not freeware, but a paid app. It has a clean, user-friendly interface and offers cloud integration with services like iCloud, Dropbox, and Google Drive. It’s a solid choice for iPhone and iPad users who value convenience, format flexibility, and seamless file management.
Among all these tools, AVS Audio Converter stands out as the best APE file converter for Windows, thanks to its intuitive design, high-speed performance, and extensive format support. Whether you need to convert a single file or an entire music collection, it offers a smooth, professional experience.
How to convert APE files using AVS Audio Converter
To convert APE files quickly and efficiently on Windows, follow these steps:
Download and install AVS Audio Converter from the official website.
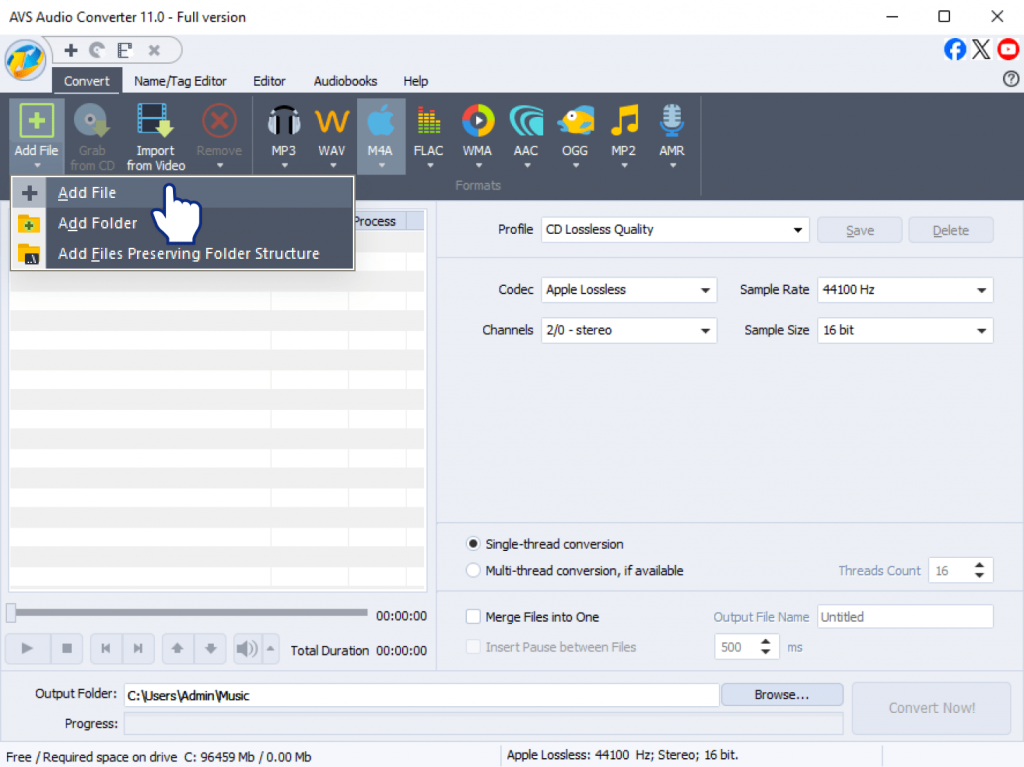
Launch the program and click on the “Add File” button to import your APE audio files.
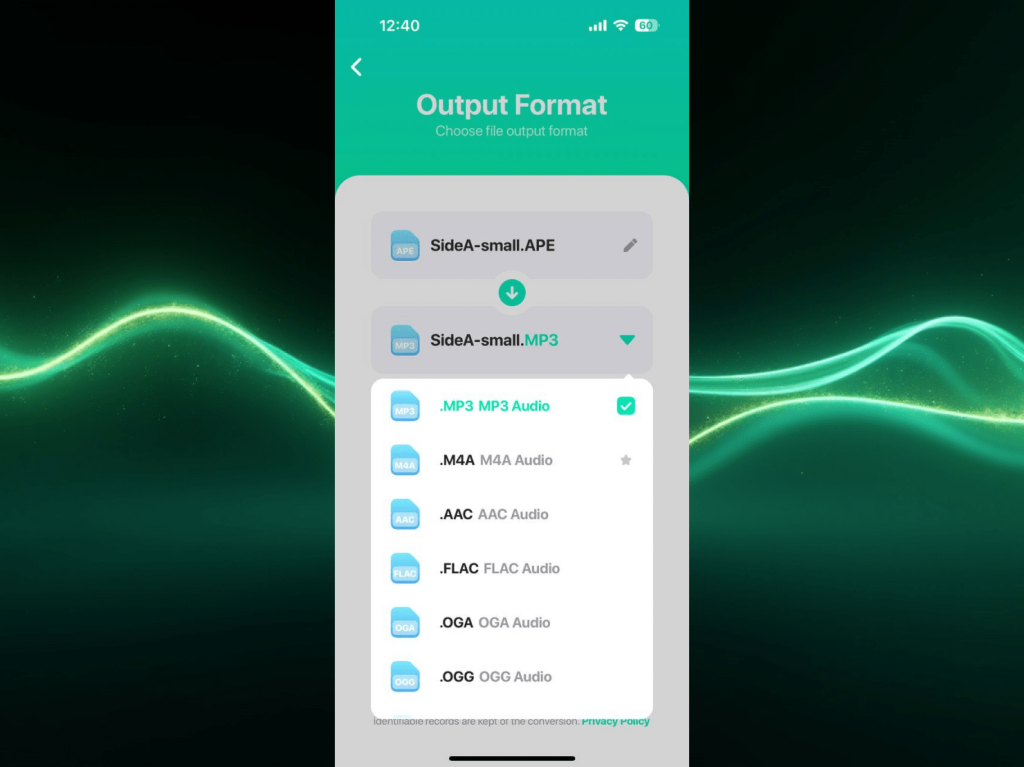
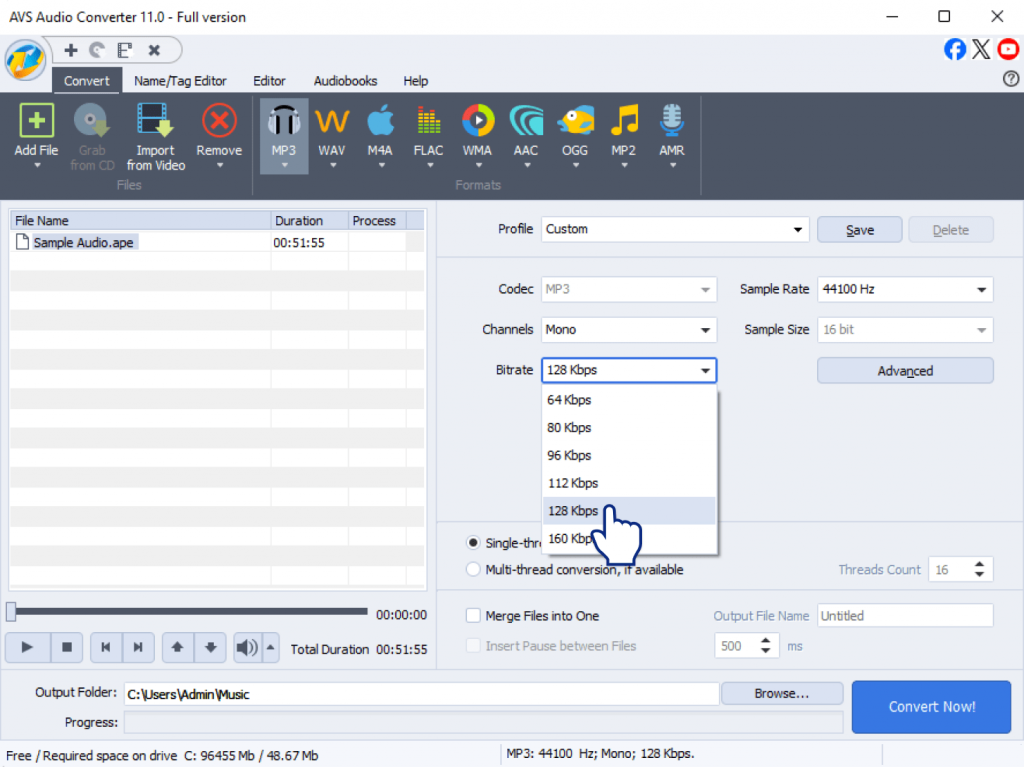
Choose the output format from the top tab: MP3, WAV, FLAC, M4A, etc.

Adjust settings if necessary:
- Bitrate (e.g., 192kbps, 320kbps)
- Sample rate (e.g., 44.1 kHz)
- Channels (stereo or mono)
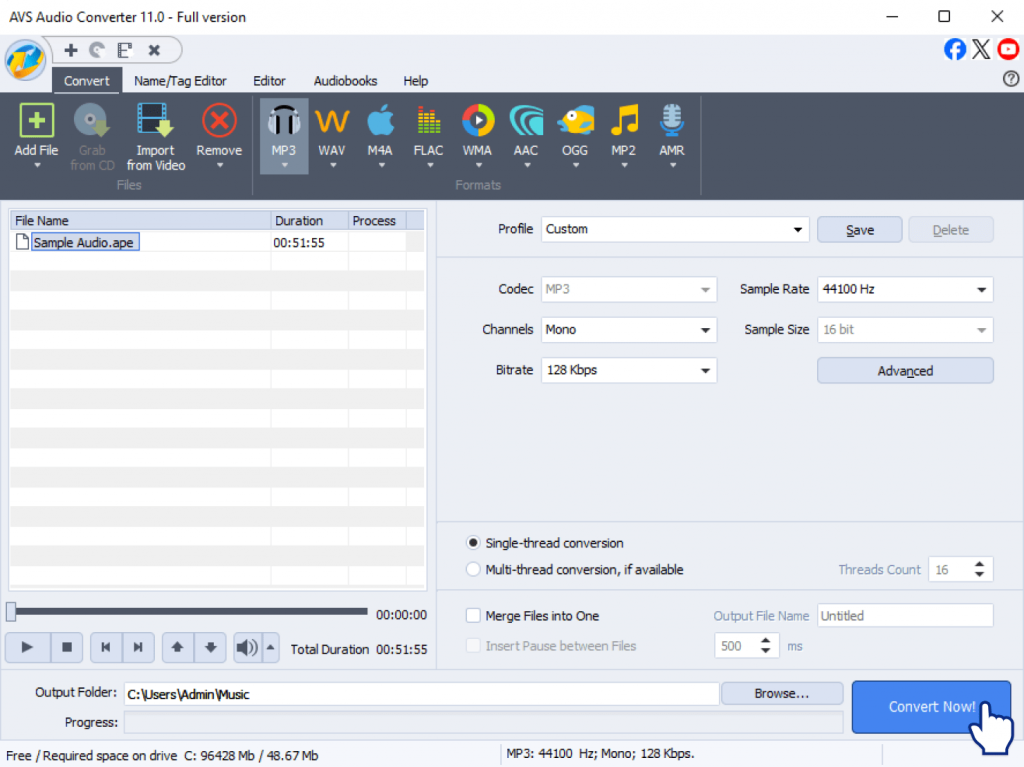
Set the destination folder where you want to save converted files.

Click “Convert Now!” to start the conversion process.
Key extras:
- Batch conversion
Convert multiple APE files at once.
- Format compatibility
Supports all major audio formats.
- Preview & trim
Edit audio clips before conversion.
Final Thoughts: Enjoy your APE files anywhere
APE files deliver studio-quality audio, but they can be a pain to use. Not every device or media player supports them, leaving you stuck when you just want to listen to your music.
The good news? You don’t have to sacrifice quality for convenience. Converting your APE files to MP3, FLAC, or ALAC, etc. means that there are no more “unsupported format” errors, you can save space on your disc and keep your music better organized.
We recommend using AVS Audio Converter because it is absolutely free, without hidden ads, easy to use, and ensures excellent audio quality.
Download AVS Audio Converter now and say goodbye to all compatibility issues!
FAQ (Frequently Asked Questions)
Is APE better than MP3 for audio quality?
Yes. While APE is a lossless format, MP3 is a lossy format. In other words, APE keeps original high quality audio, unlike MP3, which compresses and removes some data. Nonetheless, MP3 is more compatible with different platforms and devices, and it has a compact size which is crucial for media storage.
How to convert multiple APE files at once?
Convert as many APE files as you want using batch mode in AVS Audio Converter. Simply import all your APE files, choose output settings, and click “Convert Now.” It converts them all together at once.
Why can’t I open my APE file in iTunes or Windows Media Player?
These players don’t support the APE format by default. To solve the problem, you have to convert your APE files to MP3 or WAV using an audio converter, for example, AVS Audio Converter.
Useful links

Silent pauses can quickly drain the energy from your recordings. Unnecessary dead air slows down lively conversations in podcasts, webinars, or voiceovers, making them feel sluggish and less professional. In addition, long gaps increase editing time and bloat your audio files. The good news is, removing these silent sections is easy with modern audio tools and the result is content that sounds crisp and engaging.
What causes silence in recordings
If you’ve ever listened back and wondered, “Where did all this empty space come from?” you’re not alone. Silence squeaks in for a handful of reasons:
- People naturally pause while talking – thinking, breathing, or hesitating.
- Sensitive microphones pick up faint hums or static, which can be interpreted as silence by editing software.
- Virtual calls might drop out for a second, leaving a blank in your otherwise perfect take.
- Sometimes, speakers just need a moment to gather their thoughts, which doesn’t sound as natural on playback as it does in real life.
When you’re creating a podcast, a narrated video, or an online course, those gaps can sneak in and disrupt the flow. Once you know where silence tends to show up, it’s much easier to fix it.
Key benefits of removing silence from audio
Getting rid of unnecessary silence comes with several perks:
- The flow gets smoother, so listeners stay tuned in.
- Everything sounds sharper and more professional.
- Audio files end up smaller, so sharing and storing is a breeze.
- Automated tools give you your time back, and the core message stands out, no distractions.
How to remove silence: Tools and techniques
Silence removal in AVS Audio Editor – Quick guide
AVS Audio Editor makes cleaning up silence almost effortless, even if you’re not a tech whiz. Here’s how you do it:
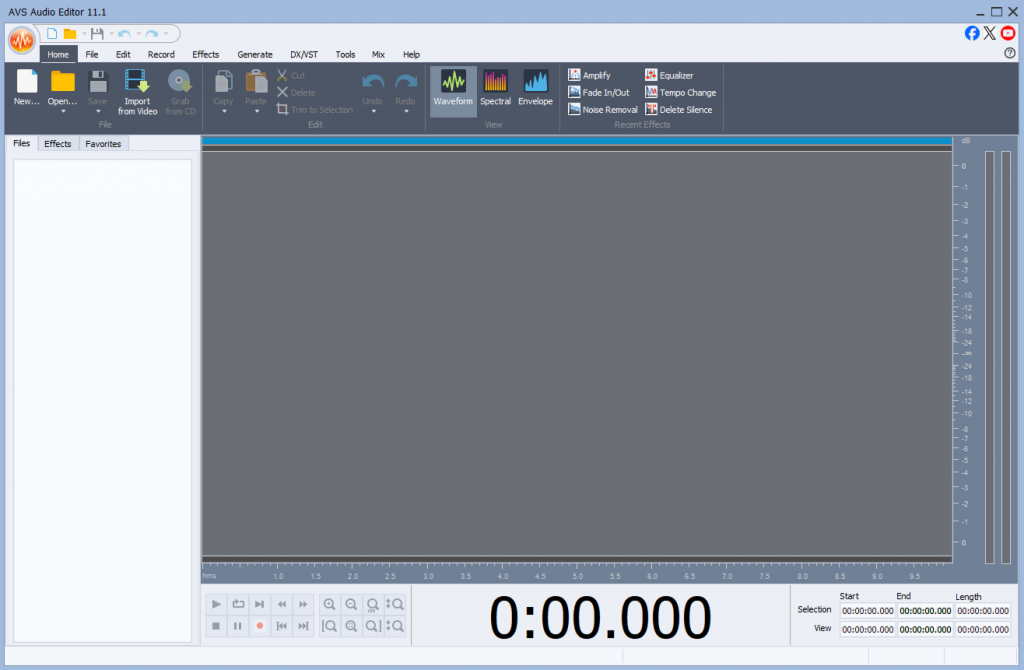
1. Download and install AVS Audio Editor.
2. Import your audio file.
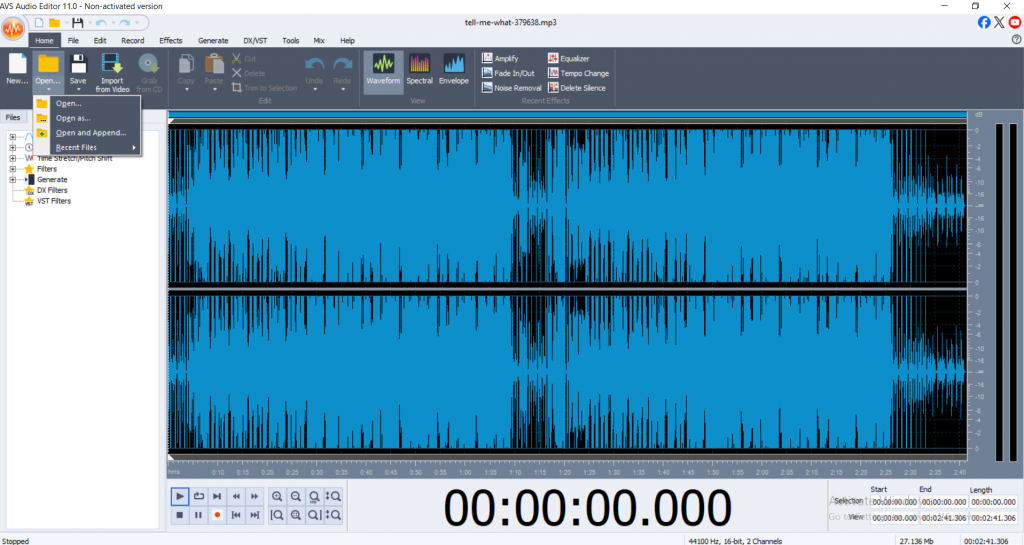
Launch AVS Audio Editor.
Click File > Open, or simply drag and drop your audio file into the workspace.
3. Select Delete Silence
In the top menu, find Effects tab and select Delete Silence.
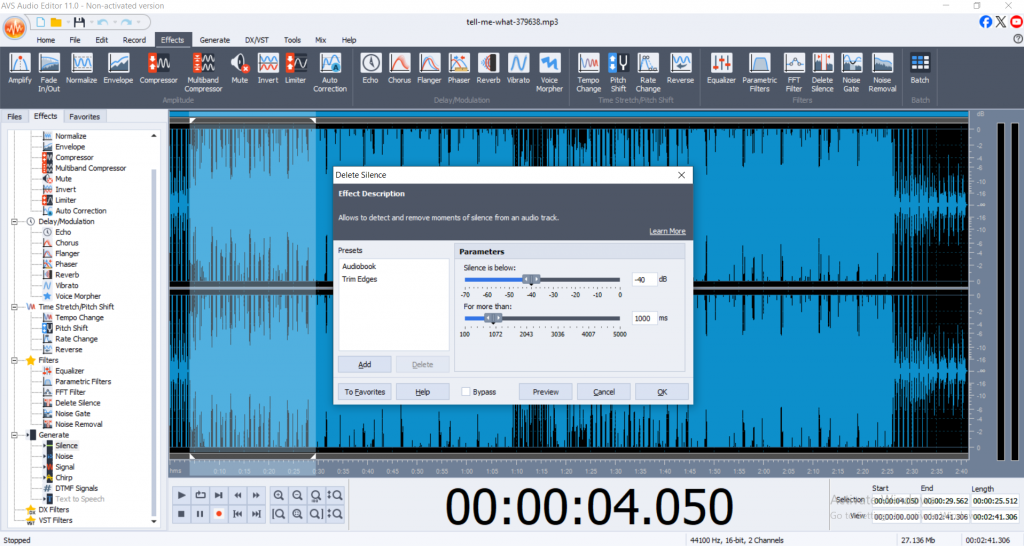
The exact wording may vary by version, but look for options related to silence or trimming.
4. Adjust silence detection settings
A dialog box will appear letting you set what counts as “silence.” You can adjust:
Threshold (dB): The loudness level below which sound is classified as silence. Lower values catch quieter sounds.
Duration (milliseconds/seconds): Minimum silence length required for detection and deletion during processing.
Adjust the settings according to your needs. For voice recordings, you might set threshold around -40dB and duration at 300ms, but experiment to achieve better results.
5. Preview detectedsilences
Click the Previewbutton in the dialog box.
AVS Audio Editor will visually highlight detected silent sections and let you preview the audio as it will sound after trimming.
6. Apply silence removal
If everything sounds right, click OK.
The editor will automatically cut out the detected silence sections across your audio file.
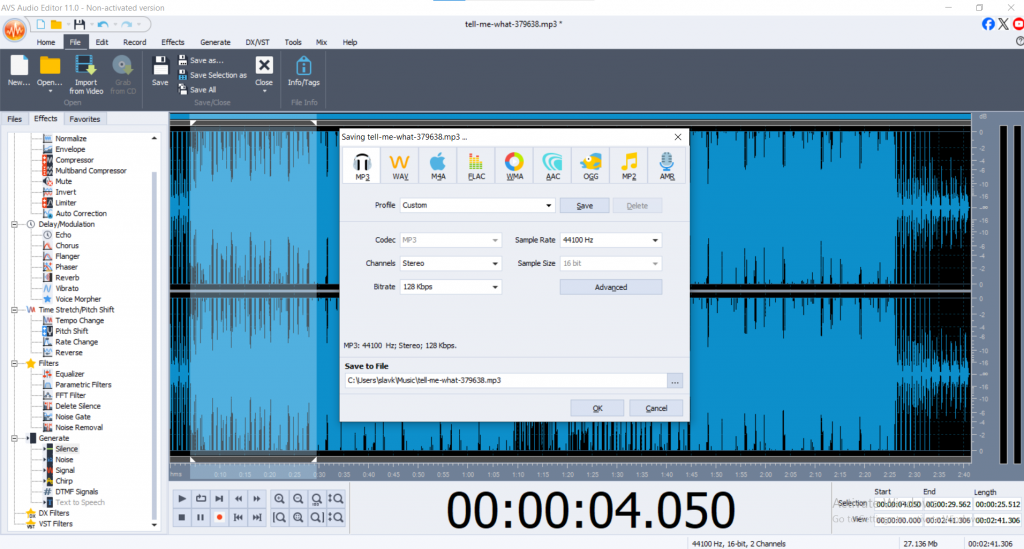
7. Export your edited audio
Go to File > Save As.
Choose your desired file format: MP3, WAV, FLAC, etc.
Every tweak you make can be undone, so you’re free to experiment until your track sounds just right.
Why AVS Audio Editor?
- It’s intuitive and quick.
- Batch processing means you can fix multiple files together.
- No steep learning curves or overwhelming menus.
How to remove silence in Audacity for cleaner audio
If you like open-source tools, Audacity is a tried-and-true classic. Its ‘Truncate Silence’ function does the trick:
- Import your audio, highlight it, then go to Effect > Truncate Silence.
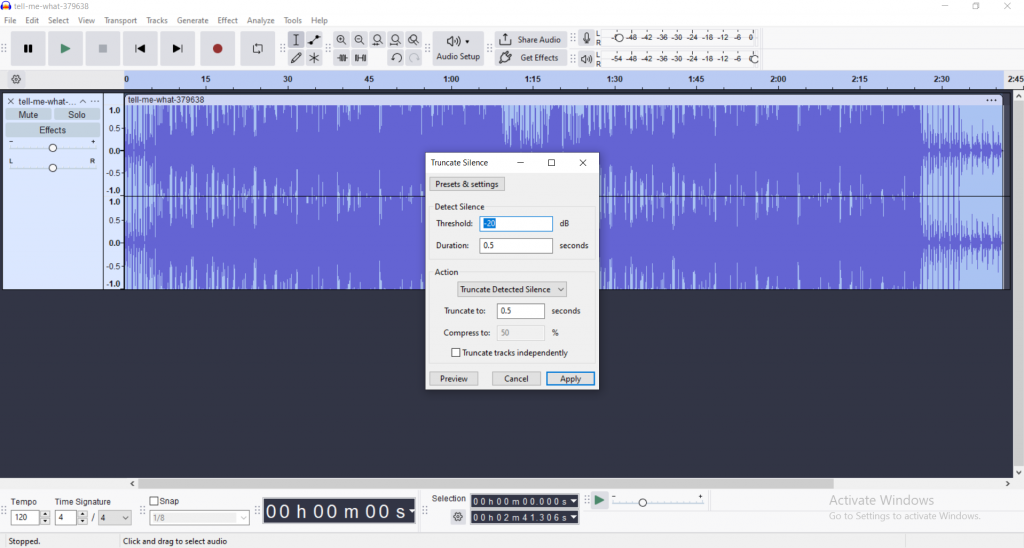
- Set your threshold and time values.
- Preview, apply, and you’re set.
Audacity is free, reliable, with a passionate community, though it might take some exploring to get comfortable with it.
Manual method: hands-on editing
Sometimes, nothing beats doing it yourself especially if you want ultra-precise control or just have a couple of spots to clean up.
Pros: you decide what stays and what goes.
Cons: it’s time-consuming and harder to keep pacing consistent for longer files.
Pro tips for better audio cleanup
Here are some expert tips to improve your audio editing workflow:
- Use noise reduction first: Clean background hiss or hum before trimming silence. This prevents removing quiet but important parts accidentally.
- Don’t cut too aggressively: Natural pauses in silence help improve understanding. Removing every pause can make speech sound rushed or robotic.
- Preview your edits: Always listen to your audio after trimming silence to catch any awkward jumps or clipped words.
- Back up originals: Save a copy of your raw audio before editing so you can revert changes if needed.
- Consider compression and equalization: After cleaning silence, apply compression to even out volume levels, and equalization to enhance sound quality for a professional finish.
Conclusion
Removing silence from your recordings is a simple way to make your audio sound more professional and engaging. By cutting out unnecessary pauses, your audience will find it easier to follow along and better understand your message.
With the Auto Silence Detection feature, AVS Audio Editor makes this process quick and easy. If you want your recordings to sound smooth and well-edited, try AVS Audio Editor and see for yourself how easily you can improve your audio quality.
Useful links
7 easy steps for an audio cleanup