
Swapping video backgrounds used to be something only high-budget productions could achieve. Today, it is possible for anyone with a laptop, smartphone, or web browser to create professional-looking videos. Modern tools have made background removal more accessible than ever, making it easy to create YouTube content, join virtual meetings, or experiment just for fun.
At the core of this process is chroma keying, more commonly known as green screen editing. By filming yourself in front of a bright green or blue backdrop, you can use editing software to replace that background with virtually anything, from tropical beaches to your company’s logo. And now, with the rise of AI-powered tools, you can remove backgrounds even without a green screen. In this article, we will explore both approaches and recommend the best tools available for desktop, web, and mobile editing.
What is Chroma Keying?
Chroma keying is a visual effects process that removes a specific color, typically green or blue, from video footage, making those areas transparent so you can insert any background you like. The process works by isolating the chosen color range (the “chroma”) and replacing it with a new image or video.
Why Green?
Green is the industry standard because it offers maximum contrast with human skin tones and is efficiently captured by digital cameras, resulting in cleaner, more accurate keys. Blue screens are sometimes used, especially if the subject contains green elements or if you’re working with film, but green remains the preferred choice for most digital workflows due to its brightness and lower noise profile.
AI-powered background removal is a newer approach that uses machine learning to automatically detect and separate subjects from any background, regardless of color. This method is fast and requires no special setup, making it ideal for creators who need flexibility. However, traditional chroma keying still offers the highest level of control and quality, especially for professional project.
How to use a green screen: traditional Chroma Key workflow
Getting clean results starts way before you open any editing software. A lousy green screen setup will give you headaches later, no matter how fancy your software is.
- Lighting: Use soft, diffuse lights to illuminate the green screen evenly. Set up your lights to minimize shadows and hotspots. Place your subject several feet in front of the screen to reduce color spill and ensure separation.
- Camera Settings: Shoot at the highest possible resolution for finer detail. Use a low ISO to minimize noise, and set your white balance to match your lighting. Proper exposure is crucial – overexposed or underexposed screens are harder to key cleanly.
Post-production tips to remove green screen background
Once your footage is captured, the chroma key effect is applied in post-production:
- Apply Chroma Key effect: Most video editors include a chroma key or “green screen” effect. Select the green color using an eyedropper or color picker tool.
- Adjust settings: Fine-tune tolerance (the range of green to remove), edge softness (to smooth cutout lines), and spill suppression (to reduce green tint on your subject).
- Common issues & solutions:
- Uneven Green Screen: Adjust lighting or use multiple color samples in software.
- Fuzzy Edges: Increase resolution or refine edge settings.
- Color Spill: Add rim lighting or use spill suppression tools.
A careful setup and attention to detail in post-production are key to achieving a professional, seamless result.
How to remove backgrounds on different platforms
Desktop Tools for Background Removal
Using AVS Video Editor to remove backgrounds
AVS Video Editor makes chroma keying surprisingly straightforward, even if you’ve never touched video editing software before.
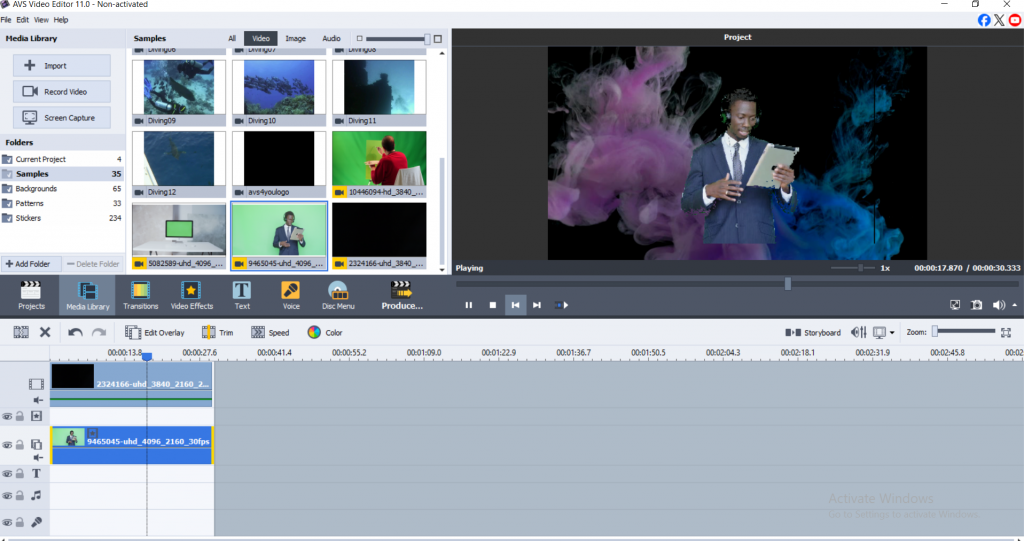
Step 1: Import and Arrange Footage
Start by adding your background video or image to the Main Video line on the timeline. Then drag your green screen footage to the Video Overlay line, positioning it above the background layer.

Step 2: Apply Chromakey Effect
Select the green screen clip on the Video Overlay line and click the Edit Overlay button. In the overlay properties window, check the Chromakey box to activate the effect. Adjust the Chromakey slider to increase the effect strength for better green removal.
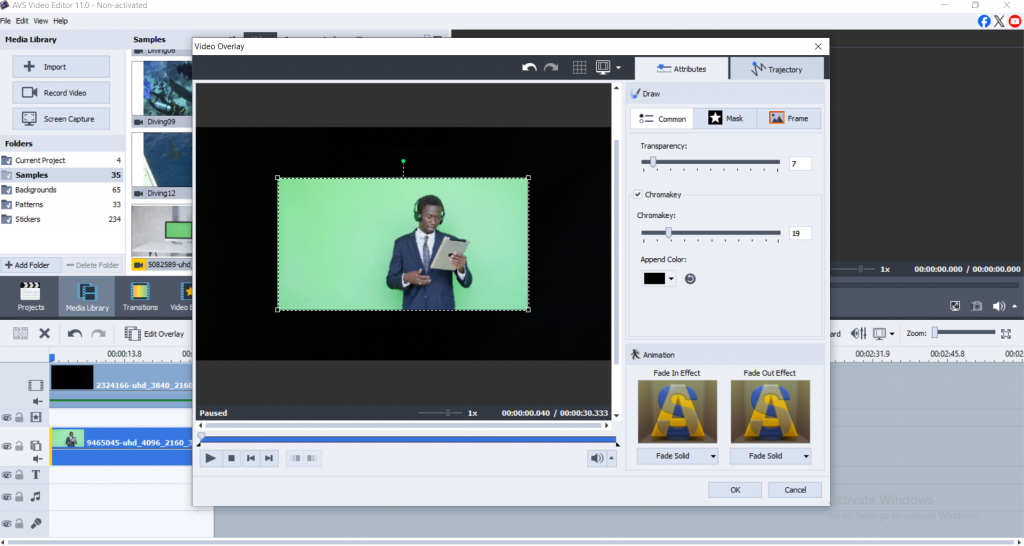
Step 3: Fine-tune Color Selection
Use the Append Color option to select specific green tones for removal. Click the color field and use the color picker to sample different areas of your green screen for more precise keying. The zoom feature helps you select colors with greater accuracy.
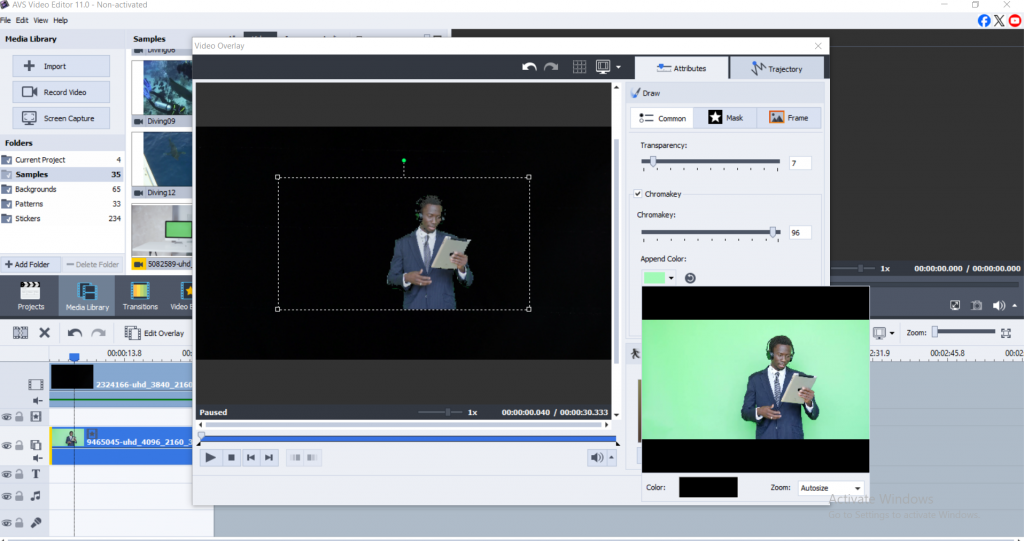
Step 4: Preview and Export
Preview your results using the playback button in the overlay window. Once satisfied with the keying quality, click OK to apply changes and export your video in your preferred format.
More Ways to Remove Backgrounds on Desktop
DaVinci Resolve gives you Hollywood-level tools without the Hollywood price tag (it’s free). The learning curve is steeper, but the Qualifier and 3D Keyer tools can handle complex scenes that would trip up simpler software.
Adobe Premiere Pro remains the industry standard. The Ultra Key effect produces excellent results, and if you’re already paying for Creative Cloud, it’s a no-brainer.
Green screen remover tools online
Sometimes you just need to get something done fast without installing anything new. Online editors have becomesurprisingly capable, though they’ll never match desktop software for complex projects.
Kapwing handles both traditional chroma keying and AI removal. Upload your footage, select your green screen color (or let the AI figure it out), then download your finished video. The interface is clean and beginner-friendly, plus you can collaborate with team members in real-time.
Canva keeps things simple with basic background removal for images and short videos. Perfect for social media posts where you need something quick and don’t care about pixel-perfect edges.
The trade-offs are obvious: limited features, file size restrictions, and you’re dependent on your internet connection. But for quick projects or when you’re away from your main computer, online tools get the job done.
Mobile Chroma Key: iOS & Android Solutions
Your phone is probably powerful enough to handle chroma keying now, which would’ve sounded crazy just a few years ago.
KineMaster brings desktop-level chroma key tools to mobile. The interface takes some getting used to on a small screen, but the results are solid. You can fine-tune your key, adjust edge feathering, and layer multiple backgrounds.
Adobe Premiere Rush syncs with desktop Premiere projects if you’re bouncing between devices. The AI-assisted background removal works well for simple scenes, though it struggles with complex lighting or detailed edges.
LumaFX focuses specifically on advanced keying and effects. If you’re serious about mobile video production, it’s worth the learning curve.
AI background removal
How AI removes background
These AI models have been trained on millions of images, learning to recognize the difference between people and backgrounds. They analyze each frame, identifying edges, depth cues, and visual patterns to separate subjects automatically. The newer models can even handle tricky stuff like hair blowing in the wind or semi-transparent objects.
When AI beats traditional methods
No green screen setup required, you can shoot anywhere, anytime. It’s faster for simple scenes and perfect when you’re working with existing footage that wasn’t shot for keying. Plus, you don’t need to worry about color spill or uneven lighting.
Where traditional chromakey still wins
Complex scenes with lots of detail, professional productions where quality matters most, and situations where you need frame-perfect control. AI is great, but it’s still making educated guesses about what should stay and what should go.
AI tools worth trying
NVIDIA Broadcast has become the gold standard for real-time background replacement during streaming or video calls. Unscreen.com handles pre-recorded videos with impressive accuracy. Remove.bg started with still images but now tackles video too.
Which background removal is best for you?
- Use chroma key green screen workflows when you require precise, professional results and have control over your shooting environment. This method is ideal for commercial videos, streaming, and projects where edge quality is critical.
- Opt for AI background removal when speed and convenience are paramount, or when shooting in uncontrolled environments without access to a green screen. AI tools are perfect for social media content, remote work, and quick edits where ultimate precision is less important.
- Consider your audience’s expectations as well, while AI removal continues improving, discerning viewers may still notice the difference in professional applications where perfect edge quality is crucial.
Conclusion
Chroma key green screen technology and AI background removal each offer unique advantages for video creators. For those seeking professional-grade results with full control, AVS Video Editor stands out as a reliable and user-friendly choice for desktop editing. Meanwhile, AI-powered tools and mobile apps provide flexibility and speed for creators on the move.
Ready to elevate your video projects?
Download AVS Video Editor and experience seamless background replacement with industry-leading chroma key tools. Explore our blog for more expert tips and tutorials on video editing and green screen techniques.
Useful links
10 common video effects every video editor must have
Enhance your video storytelling with special effects for mood creation