
Birthdays are more than just a date on the calendar. They’re a chance to wrap someone in love and show them how much they mean to you. Let’s be real: a birthday text or card is nice, but commonplace. What about a personalized video? It is a gift your dearest and nearest will truly cherish, be it a surprise for your mom, a laugh-filled tribute for your best friend, or a heartfelt thank you for a mentor.
Ready to create something truly touching? Don’t worry if you’ve never edited a video before. We’ll walk you through the entire process using AVS Video Editor, a powerful and easy to use video editing software. After reading this guide you will be able to create a festive video with ease. Let’s get started!
Step 1: Plan your birthday video
Feeling excited to start? Awesome! Let’s do a quick five-minute planning session first to make the editing process a breeze. First of all, you have to decide if the tone of your birthday video should be hilarious, tender, or energetic.
Once it is done, gather all the necessary materials: photos, short video clips, and greetings from family members and friends, and put them in one folder. Trust us, this keeps things organized. We recommend a runtime of 3-5 minutes. This is long enough to cover all the highlights but short enough to hold everyone’s attention.
Pro Tip: The fastest way to save time is to sketch a simple outline. You can organize video clips chronologically or group moments by theme: “family trips,” “school years,” “achievements”, etc.. The prep work saves lots of time and simplifies the editing flow in general.
Step 2: Import photos and clips into AVS Video Editor
Now that your plan and materials are ready, it’s time to bring them to life in AVS Video Editor. Make sure that you have already downloaded and installed AVS Video Editor from our official website.
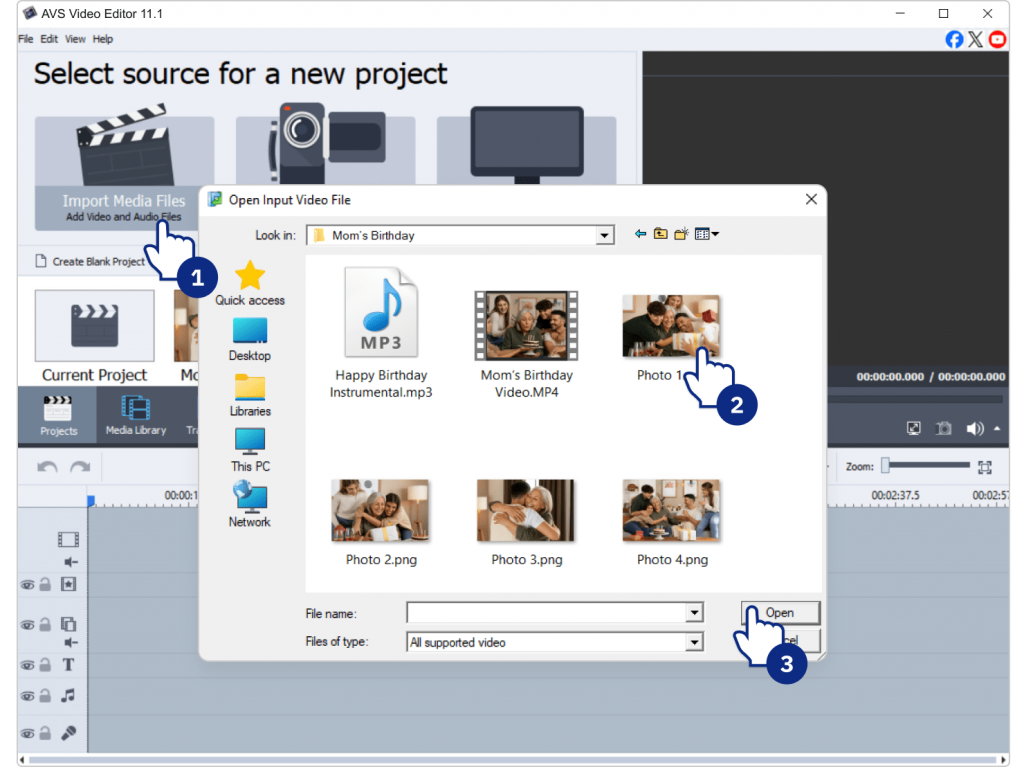
- Launch the program and click Import Media Files to add your photos and videos.
- Drag them onto the Timeline in the order you prefer, either chronological or thematic.

Tip: Before you start, organize your media into folders such as childhood photos, party clips or vacation videos. A clear folder structure helps you quickly find what you need and keeps your editing smooth. Another trick is to rename files with short descriptive titles (“graduation,” “birthday 2012”) so you instantly recognize them on the timeline.
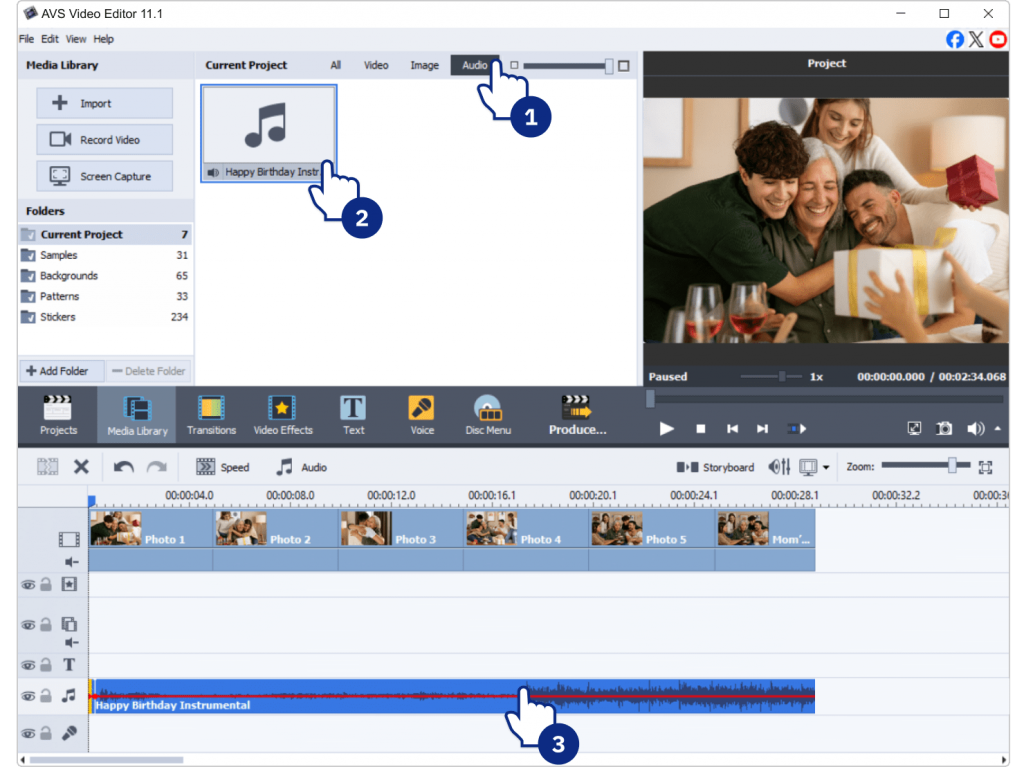
Step 3: Add music
Music sets the mood of your birthday video. Here’s how to add it in AVS Video Editor:
- Go to the Audio tab and import your chosen track(s).
- Drag the track onto the audio line below your video clips.
Choosing the right soundtrack is paramount, as the genre and tempo directly influence the viewer’s experience. Think about the person’s character and the mood you want to set:
- For energetic, fun celebrations opt for upbeat pop, rock, or electronic songs that deliver joy and excitement.
- For heartfelt, family-centered tributes select soft, sentimental music, for example, acoustic ballads or pieces of classical music to evoke warmth and nostalgia.
- To craft a vibrant mix combine songs to match different segments of the video.
Optional: Use AVS Audio Editor to trim, mix, or adjust songs before adding them.
Step 4: Enhance with transitions and effects
Transitions smooth the flow between clips and photos, while effects make your video eye-catching.
- Go to the Transitions tab and drag effects between clips (e.g., fade, dissolve, page flip).
- Add Text Overlays for birthday wishes, names, or funny captions.
- Experiment with Filters (black-and-white for nostalgia, bright filters for parties).
- Try Slow Motion for dramatic or funny moments.
Less is more. Choose 2–3 transition styles and use them throughout the entire video.
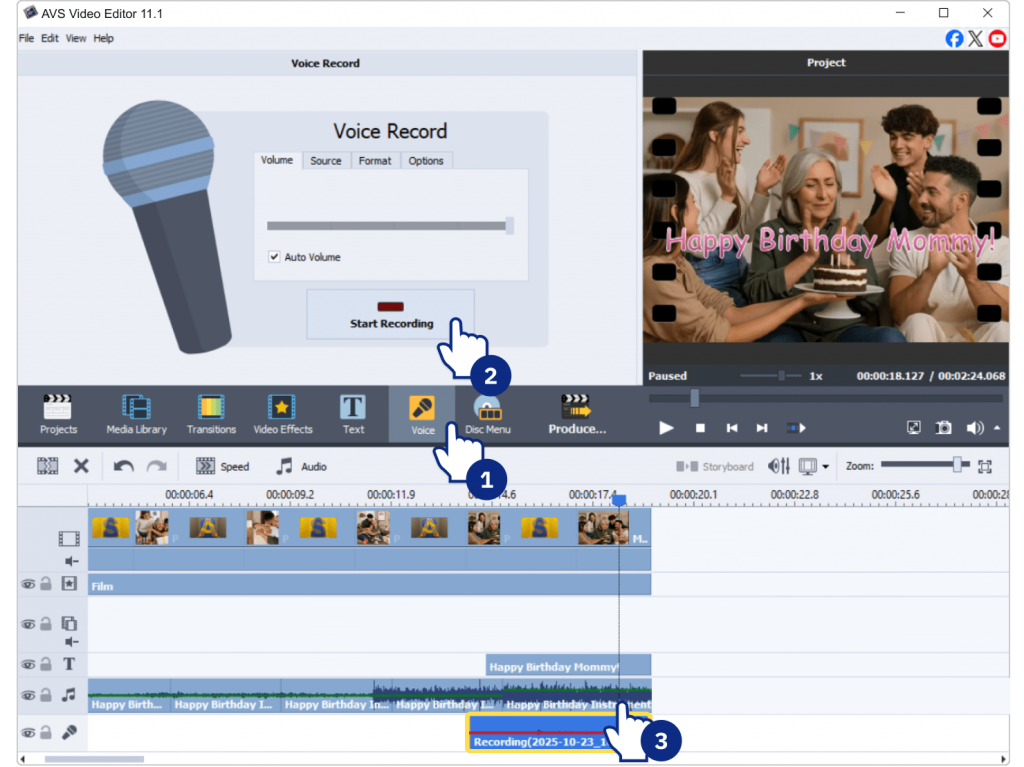
Step 5: Add a personal touch
This is where your video birthday greeting becomes truly unique.
- Voiceover: Record a birthday message directly in AVS Video Editor or polish it in AVS Audio Editor.
- Inside jokes: Add fun text captions only the birthday person will understand.
- Closing message: End with a heartfelt note or a group greeting clip.
Tip: Balance audio carefully so that your voiceover isn’t drowned out by the background music.
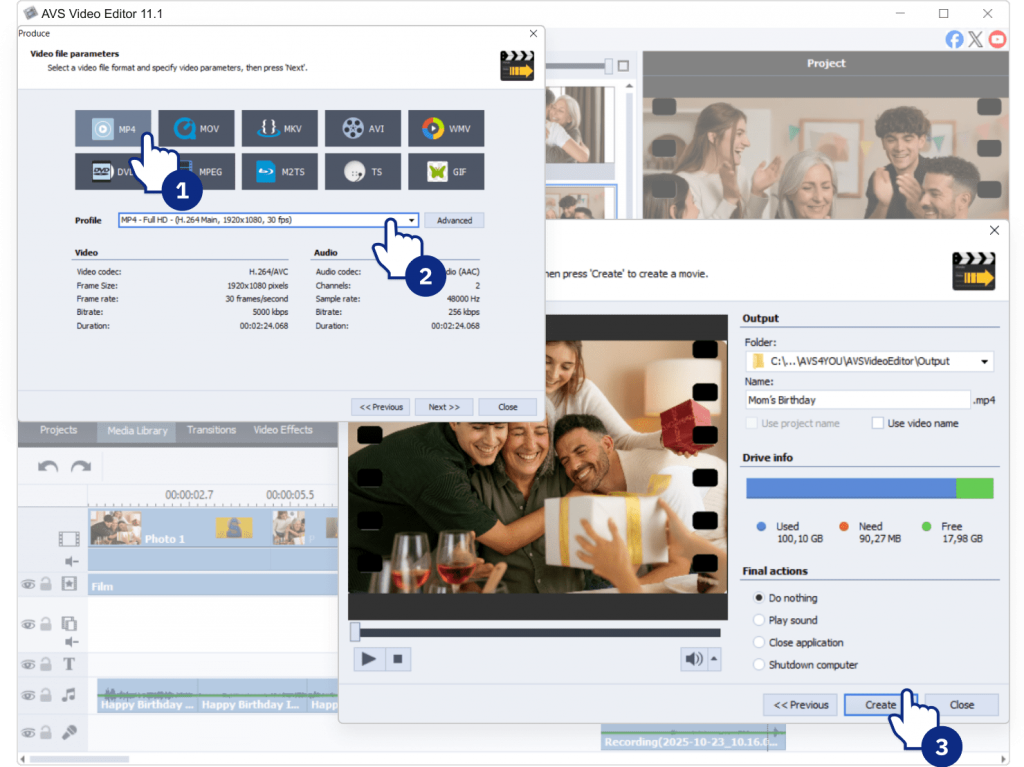
Step 6: Export and share your birthday video
When your project is ready, it’s time to save and share.
- Click Produce.
- Choose your format (MP4 for universal playback, DVD for a physical gift).
- Adjust resolution.1080p works great for most purposes.
- Save the file.
After exporting, you have a variety of wonderful ways to present your video and delight the guest of honor. Here are some of them:
- At the party: For a grand show, play the video directly on a big screen or TV.
- Social media: Upload it to YouTube, Facebook, or Instagram to celebrate with friends and family far and wide.
- Private link: For a more personal and intimate touch, upload the file to a cloud storage service (Google Drive or Dropbox) and share a private link.
Extra tips for a great birthday video
- Use high-quality source material: Select clear, high-resolution images and clips to avoid blurry or pixelated footage.
- Mix the pacing: Build a compelling narrative by interweaving faster, energetic sequences and slower, more emotional moments.
- Keep audio balanced: Ensure the music volume complements but never overpowers any important narration or natural sound from the clips.
- Always test a preview: Watch your entire video before exporting to catch any errors.
The final step to a heartfelt birthday video
A well-made birthday video is more than just a slideshow. It’s a collection of memories, emotions, and shared experiences brought to life with music and effects. Unlike store-bought gifts, it’s personal, unique, and timeless.
In this guide you have learned how to create a stunning birthday video from start to finish. Undoubtedly, your gift is going to be memorable, warm and touching that will absolutely wow your loved one. Remember, the most important ingredient is the love and memories you pour into it. The only thing left to do is to start creating.
Put your creativity into action with AVS Video Editor known for its great balance of power and ease-of-use.
Download AVS Video Editor to start crafting your one-of-a-kind gift right away.