How to blur a face or background in your videos?
Sometimes you may want to add a fuzzy effect to your video or create the illusion of motion in your photo. In some cases, e.g. if you post a video on the web, you may also need to anonymize faces in your video so that they cannot be recognized. You can easily enhance your movie with amazing effects or masque faces in your video by applying one of the Blur effect variations to your video image or photos.
AVS Video Editor is an easy-to-use software that allows you to blur your video in a few clicks. It offers you a plenty of professional video effects, including Blur, Gaussian Blur and Motion Blur. You can choose the one that suites you best (the description of each separate effect can be found in the next step). Any of the Blur effects can be applied to an entire image or its selected part only.
After you import your video into the application and add it to the timeline, please follow the steps below to blur your video.
Generally, any of the Blur effects allows you to smooth and soften edges and details in the video image.
 Blur
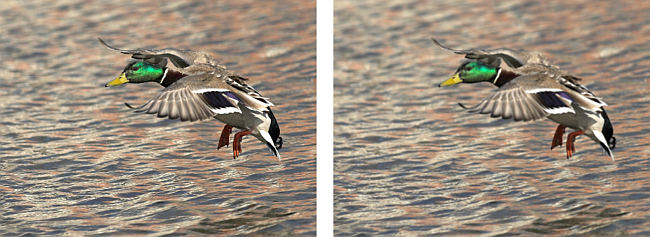
Blur is the basic blur effect that reduces contrast between adjacent pixels by lightening pixels next to well-defined edges and shadows.
In the figures below you can see an example of the video picture before and after applying the Blur effect (the effect is applied to the entire image):
 Gaussian Blur
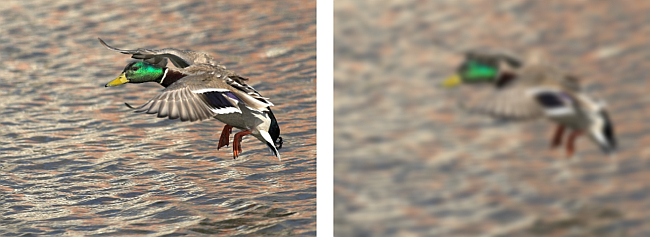
 uses a mathematical equation to calculate the transition between adjacent pixels, that results in a defocused effect.
The following images demonstrate an example of the video picture before and after applying the Gaussian Blur effect (the effect is applied to the entire image):
 Motion Blur
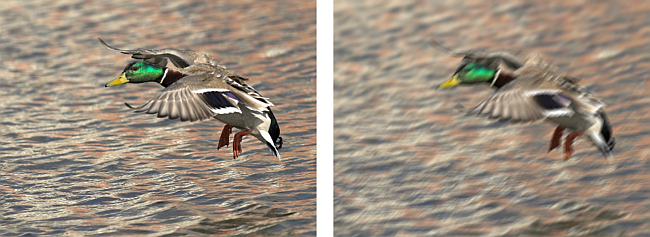
 gives the impression of motion in the image as if the photo had been taken when the object was moving.
The screenshots below display an example of the video picture before and after applying the Motion Blur effect (the effect is applied to the entire image):
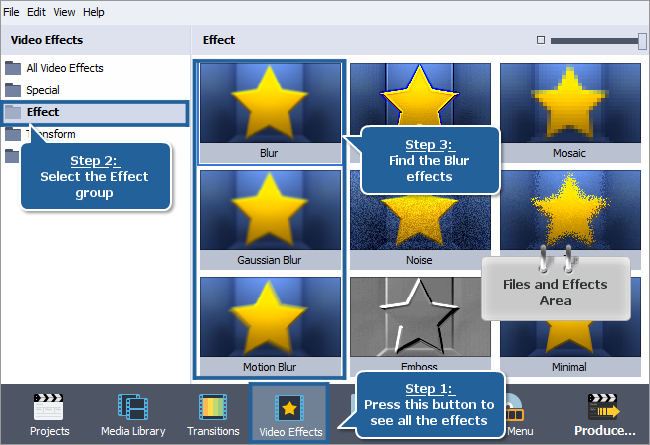
Press the Video Effects central button within the main window of AVS Video Editor.
All of the available effects will be displayed within the Files and Effects Area. To find the necessary video effect more easily, select the Effect group from the effects groups displayed on the left.
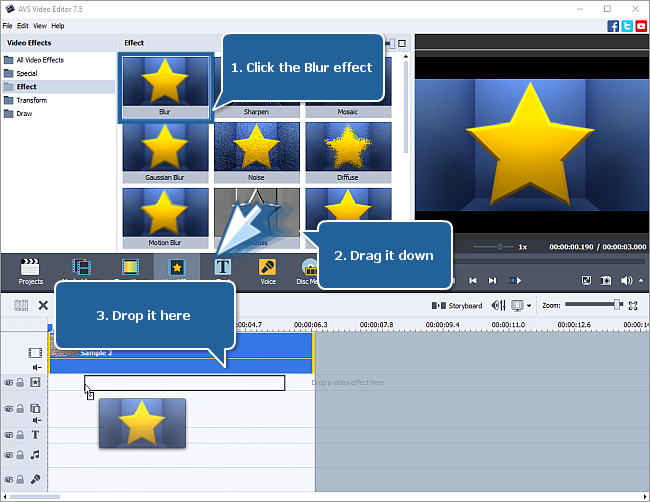
To add the Blur effect to the timeline, right-click it and choose the only available option of the express menu - Add or Replace Video Effect. After doing this, the effect will be displayed on the timeline.
Alternatively, you can simply drag-and-drop the effect to the Video Effects line of the timeline.
[Back to the Top]
The Blur effect is now placed at the current cursor position on the timeline and occupies the standard room within the video effects line.
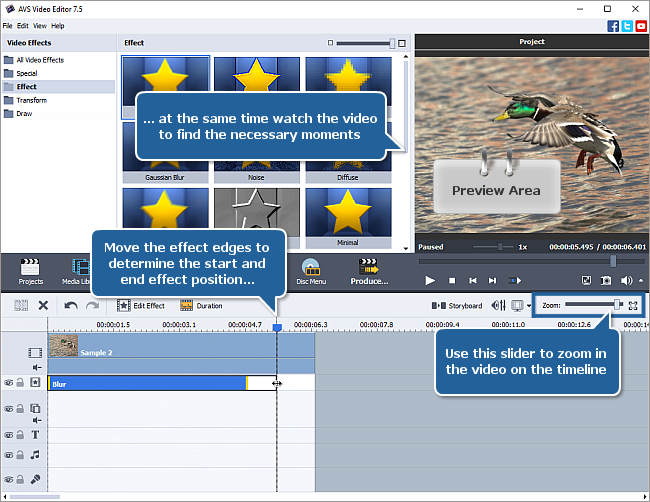
Whether you want to apply the effect to the entire video or to its certain part only, you might need to change the effect duration. To do that quickly and easily, just drag the effect boundaries.
Hover the mouse pointer over the left effect edge until it turns into the bidirectional black arrow and drag it to the left or right without releasing the mouse button to find the beginning of the scene you want to apply the effect to. While moving the arrow, have a look at the Preview Area. As soon as you find this certain moment, release the mouse button. Then do the same with the right effect edge to find the moment, when the necessary scene ends.
You can use the Zoom slider to zoom in the video on the timeline in order to find the exact moments easily.
[Back to the Top]
The Blur effect allows to adjust the Blur level. By default, it is set to the maximum value. If necessary, you can change it specifying a value from 0 to 100. Drag the slider or type in the necessary numeric value into the entry field on the right.
For the Gaussian Blur effect, the Size parameter can be set to a value from 0 to 50 (the default value is 10). Higher values produce the more intensive blur effect.
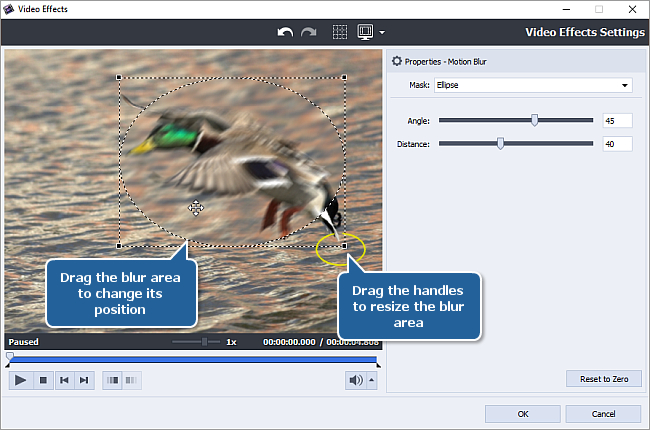
Applying the Motion Blur effect, you can adjust the following parameters:
- Angle - an angle between -180° to 180° (the default value is 45°). This parameter specifies the angle of the movement. For example, the value of 0 produces a horizontal blur, the value of 90 produces a vertical blur.
- Distance - a distance from 1 to 100 pixels (by default, it is set to 40). This parameter specifies how far the original pixels are shifted.

If you do not want to apply the effect to an entire image, you can set the necessary part of the frame that the effect will be applied to. To specify the blur area for any of the Blur effects, select the necessary preset from the Mask list: Rectangle, Ellipse, or Polygon (the None option is selected by default that allows to apply the effect to the entire image). Areas outside of the applied mask remain unchanged. You can additionally modify the mask area:
- Adjust the blur area size by dragging the resize handles
 in the corners of the mask area.
- Change the Rectangle or Ellipse mask position on the screen. Hover the mouse pointer over the area you want to move until it turns into a cross with arrows
 , hold the mouse button and drag the mask to a new position.
- The Polygon preset allows you to create a free-form area. To do that, click on a dashed border of the mask area - a new reshaping handle appears, then drag it as you want. Repeat this operation until you get an appropriate shape.
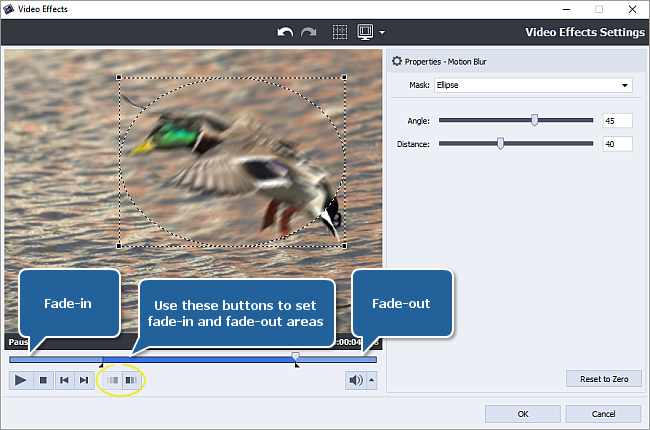
To make the effect gradually appear and disappear in the video, click with the mouse within the blue bar shown in the figure below and press the  button. Therefore, the Fade-in area will be marked. To set the Fade-out area, click with the mouse in another place and press the
  button.
[Back to the Top]
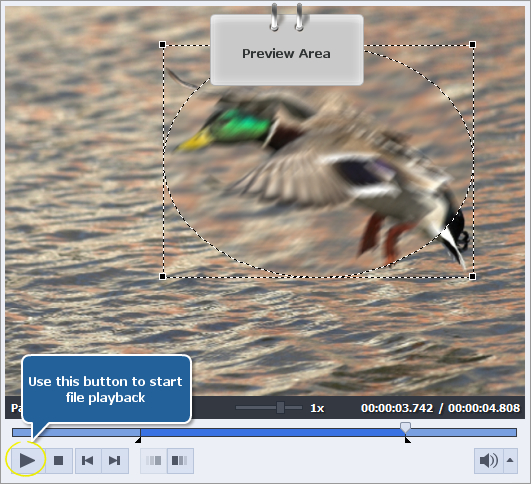
Now you can preview your video with the applied effect to make sure you got the necessary result. Please, press the  button within the Preview Area of the same window to start playback.
If you are completely satisfied with the result, click the OK button to accept all the changes and close the Video Effects window. Then you can save the current project, as well as the edited video file into one of the supported formats. To learn more about it, read the How to save the project and the video in AVS Video Editor? guide.
That's all. You have just successfully applied the blur effect to your video.
[Back to the Top]
Version: 9.1.1.336Size: 155.45 MBPlatforms: Windows 10, 8.1, 8, 7, XP, 2003, Vista
(no Mac OS/Linux support)
Download
AVS Video Editor
Registration on AVS4YOU is like buying a single product listed on
www.AVS4YOU.com and getting all other products from our site as a gift. That means you can install and use
ALL OTHER software with the same serial number without additional fees and limitations.
Please note that AVS4YOU programs do not allow you to copy protected material. You may use this software in copying material in which you own the copyright or have obtained permission to copy from the copyright owner.
By using our services, you agree to our use of cookies.