When you shoot your video using a smartphone or a handheld camera without a tripod, you can often receive shaky footage as a result. To improve these video recordings after shooting, reduce jittering or blurring caused by shaky motions of a camera, you can use video stabilization software. AVS Video Editor allows you to quickly and easily stabilize your video and produce a high-quality movie.
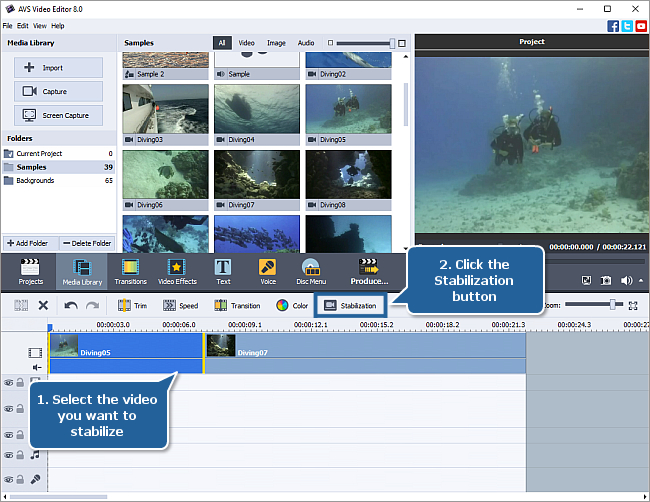
First you need to import your video into the program and add the files to the Timeline/Storyboard area.
Select the video clip on the Main video line of the Timeline by clicking it. Press the Stabilization button above the Timeline. Alternatively, you can right-click your video and select the Stabilization option from the express menu.
The Stabilization window appears. In the right part of the window, the stabilization settings are displayed. The Stabilize video box is checked by default. You can use the Compensation slider to increase or decrease the stabilization degree.
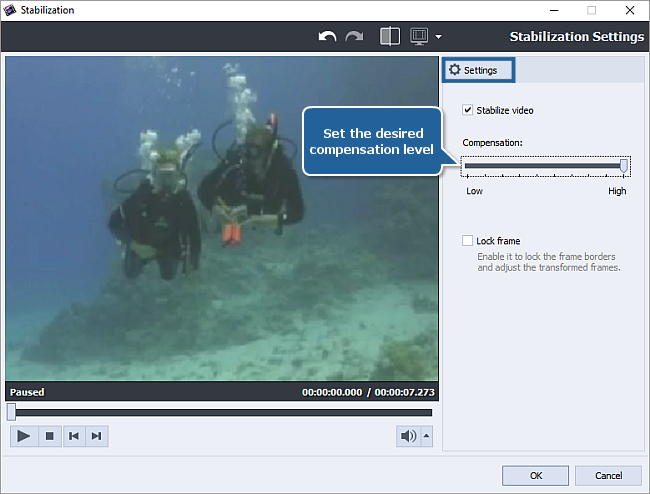
In order to reduce the shakiness, the video image will be zoomed in and cropped. As a result, some parts on the edges of the frame will be lost. The higher the compensation level, the greater cropping is applied to the video image. To avoid this effect and lock the frame borders, you can just check the Lock frame option.

[Back to the Top]
To understand what stabilization level will be best for improving your video image, preview the result in the left part of the window. Press the  button within the Preview Area to start playback. Use the Split Preview button at the top of the window to compare the original and the adjusted video image. The preview screen will be divided into two parts. The original video image without correction will be displayed on the left side and at the same time the adjusted video will be shown on the right side. To disable this option press the Split preview button once again.
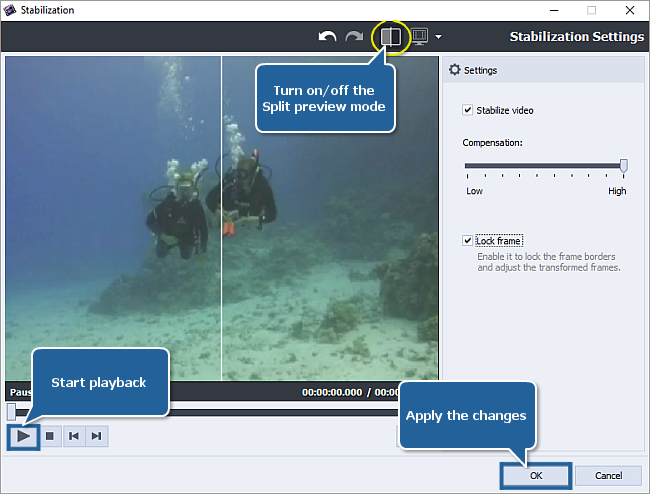
To accept the changes and close the Stabilization window click the OK button. Once you save the adjustments you've made, the video file in the Timeline/Storyboard Area will be marked by this sign  .
.
When ready, proceed to saving the stabilized video into an appropriate format. That's all. Now you know how to improve your shaky video in a few mouse clicks.
[Back to the Top]
Version: 9.1.1.336Size: 155.45 MBPlatforms: Windows 10, 8.1, 8, 7, XP, 2003, Vista
(no Mac OS/Linux support)
Download
AVS Video Editor
Registration on AVS4YOU is like buying a single product listed on
www.AVS4YOU.com and getting all other products from our site as a gift. That means you can install and use
ALL OTHER software with the same serial number without additional fees and limitations.
Please note that AVS4YOU programs do not allow you to copy protected material. You may use this software in copying material in which you own the copyright or have obtained permission to copy from the copyright owner.