AVS Image Converter supports the command line mode, therefore allowing you to automate the processing of your images. This opportunity can be indispensable in case you have to constantly work with a large number of different files.
For example, you can automatically complete the following routine tasks:
- convert a series of images into popular formats,
- create animated GIF or PNG images,
- resize a set of photos using ready-made presets,
- add a text or image watermark to a bunch of pictures,
- correct digital photos adjusting their brightness, contrast etc.
- apply effects, such as Sepia, Anaglyph 3D etc., to several images at once,
- convert images into a multi-page PDF document.
This guide describes how to resize multiple images using AVS Image Converter in the command line mode.
Even if you have never worked with Command Prompt before, you will easily cope with such a task following our instructions. Just use an XML file example that contains the conversion parameters, make a quick correction to it changing some values and then automatically convert any number of files according to this preset. You can use the same preset for new files conversion whenever you wish.
Click here to download it. After the download is finished, run the AVSImageConverter.exe file and follow the installation wizard instructions.
Please remember the path to the installation folder as it will be necessary later.
[Back to the Top]
Put all the image files you need to resize into a folder on your computer HDD.
[Back to the Top]
For your convenience, some XML file examples are included into the AVS Image Converter installation and can be found in the program installation folder (by default it is C:\Program Files\AVS4YOU\AVSImageConverter\examples or C:\Program Files (x86)\AVS4YOU\AVSImageConverter\examples for a 64-bit version of Windows).
 Note
Note: the
\AVSImageConverter\examples folder also contains a number of
.BAT files. For a quick demonstration of the command line conversion opportunities, you can launch any of them by double-clicking the file.
If you do not know how to create a new XML file, just copy the appropriate example, open it using any text editor, adjust some configuration parameters depending on your current task and save the changes.
Below you can see an example of the XML file content which includes all the necessary parameters for the entire conversion process.
<?xml version="1.0" encoding="utf-8"?>
<conversion fileFormat="PNG">
     <inputFiles>
        <file>C:\Examples\Images\image1.jpg</file>
        <file>C:\Examples\Images\image2.jpg</file>
     </inputFiles>
     <inputFolders>
        <folder>C:\Examples\Images\New</folder>
        <filter>*.jpg</filter>
        <includeSubfolders>false</includeSubfolders>
     </inputFolders>
     <outputFolder>%MYDOCUMENTS%\AVS4YOU\AVSImageConverter</outputFolder>
     <formatSettings>
        <jpeg>
            <quality>95</quality>
        </jpeg>
        <pdf>
            <pageFormat>1</pageFormat>
            <inOneDocument>false</inOneDocument>
            <fileName>Untitled</fileName>
        </pdf>
        <gif>
            <animated>true</animated>
            <fileName>Untitled</fileName>
            <frameDurationMs>100</frameDurationMs>
        </gif>
        <png>
            <animated>false</animated>
            <fileName>Untitled</fileName>
            <frameDurationMs>100</frameDurationMs>
        </png>
        <tiff>
            <compress>true</compress>
            <inOneDocument>true</inOneDocument>
            <fileName>Untitled</fileName>
        </tiff>
     </formatSettings>
     <resize>
        <profiles>ResizeProfile</profiles>
        <GUID>E8F80ACD-8EFF-4aad-A709-C606F6B67749</GUID>
     </resize>
     <rename>
        <profiles>NameProfile</profiles>
        <GUID></GUID>
     </rename>
     <corrections>
        <useAdvanced>false</useAdvanced>
        <basic>
            <effectNumber>0</effectNumber>
        </basic>
        <advanced>
            <brightness>
                <auto>false</auto>
                <value>0</value>
            </brightness>
            <contrast>
                <auto>false</auto>
                <value>0</value>
            </contrast>
            <temperature>
                <auto>false</auto>
                <value>0</value>
            </temperature>
            <blur-sharpen>
                <value>0</value>
            </blur-sharpen>
            <effects>
                <effect>0</effect>
            </effects>
            <texture>
                <mask>0</mask>
            </texture>
        </advanced>
     </corrections>
     <watermark>
        <profiles>UserWatermarkProfile</profiles>
        <GUID></GUID>
     </watermark>
     <saveFileDateTime>false</saveFileDateTime>
     <autostartConversion>true</autostartConversion>
     <minimizeForm>false</minimizeForm>
     <replaceFileAndDir>true</replaceFileAndDir>
     <priority>3</priority>
     <finalAction>2</finalAction>
     <openOutputFolder>true</openOutputFolder>
</conversion>
- The <conversion fileFormat=""> tag allows to set the desired output format.
In the example above, the PNG format is specified, but you can also convert your images into JPEG, PDF, GIF, TIFF, BMP, TGA, RAS.
- The <formatSettings> tag allows to specify some output format parameters.
E.g. for the PNG format, you can specify if you want to merge input images into an animated image or not, setting the <animated> parameter to true or false correspondingly.
- The <inputFiles> and <inputFolders> tags allow to set your input files and/or folders location.
E.g. you can list necessary files one by one using the <inputFiles> parameter or specify paths to folders using the <inputFolders> parameter and filter the folder contents by file extension.
The *.jpg value specified for the <filter> tag in the example above allows to upload JPG files only. The *.* value allows to upload all the files stored in the folder. To use files of several specified formats only, set the values separating them with a semicolon: *.jpg;*.jpg etc.
- The <outputFolder> tag is used to set a path to the folder fot output files.
- If necessary, you can also set parameters for resizing and renaming files, adding a watermark or applying effects.
As we are about to resize the images, we need to use the <resize> tag. It should look something like this:
<resize>
        <profiles>ResizeProfile</profiles>
        <GUID>E8F80ACD-8EFF-4aad-A709-C606F6B67749</GUID>
</resize>
Where <profiles>ResizeProfile</profiles> is a name of the XML file with resize profiles (without extension). It can be either ResizeProfile or UserResizeProfile (if custom profiles have previously been defined).
The necessary XML file can be found in the AVS Image Converter installation folder: \AVSImageConverter\profiles\ResizeProfile.xml or \AVSImageConverter\profiles\UserResizeProfile.xml.
<GUID>E8F80ACD-8EFF-4aad-A709-C606F6B67749</GUID> is a GUID of the necessary profile (it should be taken from the ResizeProfile.xml/UserResizeProfile.xml file). E.g the GUID specified in this example corresponds to the Photo 3.5x5.1 inch (9x13 cm) 300dpi preset.
- The <autostartConversion> tag is used to specify if you want to start the conversion process immediately as the program launches. Set it to false if you just want to launch AVS Image Converter with all the specified parameters without starting the conversion itself.
- Finally, specify some general parameters like the conversion priority, actions that must be accomplished after conversion etc.
Please do not forget to replace the paths to input files/folders provided in our examples with your own ones. When specifying paths to files and folders using the <file>, <folder> and <outputFolder> tags, you can use environment variables like %PROGRAMFILES%, %MYPICTURES% etc. In the example above we use the %MYDOCUMENTS% variable that specifies the "Documents" / "My Documents" directory of the current user.
For more details on the tags and environment variables used in the AVS Image Converter XML files please refer to our Appendix section. You can also find all the necessary information in the CommandLineKeys.txt file located in the AVS Image Converter installation folder.
[Back to the Top]
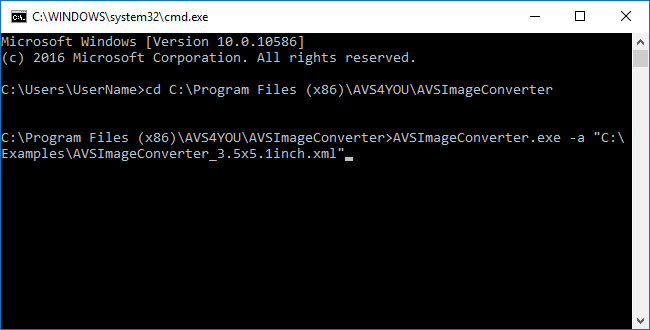
- Start the Command Prompt. For example, you can press the Win+R key combination, type cmd and press Enter.
- Use the cd command to go to the AVS Image Converter installation directory that contains the application executable file. If you are using a 32-bit version of Windows, the command should look like this:
cd C:\Program Files\AVS4YOU\AVSImageConverter
If you are using a 64-bit version of Windows, run the following command:
cd C:\Program Files (x86)\AVS4YOU\AVSImageConverter
Note: if you forgot where the installation folder is located, you can easily find it in the following way: right-click on the application desktop shortcut and select the
Properties option. Copy the path specified in the
Start in field and paste it using the
Ctrl+V key combination or just right-clicking within the
Command Prompt window.
- To run the AVS Image Converter in the automatic mode, use the following command:
AVSImageConverter.exe -a "C:\AVSImageConverter.xml"
where:
- AVSImageConverter.exe is the converter executable file name.
- -a is one of the possible commands to run the application in the automatic mode,
- C:\AVSImageConverter.xml is the full path to the XML file you've created. Please note that you need to replace the path to the XML file provided in the command example with your own one before executing the command. The file path must be enclosed in double quotes.
AVS Image Converter starts with all the conversion parameters specified in the XML file, and the conversion process begins immediately (if the <autostartConversion> parameter is set to true).

Once the conversion is over, the AVS Image Converter window closes automatically and the assigned output folder with the converted files opens (but you can specify another final actions in the configuration XML).
Note: if you wish to just run the converter from the command line with some files loaded so that you can manually edit them or change some parameters before the conversion, you can either set the
<autostartConversion> parameter to
false or use the following command in the
Command Prompt window:
"C:\Program Files\AVS4YOU\AVSImageConverter\AVSImageConverter.exe" "C:\Images\image1.jpg" "C:\Images\image2.jpg"
[Back to the Top]
Please note that AVS4YOU programs do not allow you to copy protected material. You may use this software in copying material in which you own the copyright or have obtained permission to copy from the copyright owner.