Sometimes you might want to quickly join several video files you have into one without the need to edit or re-encode them. Using AVS Video ReMaker you can do that quickly and easily. It will let you merge several files into a single one automatically. You can also cut the unnecessary scenes from these video files before saving them.
Click here to download it. After the download is finished, run the AVSVideoReMaker.exe file and follow the installation wizard instructions.
[Back to the Top]
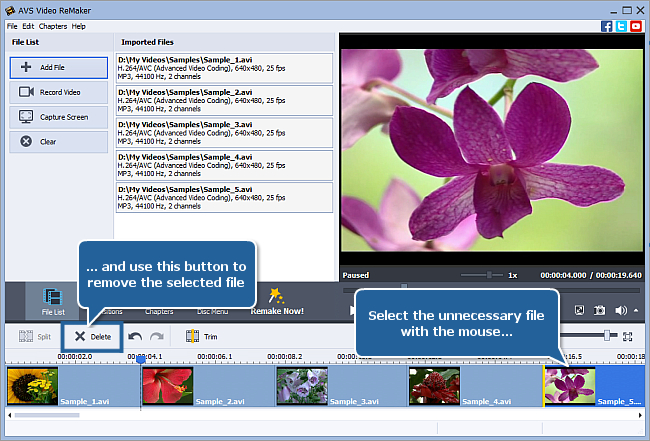
After you launch the program, you can select your video using the Add File button. In the opened Windows Explorer window browse for the necessary video:

 Note
Note: when your input is a DVD disc, you will need to select the path to your source file: X:\Video_TS\Video_TS.IFO. "X" stands for your DVD-ROM or the hard disk drive folder where your DVD is stored. Please see the
online help section to find more on how to convert your home DVDs to other video formats.
The same way load all the video files you would like to merge.
Note: in case you add several different video files to the program all of them
must have the same parameters - video resolution, aspect ratio, frame rate and bitrate.
[Back to the Top]
If you would like to remove some loaded files click the unnecessary one with the mouse and press the Delete button above the Timeline. The highlighted file will be removed. To remove all the files added to the program use the Clear button.
You can also cut out several fragments in different parts of the video clip - beginning, end or anyplace in the middle. Please read the How to cut out unnecessary scenes without re-encoding? guide to learn how to do it.
[Back to the Top]
After deleting all the unwanted parts of the video you can set the video file sequence. To do it please click the clip which place you would like to change with the left mouse button, the mouse cursor will change into a hand  , then without releasing the mouse button move the clip left or right to the desired position.
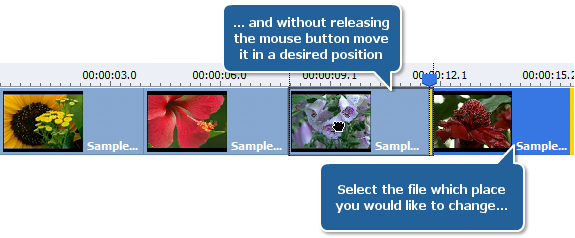
When you release the mouse button, the video clip position will be changed:

The same way you can change the place of any video clip.
If you move a clip to the left so that it doesn't reach the left border of the previous clip, the clips will not change their positions but the Fade transition will be created between these clips.
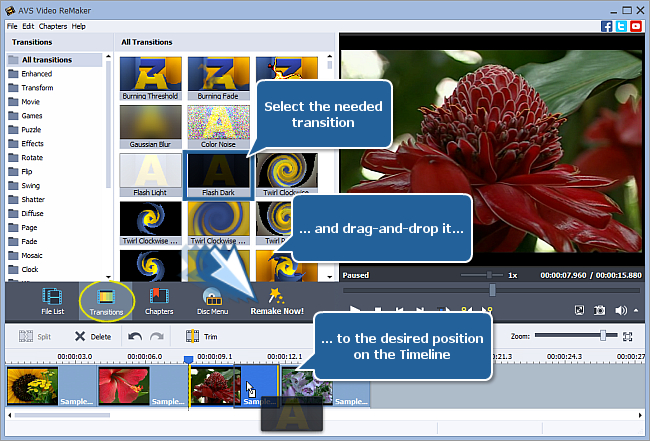
To add different transitions between your clips click the Transitions central button, select one of the available transitions and drag-and-drop it to the needed place on the Timeline.
Note: if your video files can be split by keyframes only, it is impossible to add a transition. In this case the
Transitions button will be disabled.
[Back to the Top]
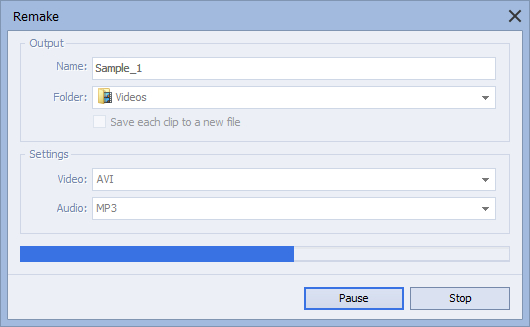
 Now you need to set the output file parameters. Click the Remake Now! central button to open the Remake window.
In the Output section of the Remake window enter the output file Name into the appropriate field, select the Folder to save your resulting video and choose one of the available Video/Audio formats in the Settings section.
If you decide to save your video files into one make sure the Save each clip to a new file option is not selected.
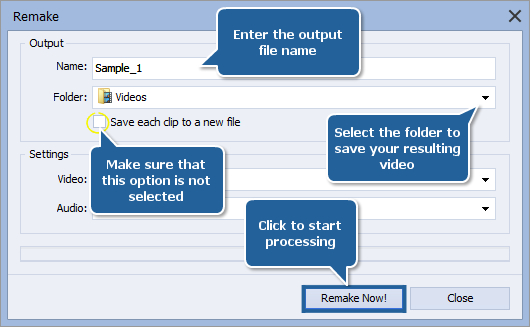
When all is ready press the Remake Now! button to start processing. You will see the progress on the progress bar. It will take some time depending on the file length and your computer configuration.
And that's just it - all your home video files have now become a part of a single file.
[Back to the Top]
Version: 6.3.1.230Size: 59.00 MBPlatforms: Windows 10, 8.1, 8, 7, XP, 2003, Vista
(no Mac OS/Linux support)
Download
AVS Video ReMaker
Registration on AVS4YOU is like buying a single product listed on
www.AVS4YOU.com and getting all other products from our site as a gift. That means you can install and use
ALL OTHER software with the same serial number without additional fees and limitations.
Please note that AVS4YOU programs do not allow you to copy protected material. You may use this software in copying material in which you own the copyright or have obtained permission to copy from the copyright owner.